Scanned by CamScanner
|
|
|
- Emory Franklin
- 5 years ago
- Views:
Transcription
1 Scanned by CamScanner
2 USER MANUAL for PFMS Pension Module Prepared by: Ritu Sharma
3 Contents 1. Quick Action Menu Introduction Pension Case received through Bhavishya Superannuation Pension Case...5 Validations: Family Pension Case...19 Validations: Manual Case Superannuation Pension Cases...32 Logic Flow: Validations: Logic Flow: Validations: Validations: Validations: Validations: Validations: Validations: Validations: Validations: Validations: Validations: Validations: Validations: Validations: Validations: Family Pension Cases...57 Logic Flow: Validations: Logic Flow: Validations: Validations: Validations: Validations: Validations: Validations: Validations: Validations: Validations: Validations: Validations: Validations: Validations: Validations: Voluntary Retirement Pension Cases...79 Logic Flow: Validations: Logic Flow: Validations: Validations: Validations:... 84
4 Validations: Validations: Validations: Validations: Validations: Validations: Validations: Validations: Validations: Validations: Validations: Return Flow of Manual Case Return Flow of Pension Cases received from Bhavishya DSC e-ppo List Pension Reports Dashboard MIS Reports Annexure I...114
5 1. Quick Action Menu Sr. No. Name of Screen Action 1. Create Pensioner>Pensioner Details Create New Pensioner case 2. Manage Pensioner> Search Pensioner Search Pensioner(Manual case/bhavishya Case/Revision Case) via input fields on the screen. Manage Pensioner >Pensioner View and edit Pensioner Personal details Details 3. Manage Pensioner> Pensioner Summary Details Display Form name(s) and Form status with link based access. 4. Manage Pensioner> Pensioner Contact Details Capture Inputs for Pensioner Contact details, Present Address, Permanent Address, Photo, Joint Photo, 5. Manage Pensioner> Pensioner Service Details 6. Manage Pensioner> Pensioner Family/ Nominee Details 7. Manage Pensioner> Pensioner Family Contact Details 8. Manage Pensioner> Pensioner Nominee Details 9. Manage Pensioner> Pensioner Bank Details 10. Manage Pensioner> Pensioner NQS Details 11. Manage Pensioner> Pensioner AQS Details 12. Manage Pensioner> Pensioner Salary Details 13. Manage Pensioner> Pensioner Commutation and Medical Allowance Details 14. Manage Pensioner> Pensioner Gratuity Recovery Details 15. Manage Pensioner> Pension Calculation Sheet Signature Capture Inputs for Pensioner Service details Capture Inputs for Pensioner Family details and Nominee Contact details(if any) Capture Inputs for Pensioner Family Contact, Disability(if any), Co-Authorization details along with Family member Photo, signature, Disability Certificate(if any), Co-Authorization Certificate Capture Inputs for Pensioner Nominee details and alternate nominee details like share percentage of Nominee Capture Inputs for Pensioner Bank details along with Spouse Signature and Undertaking Capture Inputs for Pensioner Non Qualifying Service details Capture Inputs for Pensioner Additional Qualifying Service details Capture Inputs for Pensioner Salary details Capture Inputs for Pensioner Commutation, Medical Allowance, Penalty details Capture Inputs for Pensioner Withheld Gratuity Amount, Gratuity Recovery details Displays either invalid/incomplete entries or calculation sheet. Provision of Freezing the case on this screen. For only Bhavishya cases, there is calculation decision option to select. 16 Pensioner Case Forwarding Select the Forms, write Remarks (if any). There is a provision to pass or return the case with reason of returning the case. There is view link to see calculation sheet
 or capturing the data manually by PAO Office. 3. Pension Case received through Bhavishya 3.")
6 2. Introduction Pension module in PFMS has provision of either obtaining the Retiree/Pensioner data electronically from Bhavishya application of Department of Pensions (Desirable) after the data verification from Head of office (automatic fetching of data) or capturing the data manually by PAO Office. 3. Pension Case received through Bhavishya 3.1 Superannuation Pension Case Login at DH Level 1. When System receives Pension cases from Bhavishya, a File Number is allotted against each pension case and DH processes these pension cases via Pension >- Manage Pensioner. 2. All Pension Cases received from Bhavishya are available in orange color on Search Pensioner Form. 3. On clicking the pension case from the above screen, Pensioner Summary Details Form comes up as displayed below. None of the Form is editable. DH user can only view all the details by clicking on the links of each Form.

7 4. On clicking each Form link, all the pre-filled following Forms are displayed below. All the update/save buttons are disabled. User can only navigate via previous and next Forms by clicking on the respective buttons. (a) Pensioner Personal Details


8 (b) Pensioner Contact Details - (c) Pensioner Service Details -

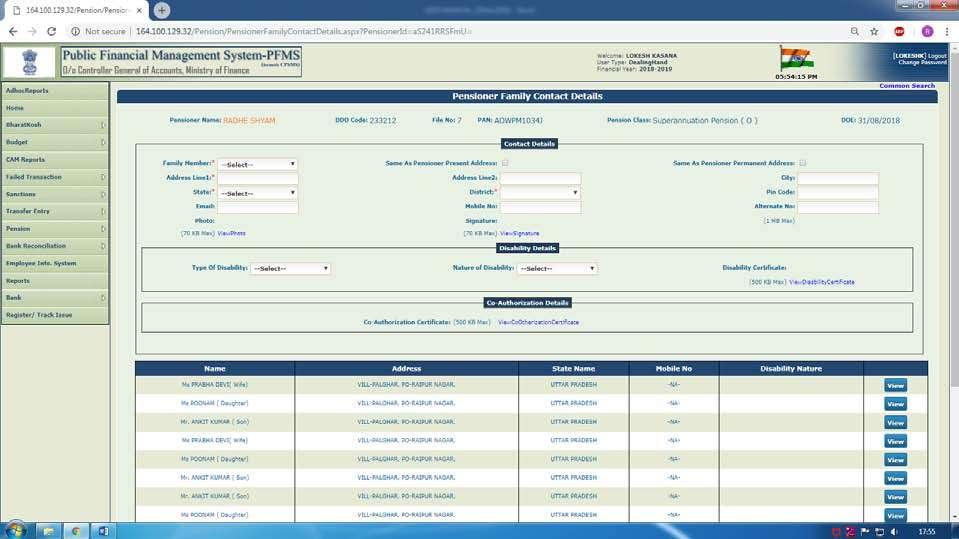
9 (d) Pensioner Family/ Nominee Details User can view the details on clicking View button available under the grid. (e) Pensioner Family Contact Details- User can view the details on clicking View button available under the grid.


10 (f) Pensioner Nominee Details (g) Pensioner Bank Details
 Additional Qualifying")
11 (h) Non Qualifying Service (i) Additional Qualifying Service
")

12 (j) Pensioner Salary Details (k) Pensioner Commutation and Allowance Details
13 (j) Pension Calculation Sheet- DH User can compare PFMS and Bhavishya calculation, save and freeze to forward and proceed further. DH User can select all Form status and select the Calculation decision from the dropdown. Pass button is enabled only if calculation decision is Both PFMS and Bhavishya Calculations correct. Also remarks can be mentioned. DH User can pass or return the case to AAO. Similarly, AAO return the case to PAO with the return reason and PAO return the case to Head of Office(HOO). Pension cases returned by PAO, will be available at HOO login in Bhavishya Portal along with returning reasons. HOO can resubmit the case after rectification of observations of PAO in Bhavishya. Once, resubmitted by HOO through Bhavishya the case will be available in Manage pensioner at DH level.

14 End of DH Level


15 Login at AAO Level 1. All the pension cases of Bhavishya passed by DH User are available at AAO Level under Pension >- Manage Pensioner menus. 2. AAO User verify the case and pass/return the case to PAO Level along with remarks and calculation decision End of AAO Level
16 Login at PAO Level 1. All the Pension cases passes by AAO are available on Search Pensioner form which can be navigated via Pension >- Manage Pensioner 2. After PAO pass the case, following message is displayed showing that Pension case is passed and available for PPO Number generation. These cases can be accessed from PPO Allotment screen for PPO Number generation, e-ppo generation and DSC. 3. Here are the Figures showing the sequence of generation PPO Number, e-ppo generation and Digital signing of the e-ppo. STEP-1 PPO Number generation Click on Get PPO Number from CPAO after filling in the DDO code, file no, Pensioner Name
17 STEP-2 e-ppo generation Click on generate e-ppo Button application. STEP-3 DSC process on IE 11 ( DSC can only be done on IE 9 or above versions) (1) On clicking Digitally Sign Button, it downloads an application and asks to run the
18 (2) Select Certificate (3) Confirm dialog box appear, click on yes to sign in
19 (4) Enter the User PIN and click on Login (5) Digital signing is successful and its confirmation appears in a dialog box. Validations: DSC can be done only on Internet Explorer(IE) version 9 or above. DSC should be registered at PFMS and approved for Pension Authority by PAO. After Bill is passed to PAO, bill will be available to Receive option of Sanction Module like any other Bill End of Bhavishya case at PAO Level
20 3.2 Family Pension Case Login at DH Level 1. When navigated via Pension >- Manage Pensioner, Search Pensioner Form comes up where all Pensioners are available by default on this screen. 2. Pensioners can be searched on Search Pensioner Form by giving values in available text fields. Pension cases are displayed after searching pensioner either by DDO Code or File Number or PAN or First Name or Last Name or Case Type or Pension Class. 3. On clicking the Family Pension case from the above screen, Pensioner Summary Details Form comes up as displayed below. None of the Form is editable. DH user can only view all the details by clicking on the links of each Form.

21 4. On clicking each Form link, all the pre-filled following Forms are displayed below. All the update/save buttons are disabled. User can only navigate via previous and next Forms by clicking on the respective buttons. (a) Pensioner Personal Details
 Pensioner Service Details")
22 (b) Pensioner Contact Details (c) Pensioner Service Details
 Pensioner Family Contact")
23 (d) Pensioner Family/ Nominee Details (e) Pensioner Family Contact Details
 Bank")
24 (f) Nominee Details (g) Bank Details
25 (h) Non Qualifying Service Details (i) Additional Qualifying Service Details
")

26 (j) Pensioner Salary Details (k) Commutation and Medical Allowance Details

27 (l) Pension Calculation Sheet End of DH Level


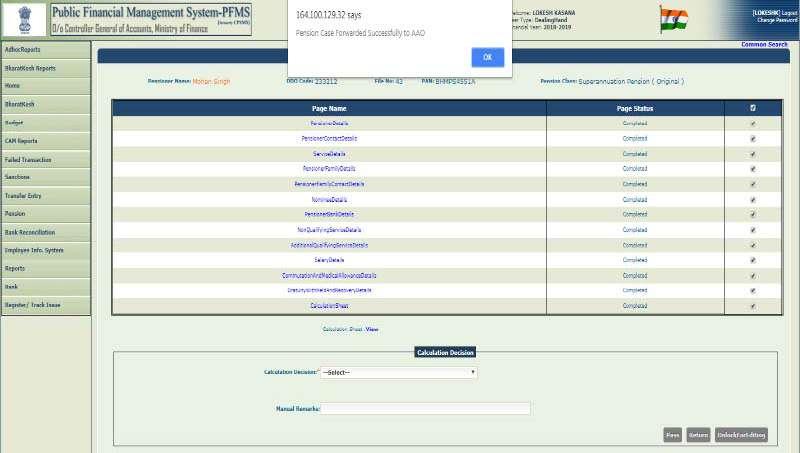
28 Login at AAO Level 1. All the Family Pension cases passed by DH are available on Search Pensioner form which can be navigated via Pension >- Manage Pensioner 2. After AAO pass the case, following message is displayed showing that Pension case is passed to PAO.

29 Login at PAO Level 1. All the Family Pension cases passed by AAO are available on Search Pensioner form which can be navigated via Pension >- Manage Pensioner. 2. After PAO pass the case, following message is displayed showing that Pension case is passed and available for PPO Number generation. 3. Now PAO passed cases can be accessed from PPO Allotment screen for PPO Number generation, e-ppo generation and DSC. 4. Here are the Figures showing the sequence of generation PPO Number, e-ppo generation and Digital signing of the e-ppo. STEP-1 PPO Number generation Click on Get PPO Number from CPAO after filling in the DDO code, file no, Pensioner Name

 (1) On clicking Digitally Sign")
30 STEP-2 e-ppo generation Click on generate e-ppo Button application. STEP-3 DSC process on IE 11 ( DSC can only be done on IE 9 or above versions) (1) On clicking Digitally Sign Button, it downloads an application and asks to run the
31 (2) Select Certificate (3) Confirm dialog box appear, click on yes to sign in
32 (4) Enter the User PIN and click on Login (5) Digital signing is successful and its confirmation appears in a dialog box. Validations: DSC can be done only on Internet Explorer(IE) version 9 or above. DSC should be registered at PFMS and approved for Pension Authority by PAO. After Bill is passed to PAO, bill will be available to Receive option of Sanction Module like any other Bill End of Bhavishya case at PAO Level
 initiates by making entries after scrutiny of Pension case and hence create Pensioner. 2.")

33 4. Manual Case 4.1 Superannuation Pension Cases Login at DH Level 1. DH (at PAO Office) initiates by making entries after scrutiny of Pension case and hence create Pensioner. 2. After all Personal details of Pensioner are captured and saved, File number is generated and pension case is passed to AAO and then PAO respectively. 3. Manually created pensioners can be searched on Search Pensioner Form under Pension >- Manage Pensioner menus and Manual Pension cases are available in Blue color. a) STEP 1: For creating Manual Pension Case, navigate via Pension >- Create Pensioner

34 Logic Flow: 1. When User select Type of Pension from the dropdown, Pension class as Superannuation Pension is displayed against the selection of type of pension. 2. Select the DDO Code, Title, Nationality, Blood Group and Religion from the dropdown. 3. Make entry in the corresponding fields of PAN number, First Name, Middle Name, Last Name, Aadhaar Number, Date of Birth, Spouse Name, Father s/husband s Name, Mother s Name, Identification Mark1, Identification Mark2, Employee Code and Emp Code/Force Number. 4. Choose from the fields of Gender and Have Family. 5. Click on Save to save the Pensioner s personal details and all the fields will become empty if clicked on Reset. 6. After submission of form, message highlighted in red color appears on the top of screen displaying the File number which is generated against the pensioner.
 STEP 2: After creating Pensioner, navigate via Pension >- Manage Pensioner menu options to process the Superannuation pension cases Logic Flow: When clicked on Manage Pensioner, Search Pensioner")
35 Validations: All the mandatory/required fields which are highlighted by a red asterisk (*) mark cannot be left blank. PAN number should be unique and valid. Aadhaar number should be unique and valid. b) STEP 2: After creating Pensioner, navigate via Pension >- Manage Pensioner menu options to process the Superannuation pension cases Logic Flow: When clicked on Manage Pensioner, Search Pensioner Form comes up where all manually created Pensioners are available by default on this screen. Pensioners can be searched on Search Pensioner Form by giving values in available text fields. Pension cases are displayed after searching pensioner either by DDO Code or File Number or PAN or First Name or Last Name or Case Type or Pension Class.

36 Color coding for different Pension cases is given at the bottom of the screen which shows the status as shown below: Manual Case Bhavishya Case Revision Case 1. Click on the Pensioner Details whose User want to process the pension case, Pensioner Summary Details Form is displayed as shown below with Form Name and Form Status. User can view all the filled forms details of selected Pensioner with Status. User can select and view the filled detail of any Form on clicking the same. Every Form displays Pensioner Name, DDO Code, File Number, PAN number, Pension Class on the top of the Form.

 mark cannot")
37 2. When User selects Pensioner Details on Pensioner Summary Details Form, Personal details Form comes up showing Personal Details where user can Add, Edit and Update the Personal details and click on Next for browsing and filling further forms. Validations: All the mandatory/required fields which are highlighted by a red asterisk (*) mark cannot be left blank. PAN Number and Aadhaar Number should be unique and valid.


38 3. Next is Pensioner Contact Details, user can Save Contact Details or navigate via previous or next button. Contact Details: Make entry in the corresponding text fields of Mobile number, Alternate number and . Present Address: Make entry in the corresponding text fields of Address Line1, Address Line2, City, State, District and Pin Code. Permanent Address: Tick on checkbox if Permanent Address is same as Present Address. If not, then make entry in the corresponding text fields of Address Line1, Address Line2, City, State, District and Pin Code. Upload Photo, Joint Photo and Signature. User can view the uploaded Photo, Joint Photo, Signature by clicking View link after clicking Edit available under grid option as shown below:

 mark cannot be left blank.")
39 After filling all the mandatory fields viz. Address Line1, State, District in both Present Address and Permanent Address, Photo, Joint Photo, Signature, user can save the form by clicking on Save. Validations: All the mandatory/required fields which are highlighted by a red asterisk (*) mark cannot be left blank. There should not be a duplicate Id. Photo, joint photo and signature size should not exceed the limit of 70KB. Photo instructions need to be considered. Find the photo instructions in the Annexure I.

40 4. Next is Pensioner Service Details, here user can Save, Update Service details and navigate via previous or next. Select the dropdown for Service Type, Retirement Type, Designation, Office Name, DA Type. Make entry in the fields like Service Type, Retirement Type, DOJ, Date of Superannuation & Date of Retirement, Designation, Office Name on this Form. Select the option against the fields Whether any family pension receiving (By default it is No, if user choose Yes, it will prompt for text field asking for Source of Family Pension and Family Pension Amount as shown in Figure below), Military Pensioner, PPO Booklet Through, Case is Exceptional (If case is Exceptional is YES, it will prompt for a text field asking for Exception Case Remarks as shown in Figure below) Select the checkbox if needed for Supreme Court Judge/CAG (If this field is checked, Commutation % can be up to 50% and expenditure will be booked under (Charged Head)) and Whether more than one family pensioner. After filling all the mandatory fields viz. Service Type, Retirement Type, Date of Joining, Date of Superannuation, Date of Retirement, Designation, Office Name, user can save the form by clicking on Save. Validations: All the mandatory/required fields which are highlighted by a red asterisk (*) mark cannot be left blank. Minimum age of joining should be 18 years.

41 5. Next is Pensioner Family/ Nominee Details Select the option from the dropdown for the fields like Title, Relationship with Govt. Servant, Marital status, Nationality. Make the entries in the fields for First Name, Middle Name, Last Name, Date of Birth, Identification Mark, PAN, Guardian Name, Guardian Address, Aadhaar No. Choose for the fields viz. Is Dependent, Is Disable, Family Pensioner, Is Co_Authorized, Part of Family. After filling in all the details, User can save family details on clicking Add and Save on the bottom of the Form. Also user can navigate via previous and next Forms using buttons given next to save button. User can view/edit and delete family details by clicking on Edit and Delete respectively under the grid option. Validations: All the mandatory/required fields which are highlighted by a red asterisk (*) mark cannot be left blank. If Is Co_Authorized field is YES, then it is mandatory to upload Co-Authorization Certificate in next form Pensioner Family Contact Details. Always select Save for every action like Add/Edit/Update/Delete after clicking on the Edit/Update/Delete buttons respectively.

42 6. Pensioner Family Contact details Contact Details: Select the option from the dropdown of the fields viz. Family Member, State, District. Select the checkbox for the fields either from Same as Pensioner Present Address or Same as Pensioner Permanent Address. This selection will fill the existing address automatically. Make the entries in the fields viz. Address Line1, Address Line2, City, Pin Code, , Mobile No, Alternate Number. Upload Photo and Signature of the family member. Disability Details: Select Type of Disability and Nature of Disability from the dropdown. Upload Disability Certificate. Co-Authorization Details: Upload Co-Authorization Certificate if Is Co_Authorized field is YES. User can save Family Contact details on clicking Add and then Save on the bottom of the Form. Also user can navigate via previous and next Forms using buttons given next to save button. User can view the uploaded Photo, signature, Disability Certificate (if any) and Coauthorization certificate (if any) of selected family member on clicking View link after clicking edit button available under grid option. User can view/edit and delete family contact details by clicking on Edit and delete respectively under the grid option and finally click on Save to save the changes. Added details are displayed in the grid on the bottom of the Form.
43 Validations: All the mandatory/required fields which are highlighted by a red asterisk (*) mark cannot be left blank. Photo, signature size should not exceed the limit of 70 KB. Disability Certificate and Co-Authorization Certificate should be in pdf format and their size should not exceed the limit of 500 KB. Always select Save the Edit/Update/Delete buttons respectively. for every action like Add/Edit/Update/Delete after clicking on 7. Pensioner Nominee and alternate Nominee Contact details Nominee Details: Select the Nominee and Nomination for from the dropdowns. Make the entry in the fields of Nomination Letter no., Nomination Date, % age share to be paid, Contingencies on happening of which nomination shall become invalid. Click on Add and then Save to save the details. Alternate Nominee Details: Select Nomination for and Alternate Nominee from the dropdown. Make the entry in the fields: % age share to be paid. Click on Save to save the details. User can view the added Nominee Details with (%) of share to be paid by selecting the Edit under grid. User has to merge (Click on Merge button) after adding nominations and then click on Save. Make sure that the sum of nominations of all nominees should be 100%. For e.g. Let s assume nominees are A, B Gratuity for A is 50% Gratuity for B is 50% Hence sum of % of gratuity of A and B is 100 % Similarly, alternate Nominee Contact details can be saved by clicking on Save. Added details are displayed in the grid on the bottom of the Form.

44 Validations: All the mandatory/required fields which are highlighted by a red asterisk (*) mark cannot be left blank. Sum of Nomination share percentage should be 100%. Always select Save for every action like Add/Edit/Update/Delete after clicking on the Edit/Update/Delete buttons respectively. 8. Pensioner Bank Details Enter the BSR Code in the text field and following fields will populate based on the BSR Code selection: Bank Name, Branch Address, Branch State, Branch District, Branch Pin Code, IFSC Code. Make the entries in the fields viz. City, Account Number, Spouse Identification Mark. Choose from Type of Bank A/C. If Type of Bank is chosen as Single, enter Reason and Remarks for Single A/C as shown in (Figure A) If Type of Bank is chosen as Joint, enter Spouse Verification Mark and upload Spouse Signature as shown in (Figure B) Upload Undertaking for recovery of excess payment. For saving all the above Bank Account Details of the Pensioner click on Save

. 9.")
45 Figure A Figure B Validations: All the mandatory/required fields which are highlighted by a red asterisk (*) mark cannot be left blank. Spouse signature size should not exceed 70KB. Undertaking for recovery of Excess payment (pdf size should not exceed 500KB) Similar Account number should not be entered for the same bank/branch (BSR Code). 9. Pensioner Non Qualifying Service Details User can view if any NQS details available for a Pensioner on this Form under the tenure of Service (Date range: Joining Date & retirement/death Date) Select Type of NQS from the dropdown.
 mark cannot be left blank.")
46 Enter From Date and To Date, Days field will populate automatically. Joining Date & retirement/death Date will be displayed on the top right corner of the grid. Click on Add and then Save to save the NQS Details. Validations: All the mandatory/required fields which are highlighted by a red asterisk (*) mark cannot be left blank. From Date and To Date should lie between Joining Date and Retirement/Death Date range. 10. Pensioner Additional Qualifying Service Details User can view if any AQS details available for a Pensioner on this Form. Select Additional Qualifying Service from the dropdown. Enter the Year, Month and Days field. Click on Add and then Save to save the AQS Details. Added details are displayed in the grid on the bottom of the Form.
 by clicking on edit button in the grid.")
47 Validations: All the mandatory/required fields which are highlighted by a red asterisk (*) mark cannot be left blank. 11. Pensioner Salary Details User can view the Last 10 months Salary details of any Pensioner within the defined Date Range (Salary from Date & Retirement Date) by clicking on edit button in the grid. Select Pay Commission, Pay Scale, Index No from the dropdown options. Basic Pay will be auto filled after selecting Index No. Make entry in the fields of From Date, To Date, NPA. Click on Add and then Save to save all details. Added details are displayed in the grid on the bottom of the screen. Validations: All the mandatory/required fields which are highlighted by a red asterisk (*) mark cannot be left blank. The salary breakup for 10 months should be done in a way that the NQS range should not lie in between. From Date and To Date should be in contiguous order. Dates should not be missed while filling From Date and To Date. 12. Pensioner Commutation Details User can view the added Commutation, Medical Allowance, Penalty details for Pensioner.

48 Commutation Details: First Choose Is Commutation. If Is Commutation is yes then make the entries in the fields populated like Date of Commutation, Percentage of Commutation, select Commutation Amount paid through from the dropdown options. Medical Allowance: Select Fixed Medical Allowance Options from the dropdown options. Based on the selection, fields like Med Amount and Whether your residence address after retirement is as a will be auto filled. Penalty Details: Make entries in From Date, To of percent of Basic. Click on Add and then Save for saving all details. Validations: All the mandatory/required fields which are highlighted by a red asterisk (*) mark cannot be left blank. Commutation % is limited to 40% for normal Case. For availing fixed Medical Allowance, Medical Certificate is mandatory. 13. Pensioner Gratuity Recovery Details User can view the recovery details on this Form if exist in a case of any Pensioner. Withheld Gratuity Amount: Make the entry in the fields of Withheld Gratuity if exist. Gratuity Recovery: Enter the Grant No, Function Head, Object Head, Category, Amount. Click on Add Button for saving Gratuity recovery. Click Save for saving all details.
. 14.")
49 Validations: All the mandatory/required fields which are highlighted by a red asterisk (*) mark cannot be left blank. For filling in the gratuity recovery details, entries should be valid (grant no, function head, object head, category). 14. Pensioner Calculation Sheet Details User can view the PFMS Calculation on this Form. In the Figure below, there is Manual case, that s why Bhavishya calculation doesn t appear Click on Freeze to forward to proceed further for passing the case to next level. Validations: Vendor Code Generation Vendor Code will be generated only after filling all Bank Details. If Vendor Code not found status comes on Pension Calculation Sheet, click on Re-Push for Vendor Code Generation and wait for 5 minutes as shown below. Now User can open the appropriate Pensioner s Calculation Sheet through Pension >Manage Pensioner to check process as per the Normal Flow.

50 15. Pensioner Case Forwarding Details Here DH user can either pass the case to AAO to proceed further or return the case to Bhavishya. Also, User can view the Calculation Sheet and save as pdf End of DH Level
51 Login at AAO Level All the pension cases of Super annuation passed by DH will be available to AAO under the Pension >- Manage Pensioner menus as shown below: 1. Search Pensioner Form User can view the forwarded Pensioner record/case at AAO level on this Form. 2. Pensioner Case Forwarding On clicking the selected record, AAO user can view the filled details of any pensioner on clicking the Form links. User can view the Calculation Sheet which can be downloaded or saved as a pdf or word at his/her end. AAO user can also view the DH Calculation details as well. When user select all Forms following screen comes up where user can either pass or return the case and can mention remarks as well.
52 AAO user return the case, following screen comes with a link to reason list. If AAO user pass the case, a dialog box is displaying message as case forwarded to PAO and redirected to Search Pensioner Form End of AAO Level
53 Login at PAO Level STEP 1: For viewing, verifying and passing /returning all created Pension Cases, PAO can navigate via Pension >- Manage Pensioner Pension Cases are available on Search Pensioner Form after clicking on Manage Pensioner where all Pension cases are displayed by default. User can search any Pensioner by giving values in available text fields. Pension cases are displayed after searching pensioner either by DDO Code or File Number or PAN or First Name or Last Name. Color coding for different cases is given at the bottom of Form which shows the status as shown below:


54 Blue color Manual Case Orange Bhavishya Case Pink Revision Case When User selects any case from the above screen, Pensioner Case Forwarding Details Form is displayed with Form Name and Form Status. When user selects all Form status, options to pass to PAO, return to DH, return to HOO appears on the bottom of screen. User can return the case by selecting the reason from reason list. User can pass the case by clicking on pass button. Dialog box appears displaying the pass confirmation and availability for PPO number generation.


55 When PAO generates the authority, it gets available under Receive menu of Sanction Module for sanction generation and then the same is available at DDO Maker Level for Bill preparation. STEP 2: For PPO number generation of passed Pension Cases, PAO can navigate via Pension >- PPO Allotment 1. On clicking PPO Allotment, following screen is displayed. User can select user details like DDO Code, File No, Pensioner s Name and generate PPO Number by clicking on Get PPO Number from CPAO.
56 2. Generate e-ppo: After PPO number generation, User get the option to generate e-ppo on the screen. When user select the PPO number and click on Generate E-PPO, following screen comes up. After e-ppo is generated successfully, PAO user get the option of DSC on screen.
57 Validations: All the mandatory/required fields which are highlighted by a red asterisk (*) mark cannot be left blank. DSC can be done only on Internet Explorer(IE) version 9 or above. DSC should be registered at PFMS and approved by PAO End of PAO Level
58 4.2 Family Pension Cases Login at DH Level 1. DH (at PAO Office) initiates by making entries after scrutiny of Pension case and hence create Pensioner. 2. After all Personal details of Pensioner are captured and saved, File number is generated and pension case is passed to AAO and then PAO respectively. 3. Manually created pensioners can be searched on Search Pensioner Form under Pension >- Manage Pensioner menus and Manual Pension cases are available in Blue color.
59 a) STEP 1: For creating Manual Pension Case, navigate via Pension >- Create Pensioner Logic Flow: 1. When User select Type of Pension from the dropdown, Pension class as Family Pension is displayed against the selection of type of pension. 2. Select the Type of Pension, DDO Code, Title, Nationality, Blood Group and Religion from the dropdown. 3. Make entry in the corresponding fields of PAN number, First Name, Middle Name, Last Name, Aadhaar Number, Date of Birth, Spouse Name, Father s/husband s Name, Mother s Name, Identification Mark1, Identification Mark2, Emp Code/Force Number. 4. Choose from the fields of Gender and Have Family. 5. Click on Save to save the Pensioner s personal details and all the fields will become empty if clicked on Reset. 6. After submission of form, message highlighted in red color appears on the top of screen displaying system generated File number.
 STEP 2: After creating Pensioner, navigate via Pension >- Manage Pensioner menu options to process the Family pension case Logic Flow: When clicked on Manage Pensioner, Search Pensioner Form comes")
60 Validations: All the mandatory/required fields which are highlighted by a red asterisk (*) mark cannot be left blank. PAN number should be unique and valid. Aadhaar number should be unique and valid. b) STEP 2: After creating Pensioner, navigate via Pension >- Manage Pensioner menu options to process the Family pension case Logic Flow: When clicked on Manage Pensioner, Search Pensioner Form comes up where all manually created Pensioners are available by default on this screen. Pensioners can be searched on Search Pensioner Form by giving values in available text fields. Pension cases are displayed after searching pensioner either by DDO Code or File Number or PAN or First Name or Last Name or Case Type or Pension Class. 1. Click on the Pensioner Details whose User want to process the pension case, Pensioner Summary Details Form is displayed as shown below with Form Name and Form Status. User can view all the filled forms details of selected Pensioner with Status. User can select and view the filled detail of any Form on clicking the same. Every Form displays Pensioner Name, DDO Code, File Number, PAN number, Pension Class on the top of the Form.
61 2. When User selects Pensioner Details on Pensioner Summary Details Form, Personal details Form comes up showing Personal Details where user can Add, Edit and Update the Personal details and click on Next for browsing and filling further forms. Validations: All the mandatory/required fields which are highlighted by a red asterisk (*) mark cannot be left blank. PAN Number and Aadhaar Number should be unique and valid. 3. Next is Pensioner Contact Details, user can Save Contact Details or navigate via previous or next button.

62 Contact Details: Make entry in the corresponding text fields of Mobile number, Alternate number and . Present Address: Make entry in the corresponding text fields of Address Line1, Address Line2, City, State, District and Pin Code. Permanent Address: Tick on checkbox if Permanent Address is same as Present Address. If not, then make entry in the corresponding text fields of Address Line1, Address Line2, City, State, District and Pin Code. Upload Photo, Joint Photo and Signature. User can view the uploaded Photo, Joint Photo, Signature by clicking View link after clicking Edit available under grid option. After filling all the mandatory fields viz. Address Line1, State, District in both Present Address and Permanent Address, Photo, Joint Photo, Signature, user can save the form by clicking on Save. Validations: All the mandatory/required fields which are highlighted by a red asterisk (*) mark cannot be left blank. There should not be a duplicate Id. Photo, joint photo and signature size should not exceed the limit of 70KB. Photo instructions need to be considered. Find the photo instructions in the Annexure I.

63 4. Next is Pensioner Service Details, here user can Save, Update Service details and navigate via previous or next. Select the options for Service Type, Grade/ Group, Retirement Type, Designation, Office Name, DA Type. Make entry or Select the date from the calendar for Date of Joining, Date of Superannuation, Date of Retirement, Date of Death. Upload Death Certificate. Choose from the options for the fields Whether any family pension receiving (By default it is No, if user choose Yes, it will prompt for text field asking for Source of Family Pension and Family Pension Amount as shown in Figure below), Military Pensioner, PPO Booklet Through, Case is Exceptional (If case is Exceptional is YES, it will prompt for a text field asking for Exception Case Remarks as shown in Figure below) Select the checkbox if needed for Supreme Court Judge/CAG (If this field is checked, Commutation % can be up to 50% and expenditure will be booked under (Charged Head)) and Whether more than one family pensioner. After filling all the mandatory fields viz. Service Type, Retirement Type, Date of Joining, Date of Superannuation, Date of Retirement, Designation, Office Name, user can save the form by clicking on Save. Validations: All the mandatory/required fields which are highlighted by a red asterisk (*) mark cannot be left blank. Minimum age of joining should be 18 years.

64 5. Next is Pensioner Family/ Nominee Details Select the option from the dropdown for the fields like Title, Relationship with Govt. Servant, Marital status, Nationality. Make the entries in the fields for First Name, Middle Name, Last Name, Date of Birth, Identification Mark, PAN, Guardian Name, Guardian Address, Aadhaar No. Choose from the options for the fields viz. Is Dependent, Is Disable, Family Pensioner, Is Co_Authorized, Part of Family. After filling in all the details, User can save family details on clicking Add and Save on the bottom of the Form. Also user can navigate via previous and next Forms using buttons given next to save button. User can view/edit and delete family details by clicking on Edit and Delete respectively under the grid option. Validations: All the mandatory/required fields which are highlighted by a red asterisk (*) mark cannot be left blank. If Is Co_Authorized field is YES, then it is mandatory to upload Co-Authorization Certificate in next form Pensioner Family Contact Details. Always select Save for every action like Add/Edit/Update/Delete after clicking on the Edit/Update/Delete buttons respectively.

65 6. Pensioner Family Contact details Contact Details: Select the option from the dropdown of the fields viz. Family Member, State, District. Select the checkbox for the fields either from Same as Pensioner Present Address or Same as Pensioner Permanent Address. This selection will fill the existing address automatically. Make the entries in the fields viz. Address Line1, Address Line2, City, Pin Code, , Mobile No, Alternate Number. Upload Photo and Signature of the family member. Disability Details: Select Type of Disability and Nature of Disability from the dropdown. Upload Disability Certificate. Co-Authorization Details: Upload Co-Authorization Certificate if Is Co_Authorized field is YES. User can save Family Contact details on clicking Add and then Save on the bottom of the Form. Also user can navigate via previous and next Forms using buttons given next to save button. User can view the uploaded Photo, signature, Disability Certificate (if any) and Coauthorization certificate (if any) of selected family member on clicking View link after clicking edit button available under grid option. User can view/edit and delete family contact details by clicking on Edit and delete respectively under the grid option and finally click on Save to save the changes. Added details are displayed in the grid on the bottom of the Form.
66 Validations: All the mandatory/required fields which are highlighted by a red asterisk (*) mark cannot be left blank. Photo, signature size should not exceed the limit of 70 KB. Disability Certificate and Co-Authorization Certificate should be in pdf format and their size should not exceed the limit of 500 KB. Always select Save for every action like Add/Edit/Update/Delete after clicking on the Edit/Update/Delete buttons respectively. 7. Pensioner Nominee and alternate Nominee Contact details Nominee Details: Select the Nominee and Nomination for from the dropdowns. Make the entry in the fields of Nomination Letter no., Nomination Date, % age share to be paid, Contingencies on happening of which nomination shall become invalid. Click on Add and then Save to save the details. Alternate Nominee Details: Select Nomination for and Alternate Nominee from the dropdown. Make the entry in the fields: % age share to be paid. Click on Save to save the details. User can view the added Nominee Details with (%) of share to be paid by selecting the Edit under grid. User has to merge (Click on Merge button) after adding nominations and then click on Save. Make sure that the sum of nominations of all nominees should be 100%. For e.g. Let s assume nominees are A, B Gratuity for A is 50% Gratuity for B is 50% Hence sum of % of gratuity of A and B is 100 % Similarly, alternate Nominee Contact details can be saved by clicking on Save. Added details are displayed in the grid at the bottom of the Form.

67 Validations: All the mandatory/required fields which are highlighted by a red asterisk (*) mark cannot be left blank. Sum of Nomination share percentage should be 100%. Always select Save for every action like Add/Edit/Update/Delete after clicking on the Edit/Update/Delete buttons respectively. 8. Pensioner Bank Details Select Family Members from the dropdown. Enter the BSR Code in the text field and following fields will populate based on the BSR Code selection: Bank Name, Branch Address, Branch State, Branch District, Branch Pin Code, IFSC Code. Make the entries in the fields viz. City, Account Number, F.P. Identification Mark. Choose Type of Bank A/C as chosen as Single, enter Reason and Remarks for Single A/C. Upload F.P. Signature and Undertaking for recovery of excess payment. For saving all the above Bank Account Details of the Pensioner click on Add and then Save
. 9.")
 Select Type of NQS from the dropdown. Enter From Date and To Date, Days field will populate automatically.")
68 Validations: All the mandatory/required fields which are highlighted by a red asterisk (*) mark cannot be left blank. F.P. signature size should not exceed 70KB. Similar Account number should not be entered for the same bank/branch (BSR Code). 9. Pensioner Non Qualifying Service Details User can view if any NQS details available for a Pensioner on this Form under the tenure of Service (Date range: Joining Date & retirement/death Date) Select Type of NQS from the dropdown. Enter From Date and To Date, Days field will populate automatically. Joining Date & retirement/death Date will be displayed on the top right corner of the grid. Click on Add and then Save to save the NQS Details.

69 Validations: All the mandatory/required fields which are highlighted by a red asterisk (*) mark cannot be left blank. From Date and To Date should lie between Joining Date and Retirement/Death Date range. 10. Pensioner Additional Qualifying Service Details User can view if any AQS details available for a Pensioner on this Form. Select Additional Qualifying Service from the dropdown. Enter the Year, Month and Days field. Click on Add and then Save to save the AQS Details. Added details are displayed in the grid on the bottom of the Form. Validations: All the mandatory/required fields which are highlighted by a red asterisk (*) mark cannot be left blank. 11. Pensioner Salary Details User can view the Last 10 months Salary details of any Pensioner within the defined Date Range (Salary from Date & Retirement Date) by clicking on edit button in the grid. Select Pay Commission, Pay Scale, Index No from the dropdown options. Basic Pay will be auto filled after selecting Index No. Make entry in the fields of From Date, To Date, NPA.
70 Click on Add and then Save to save all details. Added details are displayed in the grid on the bottom of the screen. Validations: All the mandatory/required fields which are highlighted by a red asterisk (*) mark cannot be left blank. The salary breakup for 10 months should be done in a way that the NQS range should not lie in between. NQS Details link is provided on the top left of the grid for viewing From Date and To Date should be in contiguous order. Dates should not be missed while filling From Date and To Date. 12. Pensioner Commutation Details User can view the added Commutation, Medical Allowance, Penalty details for Pensioner.. Commutation Details: First Choose Is Commutation. If Is Commutation is yes then make the entries in the fields populated like Date of Commutation, Percentage of Commutation, select Commutation Amount paid through from the dropdown options. Medical Allowance: Select Fixed Medical Allowance Options from the dropdown options. Based on the selection, fields like Med Amount and Whether your residence address after retirement is as a will be auto filled. Penalty Details: Make entries in From Date, To of percent of Basic. Click on Add and then Save for saving all details.


71 Validations: All the mandatory/required fields which are highlighted by a red asterisk (*) mark cannot be left blank. Commutation % is limited to 40% for normal Case. For availing fixed Medical Allowance, Medical Certificate is mandatory. 13. Pensioner Gratuity Recovery Details User can view the recovery details on this Form if exist in a case of any Pensioner. Withheld Gratuity Amount: Make the entry in the fields of Withheld Gratuity if exist. Gratuity Recovery: Enter the Grant No, Function Head, Object Head, Category, Amount. Click on Add Button for saving Gratuity recovery. Click Save for saving all details.
72 Validations: All the mandatory/required fields which are highlighted by a red asterisk (*) mark cannot be left blank. For filling in the gratuity recovery details, entries should be valid (grant no, function head, object head, category). 14. Pensioner Calculation Sheet Details User can view the PFMS Calculation on this Form. In the Figure below, there is Manual case, that s why Bhavishya calculation doesn t appear. Click on Freeze to forward to proceed further for passing the case to next level. Validations: Vendor Code Generation Vendor Code will be generated only after filling all Bank Details. If Vendor Code not found status comes on Pension Calculation Sheet, click on Re-Push for Vendor Code Generation and wait for 5 minutes as shown below. Now User can open the appropriate Pensioner s Calculation Sheet through Pension >Manage Pensioner to check process as per the Normal Flow.

73 15. Pensioner Case Forwarding Details Here DH user can either pass the case to AAO to proceed further or return the case to Bhavishya. Also, User can view the Calculation Sheet and save as pdf End of DH Level


74 Login at AAO Level All the Family pension cases passed by DH will be available to AAO under the Pension >- Manage Pensioner menus as shown below: 1. Search Pensioner Form User can view the forwarded Pensioner record/case at AAO level on this Form. 2. Pensioner Case Forwarding On clicking the selected record, AAO user can view the filled details of any pensioner on clicking the Form links. User can view the Calculation Sheet which can be downloaded or saved as a pdf or word at his/her end. AAO user can also view the DH Calculation details as well. When user select all Forms following screen comes up where user can either pass or return the case and can mention remarks as well.


75 AAO user return the case, following screen comes with a link to reason list. If AAO user pass the case, a dialog box is displaying message as case forwarded to PAO and redirected to Search Pensioner Form End of AAO Level

76 Login at PAO Level STEP 1: For viewing, verifying and passing /returning all created Pension Cases, PAO can navigate via Pension >- Manage Pensioner Pension Cases of are available on Search Pensioner Form after clicking on Manage Pensioner where all Pension cases are displayed by default. User can search any Pensioner by giving values in available text fields. Pension cases are displayed after searching pensioner either by DDO Code or File Number or PAN or First Name or Last Name. Color coding for different cases is given at the bottom of Form which shows the status as shown below:
77 Blue color Manual Case Orange Bhavishya Case Pink Revision Case When User selects any case from the above screen, Pensioner Case Forwarding Details Form is displayed with Form Name and Form Status. When user selects all Form status, options to pass to PAO, return to DH, appears on the bottom of screen. User can return the case by selecting the reason from reason list. User can pass the case by clicking on pass button. Dialog box appears displaying the pass confirmation and availability for PPO number generation. When PAO generates the authority, it gets available under Receive menu of Sanction Module for sanction generation and then the same is available at DDO Maker Level for Bill preparation.
78 STEP 2: For PPO number generation of passed Pension Cases, PAO can navigate via Pension >- PPO Allotment 3. On clicking PPO Allotment, following screen is displayed. User can select user details like DDO Code, File No, Pensioner s Name and generate PPO Number by clicking on Get PPO Number from CPAO. 4. Generate e-ppo: After PPO number generation, User get the option to generate e-ppo on the screen.
79 When user select the PPO number and click on Generate E-PPO, following screen comes up. After e-ppo is generated successfully, PAO user get the option of DSC on screen. Validations: All the mandatory/required fields which are highlighted by a red asterisk (*) mark cannot be left blank. DSC can be done only on Internet Explorer(IE) version 9 or above. DSC should be registered at PFMS and approved by PAO End of PAO Level
80 4.3 Voluntary Retirement Pension Cases Login at DH Level 1. DH (at PAO Office) initiates by making entries after scrutiny of Voluntary Retirement Pension cases and hence create Pensioner. 2. After all Personal details of Pensioner are captured and saved, File number is generated and pension case is passed to AAO and then PAO respectively. 3. Manually created pensioners can be searched on Search Pensioner Form under Pension >- Manage Pensioner menus and Manual Pension cases of Voluntary Retirement are available in Blue color. a) STEP 1: For creating Manual Pension Case, navigate via Pension >- Create Pensioner Logic Flow: 1. When User select Type of Pension from the dropdown, Pension class as a Retiring Pension is displayed against the selection of type of pension. 2. Select the Type of Pension, DDO Code, Title, Nationality, Blood Group and Religion from the dropdown. 3. Make entry in the corresponding fields of PAN number, First Name, Middle Name, Last Name, Aadhaar Number, Date of Birth, Spouse Name, Father s/husband s Name, Mother s Name, Identification Mark1, Identification Mark2, Emp Code/Force Number. 4. Choose from the fields of Gender and Have Family. 5. Click on Save to save the Pensioner s personal details and all the fields will become empty if clicked on Reset. 6. After submission of form, message highlighted in red color appears on the top of screen displaying system generated File number.
 STEP 2: After creating Pensioner, navigate via Pension >- Manage Pensioner menu options to process the Voluntary Retirement pension case Logic Flow: When clicked on Manage Pensioner, Search")
81 Validations: All the mandatory/required fields which are highlighted by a red asterisk (*) mark cannot be left blank. PAN number should be unique and valid. Aadhaar number should be unique and valid. c) STEP 2: After creating Pensioner, navigate via Pension >- Manage Pensioner menu options to process the Voluntary Retirement pension case Logic Flow: When clicked on Manage Pensioner, Search Pensioner Form comes up where all manually created Pensioners are available by default on this screen. Pensioners can be searched on Search Pensioner Form by giving values in available text fields. Pension cases are displayed after searching pensioner either by DDO Code or File Number or PAN or First Name or Last Name or Case Type or Pension Class.


82 1. Click on the Pensioner Details whose User want to process the Voluntary Retirement pension case, Pensioner Summary Details Form is displayed as shown below with Form Name and Form Status. User can view all the filled forms details of selected Pensioner with Status. User can select and view the filled detail of any Form on clicking the same. Every Form displays Pensioner Name, DDO Code, File Number, PAN number, Pension Class on the top of the Form.
83 2. When User selects Pensioner Details on Pensioner Summary Details Form, Personal details Form comes up showing Personal Details where user can Add, Edit and Update the Personal details and click on Next for browsing and filling further forms. Validations: All the mandatory/required fields which are highlighted by a red asterisk (*) mark cannot be left blank. PAN Number and Aadhaar Number should be unique and valid. 3. Next is Pensioner Contact Details, user can Save Contact Details or navigate via previous or next button. Contact Details: Make entry in the corresponding text fields of Mobile number, Alternate number and . Present Address: Make entry in the corresponding text fields of Address Line1, Address Line2, City, State, District and Pin Code. Permanent Address: Tick on checkbox if Permanent Address is same as Present Address. If not, then make entry in the corresponding text fields of Address Line1, Address Line2, City, State, District and Pin Code. Upload Photo, Joint Photo and Signature. User can view the uploaded Photo, Joint Photo, Signature by clicking View link after clicking Edit available under grid option.
 mark cannot be left blank. There should not be a duplicate Email Id.")
84 After filling all the mandatory fields viz. Address Line1, State, District in both Present Address and Permanent Address, Photo, Joint Photo, Signature, user can save the form by clicking on Save. Validations: All the mandatory/required fields which are highlighted by a red asterisk (*) mark cannot be left blank. There should not be a duplicate Id. Photo, joint photo and signature size should not exceed the limit of 70KB. Photo instructions need to be considered. Find the photo instructions in the Annexure I. 4. Next is Pensioner Service Details, here user can Save, Update Service details and navigate via previous or next. Select the options for Service Type, Grade/ Group, Retirement Type, Designation, Office Name, DA Type. Make entry or Select the date from the calendar for Date of Joining, Date of Superannuation, Date of Retirement. Choose from the options for the fields Whether any family pension receiving (By default it is No, if user choose Yes, it will prompt for text field asking for Source of Family Pension and Family Pension Amount as shown in Figure below), Military Pensioner, PPO Booklet Through, Case is Exceptional (If case is Exceptional is YES, it will prompt for a text field asking for Exception Case
) and Whether more than one family pensioner. After filling all the mandatory fields viz.")
85 Remarks as shown in Figure below) Select the checkbox if needed for Supreme Court Judge/CAG (If this field is checked, Commutation % can be up to 50% and expenditure will be booked under (Charged Head)) and Whether more than one family pensioner. After filling all the mandatory fields viz. Service Type, Grade/ Group, Retirement Type, Date of Joining, Date of Superannuation, Date of Retirement, Designation, Office Name, user can save the form by clicking on Save. Validations: All the mandatory/required fields which are highlighted by a red asterisk (*) mark cannot be left blank. Minimum age of joining should be 18 years. 5. Next is Pensioner Family/ Nominee Details Select the option from the dropdown for the fields like Title, Relationship with Govt. Servant, Marital status, Nationality. Make the entries in the fields for First Name, Middle Name, Last Name, Date of Birth, Identification Mark, PAN, Guardian Name, Guardian Address, Aadhaar No. Choose from the options for the fields viz. Is Dependent, Is Disable, Is Co_Authorized, Part of Family.

86 After filling in all the details, User can save family details on clicking Add and Save on the bottom of the Form. Also user can navigate via previous and next Forms using buttons given next to save button. User can view/edit and delete family details by clicking on Edit and Delete respectively under the grid option. Validations: All the mandatory/required fields which are highlighted by a red asterisk (*) mark cannot be left blank. If Is Co_Authorized field is YES, then it is mandatory to upload Co-Authorization Certificate in next form Pensioner Family Contact Details. Always select Save the Edit/Update/Delete buttons respectively. for every action like Add/Edit/Update/Delete after clicking on 6. Pensioner Family Contact details Contact Details: Select the option from the dropdown of the fields viz. Family Member, State, District. Select the checkbox for the fields either from Same as Pensioner Present Address or Same as Pensioner Permanent Address. This selection will fill the existing address automatically. Make the entries in the fields viz. Address Line1, Address Line2, City, Pin Code, , Mobile No, Alternate Number. Upload Photo and Signature of the family member.

87 Disability Details: Select Type of Disability and Nature of Disability from the dropdown. Upload Disability Certificate. Co-Authorization Details: Upload Co-Authorization Certificate if Is Co_Authorized field is YES. User can save Family Contact details on clicking Add and then Save on the bottom of the Form. Also user can navigate via previous and next Forms using buttons given next to save button. User can view the uploaded Photo, signature, Disability Certificate (if any) and Coauthorization certificate (if any) of selected family member on clicking View link after clicking edit button available under grid option. User can view/edit and delete family contact details by clicking on Edit and delete respectively under the grid option and finally click on Save to save the changes. Added details are displayed in the grid on the bottom of the Form. Validations: All the mandatory/required fields which are highlighted by a red asterisk (*) mark cannot be left blank. Photo, signature size should not exceed the limit of 70 KB. Disability Certificate and Co-Authorization Certificate should be in pdf format and their size should not exceed the limit of 500 KB.
88 Always select Save for every action like Add/Edit/Update/Delete after clicking on the Edit/Update/Delete buttons respectively. 7. Pensioner Nominee and alternate Nominee Contact details Nominee Details: Select the Nominee and Nomination for from the dropdowns. Make the entry in the fields of Nomination Letter no., Nomination Date, % age share to be paid, Contingencies on happening of which nomination shall become invalid. Click on Add and then Save to save the details. Alternate Nominee Details: Select Nomination for and Alternate Nominee from the dropdown. Make the entry in the fields: % age share to be paid. Click on Save to save the details. User can view the added Nominee Details with (%) of share to be paid by selecting the Edit under grid. User has to merge (Click on Merge button) after adding nominations and then click on Save. Make sure that the sum of nominations of all nominees should be 100%. For e.g. Let s assume nominees are A, B Gratuity for A is 50% Gratuity for B is 50% Hence sum of % of gratuity of A and B is 100 % Similarly, alternate Nominee Contact details can be saved by clicking on Save. Added details are displayed in the grid at the bottom of the Form.

89 Validations: All the mandatory/required fields which are highlighted by a red asterisk (*) mark cannot be left blank. Sum of Nomination share percentage should be 100%. Always select Save for every action like Add/Edit/Update/Delete after clicking on the Edit/Update/Delete buttons respectively. 8. Pensioner Bank Details Select Family Members from the dropdown. Enter the BSR Code in the text field and following fields will populate based on the BSR Code selection: Bank Name, Branch Address, Branch State, Branch District, Branch Pin Code, IFSC Code. Make the entries in the fields viz. City, Account Number, Spouse Identification Mark. Choose from Type of Bank A/C. If Type of Bank is chosen as Single, enter Reason and Remarks for Single A/C as shown in (Figure A) If Type of Bank is chosen as Joint, enter Spouse Verification Mark and upload Spouse Signature as shown in (Figure B) Upload Spouse Signature and Undertaking for recovery of excess payment. For saving all the above Bank Account Details of the Pensioner click on Add and then Save.

. 9.")
90 Figure A Figure B Validations: All the mandatory/required fields which are highlighted by a red asterisk (*) mark cannot be left blank. Spouse signature size should not exceed 70KB. Undertaking for recovery of Excess payment (pdf size should not exceed 500KB) Similar Account number should not be entered for the same bank/branch (BSR Code). 9. Pensioner Non Qualifying Service Details User can view if any NQS details available for a Pensioner on this Form under the tenure of Service (Date range: Joining Date & retirement/death Date)
 mark cannot be left blank.")
91 Select Type of NQS from the dropdown. Enter From Date and To Date, Days field will populate automatically. Joining Date & retirement/death Date will be displayed on the top right corner of the grid. Click on Add and then Save to save the NQS Details. Validations: All the mandatory/required fields which are highlighted by a red asterisk (*) mark cannot be left blank. From Date and To Date should lie between Joining Date and Retirement/Death Date range. 10. Pensioner Additional Qualifying Service Details User can view if any AQS details available for a Pensioner on this Form. Select Additional Qualifying Service from the dropdown. Enter the Year, Month and Days field. Click on Add and then Save to save the AQS Details. Added details are displayed in the grid on the bottom of the Form.


92 Validations: All the mandatory/required fields which are highlighted by a red asterisk (*) mark cannot be left blank. 11. Pensioner Salary Details User can view the Last 10 months Salary details of any Pensioner within the defined Date Range (Salary from Date & Retirement Date) by clicking on edit button in the grid. Select Pay Commission, Pay Scale, Index No from the dropdown options. Basic Pay will be auto filled after selecting Index No. Make entry in the fields of From Date, To Date, NPA. Click on Add and then Save to save all details. Added details are displayed in the grid on the bottom of the screen.

93 Validations: All the mandatory/required fields which are highlighted by a red asterisk (*) mark cannot be left blank. The salary breakup for 10 months should be done in a way that the NQS range should not lie in between. NQS Details link is provided on the top left of the grid for viewing. From Date and To Date should be in contiguous order. Dates should not be missed while filling From Date and To Date. 12. Pensioner Commutation Details User can view the added Commutation & Medical Allowance, Penalty details for Pensioner. Commutation Details: First enter Physical Form Submission Date to HOO and choose Is Commutation. If Is Commutation is yes then make the entries in the fields populated like Date of Commutation, Percentage of Commutation, select Commutation Amount paid through from the dropdown options, Upload Medical Certificate for Commutation, enter Age on next Birthday. Medical Allowance: Select Fixed Medical Allowance Options from the dropdown options. Based on the selection, fields like Med Amount and Whether your residence address after retirement is as a will be auto filled. Penalty Details: Make entries in From Date, To of percent of Basic. Click on Add and then Save for saving all details.
94 Validations: All the mandatory/required fields which are highlighted by a red asterisk (*) mark cannot be left blank. Commutation % is limited to 40% for normal Case. For availing fixed Medical Allowance, Medical Certificate is mandatory. Size of Medical Certificate should not exceed 500KB. 13. Pensioner Gratuity Recovery Details User can view the Pensioner s recovery details on this Form if exist. Withheld Gratuity Amount: Make the entry in the fields of Withheld Gratuity if exist. Gratuity Recovery: Enter the Grant No, Function Head, Object Head, Category, Amount. Click on Add Button for saving Gratuity recovery. Click Save for saving all details. Validations: All the mandatory/required fields which are highlighted by a red asterisk (*) mark cannot be left blank. For filling in the gratuity recovery details, entries should be valid (grant no, function head, object head, category).

95 14. Pensioner Calculation Sheet Details User can view the PFMS Calculation on this Form. In the Figure below, there is Manual case, that s why Bhavishya calculation doesn t appear. Click on Freeze to forward to proceed further for passing the case to next level. Validations: Vendor Code Generation Vendor Code will be generated only after filling all Bank Details. If Vendor Code not found status comes on Pension Calculation Sheet, click on Re-Push for Vendor Code Generation and wait for 5 minutes as shown below. Now User can open the appropriate Pensioner s Calculation Sheet through Pension >Manage Pensioner to check process as per the Normal Flow.

96 15. Pensioner Case Forwarding Details Here DH user can either pass the case to AAO to proceed further or return the case to Bhavishya. Also, User can view the Calculation Sheet through View Link and save as pdf End of DH Level


97 Login at AAO Level All the Voluntary Retirement pension cases passed by DH will be available to AAO under the Pension >- Manage Pensioner menus as shown below: 1. Search Pensioner Form User can view the forwarded Pensioner record/case at AAO level on this Form.
98 2. Pensioner Case Forwarding On clicking the selected record, AAO user can view the filled details of any pensioner on clicking the Form links. User can view the Calculation Sheet which can be downloaded or saved as a pdf or word at his/her end. AAO user can also view the DH Calculation details as well. When user select all Forms following screen comes up where user can either pass or return the case and can mention remarks as well. If AAO user pass the case, a dialog box is displaying message as case forwarded to PAO and redirected to Search Pensioner Form End of AAO Level

99 Login at PAO Level STEP 1: For viewing, verifying and passing /returning all Voluntary Retirement Pension Cases, PAO can navigate via Pension >- Manage Pensioner

100 Pension Cases of Voluntary Retirement passed by AAO are available on Search Pensioner Form after clicking on Manage Pensioner where all Pension cases are displayed by default. User can search any Pensioner by giving values in available text fields. Pension cases are displayed after searching pensioner either by DDO Code or File Number or PAN or First Name or Last Name. Color coding for different cases is given at the bottom of Form which shows the status as shown below: Blue color Manual Case Orange Bhavishya Case Pink Revision Case When User selects any case from the above screen, Pensioner Case Forwarding Details Form is displayed with Form Name and Form Status. When user selects all Form status, options to pass to PAO, return to DH, appears on the bottom of screen. User can return the case by selecting the reason from reason list. User can pass the case by clicking on pass button. Dialog box appears displaying the pass confirmation and availability for PPO number generation. When PAO generates the authority, it gets available under Receive menu of Sanction Module for sanction generation and then the same is available at DDO Maker Level for Bill preparation.
101 STEP 2: For PPO number generation of passed Pension Cases, PAO can navigate via Pension >- PPO Allotment 5. On clicking PPO Allotment, following screen is displayed. User can select user details like DDO Code, File No, Pensioner s Name and generate PPO Number by clicking on Get PPO Number from CPAO.
102 6. Generate e-ppo: After PPO number generation, User get the option to generate e-ppo on the screen. When user select the PPO number and click on Generate E-PPO, following screen comes up. After e-ppo is generated successfully, PAO user get the option of DSC on screen. Validations: All the mandatory/required fields which are highlighted by a red asterisk (*) mark cannot be left blank. DSC can be done only on Internet Explorer(IE) version 9 or above. DSC should be registered at PFMS and approved by PAO End of PAO Level
103 5. Return Flow of Manual Case If Details are incorrect while scrutiny of case at initial level, DH will return the case to AAO and AAO will return the case to PAO with the remarks mentioned for the return. PAO will return the case to DH and then DH will return the case to Bhavishya. Pension case returned by PAO will be available at DH. DH can manually return the case to HOO along with observations. Returned pension case are available in Manage Pensioner at DH level for further processing. DH user can reprocess the case once the case is resubmitted by HOO after rectification of observations.

104 6. Return Flow of Pension Cases received from Bhavishya If Calculations on the Calculation Sheet do not match and the calculation decision under Case Forwarding Decision selected as PFMS calculation is correct as shown in figure below, then DH return the Case to AAO with the reason selected in the Reason List. If Others is selected in the reason list, then remarks are entered in the remarks field (required field in case of others ). Similarly, AAO return the case to PAO with the return reason and PAO return the case to Head of Office(HOO). Pension cases returned by PAO, will be available at HOO login in Bhavishya Portal along with returning reasons. HOO can resubmit the case after rectification of observations of PAO in Bhavishya. Once, resubmitted by HOO through Bhavishya the case will be available in Manage pensioner at DH level.


105 7. DSC e-ppo List 1. The list of Digitally Signed e-ppo can be viewed via Pension >-DSC EPPO List. 2. On landing at Digitally Signed EPPO page, the grid displays the PPO Number, Pensioner Name, Pension Class, Year, Month of all DSC e-ppo where PPO Number is clickable so that Digitally Signed e-ppo can be downloaded and viewed. 3. Also any specific DSC e-ppo can be searched after filling the specific details like DDO Code, PPO No, Year, Month and clicking on Search.

 Pension Authority Details b) Pension Calculation Sheet c)")
106 8. Pension Reports 1. Pension Reports can be viewed via CAM-Reports menu on the left. 2. On clicking CAM Reports, user lands at the page displayed below: 3. Now, click on Pension from the header menu to view the reports 4. There are following types of Pension reports: a) Pension Authority Details b) Pension Calculation Sheet c) Pension Commutation Details d) Pension Gratuity Details e) Pension MIS Report f) Pension Withheld Gratuity Details

 Pension Calculation")

107 a) Pension Authority Details This report is displayed after selecting the fields like Controller, PAO, DDO, File Number, PPO Number, Pension Type as shown in Figure1 By Default, Controller, PAO and Pension Type are filled. On selecting DDO and file number, PPO Number is populated. When clicked on View Report, report is displayed as shown in Figure2 Figure1 Figure2 b) Pension Calculation Sheet This report is displayed after selecting the fields like Controller, PAO, DDO, File Number Pension Type By Default, Controller, PAO and Pension Type are filled. On selecting DDO and file number is populated. When clicked on View Report, report is displayed as shown below:,

108 c) Pension Commutation Details This report is displayed after selecting the fields like Controller, PAO, DDO, File Number, Pensioner Name, Source, Pension Type. By Default, Controller, PAO, Source and Pension Type are filled. On selecting DDO, file number is populated and on selecting file number Pensioner Name is prefilled. When clicked on View Report, report is displayed as shown below: d) Pension Gratuity Details This report is displayed after selecting the fields like Controller, PAO, DDO, File Number, Pensioner Name, Pension Type. By Default, Controller, PAO and Pension Type are filled. On selecting DDO, file number is populated and on selecting file number Pensioner Name is prefilled. When clicked on View Report, report is displayed as shown below:

109 e) Pension MIS Reports (Under Development) This report is displayed after selecting the fields like Controller, PAO, DDO, Sanction From Date, Sanction To Date, Report Name. By Default, Controller, PAO are filled. User can select any report from report name field options and report will be displayed accordingly. When clicked on View Report, selected report shall be displayed as shown below as shown.


110 f) Pension Withheld Gratuity Details: This report is displayed after selecting the fields like Controller, PAO, DDO, File Number, Pensioner Name, Type as shown in Figure1. By Default, Controller, PAO are filled. On selecting DDO and file number is populated and on selecting File number, Pensioner Name is auto filled. When clicked on View Report, selected report shall be displayed as shown below as shown in Figure2: Figure1 Figure2


111 9. Dashboard MIS Reports Navigate via Pension >- MIS Dashboard to view Dashboard MIS Dashboard consists of 7 sections which is available at DH, AAO, PAO level as mentioned below
 Section2- Cases Pending for It will display the total number of cases which are pending because of following parameters: PPO No DSC Sanction Gratuity Sanction Commutation Sanction")
112 a) Section1-Cases Pending at It will display total number of cases pending at following levels: DH Level AAO Level PAO Level On clicking the number of cases, details of the cases are displayed as shown below b) Section2- Cases Pending for It will display the total number of cases which are pending because of following parameters: PPO No DSC Sanction Gratuity Sanction Commutation Sanction Withheld On clicking the number of cases, details of the cases are displayed as shown in below


113 c) Section3-Cases Pending at Bhavishya It will display the total number of following pending Bhavishya cases: Failure Returned On clicking the number of cases, details of the cases are displayed as shown below

114 d) Section4-Digitally Signed e-ppo Status It will display the total number of cases of digitally Signed e-ppo for the following categories: Today Final Year ( ) Till Date e) Section5- Sanction Status It will display the total number of cases with following sanction status: Landing Failure Returned/ Failure Not Processed On clicking the number of cases, details of the cases are displayed as shown below f) Section6-Original Pension Case Wise status It will display the total number of original Pension Cases (Manual and Bhavishya Cases) for following Pension Classes: Superannuation Retiring Family Others g) Section7-Revision Pension Case Wise status It will display the total number of Revision Pension Cases (Manual and Bhavishya Cases) for following Pension Classes: Superannuation Retiring Family Others
INSTRUCTIONS FOR RETIREE
 BHAVISHYA Pension Sanction & Payment Tracking System An Initiative of Department of Pension & Pensioner s Welfare INSTRUCTIONS FOR RETIREE 13/04/2017 TABLE OF CONTENTS Sl no. CONTENT PAGE 1 About Bhavishya
Frequently Asked Question on Pension Module on PFMS Portal
 Frequently Asked Question on Pension Module on PFMS Portal URL/Website Address Helpdesk email id https://pfms.nic.in pension-pfms@gov.in FAQs for PAO Users 1. Can all PAO access the Pension Module on PFMS
BHAVISHYA. Pension Sanction & Payment Tracking System. An Initiative of Department of Pension & Pensioner s Welfare
 BHAVISHYA Pension Sanction & Payment Tracking System An Initiative of Department of Pension & Pensioner s Welfare INSTRUCTIONS FOR HEAD OF OFFICE (HOO) (Pension Cases of Serving/Retired Government Employees)
BHAVISHYA. Pension Sanction & Payment Tracking System For Central Civil Retirees An Initiative of Department of Pension & Pensioner s Welfare
 BHAVISHYA Pension Sanction & Payment Tracking System For Central Civil Retirees An Initiative of Department of Pension & Pensioner s Welfare INSTRUCTIONS FOR PAY & ACCOUNT OFFICE (PAO) ABOUT BHAVISHYA
BHAVISHYA. Pension Sanction & Payment Tracking System For Central Civil Retirees An Initiative of Department of Pension & Pensioner s Welfare
 BHAVISHYA Pension Sanction & Payment Tracking System For Central Civil Retirees An Initiative of Department of Pension & Pensioner s Welfare INSTRUCTIONS FOR HEAD OF OFFICE (HOO) (Extra Ordinary Family
BHAVISHYA. Pension Sanction & Payment Tracking System For Central Civil Retirees An Initiative of Department of Pension & Pensioner s Welfare
 BHAVISHYA Pension Sanction & Payment Tracking System For Central Civil Retirees An Initiative of Department of Pension & Pensioner s Welfare INSTRUCTIONS FOR ORGANISATION ADMIN Last Updated : 02/01/2017
Overview of Enrolment
 11/8/2016 Who is an existing taxpayer? Overview of Enrolment 1. Who is an existing taxpayer? An existing taxpayer is an entity currently registered under any State or Central laws, like Value Added Tax
Lender Record Information Form 582
 Lender Record Information Form 582 Quick Reference Guide Roles in Your Organization - Ownership Interest - Contact Verification November 2018 2018 Fannie Mae. Trademarks of Fannie Mae. 11.26.2018 1 of
Traders Fresh Registration. User Guide. For. Exporter of Unmanufactured Tobacco
 Traders Fresh Registration User Guide For Exporter of Unmanufactured Tobacco User Guide Developed by: Version: 1.0 1 P a g e Contents 1. INTRODUCTION... 3 2. PRE-REQUISITES... 4 2.1. Connectivity:... 4
For Lenders. Accessing LOS: LOS is a web based program that can be accessed at the following URL address: https://los.chfa.org/los
 Accessing LOS: LOS is a web based program that can be accessed at the following URL address: https://los.chfa.org/los A User ID and Password will be assigned to all users by the designated account administrator
BBPadmin s WebCOBRA On Demand Employer User s Guide. BBPadmin s Employer User s Guide to
 BBPadmin s Employer User s Guide to 1 Table of Contents Introduction to Employers... 5 Chapter 1: Getting Started... 6 Purpose of WebCOBRA... 6 For Employers... 6 For Participants... 6 Getting Started
Reference guide for small businesses
 Small Business Superannuation Clearing House Reference guide for small businesses Contents Employer registration initial registration 2 Employer registration finalising registration 13 Employer default
Maintaining Budget Change Requests
 Maintaining Budget Change Requests This document describes the functions used in TEAMS to enter and approve requests to move funds from one General Ledger account to another. In this document: Request
Employee Online Enrollment User Guide
 Employee Online Enrollment User Guide Welcome to Online Enrollment! In this guide, you will find information and step-by-step instructions on how to enroll in your benefits. Table of Contents Before you
Employee Enrollment User Guide
 Employee Enrollment User Guide Welcome to Online Enrollment! In this guide, you will find information and step-by-step instructions on how to enroll in your benefits. Table of Contents Before you get started:
1. DO.No. PAG (A&E)/PM/II/Web/ / DO 45539, dated received from the Prl. Accountant General, (A&E), A.P., Hyderabad * * * * * * * *
/PM/II/Web/ / DO 45539, dated received from the Prl. Accountant General, (A&E), A.P., Hyderabad * * * * * * * *") GOVERNMENT OF ANDHRA PRADESH ABSTRACT Issue of Guidelines of Electronic Pension cum Provident Fund Final Withdrawal Application Orders - Issued. FINANCE (PENSION-I) DEPARTMENT G.O.Ms.No. 228 Dated: 24.08.2012
GOVERNMENT OF ANDHRA PRADESH ABSTRACT Issue of Guidelines of Electronic Pension cum Provident Fund Final Withdrawal Application Orders - Issued. FINANCE (PENSION-I) DEPARTMENT G.O.Ms.No. 228 Dated: 24.08.2012
OCF-23. Minor Injury Guideline HCAI Communication
 OCF-23 Minor Injury Guideline 2018 HCAI Communication Table of Contents Contents Chapter 1:... 4 Create an OCF-23 & Tab 1... 4 To Create an OCF-23:... 4 OCF-23 TABS... 5 Claim Identifier... 6 Plan Identifier...
TRAVEL PORTAL INSTRUCTIONS
 TRAVEL PORTAL INSTRUCTIONS Date: June 22, 2018 Version: Version 3.1 Prepared By: Berkley Canada Table of Contents 1 ACCESSING THE PORTAL... 3 1.1 LOGIN & LOGOUT... 3 1.2 RESET YOUR PASSWORD... 3 2 THE
DUS DocWay TM Loan Documents User Guide. January 2019
 DUS DocWay TM Loan Documents User Guide January 2019 Table of Contents Getting Started with DUS DocWay... 1 Welcome Page Navigation... 3 Loan Documents Navigation... 6 Update Document Category and Type...
VAT USER GUIDE (REGISTRATION, AMENDMENT, DE-REGISTRATION) December 2017
 December 2017") VAT USER GUIDE (REGISTRATION, AMENDMENT, DE-REGISTRATION) December 2017 Contents 1. Brief overview of this user guide... 3 2. Creating and using your e-services account... 4 2.1 Create an e-services account
VAT USER GUIDE (REGISTRATION, AMENDMENT, DE-REGISTRATION) December 2017 Contents 1. Brief overview of this user guide... 3 2. Creating and using your e-services account... 4 2.1 Create an e-services account
Oracle Banking Digital Experience
 Oracle Banking Digital Experience Auto Loans Originations User Manual Release 17.2.0.0.0 Part No. E88573-01 July 2017 Auto Loans Originations User Manual July 2017 Oracle Financial Services Software Limited
Individual Taxpayer Electronic Filing Instructions
 Individual Taxpayer Electronic Filing Instructions Table of Contents INDIVIDUAL TAXPAYER ELECTRONIC FILING OVERVIEW... 3 SUPPORTED BROWSERS... 3 PAGE AND NAVIGATION OVERVIEW... 4 BUTTONS AND ICONS... 5
TAX GROUP USER GUIDE (REGISTRATION, AMENDMENT AND DE- REGISTRATION) December 2017
 December 2017") TAX GROUP USER GUIDE (REGISTRATION, AMENDMENT AND DE- REGISTRATION) December 2017 Contents 1. Brief overview of this user guide... 3 2. Creating and using your e-services account... 4 2.1 Create an e-services
TAX GROUP USER GUIDE (REGISTRATION, AMENDMENT AND DE- REGISTRATION) December 2017 Contents 1. Brief overview of this user guide... 3 2. Creating and using your e-services account... 4 2.1 Create an e-services
Log in at LMS Xpress 2
 Log in at www.westernbanc.com LMS Xpress 2 From your home page, select Loan Search. LMS Xpress 3 You will now see the updated information in your pipeline LMS Xpress 4 To register a loan for a loan officer,
OCF-23. Minor Injury Guideline HCAI Communication
 OCF-23 Minor Injury Guideline 2016 HCAI Communication Table of Contents Contents Chapter 1: Create an OCF-23 & Tab 1... 4 To Create an OCF-23:... 4 OCF-23 TABS... 5 Claim Identifier... 6 Plan Identifier...
Form 1. Assessment of Attendant Care Needs HCAI Communication
 Form 1 Assessment of Attendant Care Needs 2018 HCAI Communication Table of Contents Contents Chapter 1: Create a Form 1 & Tab 1... 3 Form 1 Tabs... 4 Claim Identifier... 6 Applicant Information... 6 Auto
Cancellation of Registration
 Cancellation of Registration How can I file for cancellation of GST registration? To file for cancellation of GST registration, please perform the following steps: 1. Visit the URL: https://www.gst.gov.in.
OVERVIEW GUIDE TO HOME COUNSELOR ONLINE NATIONAL FORECLOSURE MITIGATION COUNSELING (NFMC) FEATURES
 FEATURES") OVERVIEW GUIDE TO HOME COUNSELOR ONLINE NATIONAL FORECLOSURE MITIGATION COUNSELING (NFMC) FEATURES WHO SHOULD USE THIS OVERVIEW GUIDE? WHAT IS NFMC? This overview guide contains information for Home Counselor
OVERVIEW GUIDE TO HOME COUNSELOR ONLINE NATIONAL FORECLOSURE MITIGATION COUNSELING (NFMC) FEATURES WHO SHOULD USE THIS OVERVIEW GUIDE? WHAT IS NFMC? This overview guide contains information for Home Counselor
Guide to Credit Card Processing
 CBS ACCOUNTS RECEIVABLE Guide to Credit Card Processing version 2007.x.x TL 25476 (07/27/12) Copyright Information Text copyright 1998-2012 by Thomson Reuters. All rights reserved. Video display images
Login Screen: Kindly enter your username, password and verification code as shown in the login screen.
 How to use new Internet Banking Oct 27, 2017 Login Screen: Kindly enter your username, password and verification code as shown in the login screen. After successful login, customer will be presented a
Oracle Banking Digital Experience
 Oracle Banking Digital Experience US Originations Unsecured Personal Loans User Manual Release 17.2.0.0.0 Part No. E88573-01 July 2017 US Originations Unsecured Personal Loans User Manual July 2017 Oracle
QuickSuper. User Guide.
 QuickSuper User Guide www.clearinghouseapp.hostplus.com.au QuickSuper User Guide Document History Date Description 26 Jul 2010 Initial release 20 May 2011 Updated to include EFT payment method. 03 Nov
NEST Pension File Creation
 NEST Pension File Creation Introduction... 2 NEST configuration... 3 Company configuration... 3 Employee Details configuration... 3 NEST Enrolling Workers... 4 Create a NEST Enrolling Workers file:...
Introduction to Client Online
 Introduction to Client Online Trade Finance Guide TradeFinanceNewClientsV2Sept15 Contents Introduction 3 Welcome to your introduction to Client Online 3 If you have any questions 3 Logging In 4 Welcome
Oracle Banking Digital Experience
 Oracle Banking Digital Experience US Originations Auto Loans with OFSLL User Manual Release 17.2.0.0.0 Part No. E88573-01 July 2017 US Originations Auto Loans OFSLL User Manual July 2017 Oracle Financial
Atradius Atrium. July version 3.0. Atradius Atrium. User manual. Atradius Atrium - User Manual Version 3.0
 July 2018 - version 3.0 User manual 1 - User Manual Version 3.0 Drive your business forward with powerful, easy-to-use credit management tools is the Atradius online platform, which offers you one place
Master User Manual. Last Updated: August, Released concurrently with CDM v.1.0
 Master User Manual Last Updated: August, 2010 Released concurrently with CDM v.1.0 All information in this manual referring to individuals or organizations (names, addresses, company names, telephone numbers,
Benefit Elections Guide
 Benefit Elections Guide Revised: October 2017 Workday version 29 Note: Workday provides two updates per year and there may be slight differences between the screen shots in this guide and the actual Production
Introduction to Client Online
 Introduction to Client Online Construction Finance Guide ConstructionFinanceNewClientsV2Sept15 Contents Introduction 3 Welcome to your introduction to Client Online 3 If you have any questions 3 Logging
COMBINED APPLICATION FORM FOR GENERAL PROVIDENT FUND FINAL CLOSURE AND PENSION
 COMBINED APPLICATION FORM FOR GENERAL PROVIDENT FUND FINAL CLOSURE AND PENSION PART-I FOR RETIREMENT / REVISION CASES ONLY (To be sent in Duplicate) 1. Name of the Government Employee (IN CAPITAL LETTERS).
ENTER REPORT EMPLOYER SELF-SERVICE USER GUIDE
 ENTER REPORT EMPLOYER SELF-SERVICE USER GUIDE Feb 2017 State of North Carolina Department of State Treasurer Retirement Systems Division Table of Contents 1--INTRODUCTION... 5 1.1 PREFERRED SYSTEM REQUIREMENTS
OCF-18. Treatment & Assessment Plan HCAI Communication
 OCF-18 Treatment & Assessment Plan 2018 HCAI Communication Table of Contents Contents Chapter 1:... 4 Create an OCF-18 & Tab 1... 4 To Create an OCF-18:... 4 OCF-18 TABS... 5 Claim Identifier... 7 Plan
Employer Self Service (ESS) Contribution Reporting User Guide
 Contribution Reporting User Guide") Employer Self Service (ESS) Contribution Reporting User Guide 1 TABLE OF CONTENTS I. Launch Internet Explorer 3 II. Log In 4 III. Employer Reporting Module: Submitting Employer and Employee Contributions
Employer Self Service (ESS) Contribution Reporting User Guide 1 TABLE OF CONTENTS I. Launch Internet Explorer 3 II. Log In 4 III. Employer Reporting Module: Submitting Employer and Employee Contributions
Oracle Banking Digital Experience
 Oracle Banking Digital Experience Mortgage Originations User Manual Release 17.1.0.0.0 Part No. E83887-01 March 2017 Mortgage Originations User Manual March 2017 Oracle Financial Services Software Limited
FAST Budget Budget Transfers
 FAST Budget Budget Transfers User Guide Millennium FAST The user guide was created using FAST Version 4.2.18 CSU FAST 4.2.18 BUDGET TRANSFER User Guide v0.4.docx (FOAP = FUND ORGANISATION ACCOUNT PROGRAM)
14. Roster Processing
 14. Roster Processing Plan processing Roster processing Roster processing roster list You can create rosters by entering data manually or by using the file import capability. If you want to create the
ABML Trading Account User Manual
 Annexure-A ABML Trading Account User Manual Link to open Trading Account has been placed in our Allahabad Bank Corporate Internet Portal under E-Trade (Online Trading). On clicking the link the user will
SCREEN: SCR-2 SCREEN: SCR-3
 Click Allow Option as shown in SCR-1 SCREEN: SCR-2 Select appropriate DSC to login and provide PIN details. SCREEN: SCR-3 After validating details System will display main screen as shown below in SCR-4.
Oracle Banking Digital Experience
 Oracle Banking Digital Experience Retail Recurring Deposits User Manual Release 18.2.0.0.0 Part No. E97823-01 June 2018 Retail Recurring Deposits User Manual June 2018 Oracle Financial Services Software
UNIVERSITY OF GHANA OFFICE OF RESEARCH, INNOVATION AND DEVELOPMENT (ORID) Grant Application Guide
 Grant Application Guide") UNIVERSITY OF GHANA OFFICE OF RESEARCH, INNOVATION AND DEVELOPMENT (ORID) Grant Application Guide Step 1: Login Process 1. Visit the UG-Research Management Application Portal (UG-ReMAP) to initiate your
UNIVERSITY OF GHANA OFFICE OF RESEARCH, INNOVATION AND DEVELOPMENT (ORID) Grant Application Guide Step 1: Login Process 1. Visit the UG-Research Management Application Portal (UG-ReMAP) to initiate your
People First User Guide for the Benefits Enrollment Process
 People First User Guide for the Benefits Enrollment Process Table of Contents Change My Benefits Overview... 2 Introduction... 2 Getting Started... 2 Change My Benefits... 4 Introduction... 4 Getting Started...
Introduction to Client Online
 Introduction to Client Online Bibby Factors International Guide 1 InternationalFactoringNewClientBibbyUKopsSept15 Introduction 3 Logging In 5 Welcome Screen 6 Navigation 7 Viewing Your Account 9 Invoice
Oracle Banking Digital Experience
 Oracle Banking Digital Experience Retail Term Deposits User Manual Release 18.2.0.0.0 Part No. E97823-01 June 2018 Retail Term Deposits User Manual June 2018 Oracle Financial Services Software Limited
Oracle Banking Digital Experience
 Oracle Banking Digital Experience US Originations Auto Loans User Manual Release 18.2.0.0.0 Part No. E97823-01 June 2018 US Originations Auto Loans User Manual June 2018 Oracle Financial Services Software
LLC Quick Reference Guide
 LLC Quick Reference Guide The Conveyancer (Do Process Software LP) Once you obtain your User ID and Password from FCT by email and you are ready to setup your LLC Account, log into The Conveyancer application.
CABS New Employee Benefits Enrollment Guide. Coventry Corporate Benefits
 CABS New Employee Benefits Enrollment Guide Coventry Corporate Benefits Table of Contents Overview Initial Login Screen Welcome Screen Personal Information screen (Adding Dependents and Beneficiaries)
MyBenefits Open Enrollment User Guide
 MyBenefits Open Enrollment User Guide This guide will help you navigate MyBenefits, the University s online benefits enrollment application. All benefit-eligible faculty and staff must actively enroll
Oracle Banking Digital Experience
 Oracle Banking Digital Experience Unsecured Personal Loans Originations User Manual Release 17.2.0.0.0 Part No. E88573-01 July 2017 s Originations User Manual July 2017 Oracle Financial Services Software
Oracle Banking Digital Experience
 Oracle Banking Digital Experience Unsecured Personal Loans Originations User Manual Release 18.1.0.0.0 Part No. E92727-01 January 2018 s Originations User Manual January 2018 Oracle Financial Services
Product Eligibility and Pricing Services. Loan Originator User Guide
 Product Eligibility and Pricing Services Loan Originator User Guide Table of Contents Table of Contents Log In... 1 Enter New Loan Data... 1 Evaluate Products... 6 Analyze Search Results... 6 Update Search
Oracle Banking Digital Experience
 Oracle Banking Digital Experience Corporate Term Deposit User Manual Release 18.2.0.0.0 Part No. E97823-01 June 2018 Corporate Term Deposit User Manual June 2018 Oracle Financial Services Software Limited
User guide for employers not using our system for assessment
 For scheme administrators User guide for employers not using our system for assessment Workplace pensions CONTENTS Welcome... 6 Getting started... 8 The dashboard... 9 Import data... 10 How to import a
CTIMS FLA Carl Perkins Worksheet & Application Guidebook
 April 20, 2018 CTIMS FLA Carl Perkins Worksheet & Application Guidebook CareerTech Information Oklahoma Department of Career and Technology Education Table of Contents Logging in to CTIMS... 1 Help and
PNC HSA Funding & Contribution Guide for Employers
 PNC HSA Funding & Contribution Guide for Employers How to set up and send employer-directed HSA Contributions with PNC Bank 20180924AHNJ Document Updates The table below details updates made to the document
Online Contribution Processing CIPQ BERT 2 BEWT
 EMPLOYER HELP GUIDE Online Contribution Processing CIPQ BERT 2 BEWT Disclaimer: All employer and member details used throughout this guide are fictitious and have been created for training and educational
P&C Rate Data Collection and Management System. PCRDCMS Rate Collection User Manual
 State of Florida Department of Financial Services Office of Insurance Regulation P&C Rate Data Collection and Management System (PCRDCMS) PCRDCMS Rate Collection User Manual Author: Vendor: Version: Jon
Welcome to Dearborn National s. Benefits Manager. Instruction Guide for. Web Billing. Contents Next > BM.WB
 Welcome to Dearborn National s Benefits Manager Instruction Guide for Web Billing Contents Next > BM.WB.021517 This instruction guide demonstrates how to navigate through Dearborn National s Benefits Manager.
Secure Website Encompass Loan Center
 What is housed in this website? NOVA Home Loans uses a secure website where you can access your NOVA loan documents 24-hours a day. In this secure website, you will find the documents associated with your
An overview of the financial profile fact finder
 An overview of the financial profile fact finder Functions addressed in this document: A step-by-step walk through of the financial profile fact finder. How data entry is presented to the client within
Oracle Banking Digital Experience
 Oracle Banking Digital Experience Retail Credit Cards User Manual Release 18.3.0.0.0 Part No. F12056-01 December 2018 Retail Credit Cards User Manual December 2018 Oracle Financial Services Software Limited
Margin Direct User Guide
 Version 2.0 xx August 2016 Legal Notices No part of this document may be copied, reproduced or translated without the prior written consent of ION Trading UK Limited. ION Trading UK Limited 2016. All Rights
NYIT Self-Service Application Instructions Benefits Open Enrollment AAUP, Faculty and Staff
 NYIT Self-Service Application Instructions Benefits Open Enrollment AAUP, Faculty and Staff The NYIT Self-Service Application gives employees access to view and change certain Benefits data. Benefits which
UCAA Expansion Application Insurer User Guide December 2017
 UCAA Expansion Application Insurer User Guide December 2017 2017 National Association of Insurance Commissioners All rights reserved. Revised Edition National Association of Insurance Commissioners NAIC
Dear Client, We appreciate your business!
 FTJ FundChoice Website Guide Page 1 Dear Client, Thank you for choosing FTJ FundChoice. This guide will assist you in managing your online account at: www.portfoliologin.com. In keeping with our mission
Employee New Hire and Life Event Guide
 Employee New Hire and Life Event Guide Navigating your bswift Benefit Portal Contents Log in... 1 Enroll 3 Steps... 1 Step 1: Verify Your Personal and Family Information... 1 Personal Information... 1
Oracle Banking Digital Experience
 Oracle Banking Digital Experience Corporate Loans and Finances User Manual Release 18.3.0.0.0 Part No. F12056-01 December 2018 Corporate Loans and Finances User Manual December 2018 Oracle Financial Services
QUICKSUPER. A how-to guide
 QUICKSUPER A how-to guide April 2017 1 Contents Page How to register for QuickSuper 4 How to set up your account 6 How to make a payment 10 CSV file specifications 12 How to view new default fund member
Norfolk Pension Fund PensionsWeb
 Norfolk Pension Fund PensionsWeb Local Government Pension Scheme Guide to the Employer Portal Issue 6 : Feb 2018 Copyright Norfolk Pension Fund 2018 http://portal.norfolkpensionfund.org There are two sections
Oracle Banking Digital Experience
 Oracle Banking Digital Experience US Originations Auto Loans User Manual Release 18.1.0.0.0 Part No. E92727-01 January 2018 US Originations Auto Loans User Manual January 2018 Oracle Financial Services
Using the HAMP Reporting Tool: Reporting Treasury FHA-HAMP Official Modifications to the U.S. Treasury ¹
 Using the HAMP Reporting Tool: Reporting Treasury FHA-HAMP Official Modifications to the U.S. Treasury ¹ In July 2009, the Federal Housing Administration (FHA) launched the FHA-Home Affordable Modification
X-Charge Credit Card Processing
 X-Charge Credit Card Processing OpenEdge (Formerly X-Charge) Payment Processing Setup... 1 Setting Permissions for Credit Card Processing... 1 Setting Up X-Charge Payment Processing in SuccessWare 21...
Integrated Payments: Online Payment Control & Online Payment History Quick Reference Guide
 Integrated Payments: Online Payment Control & Online Payment History Quick Reference Guide Table of Contents File Summary (Online Payment Control Only)... 2 Payment Statuses... 4 Payments Search... 5 Pending
Plan Sponsor Administrative Manual
 Plan Sponsor Administrative Manual V 3.1 Sponsor Access Website January 2017 Table of Contents Welcome Overview... p 5 How to Use this Manual... p 5 Enrollment Overview... p 7 Online Enrollment Description...
Certifying Mortgages for Freddie Mac. User Guide
 Certifying Mortgages for Freddie Mac User Guide December 2017 The Freddie Mac Single-Family Seller/Servicer (Guide) requires a Seller/Servicer selling Mortgages to Freddie Mac to forward the Notes, assignments
User Guide for Pricing Engine
 User Guide for Pricing Engine Version 1.2 Effective Date: 02/27/2019 Contents 1.0 STEPS TO ACCESS SEEMYLOANSTATUS... 2 2.0 SUBMITTING LOCK REQUEST... 4 2.1 STEPS TO REQUEST LOCK ON A NEW LOAN... 4 2.2
Online PF Withdrawal Process (Form 19 & 10C) / Transfer Process(Form 13)
 / Transfer Process(Form 13)") Online PF Withdrawal Process (Form 19 & 10C) / Transfer Process(Form 13) PF Withdrawal / Transfer Process Unemployed Employed You can withdraw PF only if you are unemployed after 60 days from your Last
Online PF Withdrawal Process (Form 19 & 10C) / Transfer Process(Form 13) PF Withdrawal / Transfer Process Unemployed Employed You can withdraw PF only if you are unemployed after 60 days from your Last
OPEN ENROLLMENT... 2 LINKS TO NEW BENEFITS OPTIONS & DESCRIPTIONS... 2 SYSTEM REQUIREMENTS...
 Title: Oracle Advanced Benefits: Open Enrollment Date Modified: 4/5/2018 Purpose: The purpose of this document is to assist OHIO employees with Open Enrollment, the annual (mid-april early-may) opportunity
Web Benefits Admin User Guide
 Web Benefits Admin User Guide. Table of Contents Navigate to Web Benefits... 3 Accessing Employee User Accounts... 4 Employee profile... 4 Active coverage... 5 Event history... 6 Family... 6 Adding a New
Self-Service Enrollment Instructions. Courtesy of
 Self-Service Enrollment Instructions Courtesy of Self-service Enrollment BenAware s convenient self-service portal is available for use anytime during the open enrollment period. STEP 1: VISIT ENROLLMENT
OCF-21C. Manual for Web Users HCAI Communication
 OCF-21C Manual for Web Users 2018 HCAI Communication Table of Contents Chapter 1:... 4 Create an OCF-21C & Tab 1... 4 To Create an OCF-21C:... 4 Create an OCF-21C from a Plan:... 4 Create an OCF-21C from
Portal Quickstart Guide
 Portal Quickstart Guide Filing processes under the Cost of Credit Disclosure and Payday Loans Act Version 1.1 7 December 2017 Introduction This is a guide for payday lenders on how to complete the following
Plan Member a) Updating the Plan Member s Personal Information... 15
 Updating the Plan Member s Personal Information... 15") Table of Contents Web Administration INTRODUCTION... 4 WELCOME TO EQUITABLE LIFE OF CANADA... 4 WEB ADMINISTRATION COVERAGE UPDATES... 5 Certificate Summary... 7 a) Terminating the Certificate... 7 b)
Table of Contents Web Administration INTRODUCTION... 4 WELCOME TO EQUITABLE LIFE OF CANADA... 4 WEB ADMINISTRATION COVERAGE UPDATES... 5 Certificate Summary... 7 a) Terminating the Certificate... 7 b)
MyBenefits. Online Benefits Enrollment for New Employees
 MyBenefits Online Benefits Enrollment for New Employees Welcome to the University of Notre Dame! This guide will help you navigate MyBenefits (mybenefits.nd.edu), the University s online benefits enrollment
The Small Business Health Options Program (SHOP) SHOP QUOTING TOOL INSTRUCTIONS
 SHOP QUOTING TOOL INSTRUCTIONS") The Small Business Health Options Program (SHOP) SHOP QUOTING TOOL INSTRUCTIONS Table of Contents What is Maryland s SHOP Quoting Tool? What do I need to use this SHOP Quoting Tool? CENSUS WORKSHEET (1
The Small Business Health Options Program (SHOP) SHOP QUOTING TOOL INSTRUCTIONS Table of Contents What is Maryland s SHOP Quoting Tool? What do I need to use this SHOP Quoting Tool? CENSUS WORKSHEET (1
Access and User Management
 Date published: 25.06.2018 Estimated reading time: 30 minutes Authors: Editorial Team The bookmarks and navigation in this tutorial are optimized for Adobe Reader. Access and User Management 1. Introduction
Funding Express User Guide Updated as of January 2017
 Funding Express User Guide Updated as of January 2017 2016 Fannie Mae. Trademarks of Fannie Mae. 10.07.2016 1 of 35 About This User Guide... 3 Getting Additional Help... 3 Prerequisites to Using Funding
MyBenefits. Online Benefits Enrollment following a Qualifying Event
 MyBenefits Online Benefits Enrollment following a Qualifying Event This guide will help you navigate MyBenefits (mybenefits.nd.edu), the University s online benefits enrollment and change application.
Government of Jammu and Kashmir Employee Personal Information. Form-1
 Form-1 Instruction: This form required to be duly filled up and submitted by the prospective employees while reporting for duty on Old/ fresh appointment. The officer before whom the prospective employee
Integrated Financial Management System (IFMS)
") Integrated Financial Management System (IFMS) User Manual New Pension Scheme (NPS) Government of Punjab, India April, 2013 Version 1.0 2 Notice 2013 Tata Consultancy Services Limited This document is being
Integrated Financial Management System (IFMS) User Manual New Pension Scheme (NPS) Government of Punjab, India April, 2013 Version 1.0 2 Notice 2013 Tata Consultancy Services Limited This document is being