Benefit Reconciliation. User s Guide. GeorgiaFIRST
|
|
|
- Ruth McCarthy
- 6 years ago
- Views:
Transcription

1 Benefit Reconciliation User s Guide GeorgiaFIRST
2
3 TABLE OF CONTENTS BENEFIT ACCOUNTING...3 BENEFIT PROCESSES... 4 CREATE BENEFIT ACCOUNTING ENTRIES... 5 Load and Validate Accounting... 6 Load Error Correction Purge Accounting Entries BENEFIT ACCOUNTING ERROR CORRECTION BENEFIT MASS ERROR CORRECTION JOURNAL GENERATE BENEFITS ACCOUNTING CREATE BENEFIT REPORTING TABLE BENEFIT PLAN DEDUCTION CODE MAPPING BENEFIT INQUIRY/REPORTS BENEFIT RECON ERRORS (AUG-MAY) BENEFIT RECONCILIATION DETAIL BENEFIT PREMIUM RECON REPORT FACULTY PAY GROUP MEMBERS /5THS RECONCILIATION JAN-JUL BENEFIT DEDUCTION CODE MAPPING ACCOUNT PROGRESSION REPORT BENEFIT ELECTIONS BENEFIT DETAIL TRANSACTIONS RETIREE BENEFIT ACCOUNTING..55 RETIREE BENEFIT PROCESSES CREATE RETIREE BENEFIT ACCOUNTING Load and Validate Accounting Load Error Correction Purge Accounting Entries RETIREE BENEFIT ERROR CORRECTION BUILD RETIREE RECEIVABLE AGING DATA JOURNAL GENERATE RETIREE BENEFITS RETIREE BENEFIT PARAMETERS RETIREE BENEFIT INQUIRY/REPORTS...94 NET RECEIVABLES CHANGE RETIREE RECEIVABLES AGING JOB EARNINGS DISTRIBUTION SUPPLEMENTAL PDR PROCESSES CREATE SUPPLEMENTAL PDR ACCOUNTING ENTRIES Load and Validate Accounting Load Error Correction Purge Accounting Entries SUPPLEMENTAL PDR ERROR CORRECT JOURNAL GENERATE SUPPLEMENTAL PDR SUPPLEMENTAL PDR MAPPING BENEFIT RECON AUDIT TOOLS
4 PERSONAL SERVICES DETAIL QUERY BENEFIT CONTROL REPORT BENEFIT PROCESS AUDIT OPEN COUPON QUERY PAYROLL ADJUSTMENTS 143 CREATE PAYROLL RECON ADJUSTMENTS ENTER PAYROLL ADJUSTMENTS VALIDATE/DELETE PAYROLL ADJUSTMENTS LOAD PAYROLL ADJUSTMENTS TO GL PAYROLL ADJUSTMENTS NOT POSTED PRINT PAYROLL ADJUSTMENTS JOURNAL GENERATE PAYROLL ADJUSTMENTS APPENDIX PREREQUISITES RECONCILIATION TASK LIST BEST PRACTICES AND TIPS
5 BENEFIT ACCOUNTING Benefit Accounting Processes Benefit Accounting in PS Financials includes the creation of accounting entries for active employees with benefits. The Benefit Accounting processes are used to generate liability relief journal entries from the Carrier Enrollment Services data dump transactions. Monthly, the Shared Services Center will receive the transaction detail file from ADP and ITS will load the file in the PeopleSoft Benefits Reconciliation environment. Once benefit data is loaded, institutions are notified that accounting entry creation and reconciliation may begin. 5
6 Create Benefit Accounting Entries Overview: The Create Benefit Accounting Entries process is used to generate liability relief journal entries from the Carrier Enrollment Services data dump transactions. The Create Benefit Accounting Entries process will generate accounting entries for active employees in the PERS_SERV_BOR and HR_ACCTG_LINE tables that are processed by PeopleSoft Financials and brought into the General Ledger. Additionally, the process will cross walk benefit plans to payroll deduction codes so that all liability and cash disbursement transactions can be tracked at an employee/deduction code level. In the event a cross walk does not exist, the process will allow users to correct errors prior to populating the accounting lines, insuring the accounting entry detail reconciles back to the data source. The following diagram highlights the business process flow for the Benefit Accounting Entries process: 6
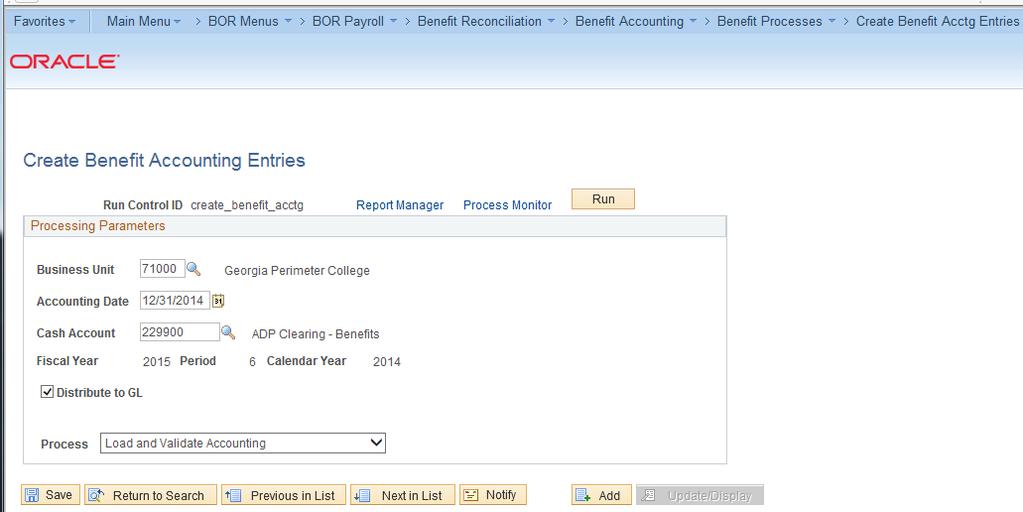
7 Procedure The steps required to Create Benefit Accounting Entries are: Step 1. Navigate to BOR Menus > BOR Payroll > Benefit Reconciliation > Benefit Accounting > Benefit Processes > Create Benefit Acctg Entries 2. Click the Add a New Value tab to create a new Run Control ID. 3. Enter "create_benefit_acctg" in the Run Control ID field. 4. Click the Add button. 7
8 Step 5. Enter the institution business unit number in the Business Unit field. 6. Enter the date in the Accounting Date field. Normally, this date would be the last day of the month for which the benefits were accrued. Once the accounting date is populated, the fiscal year, accounting period and calendar year will auto-populate. Note: The accounting date will become the journal date in the ACTUALS ledger at the time this process is run. All benefit reconciliation processes should be completed and journals posted before the accounting period is closed for efficient benefit reconciliation of GL accounts. 7. Enter the appropriate account in the Cash Account field. Note: Best practice is to use the ADP Clearing-Benefits liability account Since the process is run in one accounting period and the benefits impound is in a subsequent accounting period, using the benefits liability account instead of institutional cash account reduces impact on bank reconciliation for the institution. 8. Distribute to GL check box is on. The Distribute to GL flag determines whether a transaction will be sent to the general ledger 9. Process selection is Load and Validate Accounting 10. Click the Save button. 11. Click the Run button. 12. Click the OK button. 13. Click the Process Monitor link. 8
9 9

10 Step 13. Once the process monitor indicates this process is complete any mapping errors must be corrected before accounting entries may be created and journal generated. Note: When mapping errors exist the process monitor will show the run status as Warning. If no mapping errors exist the run status will show as Success. 10
11 Load Benefit Error Corrections Overview: Once error correction is complete, the Create Benefit Accounting Entries process has to be executed again in order to load the error corrections. The Load Error Corrections process will extract corrected transactions from the BOR_ADP_CES_ERR table and insert them into the BOR_ADP_CES_TMP table. If all errors are corrected, PERS_SERV_BOR and HR_ACCTG_LINE will be populated with balanced accounting entries. As discussed in the Load / Validate Benefit Accounting entries, the following steps outline the process required to create Benefit Accounting Lines: 1) Load and Validate the Benefit Accounting Lines 2) Correct Benefit Errors or Benefit Mass Error Correction 3) Load Error Corrections 4) Validate Benefits Data Load 5) Journal Generate, Edit, Budget Check and Post Benefit Accounting Lines This process reviews the steps required to Load Benefit Error Corrections. Prerequisite: Load / Validate Benefit Accounting Lines Related Processes (1): Correct Benefit Errors Related Processes (2): Benefit Mass Error Correction 11
12 Procedure The steps required to Load Error Corrections are: Step 1. Navigate to BOR Menus > BOR Payroll > Benefit Reconciliation > Benefit Accounting > Benefit Processes > Create Benefit Acctg Entries. 2. Enter the institution business unit in the Business Unit field. 3. Enter "create_benefit_acctg" in the Run Control ID begins with field on the Find an Existing Value tab. (use the same run control ID used to create benefit accounting entries). Note: The Run Control ID begins with field may be left blank to search for all values. 4. The Accounting Date field should be pre-populated with the current benefit accounting entries load date. 5. The Cash Account field should be pre-populated with the account used in the current benefit accounting load. 6. Fiscal year, Period and Calendar year fields should be pre-populated from the current benefit accounting entries load date. 7. Distribute to GL check box is checked on. 8. Process selection is Load Error Corrections. Note: This should be pre-populated if all errors have been corrected. 9. Click the Save button. 10. Click the Run button. 11. Click the OK button. 12. Click the Process Monitor link. 13. To validate that the data successfully loaded run the Personal Services Detail query on the appropriate date range and account range for current reconciling period. Select all or one Empl ID to validate data processed accurately. Use the wildcard % for Transaction Code. 12
13 13
14 Purge Benefit Accounting Entries (optional) Overview: In the event there is a need to start the accounting entry process over again, the Purge Benefit Accounting Line Creation process allows users to purge all transaction tables for a given business unit and accounting period. Prerequisite: Load / Validate Benefit Accounting Lines Prerequisite: Benefit Accounting Error Correction Related Processes: Benefit Mass Error Correct Related Processes: Delete CES Journal (if created) 14
15 Procedure The steps required to Purge Benefit Accounting Lines are: Step 1. Navigate to BOR Menus > BOR Payroll > Benefit Reconciliation > Benefit Accounting > Benefit Processes > Create Benefit Acctg Entries 2. Enter the institution business unit in the Business Unit field. 3. Enter "create_benefit_acctg" in the Run Control ID begins with field on the Find an Existing Value tab. (Use the same run control ID used to create benefit accounting entries.) Note: The Run Control ID begins with field may be left blank to search for all values. 4. The Accounting Date field should already be pre-populated based on the accounting entries loaded and errors corrected. 5. The Cash Account field should be pre-populated with the account used in the current benefit accounting load and error correction load. 6. Fiscal year, Period and Calendar year fields should be pre-populated from the current benefit accounting entries load date. 7. Distribute to GL check box is checked on. 8. Click the Process Purge Accounting Entries list item. Note: All errors must to be corrected before accounting entries will be created. 9. Click the Save button. 10. Click the Run button. 11. Click the OK button. 15
16 16

17 Step 12. Click the Process Monitor link. 13. Once the purge process successfully completes, the Create Benefit Accounting Entries process may be started again. 17
18 Benefit Error Correction Overview: The Benefit Error Correction component is used when an institution needs to correct invalid deduction plans, fund codes or account codes created during the Create Benefit Accounting Entries process. Benefit Accounting Errors typically occur during the mapping process from the benefit plan to the payroll deduction. In most instances, the Benefit Accounting Entry process successfully completes the mapping activity, however, there may be instances when the benefit plan and deduction code mapping is incomplete or the benefit election table is out of sync with the online benefit enrollment. In those instances, error correction is required in order to account for all benefit payments. The mapping process logic is as follows: 1) Select the payment made by benefit plan 2) Derive the deduction codes associated with the benefit Plan 3) Review the benefit elections to determine what deduction code is associated with the employee 4) Review the deduction class table to determine the fund and account associated with the deduction code Once all errors have been corrected, The Benefit Accounting Entry process must be executed again to load the corrections and generate the accounting entries in HR_ACCTG_LINE and PERS_SERV_BOR 18
19 Procedure The steps required to correct Benefit Accounting Errors are: Step 1. Navigate to BOR Menus > BOR Payroll >Benefit Reconciliation > Benefit Accounting > Benefit Process > Benefit Acctg Error Correction. 2. Enter the institution business unit in the Business Unit field. 3. Click the Search button to view mapping errors. 4. In order to view deduction codes associated with benefit plans, Click the View Plan button. 5. A new window will be displayed. Once the value needed to correct the errors has been obtained (Copy/paste may be used), close the window. 6. Enter/paste the appropriate deduction code in the Deduction Code field. Once the value is entered in the Deduction Code field, PeopleCode will be executed to retrieve the fund code and the account value. Note: Once populated, institutions have the ability to override the account value. 7. If an institution is unsure of the correct Deduction Code to use, the benefit elections can also be displayed from the Benefit Acctg Error Correction component. In order to view benefit data, Click the View Winflex button. 8. A new window will open. Review the benefit election and determine the correct deduction code to use in the Benefit Acctg Error Correction component (Copy/paste may be used), close the window. 9. Once the value entered in the Deduction Code field, PeopleCode will be executed to retrieve the fund code and the account value. 10. Repeat these steps until all errors are corrected. Save the panel. Note: In order for the Benefit Accounting Entries to be created, the Error Status should be None for all distribution lines. 19
")
20 Benefit Accounting Error Correction (before error corrections) Benefit Accounting Error Correction (after error corrections) 20
21 Benefit Mass Error Correction Overview: Benefit Mass Error Correction utility is used when an institution has a number of deduction plans, fund codes or accounts in error that have similar characteristics. Using this page prevents institutions from updating lines one transaction at a time. Benefit Accounting errors typically occur during the mapping process from the benefit plan to the payroll deduction. In most instances, the Benefit Accounting Entry process successfully completes the mapping activity. However, there may be instances when the benefit plan and deduction code mapping is incomplete or the benefit plan is out of sync with the online benefit enrollment. In those instances, manual correction is required in order to account for all benefit payments. The mapping process logic is as follows: 1) Select the payment made by benefit plan 2) Derive the deduction codes associated with the benefit plan 3) Review the benefit elections to determine the deduction code associated with the employee 4) Review the deduction class table to determine the fund and account associated with the deduction code Once all errors have been corrected, the Benefit Accounting Entry process must be executed again to load the corrections and generate the accounting entries in HR_ACCTG_LINE and PERS_SERV_BOR 21

22 Procedure The steps required to perform Benefit Mass Error Correction for the Benefit Accounting Entry interface are: Step 1. Navigate to BOR Menus > BOR Payroll > Benefit Reconciliation > Benefit Accounting > Benefit Processes > Benefit Mass Error Correction. 22

23 Step 2. Enter the institution business unit in the Business Unit field. 3. Once the business unit field is populated, tab out of the field. This will execute the logic necessary to enable the Benefit Plan ID field. 4. The Benefit Plan ID prompt is limited to the benefit plans that contain errors in the Benefit Accounting Error table. When no plans are available, the institution can assume all errors have been corrected 23

24 Step 5. Select the first Benefit Plan ID in the error list. The plan description populates once a Benefit Plan ID has been selected. 6. Click the View Plan link. The View Plan hyperlink may be utilized if an institution is unsure which deduction codes are associated with a benefit plan. A new window will open and the Benefit Plan to Deduction Code mapping component will be displayed (copy/paste may be used), close the window. 7. Enter/paste the appropriate deduction code in the Deduction Code field. Once the value is entered in the Deduction Code field, PeopleCode will be executed to retrieve the fund code and the account value. 8. The Record Type field is used to distinguish between Employee and Employer transactions. Accounting for employee benefit liabilities is different based on the type of record. Employee liabilities are in a range beginning with 22XXXX accounts. Employer liabilities are in a range beginning with 235XXX accounts. 24

25 Step 9. Once all values are populated the system is ready to update the errors. Click the Update Benefit Errors button. 10. If the update is successful, the institution will be transferred back to the Mass Error Correction page in order to correct another series of errors. 11. To verify no errors exist click the Correct Benefit Acctg Errors link. 12. Enter the institution business unit in the Business Unit field. 13. Click the Search button. 14. Verify the updates have taken place and no other errors need correcting by checking the error status column. None will be populated for all corrected errors. 25
26 26
27 Journal Generate Benefit Accounting Entries Overview: Institutions can create journal entries in the General Ledger once the benefit accounting entries have been created, errors corrected and data validated. An accounting entry definition has been created (PYRLCEDEF) to isolate the Benefit Accounting Entries. Benefit journal entries can be identified by the Journal ID Mask of CES and a journal source of PAY. Note: The creation of these entries will not be included in the nightly batch schedule as institutions expressed a desire to run the process on demand. Prerequisite: Load / Validate Benefit Accounting Lines Prerequisite: Load Error Corrections Prerequisite: Run the Personnel Services Detail query to validate data Related Process: Journal Edit, Budget Check and Post 27
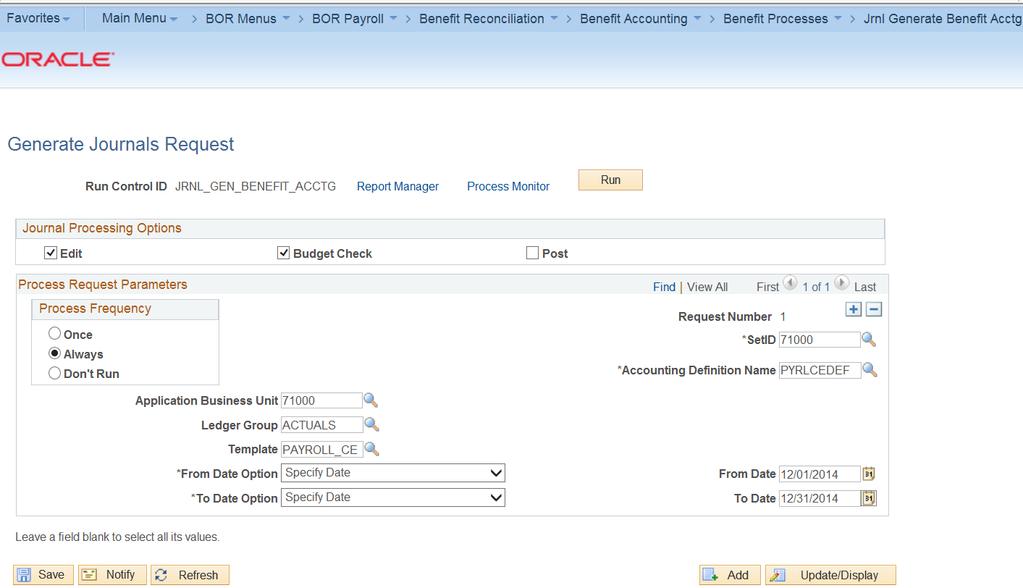
28 Procedure The steps required to create the Benefit Accounting journal entries are: Step 1. Navigate to BOR Menus > BOR Payroll > Benefit Reconciliation > Benefit Accounting > Benefit Processes > Jrnl Generate Benefit Acctg 2. Click the Add a New Value tab. 3. Enter "JRNL_GEN_BENEFIT_ACCTG" in the Run Control ID field. 4. Click the Add button. 5. Journal Processing Options are institution specific. Generally Edit and Budget Check boxes are checked on, but NOT Post. 6. Click the Always option on for Processing Frequency 7. Enter the institution SETID in the SetID field. 8. Enter/Select "PYRLCEDEF" in the Accounting Definition Name field. Note: The creation of a new accounting entry definition prevents any other journal generation process from picking up benefit accounting lines. 9. Enter the institution business unit in the Application Business Unit field. 10. Enter ACTUALS in the Ledger Group field. 11. Enter PAYROLL_CE in the Template field. 12. Enter Specify Date in the From Date Option field. 13. Enter the begin date of the month the benefit acctg data loaded in the From Date field. 14. Select Specify Date in the To Date Option field. 15. Enter the end date of the month the benefit acctg data loaded in the To Date field. 16. Click the Save button. 17. Click the Run button. 18. Click the OK button. 28
29 29

30 Step 19. Click the Process Monitor link. 20. Click in the Details column of the completed journal generate process. 30
31 Step 21. Click the Message Log link. 31
32 Step 22. Review the message log. There should be a message stating 1 journal entry has been created. The journal number and date should be shown. Note: Go to Main Menu > General Ledger > Journals > Journal Entry > Create/Update Journals to review, submit and print journal. 32
33 Build Benefit Reconciliation Reporting Table Overview: The Benefit Reconciliation Report Build process extracts benefit liability accruals and payments into two temporary tables from the PERS_SERV_BOR table. Queries and reports have been created to give institutions quick access to identify and correct differences between benefit enrollment and payroll deductions. Institutions should run the process after all payroll related accounting transactions have been processed each month. In the event an institution is behind in reconciling, multiple months may be reconciled at one time. Prerequisites: Payroll to GL interfaces for reconciling month are complete. Prerequisites: Benefit Accounting processes for reconciling month are complete. 33
34 Procedure The steps required to build the Benefit Reporting Table are: Step 1. Navigate to BOR Menus > BOR Payroll > Benefit Reconciliation > Benefit Accounting > Benefit Processes > Create Benefit Reporting Table 2. Click the Add a New Value tab to create a new Run Control ID. 3. Enter "create_reporting_table" in the Run Control ID field. 4. Click the Add button. 34

35 Step 5. Enter the institution business in the Business Unit field. 6. The begin and end dates filter the payroll transaction activity extracted from PERS_SERV_BOR. Logically, the begin date should be the first day of an accounting period and the end date should be the last day of an accounting period. Note: Institutions have the ability to reconcile multiple months of data at one time; however it is recommended institutions reconcile monthly. 7. Enter the first day of the reconciling month in the Begin Date field. 8. Enter the last day of the reconciling month in the End Date field. 9. Click the Save button. 10. Click the Run button. 11. Click the OK button. 35

36 Step 12. Click the Process Monitor link. 13. Note: This process can complete with a Warning status. The warning status indicates there are variances in the reconciling process. These errors are reported in the reconciliation queries and reports. 36

37 Benefit Plan Deduction Code Mapping Overview: The Benefit Plan to Deduction Code Mapping allows institutions to view/add or delete benefit plan ID s and their associated deduction codes. Procedure The steps required to view/add or delete benefit plan ID s are: Step 1. Navigate to BOR Menus > BOR Payroll > Benefit Reconciliation > Benefit Accounting > Benefit Processes > Benefit Plan Deduct Code Map 2. Enter the Benefit Plan ID in the Benefit Plan ID field. 3. Click the Search button. 37
. 4. Select the appropriate tax code from the drop down box in the Taxable Code field. 5.")
38 Step 1. Click the Add a new row button at row Enter Deduction Code in the Deduction Code Field. 3. The exclude check box will exclude this row from the benefits reconciliation process (not recommended). 4. Select the appropriate tax code from the drop down box in the Taxable Code field. 5. Select the appropriate benefit type from the drop down box in the Benefit Type field. 6. Enter the appropriate benefit option based on the Benefit Plan ID in the Benefit Option field. 7. Click the Save button. 38
39 39
40 Benefit Inquiry/Reports Reconciliation queries and reports have been developed to assist institutions with benefit reconciliation and variance correction. The queries and reports may be run after the Benefit Accounting processes are completed and the Create Benefit Reporting table is run. 40

41 Benefit Recon Errors (Aug May) query Overview: The Benefit Recon Errors (Aug-May) query displays employees, deduction codes and amounts where the payroll liability accrual is not equal to the benefit premium payment. For each variance an institution will have to determine what adjustments will be required to zero out the variance. In most instances, a pay line adjustment or an online payroll adjustment entry will be required. The query output will not include variances for faculty members for the months of June and July as their benefits were accrued during the January to May timeframe. Not all reconciling items will be displayed in this query. If faculty members transfers or terminate during the June and July timeframe, manual adjustments may be required. Prerequisite: Create Benefit Accounting Entries to completion Prerequisite: Create Benefit Reporting Table to success Procedure The steps required to initiate the Benefit Recon Errors (Aug to May) query are: Step 1. Navigate to BOR Menus > BOR Payroll > Benefit Reconciliation > Benefit Accounting > Benefit Inquiry/Reports > Benefit Recon Errors (Aug-May) 2. Enter the institution business unit in the Business Unit field. 3. Click the View Results button. 4. Review the results and/or download to Excel to begin the reconciliation process. 41

42 42
43 Benefit Reconciliation Detail Query Overview: The Benefit Reconciliation Detail query displays employees, deduction codes and amounts for all payroll accruals and benefit premium payments for a given time frame. Institutions are encouraged to utilize this query in conjunction with Microsoft Excel pivot tables in order to perform interactive reconciliation activities. In most instances, when variances are discovered, a pay line adjustment or online payroll adjustment entry will be required. Prerequisite: Create Benefit Accounting Entries to completion Prerequisite: Create Benefit Reporting Table to success Procedure The steps required to run the Benefit Reconciliation Detail query are: Step 1. Navigate to BOR Menus > BOR Payroll > Benefit Reconciliation > Benefit Accounting > Benefit Inquiry/Reports > Benefit Reconciliation Detail 2. Enter the institution business unit in the Business Unit field. 3. Enter "%" (wildcard) in the EmplID field. This query supports wildcarding. If an institution desires the detail for all employees, enter % in the EMPL ID field. Note: Larger institutions may have to use the schedule query function as the detail output can produces a large number of rows. 4. Click the View Results button. 5. Click the Excel Spreadsheet link. 43

44 44
45 Benefit Premium Recon Report Overview: The Benefit Premium Recon Report is used by institutions to identify differences between payroll withholdings and benefit premium payments. The report allows institutions to run for a specific deduction code or all deduction codes. Additionally, users can specify an option to only see instances where the withholding does not equal the payment. Prerequisite: Create Benefit Accounting Entries to completion Prerequisite: Create Benefit Reporting Table to success Procedure The steps required to execute the Benefit Premium Reconciliation Report (full detail) are: Step 1. Navigate to BOR Menus > BOR Payroll > Benefit Reconciliation > Benefit Accounting > Benefit Inquiry/Reports > Benefit Premium Recon RPT 2. Click the Add a New Value tab. 3. Enter "benefit_recon_rpt" in the Run Control ID field. 4. Click the Add button. 45
46 Step 5. Enter the institution business unit in the Business Unit field. 6. Note: Users are not required to enter a deduction code. If the field is left blank, the report will be executed for all deduction codes. Note: The Reporting Begin and End Dates are populated based on the Create Benefit Reporting Table dates. 7. Click the Report Only Variances checkbox. 8. Click the Save button. 9. Click the Run button. 10. Report in PDF format is generated in the Process Monitor 46

47 Faculty Pay Group Members Query Overview: The Faculty Pay Group Members query is populated when the Create Benefit Accounting Entries process is executed. The query lists the employees that make up the Faculty pay group for an institution. The list of employees is assembled based on the employees who exist in the PERS_SERV_BOR table for the month the Create Benefit Accounting Entries is run. The query should be used to validate reconciliation issues stemming from the 7/5th's benefit proration during the months of January to May. Prerequisite: Create Benefit Accounting Entries Procedure The steps required to execute the Faculty Pay Group Members query are: Step 1. Navigate to BOR Menus > BOR Payroll > Benefit Reconciliation > Benefit Accounting > Benefit Inquiry/Reports > Faculty Pay Group Members 2. Enter the institutional business unit in the Business Unit field. 3. Click the View Results button. 4. Note: This data is based on the Create Benefit Accounting Entries data and not the pay group field from job data. 47
 and premium amounts (shown as positive amounts) processed in the Benefit Accounting process then show the sum net total")
48 7/5ths Reconciliation Jan-Jul Query Overview: 7/5ths Reconciliation Jan-Jul query lists the employees that are in Pay Groups F, J and X for an institution. The query will sum each month s payroll deductions (shown as negative amounts) and premium amounts (shown as positive amounts) processed in the Benefit Accounting process then show the sum net total by adding all premium amounts less the payroll deductions. This sum net total will provide the outstanding balance amount as of the date the Create Benefit Reporting Table process has been run. The query may be used to validate reconciliation issues stemming from the 7/5th s benefit proration during the months of January to May. Prerequisite: Create Benefit Accounting Entries completion Prerequisite: Create Benefit Reporting Table completion Procedure The steps required to execute the 7/5ths Reconciliation Jan-Jul query are: Step 1. Navigate to BOR Menus > BOR Payroll > Benefit Reconciliation > Benefit Accounting > Benefit Inquiry/Reports > 7/5ths Reconciliation Jan-Jul query 2. Enter the institutional business unit in the Business Unit field. 3. Enter the calendar year in the Year field. 4. Click the View Results button. 48

49 Benefit Deduction Code Mapping Query Overview: The Benefit Deduction Code Mapping query provides a complete mapping list of benefit plans, liability accounts, plan ID s and associated deduction codes. The query will be useful in providing a complete mapping listing to aide in entering deduction codes for error correction. Procedure The steps required to run the Benefit Deduction Code Mapping query are: Step 1. Navigate to BOR Menus > BOR Payroll > Benefit Reconciliation > Benefit Accounting > Benefit Inquiry/Reports > Benefit Deduction Code Mapping query 2. Enter the deduction code in the Deduction Code field. Note: Query lists all Benefit Deduction Code Mapping with the associated data fields by using the (%) wild card 3. Click the View Results button. 49

50 Account Progression Report Overview: The Account Progression Report is an online query that provides detail journal line data for a requested account and date range in a meaningful format, rather than the standard General Ledger Activity reports. The Account Progression Report provides access to journal data that may not be available to users via alternate menus. The data contained in the report is taken from the PERS_SERV_BOR table based on the Benefit Accounting processes completion. The report may be used to assist users in identifying variances in an account or as supporting documentation for the reconcilement processes. Procedure The steps required to execute the Account Progression Report are: Step 1. Navigate to BOR Menus > BOR Payroll > Benefit Reconciliation > Benefit Accounting > Benefit Inquiry/Reports > Account Progression Report 2. Enter the business unit in the Business Unit field. 3. Enter the first account of your range of accounts in the From Account field. 4. Enter the last account of your range of accounts in the To Account field. 5. Enter the earliest date of your date range in the From Date field. 6. Enter the last date of your date range in the To Date field. 7. Click the View Results button. 50

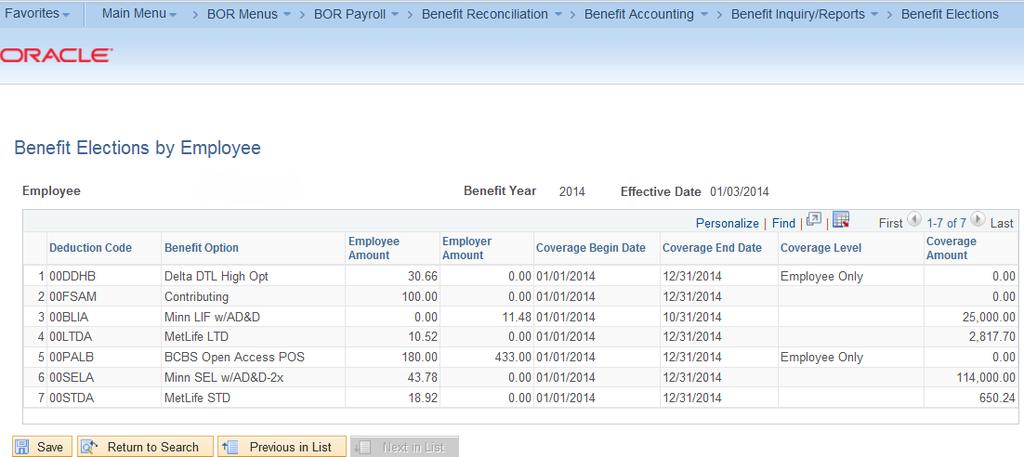
51 Benefit Elections Inquiry Overview: The Benefit Elections inquiry screen is a view of the EV5 Winflex table. The data in the screen gets refreshed daily at 5:00AM from the ADP Reporting System. Institutions may utilize the component to determine the benefit enrollment for an individual when Benefit Accounting Entry errors occur. Additionally, they can investigate reconciliation issues. Prerequisites: None Procedure The steps required to view the Benefit Elections component are: Step 1. Navigate to BOR Menus > BOR Payroll > Benefit Reconciliation > Benefit Accounting > Benefit Inquiry/Reports > Benefit Elections 2. Enter the Empl ID in the Empl ID field. 3. Click the Search button. 4. Select the appropriate benefit effective date to view employee s benefit elections. 51
52 52
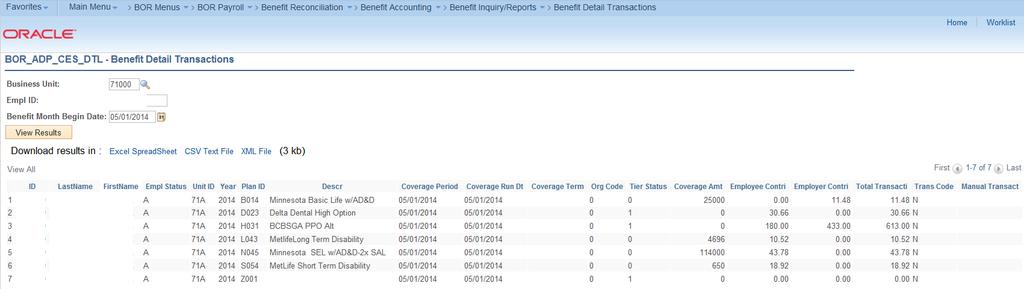
53 Benefit Detail Transaction Query Overview: The Benefit Detail Transactions query provides a listing of the data lines loaded by the Benefit Table Load process which contains benefit enrollment data and associated costs. This query is utilized by institutional users who do not have ready access to the data from the source payroll system and/or the data dump file. Prerequisite: Create Benefit Accounting Entries completion Prerequisite: Create Benefit Reporting Table completion Procedure The steps required to execute the Benefit Detail Transaction query are: Step 1. Navigate to BOR Menus > BOR Payroll > Benefit Reconciliation > Benefit Accounting > Benefit Inquiry/Reports > Benefit Detail Transactions 3. Enter the Empl ID in the Empl ID field. Note: Query lists all Empl ID s when using the (%) wild card 4. Enter the first day of reporting month in the Benefit Month Begin Date field. 5. Click the View Results button. 53
54 54
55 RETIREE BENEFIT ACCOUNTING 55
56 Retiree Benefit Processes Retiree Benefit Accounting in PS Financials includes the creation of accounting entries for retirees, COBRA participants and employees on Leave of Absence (LOA) with benefits. Retiree Benefit Accounting is used to process non-active employee data from the Carrier Enrollment Services data dump transactions. The employer costs will be entered as expenses and the employee costs from the file will be entered as receivables. Monthly, the Shared Services Center will receive the transaction detail file from ADP and ITS will load data into the PeopleSoft Benefit Reconciliation environment. Once the file is loaded institutions are notified that accounting entry creation and reconciliation may begin. 56
57 Create Retiree Benefit Accounting Entries Overview: The Create Retiree Benefit Accounting Entries process is used to generate liability relief journal entries from the Carrier Enrollment Services data dump transactions for non-active participants. The Retiree Benefit Accounting line process (BOR_RETACCT) will generate accounting entries in the PERS_SERV_BOR and HR_ACCTG_LINE tables that can be processed by PeopleSoft Financials and brought into the General Ledger. Additionally, the process will cross walk benefit plans to payroll deduction codes so that all liability and cash disbursement transactions can be tracked at a participant/deduction code level. The expense distribution is based on the job earnings distribution for the participant. In the event a cross walk does not exist, the process will allow users to correct errors prior to populating the accounting lines, insuring the accounting entry detail reconciles back to the data source. The following steps outline the process required to load Retiree Benefits Accounting Lines 1) Load and Validate the Retiree Benefits Accounting Lines 2) Correct RET Errors 3) Load Error Corrections 4) Download the BANNER SLOA file for employees on Leave of Absence (LOA) 5) Journal Generate, Edit, Budget Check and Post Retiree Benefits Accounting Lines Prerequisite: Receive Data Dump Load Notification 57
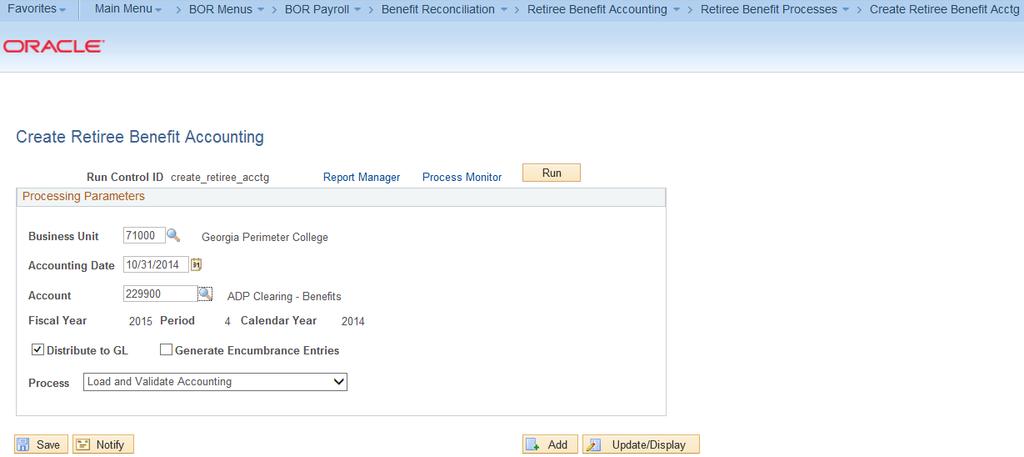
58 Procedure The steps required to Create Retiree Benefit Accounting Entries are: Step 1. Navigate to BOR Menus > BOR Payroll > Benefit Reconciliation > Retiree Benefit Accounting > Retiree Benefit Processes > Create Retiree Benefit Acctg 2. Click the Add a New Value tab to create a new Run Control ID. 3. Enter "create_retiree_acctg" in the Run Control ID field. 4. Click the Add button. 58
59 Step 5. Enter the institution business unit in the Business Unit field. 6. Enter the date in the Accounting Date field. Normally, this date would be the last day of the month for which the benefits were accrued. Once the accounting date is populated, the fiscal year, accounting period and calendar year will auto-populate. Note: The accounting date will become the journal date in the ACTUALS ledger at the time this process is run. All retiree benefit reconciliation processes should be completed and journals posted before the accounting period is closed in order for accurate benefit reconciliation of GL accounts. 7. Enter the appropriate account in the Cash Account field. Note: Best practice is to use the ADP Clearing-Benefits liability account Since the process is run in one accounting period and the benefits impound is in a subsequent accounting period, using the benefits liability account instead of institutional cash account reduces impact on bank reconciliation for the institution. 8. Distribute to GL check box is on. The Distribute to GL flag determines whether a transaction will be sent to the general ledger 9. Process selection is Load and Validate Accounting 10. Click the Save button. 11. Click the Run button. 12. Click the OK button. 13. Click the Process Monitor link. 59
60 60

61 Step 14. Once the Process Monitor indicates the process is complete any mapping errors must be corrected before accounting entries may be created and journal generated. 15. Review Log/Trace file to determine if any mapping errors exist and need correcting. 61
62 62
63 Load Benefit Error Corrections Overview: Once error correction is complete, the Create Retiree Benefit Accounting Entries process has to be executed again in order to load the error corrections. The Load Error Corrections process will extract corrected transactions from the BOR_ADP_CES_ERR table and insert them into the BOR_ADP_CES_TMP table. If all errors are corrected, PERS_SERV_BOR and HR_ACCTG_LINE will be populated with balanced accounting entries. This process reviews the steps required to Load Benefit Error Corrections. Prerequisite: Load / Validate Retiree Benefit Accounting Lines Related Processes (1): Correct Retiree Benefit Errors 63
64 Procedure This steps required to Load Retiree Error Corrections are: Step 1. Navigate to BOR Menus > BOR Payroll > Benefit Reconciliation > Retiree Benefit Accounting > Retiree Benefit Processes > Create Retiree Benefit Acctg 2. Enter "create_retiree_acctg" in the Run Control ID begins with field on the Find an Existing Value tab. Note: The Run Control ID begins with field may be left blank to search for all values. 3. Click the Search button. 4. The Business Unit field should be pre-populated based on user security. 5. The Accounting Date field should be pre-populated with the current benefit accounting entries load date. 6. The Cash Account field should be pre-populated with the account used in the current benefit accounting load. 7. Fiscal year, Period and Calendar year fields should be pre-populated from the current benefit accounting entries load date. 8. Distribute to GL check box is checked on. 9. Process selection is Load Error Corrections. Note: This should be pre-populated if all errors have been corrected. 10. Click the Save button. 11. Click the Run button. 12. Click the OK button. 13. Click the Process Monitor link. 14. To validate that the data successfully loaded run the Personal Services Detail query on appropriate date range and account range for current reconciling period. Select all or one EMPLID to validate data processed accurately. Use the wildcard R% for Transaction Type. 64
65 65
66 66

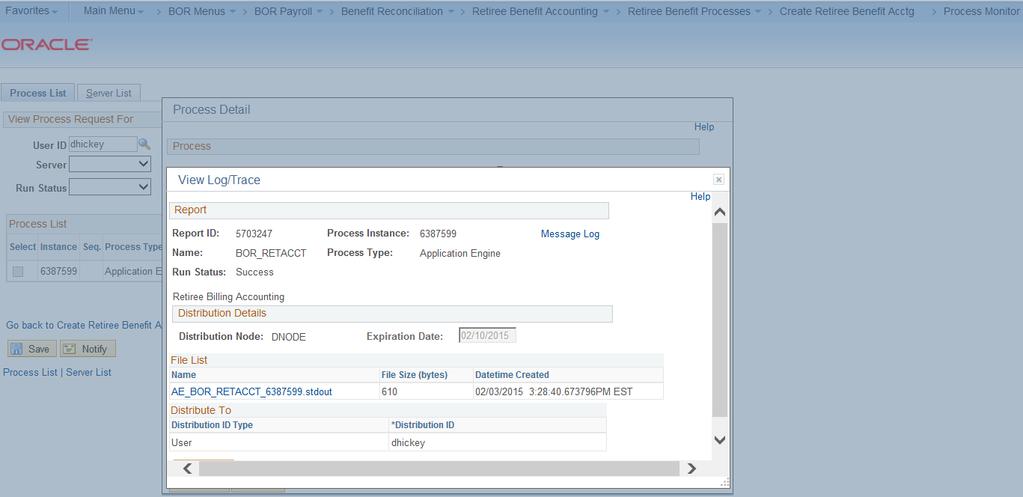
67 Step 15. Click in the Details column of the completed BOR_RETACCT process. 16. Click on the View Log/Trace link. 67

68 Step 17. A successful process creates a text file that contains benefits data for all employee status codes that are marked for EXPORT to BANNER in the Retirement Benefits Parameter page (Employees on Leave of Absence/LOA). Note: This is the file uploaded to Banner to create LOA receivable accounts and are billed manually by the institution 18. Right-click on the banner_46a.txt link to open menu 68

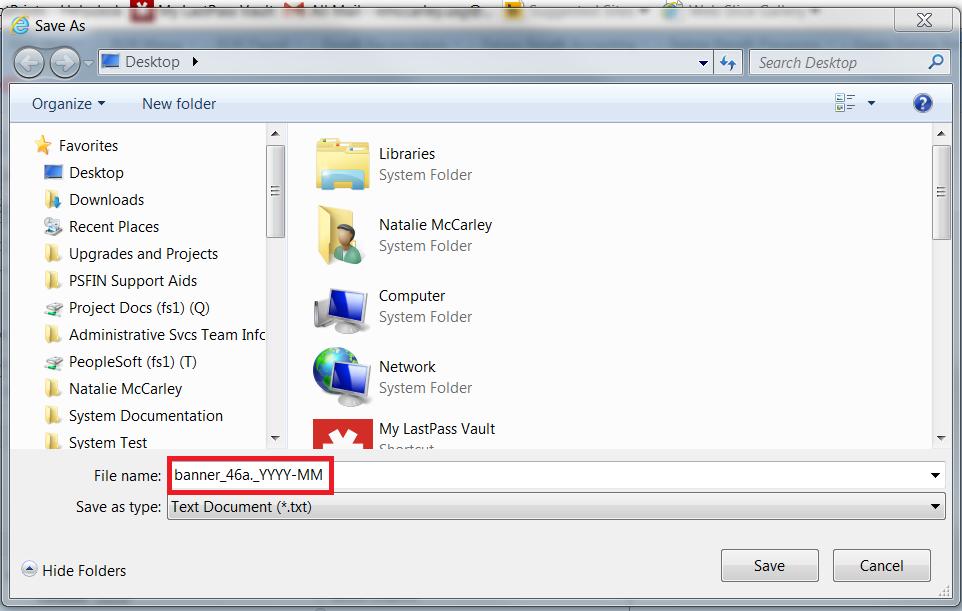
69 Step 19. Click on Save Target As (new window will open). Save the Banner SLOA text file to your computer. This is the file uploaded to Banner to create LOA receivable accounts and are billed manually by the institution. Note: File may be renamed with unique value for retention purposes 69
70 70
71 Purge Retiree Accounting Entries (optional) Overview: In the event an institution needs to start the retiree accounting entry process over again, the Purge Retiree Accounting Line Creation process allows users to purge all transaction tables for a given business unit and accounting period. Prerequisite: Load / Validate Retiree Benefit Accounting Lines Prerequisite: Retiree Benefit Error Correction Prerequisite: Delete retiree benefit journal (if already created) Procedure The steps required to Purge Retiree Accounting are: Step 1. Navigate to BOR Menus > BOR Payroll > Benefit Reconciliation > Retiree Benefit Accounting > Retiree Benefit Processes > Create Retiree Benefit Acctg 2. Enter "create_retiree_acctg" in the Run Control ID begins with field on the Find an Existing Value tab. Note: The Run Control ID begins with field may be left blank to search for all values. 3. Click the Search button. 71
72 72
73 Step 4. The Business Unit field should be pre-populated based on user security. 5. The Accounting Date field should be pre-populated with the current benefit accounting entries load date. 6. The Cash Account field should be pre-populated with the account used in the current benefit accounting load. 7. Fiscal year, Period and Calendar year fields should be pre-populated from the current benefit accounting entries load date. 8. Distribute to GL check box is checked on. 9. Process selection is Purge Accounting Entries. 10. Click the Save button. 11. Click the Run button. 12. Click the OK button. 13. Click the Process Monitor link. 73

74 Step 14. Click on the Details link of the completed BOR_RETACCT process in the Process Monitor. 74
75 Step 15. Click on the Message Log link. 75
76 Step 16. If Purge process is successful message log will indicate tables purged. 76
77 Retiree Benefit Error Correction Overview: The Retiree Benefit Error Correction component is used when an institution needs to correct invalid deduction codes, fund codes or account codes in the Retiree Benefit Process. Retiree Benefit Accounting errors typically occur during the mapping process from the benefit plan to the payroll deduction or when a match is not found for the retiree s (job) earnings distribution (JED). In most instances, the Retiree Accounting Entry process successfully completes the mapping activity, however, there may be instances when the benefit plan and deduction code mapping is incomplete or the benefit election table is out of sync with the benefits enrollment. In those instances, error correction is required in order to account for all retiree charges. The mapping process logic is as follows: 1) Select the payment made by benefit plan 2) Derive the deduction codes associated with the benefit plan 3) Review the benefit elections to determine what deduction code is associated with the employee 4) Review the deduction class table to determine the fund and account associated with the deduction code 5) Review the job earnings distribution to select the appropriate account code. Once all errors have been corrected, the Create Retiree Benefit Accounting process must be executed again to load the corrections and generate the accounting entries in HR_ACCTG_LINE and PERS_SERV_BOR Prerequisite: Create Retiree Benefit Accounting 77
78 Procedure The steps required to correct Retiree Benefit Accounting Errors are: Step 1. Navigate to BOR Menus > BOR Payroll >Benefit Reconciliation > Retiree Benefit Accounting > Retiree Benefit Process > Retiree Ben Error Correction. 2. Enter the institution business unit in the Business Unit field. 3. Click the Search button to view mapping errors. 4. In order to view deduction codes associated with benefit plans, Click the View Plan button. 5. A new window will open. Once the deduction code needed to correct the error has been obtained (copy/paste may be used), close the window to return to the retiree benefit error correction window. 6. Once the deduction code has been entered in the Deduction Code field, PeopleCode will be executed to retrieve the fund code and the account value. Once populated, institutions have the ability to override the account value. 7. If an institution is unsure of the correct deduction code to use, the benefit elections can also be displayed from the Benefit Acctg Error Correction component. In order to view benefit data, click the View Winflex button. A new window will open. Review the benefit election and determine the correct deduction code to use in the Benefit Acctg Error Correction component (copy/paste may be used). Close the window to return to the retiree benefit error correction window. 8. If there is no account code populated in the Account Code field, click the View JED button. A new window will open and the job earnings distribution lookup will display the corresponding account code for the participant. You will have to review the value on the JED page and enter it as the account code (copy/paste may be used). Close the window to return to the retiree benefit error correction window. Note: Fund code, department, program code and class code are auto-populated based on the JED code. 9. Repeat these steps until all errors are corrected. Note: In order for the Retiree Benefit Accounting Entries to be created, the Distribution Status should be None for all lines. 10. Click on Save. 78

 79")
79 Retiree Benefit Error Correction (before corrections) Retiree Benefit Error Correction (after corrections) 79
80 Build Retiree Receivable Aging Data Overview: The Build Retiree Receivable Aging Data (BOR_RETAGING) process compiles data in summary form by date ranges of 30, 60, 90 and 120 days (buckets) to be used when reconciling receivable accounts. The Build Retiree Receivable Aging Data (BOR_RETAGING) process complies data from the PERS_SERV_BOR (Personal Services Data) table by EMPLID, deduction code, date range and expended amount and inserts it into the BOR_ADP_RET_AGE table for reporting balances in the Retiree Receivable Aging online query. The data is totaled in date buckets dependent upon the As of Date selected in the processing parameters. This will allow institutions to evaluate participant s premium due amounts as of the given month end and how old the receivable amount would be. The data selected is for accounts between and , this is the range of accounts used in processing retiree data. Prerequisite: Create Retiree Benefit Accounting completion Prerequisite: Create Supplemental PDR Accounting completion 80
81 Procedure The steps required to Build Retiree Receivables Aging Data are: Step 1. Navigate to BOR Menus > BOR Payroll >Benefit Reconciliation > Retiree Benefit Accounting > Retiree Benefit Process > Build Retiree Receivable Aging Data. 2. Click the Add a New Value tab to create a new Run Control ID. 3. Enter "build_retiree_aging_tbl" in the Run Control ID field. 4. Click the Add button. 81
82 Step 5. Enter the business unit in the Business Unit field. 6. Enter the as of date in the As of Date field. Note: The As of Date should be the last day of the month of the current reconciling period and current Retiree Benefit Accounting and Supplemental PDR Accounting processes. 7. Click on Save. 8. Click the Run button. 9. Click the OK button. 10. Click the Process Monitor link. 82

83 Step 11. When the process has successfully completed retiree queries and reports may be run. 83
84 Journal Generate Retiree Benefit Accounting Entries Overview: Institutions may journal generate the retiree benefit journal entries in the General Ledger once the retiree benefit accounting entries have been created, errors corrected and data validated. New accounting entry definitions have been created (PYRLRBDEF & PYRLRNCDEF) to isolate the Retiree Benefits Accounting Entries. These journal entries can be identified by the Journal ID Mask of RB and RN (for encumbrances) and a journal source of PAY. Note: The creation of these entries will not be included in the nightly batch schedule as institutions expressed a desire to run the process on demand. Prerequisite: Load / Validate Retiree Benefits Prerequisite: Run the Personnel Services Detail Query Related Process: Journal Edit, Budget Check and Post 84
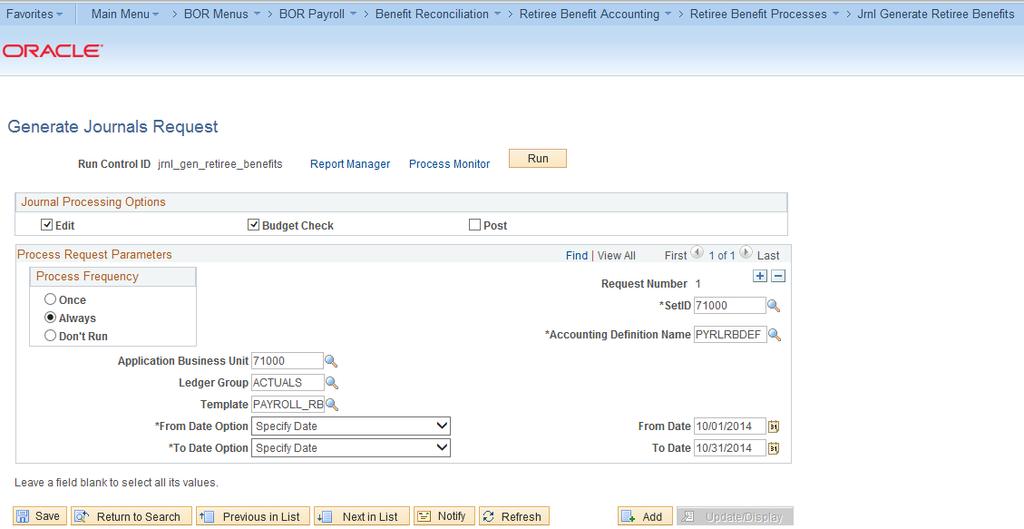
85 Procedure The steps required to Journal Generate Retiree Benefit Accounting Entries are: Step 1. Navigate to BOR Menus > BOR Payroll > Benefit Reconciliation > Retiree Benefit Accounting > Retiree Benefit Processes > Jrnl Generate Retiree Benefits 2. Click the Add a New Value tab. 3. Enter "jrnl_gen_retiree_benefits in the Run Control ID field. 4. Click the Add button. 85
86 Step 5. Journal Processing Options are institution specific. Generally Edit and Budget Check boxes are checked on, but NOT Post. 6. Click the Always option on for Processing Frequency. 7. Enter the institution SETID in the SetID field. 8. Enter/Select "PYRLRBDEF " in the Accounting Definition Name field. Note: The creation of a new accounting entry definition prevents any other journal generation process from picking up benefit accounting lines. 9. Enter the institution business unit in the Application Business Unit field. 10. Enter ACTUALS in the Ledger Group field. 11. Enter PAYROLL_RB in the Template field. 12. Enter Specify Date in the From Date Option field. 13. Enter the begin date of the month the retiree benefit acctg data loaded in the From Date field. 14. Select Specify Date in the To Date Option field. 15. Enter the end date of the month the retiree benefit acctg data loaded in the To Date field. 16. Click the Save button. 17. Click the Run button. 18. Click the OK button. 86
87 87
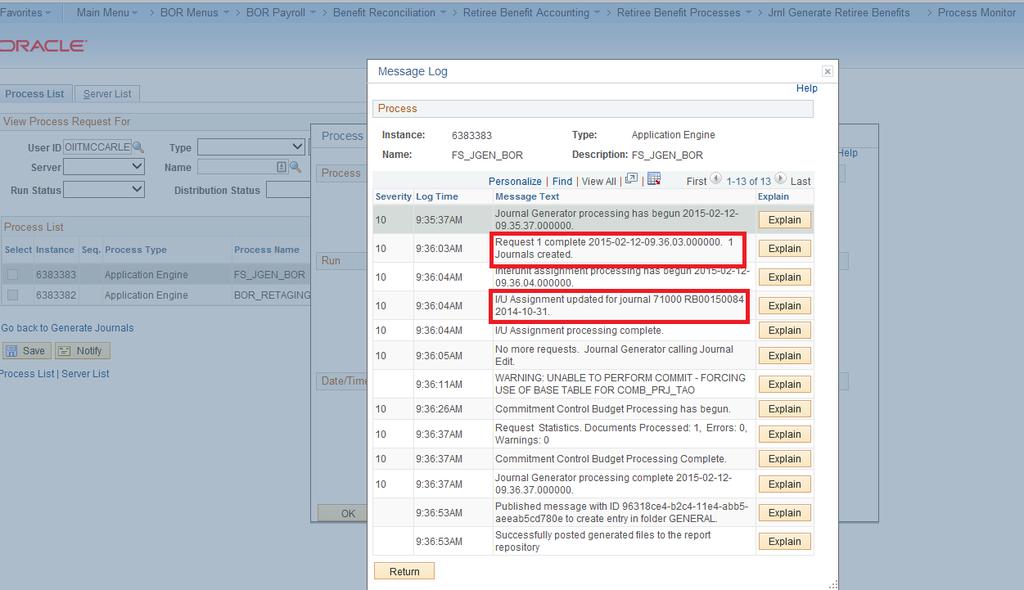
88 Step 23. Click the Process Monitor link. 24. Click in the Details link of the completed journal generate process. 88

89 Step 25. Click the Message Log link. 26. Review the message log. There should be a message stating 1 journal entry has been created. The journal number and date should be shown. Note: Go to Main Menu > General Ledger > Journals > Journal Entry > Create/Update Journals to review, submit and print journal. 89
90 90
91 Retiree Benefit Parameters Overview: The Retiree Benefit Parameters page/component is used to configure Retirement Benefits and Payment processes. The Retiree and COBRA receivable accounts are assigned by institution and by Employee Status. The data entered in the Retiree Benefit Parameters page/component is inserted into the BOR_ADP_RET_PRM table by ITS Support only. Institutional users should have read only access. The BOR_ADP_RET_PRM table has an Export to Banner File flag which lets the BOR_RETACCT process know what accounts to include in the banner_46a.txt outbound file. The BOR_ADP_RET_PRM table connects the Employee Status to the Account. The Retiree Benefit Parameters is required for Retiree Benefit Accounting processes and accurate account classification and reconcilement. 91

92 Procedure The steps required to view the Retiree Benefit Parameters are: Step 1. Navigate to BOR Menus > BOR Payroll > Benefit Reconciliation > Retiree Benefit Accounting > Retiree Benefit Processes > Retiree Benefit Parameters 2. Enter the business unit/setid in the SETID field. 92

93 Step 3. Review employee status and account parameters to determine what employee status codes will generate charges to receivable accounts. 4. Report any necessary changes to ITS at 93
94 Retiree Benefit Inquiry/Reports Reconciliation queries and reports have been developed to assist institutions with retiree benefit reconciliation and variance correction. The queries and reports may be run after the Retiree Benefit Accounting processes are completed and the Build Retiree Receivable Aging Data build is run. 94
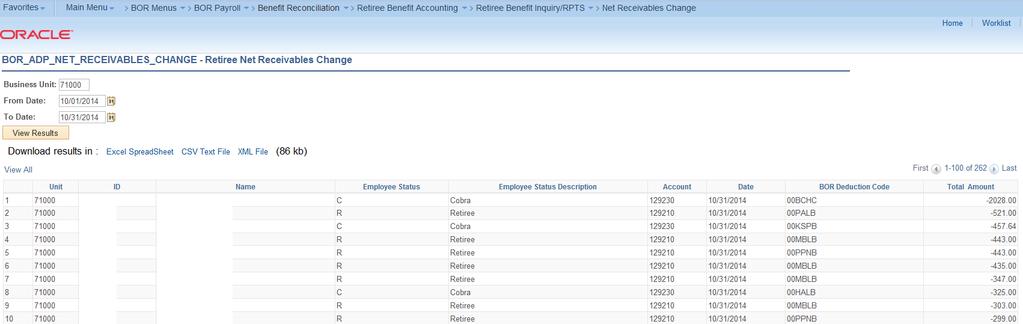
95 Net Receivables Change query Overview: The Net Receivables Change query displays the net change in a participant s receivable balance for a specified date range. The query should be run after the Retiree Benefit Accounting processes and the Supplemental PDR processes are completed. Prerequisites: Retiree Benefits Accounting process. Prerequisites: Supplemental PDR process. Prerequisites: Build Retiree Receivable Aging Data Procedure The steps required to run the Net Receivables Change query are: Step 1. Navigate to BOR Menus > BOR Payroll > Benefit Reconciliation > Retiree Benefit Accounting > Retiree Benefit Inquiry/Reports > Net Receivables Change query 2. Enter the business unit in the Business Unit field. 3. Enter the first day of the reconciling month in the From Date field. 4. Enter the last day of the reconciling month in the To Date field. 5. Click on View Results. 6. Click on Download Results in Excel Spreadsheet. 95
96 96
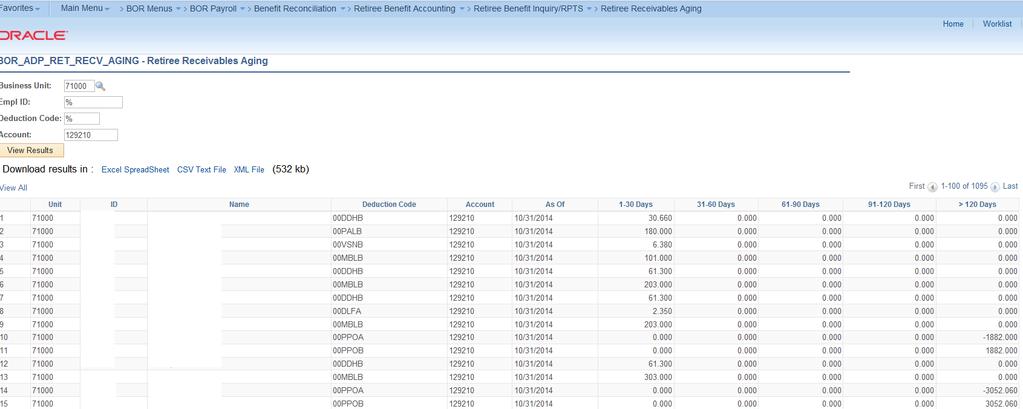
97 Retiree Receivable Aging query Overview: The Retiree Receivables Aging query takes the data compiled in the Build Retiree Receivable Aging Data (BOR_RETAGING) process and totals in summary form by Empl ID and Deduction Code by date ranges of 30, 60, 90 and 120 days (buckets). This query will allow the user to evaluate employees premium due amounts as of the given month end and how old the receivable amount would be. The data selected is for accounts between 129% and , this is the range of accounts used in processing retiree data. Pivot tables may be created to use for reconciliation purposes Prerequisites: Retiree Benefits Accounting process. Prerequisites: Supplemental PDR process. Prerequisites: Build Retiree Receivable Aging Data Procedure The steps required to run the Retiree Receivables Aging query are: Step 1. Navigate to BOR Menus > BOR Payroll > Benefit Reconciliation > Retiree Benefit Accounting > Retiree Benefit Inquiry/Reports > Retiree Receivables Aging query 2. Enter the business unit in the Business Unit field. 3. Enter the Empl ID in the Empl ID field. Note: Query lists all Empl ID s when using the (%) wild card. 4. Enter the deduction code in the Deduction Code field. Note: Query lists all Deduction Codes when using the (%) wild card. 5. Enter the account in the Account field. Note: Query lists all Receivable Accounts when using the (%) wild card. 6. Click on View Results. 7. Click on Download Results in Excel Spreadsheet. 97
98 98
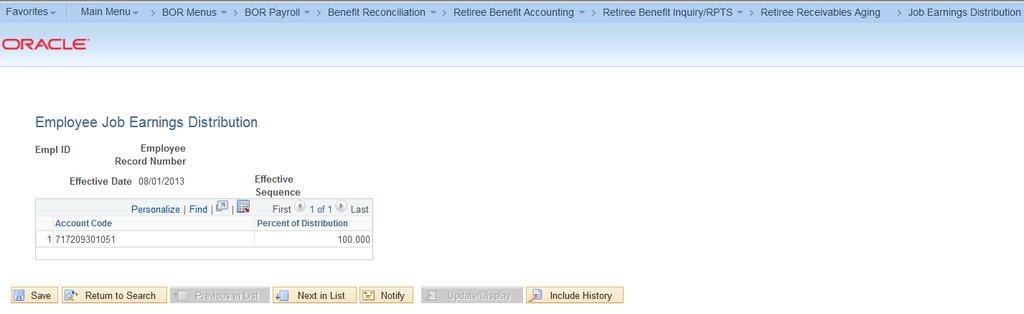
99 Job Earnings Distribution view Overview: The Job Earnings Distribution page/component is to provide institutions the ability to review employee job earnings distributions within PS Financials. In some circumstances, the retiree status on the benefit file will not match the corresponding data in the JOB table. The Job Earnings Distribution page will allow the user to lookup the appropriate account code that must be charged when booking the expenses. Prerequisites: None. Procedure The steps required to view the Job Earnings Distribution page are: Step 1. Navigate to BOR Menus > BOR Payroll > Benefit Reconciliation > Retiree Benefit Accounting > Retiree Benefit Inquiry/Reports > Job Earnings Distribution. 2. Enter the Empl ID in the Empl ID field. 99
100 100
101 Supplemental PDR Accounting Each month retirees are billed by and will remit payment to ADP s BeneDirect organization and a receivable (Open Coupon) balance will be accrued for each retiree and COBRA participant s obligation for benefits premiums. The Supplemental Premium Data Reporting (PDR) data will relieve the receivable balances created by the Retiree Benefit Accounting process. Monthly, the Shared Services Center will receive the receipt transaction detail file from BeneDirect and then ITS will load the file into the PS Financials Benefit Reconciliation module. Once the file is loaded institutions are notified that accounting entry creation and reconciliation may begin. 101
102 Create Supplemental PDR Accounting Entries Overview: The Create Supplemental PDR Accounting Entries process is a batch process to read the Supplemental PDR Load file used to process the retiree and COBRA premium receipts. This process provides a reconciliation tool to the institutions for retiree and COBRA benefit payments and outstanding balances. The following steps outline the process required to load Supplemental PDR Accounting Lines: 1) Load and Validate the Supplemental PDR Accounting Lines 2) Correct Supplemental PDR Errors 3) Load Error Corrections 4) Purge Supplemental PDR Accounting 5) Journal Generate, Edit, Budget Check and Post Supplemental PDR Accounting Lines Prerequisite: Receive Supplemental PDR Load Notification 102

103 Procedure The steps required to Create Supplemental PDR Accounting Entries are: Step 1. Navigate to BOR Menus > BOR Payroll > Benefit Reconciliation > Supplemental PDR Accounting > Supplemental PDR Processes > Create SUPPDR Acctg Entries 2. Click the Add a New Value tab to create a new Run Control ID. 3. Enter "create_supplpdr_entries" in the Run Control ID field. 4. Click the Add button. 103
104 Step 5. Enter the institution business unit in the Business Unit field. 6. Enter the date in the Accounting Date field. Normally, this date would be the last day of the month for which the benefits were accrued. Once the accounting date is populated, the fiscal year, accounting period and calendar year will auto-populate. Note: The accounting date will become the journal date in the ACTUALS ledger at the time this process is run. All supplemental PDR reconciliation processes should be completed and journals posted before the accounting period is closed in order for accurate benefit reconciliation of GL accounts. 7. Enter the appropriate account in the Cash Account field. 8. Distribute to GL check box is on. The Distribute to GL flag determines whether a transaction will be sent to the general ledger 9. Process selection is Load and Validate Accounting 10. Click the Save button. 11. Click the Run button. 12. Click the OK button. 13. Click the Process Monitor link. 104
105 105

106 Step 14. Once the process monitor indicates this process is complete any mapping errors must be corrected before accounting entries may be created and journal generated. Note: When mapping errors exist the process monitor will show the run status as Warning. If no mapping errors exist the run status will show as Success. 106

107 Step 15. Click on the details link of the completed BOR_SUPACCT process. 16. Click on the message log to confirm errors exist and need correcting. 107
108 Load Supplemental PDR Error Corrections Overview: Once error correction is complete, the Create Supplemental PDR Accounting Entries process has to be executed again in order to load the error corrections. The Load Error Corrections process will extract corrected transactions from the BOR_ADP_SUP_ERR table and insert them into the BOR_ADP_SUP_TMP table. If all errors are corrected, PERS_SERV_BOR and HR_ACCTG_LINE will be populated with balanced accounting entries. As discussed in the Load / Validate Supplemental PDR Accounting entries, the following steps outline the process required to create Supplemental PDR Accounting Lines: 1) Load and Validate the Supplemental PDR Accounting Lines 2) Correct Supplemental PDR Errors 3) Load Error Corrections 4) Journal Generate, Edit, Budget Check and Post Supplemental PDR Accounting Lines Prerequisite: Load / Validate Supplemental PDR Accounting Lines Related Processes: Correct Supplemental PDR Errors 108
109 Procedure The steps required to Load Error Corrections are: Step 1. Navigate to BOR Menus > BOR Payroll > Benefit Reconciliation > Supplemental PDR Accounting > Supplemental PDR Processes > Create SUPPDR Acctg Entries. 2. Enter the institutions business unit in the Business Unit field. 3. Enter "create_supplpdr_entries" in the Run Control ID field on the Find an Existing Value tab. (Use the same run control ID used to Create Supplemental PDR Accounting Entries). Note: The Run Control ID begins with field may be left blank to search for all values. 109
110 Step 4. The Accounting Date field should be pre-populated with the current benefit accounting entries load date. 5. The Cash Account field should be pre-populated with the account used in the current benefit accounting load. 6. Fiscal year, Period and Calendar year fields should be pre-populated from the current benefit accounting entries load date. 7. Distribute to GL check box is checked on. 8. Process selection is Load Error Corrections. Note: This should be pre-populated if all errors have been corrected. 9. Click the Save button. 10. Click the Run button. 11. Click the OK button. 12. Click the Process Monitor link. 13. To validate that the data successfully loaded run the Personal Services Detail query on the appropriate date range and account range for current reconciling period. Select all or one Empl ID to validate data processed accurately. Use the SP% for Transaction Code. 110
111 111

112 Step 14. Once the process monitor indicates this process is complete click on the details link of the BOR_SUPACCT process. 15. Click on the message log to confirm load error corrections process is successful. 112
113 Purge Supplemental PDR Accounting Entries (optional) Overview: In the event there is a need to start the supplemental PDR accounting entry process over again, the Purge Supplemental PDR Accounting Line process allows users to purge all transaction tables for a given business unit and accounting period. If the process completes successfully, the following tables will be purged for the specified business unit and accounting date range: 1) BOR_ADP_PDR_TMP 2) BOR_ADP_PDR_ERR 3) PERS_SERV_BOR 4) HR_ACCTG_LINE Prerequisites: Load / Validate Supplemental PDR Accounting Lines Prerequisites: Supplemental PDR Error Correction Prerequisites: Load Error Corrections - Supplemental PDR Accounting Lines Related Processes: Delete PDR Journal (if created) 113
114 Procedure The steps required to Purge Supplemental PDR Accounting Lines are: Step 1. Navigate to BOR Menus > BOR Payroll > Benefit Reconciliation > Supplemental PDR Accounting > Supplemental PDR Processes > Create SUPPDR Acctg Entries. 2. Enter the institution business unit in the Business Unit field. 3. Enter "create_supplpdr_entries" in the Run Control ID field on the Find an Existing Value tab. (Use the same run control ID used to Create Supplemental PDR Accounting Entries). Note: The Run Control ID begins with field may be left blank to search for all values. 114
115 Step 4. The Accounting Date field should already be pre-populated based on the accounting entries loaded and errors corrected. 5. The Cash Account field should be pre-populated with the account used in the current benefit accounting load and error correction load. 6. Fiscal year, Period and Calendar year fields should be pre-populated from the current benefit accounting entries load date. 7. Distribute to GL check box is checked on. 8. Click the Process Purge Accounting Entries list item. Note: All errors must to be corrected before accounting entries will be created. 9. Click the Save button. 10. Click the Run button. 11. Click the OK button. 115
116 Step 12. Click the Process Monitor link. 116

117 Step 13. When the process successfully completes, click on the Details link. 14. Click on the Message Log link to confirm purge process completed. 117
118 118
119 Supplemental PDR Error Correction Overview: The Supplemental PDR Error Correction component is used when an institution needs to correct invalid deduction codes, fund codes or account codes in the Supplemental PDR Accounting Process. Supplemental PDR errors typically occur during the mapping process from the benefit plan to the BeneDirect payment. In most instances, the Supplemental PDR Accounting Entry process successfully completes the mapping activity, however, there may be instances when the benefit plan and deduction code mapping is incomplete or the benefit election table is out of sync with the benefits enrollment. In those instances, error correction is required in order to account for all retiree charges. The mapping process logic is as follows: 1) Select the payment made by benefit plan 2) Derive the deduction codes associated with the benefit plan 3) Review the benefit elections to determine what deduction code is associated with the employee 4) Review the deduction class table to determine the fund and account associated with the deduction code Once all errors have been corrected, the Create Supplemental PDR Accounting process must be executed again to load the corrections and generate the accounting entries in HR_ACCTG_LINE and PERS_SERV_BOR Prerequisite: Create Supplemental PDR Accounting 119
120 Procedure The steps required to correct Supplemental PDR Accounting Errors are: Step 1. Navigate to BOR Menus > BOR Payroll >Benefit Reconciliation > Supplemental PDR Accounting > Supplemental PDR Process > Supplemental PDR Error Correct. 2. Enter the institution business unit in the Business Unit field. 3. Click the Search button to view mapping errors. 4. In order to view deduction codes associated with benefit plans, Click the View Plan button. 5. A new window will open. Once the deduction code needed to correct the error has been obtained (copy/paste may be used), close the window to return to the Supplemental PDR error correction window. 6. Once the deduction code has been entered in the Deduction Code field, PeopleCode will be executed to retrieve the fund code and the account value. Once populated, institutions have the ability to override the account value. 7. If an institution is unsure of the correct deduction code to use, the benefit elections can also be displayed from the Supplemental PDR Error Correction component. In order to view benefit data, click the View Winflex button. A new window will open. Review the benefit election and determine the correct deduction code to use in the Supplemental PDR Error Correction component (copy/paste may be used). Close the window to return to the Supplemental PDR Error correction window. 8. Repeat these steps until all errors are corrected. Note: In order for the Supplemental PDR Accounting Entries to be created, the Error Status should be None for all lines. 9. Click on Save. 120

121 Supplemental PDR Error Correct-before corrections 121

122 Supplemental PDR Error Correct-after corrections 122
123 Journal Generate Supplemental PDR Accounting Entries Overview: Institutions may journal generate the supplemental PDR journal entries in the General Ledger once the create supplemental PDR accounting entries process has been run, errors corrected and data validated. A new accounting entry definition has been created (PYRLSPDEF) to isolate the Supplemental PDR Accounting Entries. These journal entries can be identified by the Journal ID Mask of SP and a journal source of PAY. Note: The creation of these entries will not be included in the nightly batch schedule as institutions expressed a desire to run the process on demand. Prerequisite: Supplemental PDR Accounting process completion Prerequisite: Run the Personnel Services Detail Query Related Process: Journal Edit, Budget Check and Post 123
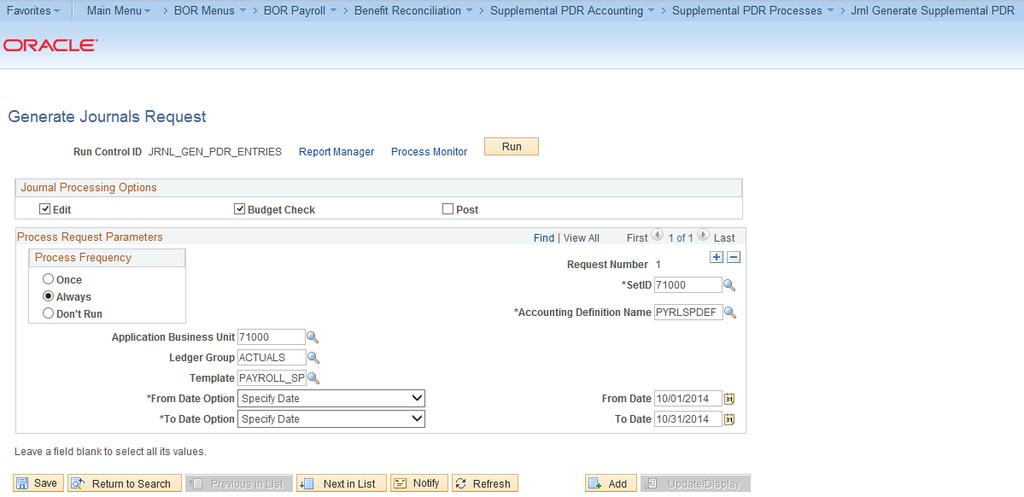
124 Procedure The steps required to Journal Generate Supplemental PDR Accounting Entries are: Step 1. Navigate to BOR Menus > BOR Payroll > Benefit Reconciliation > Supplemental PDR Accounting > Supplemental PDR Processes > Jrnl Generate Supplemental PDR 2. Click the Add a New Value tab. 3. Enter "JRNL_GEN_PDR_ENTRIES in the Run Control ID field. 4. Click the Add button. 124
125 Step 5. Journal Processing Options are institution specific. Generally Edit and Budget Check boxes are checked on, but NOT Post. 6. Click the Always option on for Processing Frequency. 7. Enter the institution SETID in the SetID field. 8. Enter/Select "PYRLSPDEF " in the Accounting Definition Name field. Note: The creation of a new accounting entry definition prevents any other journal generation process from picking up benefit accounting lines. 9. Enter the institution business unit in the Application Business Unit field. 10. Enter ACTUALS in the Ledger Group field. 11. Enter PAYROLL_SP in the Template field. 12. Enter Specify Date in the From Date Option field. 13. Enter the begin date of the month the supplemental PDR acctg data loaded in the From Date field. 14. Select Specify Date in the To Date Option field. 15. Enter the end date of the month the supplemental PDR acctg data loaded in the To Date field. 16. Click the Save button. 17. Click the Run button. 18. Click the OK button. 125
126 126
127 Step 19. Click the Process Monitor link. 20. Click in the Details link of the completed journal generate process. 127
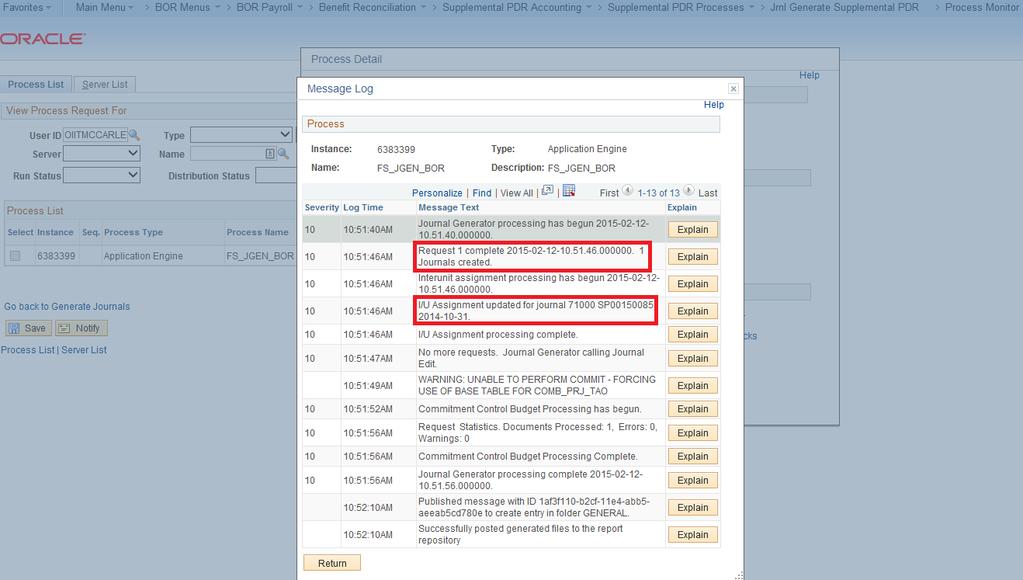
128 Step 21. Click the Message Log link. 22. Review the message log. There should be a message stating 1 journal entry has been created. The journal number and date should be shown. Note: Go to Main Menu > General Ledger > Journals > Journal Entry > Create/Update Journals to review, submit and print journal. 128
129 129
130 Supplemental PDR Mapping Overview: The Supplemental PDR Mapping page/component is used to map Benefit Plans to Benefit Type, Benefit Option and the associated Carrier Enrollment Services Plan ID and Descriptions. Carrier Enrollment Services and the Supplemental Premium Distribution (PDR) reports do not always have the same plan descriptions and the mapping process links the two together. This mapping is a critical component in performing the monthly benefit reconciliation processes. The Supplemental PDR Mapping page/component will allow plans to be added, edited or deleted from the BOR_ADP_SUP_MAP table by Support Users only. Institutional Users will have read access only. 130
131 Procedure The steps required to view the Supplemental PDR Mapping are: Step 1. Navigate to BOR Menus > BOR Payroll > Benefit Reconciliation > Supplemental PDR Accounting > Supplemental PDR Processes > Supplemental PDR Mapping 2. Select a search by option from Search By list. 131
 wild")
132 Step 3. Enter the appropriate value in the begins with field. Note: Query lists all options with the associated data field by using the (%) wild card. 4. Click on Search. 132
133 Step 5. Select the option to view. 6. Review benefit plan and the associated benefit type and option. 7. Report any necessary changes to ITS at 133
134 Benefit Recon Audit Tools Overview: Audit queries have been developed to assist institutions and auditors in the validation of benefit reconciliation data and processes. The queries may be run after the Benefit Reconciliation processes are completed. 134
135 Personnel Services Detail Query Overview: The Personnel Services Detail Query allows users to view all payroll related transactions for an employee. Users have the ability to enter a business unit, account range, date range, employee id and a transaction type. This query is integral in validating the accuracy of accounting entries prior to distribution to the General Ledger and Journal Generating. During month end processing and reconcilement, institutions should be able to utilize this query to reconcile the net activity for any account. Procedure The steps required to run the Personal Services Detail query are: Step 1. Navigate to BOR Menus > BOR Payroll > Benefit Reconciliation > Benefit Accounting Audit Tools > Personal Services Detail 2. Enter the business unit in the Business Unit field. 3. Enter earliest date needed in the From Date field. 4. Enter latest date needed in the To Date field. 5. Enter first account in range needed in the From Account field. Note: Query lists all accounts when using the (%) wild card. 6. Enter last account in range needed in the To Account field. Note: Query lists all accounts when using the (%) wild card. 7. Enter Empl ID in the Empl ID field. Note: Query lists all Empl ID s when using the (%) wild card. 8. Enter a specified transaction type in the Transaction Type field. Note: Query lists all Transaction Types when using the (%) wild card. 9. Click the View Results button. 10. Click the Excel SpreadSheet link. 135
136 136
137 Benefit Control Report query Overview: In order to ensure the cash posted in the Benefit Accounting and Retiree Benefit Accounting processes reconciles to the Data Dump file, users should run the Benefit Control Report query. Prerequisites: Benefit Accounting process is complete. Prerequisites: Retiree Benefit Accounting process is complete. Procedure The steps required to run the Benefit Control Report query are: Step 1. Navigate to BOR Menus > BOR Payroll > Benefit Reconciliation > Benefit Accounting Audit Tools > Benefit Control Report query 2. Enter the business unit in the Business Unit field. 3. Enter the first day of the reconciliation process month in the From Date field. 4. Enter last day of the reconciliation process month in the To Date field. 5. Click the View Results button. 6. The query results will contain 3 sets of data: 1) Trial Balance from the Benefit Reconciliation Accounting process 2) Trial Balance from Retiree Benefit Accounting process 3) Cash Total from the Carrier Enrollment Data Dump file The account activity in 1 and 2 should equal the total in Click the Excel SpreadSheet link. 137

138 138

139 Benefit Process Audit Overview: The Benefit Process Audit provides a review of reconciliation activities by institution and user ID. This table is used as a control to verify that all institutions are utilizing the automated reconciliation procedures. The view provides Benefit Reconciliation processes and their run date, effective date and user ID and may be also used as a validation of what benefit reconciliation processes were run and when. Prerequisites: None Procedure The steps required to view the Benefit Process Audit panel are: Step 1. Navigate to BOR Menus > BOR Payroll > Benefit Reconciliation > Benefit Accounting Audit Tools > Benefit Process Audit 2. Enter the business unit in the Business Unit field. 139

140 Step 3. Completed processes are shown in descending run date order. 140
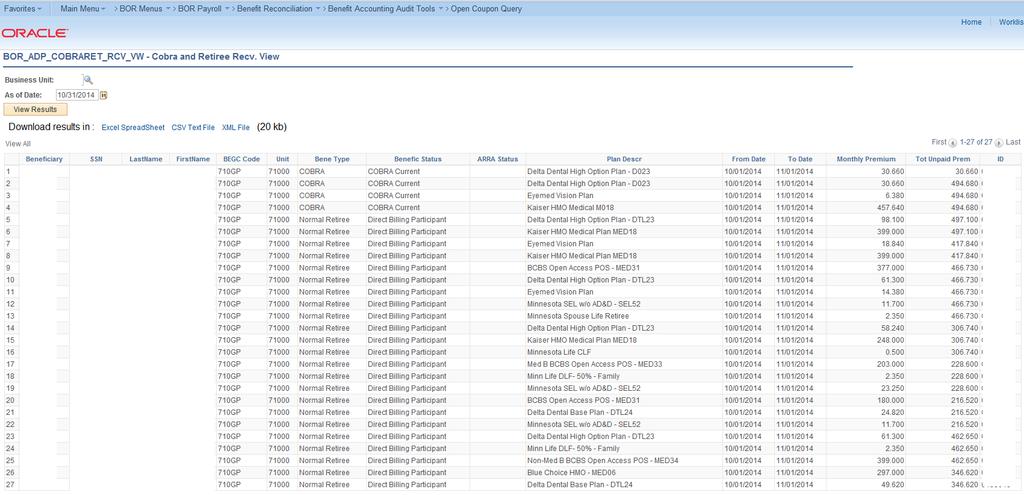
141 Open Coupon query Overview: The Open Coupon data is generated by ADP Cobra Services (BeneDirect) division showing a snapshot of the coupon balances of retirees and Cobra participants. The data used in the report is loaded monthly by ITS into PS Financials. The Open Coupon query provides users a way of reviewing receivable balances as of month end. Users will utilize the Open Coupon query along with the Supplemental PDR detail file (found on the SSC/FTP site each month) to reconcile retiree and COBRA receivable accounts. Query data is downloaded to Excel, pivot tables are created so that receivable accounts may be reconciled. Prerequisite: Receive Open Coupon Data Load Notification Procedure The steps required to view the Benefit Process Audit panel are: Step 1. Navigate to BOR Menus > BOR Payroll > Benefit Reconciliation > Benefit Accounting Audit Tools > Open Coupon Query 2. Enter the business unit in the Business Unit field. 3. Enter the as of date in the As of Date field. Note: The as of date us usually the last day of the month for the data load. 141
142 142
143 ONLINE PAYROLL ADJUSTMENTS Overview: During normal processing there may be data entries that need to be corrected and captured in the PERS_SERV_BOR table due to errors in the benefits reconcilement process or reclassification of journal entries for personal services that have already been posted. Manual journals entries entered online in the General Ledger module or uploaded using the Journal Spreadsheet load process do not insert personal services journal lines into the PERS_SERV_BOR table and the adjusted or reclassified journal data will not be included in online queries and reports created using the PERS_SERV_BOR table. 143
144 Create Payroll Adjustments The Create Payroll Recon Adjustments is a batch process that will auto create, by deduction code or account, personal services adjustment data rows and insert them into the PERS_SERV_BOR table for inclusion in queries and reports used for reconcilement and reporting purposes. The Create Payroll Adjustments process will capture variances between the reconcilement data and payroll data loaded and captured in the PERS_SERV_BOR table by Account or Deduction code based on a specified account or range of accounts and amount of variance range. Typically the amount of variance range will not exceed or whatever the acceptable amount of writeoff has been specified by the institution. The functionality of this module is similar to creating an online journal entry. The advantage is that by using this module, data will be captured at the EMPLID level and then rolled up into a Journal Entry. Most refer to this process as writing off rounding cents variances that occur from differences in payroll processing deductions for benefits and the actual benefit premiums charged to institutions. The Create Payroll Adjustment Process should be run after the Create Benefit Acctg Entries is completed and before the Create Benefit Reporting Table is run in order for the adjustments to appear in the Benefit Reconciliation Detail query. The Create Payroll Adjustment Process may only be run for current reconciling month. Any previous month s variances from rounding cents should be written off with a manual journal entry and will be excluded from the pers_serv_bor table and subsequent reporting. 144
145 Procedure The steps required to Create Payroll Adjustments are: Step 1. Navigate to BOR Menus > BOR Payroll > Benefit Reconciliation > Payroll Adjustments > Create Payroll Recon Adjustmnt 2. Click the Add a New Value tab. 3. Enter "Create_Adjustments" in the Run Control ID field. 4. Click the Add button. 145
146 Step 5. Enter institution business unit in the Business Unit field. 6. Enter the first day of the month for the benefits data load the From Date field. 7. Enter the last day of the month for the benefits data load the To Date field. Note: This is the TRANSACTION DATE needed to look up the adjustment. 8. The Offset Account field is institution specific. This will be the account where variances included in the adjustment are charged. 9. The Offset Account Code field is institution specific. This will be the account code where variances included in the adjustment are charged. 10. Enter "0.001" in the From Amount (ABS) field. 11. Enter "0.099" in the To Amount (ABS) field. Note: These values are absolute values i.e. you should enter positive amounts only in these fields. The process will look for +/- the values when creating the adjustment entries. 12. The Recon Option should default to "Deduction Code". You can also choose "Account" as the Recon Option from the dropdown list. 13. Enter the appropriate deduction code in the Deduction Code field if the recon option is deduction code. Enter the appropriate account code or range of accounts if recon option is account. 14. Click the Save button. 15. Click the Run button. 146
147 Create Adjustments by Deduction Code 147

148 Create Adjustments by Account 148

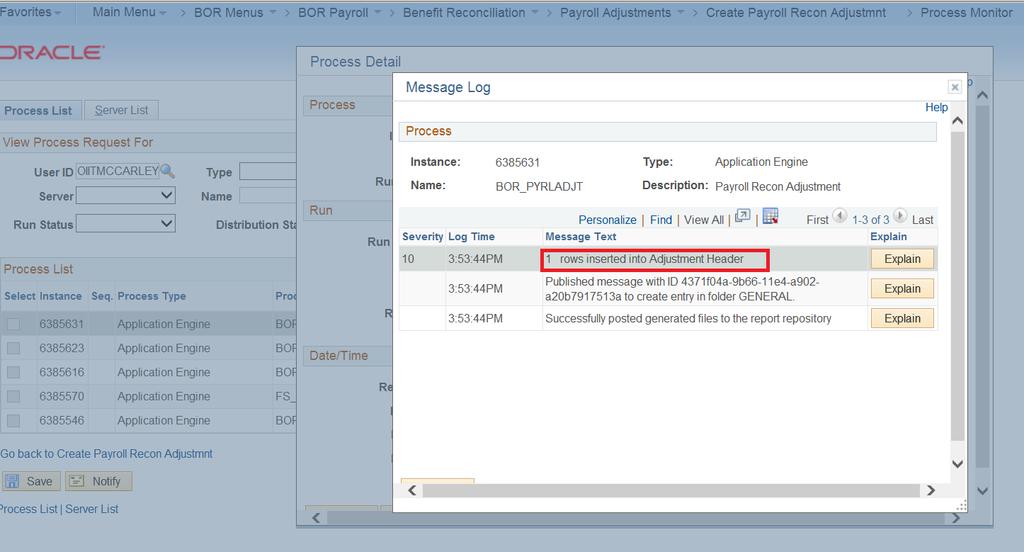
149 Step 16. Click the Process Monitor link. 17. Click in the Details column of the completed adjustment process. 18. Click the Message Log link. 19. If there are any adjustments created, this message will indicate "1 row inserted into Adjustment Header". 149
150 150
151 Enter Payroll Adjustments Overview: This module allows you enter payroll adjustments. The functionality of this module is similar to creating an online journal entry. The advantage is that by using this module, data will be captured at the EMPLID level and then rolled up into a Journal Entry. The Enter Payroll Recon Adjustments is a process that will create, by Empl ID, deduction code or account, personal services adjustment data rows and insert them into the PERS_SERV_BOR table for inclusion in queries and reports used for reconcilement and reporting purposes. The overall business process flow is: 1. Manually enter online adjustments as needed (example benefit termination rows split by employee status codes in the data dump file) 2. Save adjustment to generate a Transaction ID 3. Review and Validate(or Delete) the adjustments created using the online payroll adjustment pages 4. Load the adjustments 5. Print the adjustments 6. Journal Generate, Edit, Budget Check and Post the Payroll Adjustments Note: Adjustments generated during the reconciling and accounting period should be completed before running the Create Benefit Reporting Table to be included in the Benefit Reconciliation Detail Query. 151
. 5.")
152 Procedure The steps required to Enter Payroll Adjustments are: Step 1. Navigate to BOR Menus > BOR Payroll > Benefit Reconciliation > Payroll Adjustments > Enter Payroll Adjustments 2. Process defaults to the Add a New Value tab. 3. Enter institution business unit in the Business Unit field. 4. Next is the value for Transaction ID field (System will assign value). 5. System/Current date is the default value for Transaction Dt field. Note: Adjustments may be backdated to the reconciling month if Accounting Period has not been closed. 6. Click the Add button. 152
153 Step 7. Business Unit field should auto-populate based on user security. 8. Transaction ID field is blank until Payroll Adjustment Entry panel is saved. 9. Transaction Dt field defaults from Enter Payroll Adjustments Transaction Dt field. 10. Enter the reason for the adjustment in the Purpose field. 11. Status field defaults to Edit Req d until adjustment is validated or deleted. 12. Source field defaults to Online Entry. 13. Operator field defaults to user. 14. On Line 1 enter the Empl ID of the employee to be adjusted in the Empl ID field. The search option may be used to locate Empl ID. Note: Name field should auto-populate based on Empl ID entered 15. Distribution Type field has 3 options: EE Deduction, ER Deduction and Acct Cd. The account cd option will insert the Account Code field into the adjustment panel to adjust amounts associated with an Account Code. Note: Distribution Type field and Deduction Code field will determine what account will auto-populate the Account field and what fund will auto-populate the Fund Code field. 16. Enter the appropriate deduction code in the Deduction Code field. The search option may be used to locate deduction codes. Note: Tabbing out of the Deduction Code field should auto-populate the Account field and the Fund Code field. 17. Enter the adjustment amount in the Monetary Amount field. 18. Account field auto-populates based on the Distribution Type field and the Deduction Code field. Note: Account field may be changed manually if determined necessary. 19. Fund Code field auto-populates based on Distribution Type and Deduction Code and may not be changed. 20. Department field auto-populates based on Account Code and may not be changed. 21. Program Code field auto-populates based on Account Code and may not be changed. 22. Class Code field auto-populates based on Account Code and may not be changed. 23. Project field auto-populates based on Account Code and may not be changed. 24. Budget Reference field auto-populates based on Transaction Dt and may not be changed. 25. Reference field is open for manual editing. 26. Line Description auto-populates based on Deduction Code field or Account Code field. 153

154 Step 27. Insert data entry rows as needed to complete adjustment. 28. Click the Save button when adjustment is complete. Note: Saved adjustments generate a Transaction ID. 29. Click the Run button. 154
155 Validate/Delete Payroll Adjustments Overview: The Validate/Delete Payroll Adjustments step is to review the adjustments generated by either the Create Payroll Adjustment process or the Enter Payroll Adjustment Process before they are loaded. Users may either VALIDATE or DELETE the adjustment. This process is performed in the Enter Payroll Adjustments panel for both adjustments created and entered. Note: If adjustment entries are valid, validation is required before they can be Loaded to GL. 155

156 Procedure The steps required to Validate/Delete Payroll Adjustments are: Step 1. Navigate to BOR Menus > BOR Payroll > Benefits Reconciliation > Payroll Adjustments > Enter Payroll Adjustments 2. If the adjustment was created the Transaction ID is unknown. If the adjustment was entered then the Transaction ID is generated at the time the adjustment panel is saved. Search may be performed with or without a Transaction ID. 3. Enter the date of the adjustment created in the Transaction Dt field. 4. Click on Search. 156

157 Step 5. Note the description on the adjustment. Review to ensure that the transaction reflects your criteria. 6. Notice the STATUS says "Edit Req'd" 157

158 Step 7. Click the Processing Option list. 8. There are two Processing Options: "Validate Adjustment or Delete Adjustment". If adjustment is correct choose "Validate Adjustment". If opting to delete the adjustment, choose "Delete Adjustment". Note: If opting to delete adjustment, on pressing the "Execute" button this adjustment entry will be permanently deleted and you will be returned to the search screen. 9. Click the Execute button. 10. Notice the status now says Valid. 158
159 Load Payroll Adjustments to GL Overview: The Load Payroll Adjustments to GL process loads all adjustment entries that are in VALID status to the PERS_SERV_BOR & HR_ACCTG_LINE tables. This process may be run after each adjustment is validated or after a group of adjustments are validated. If this process is run on multiple valid adjustments, only one journal will be created when Journal Generate Payroll Adjustments is run. Procedure The steps required to Load Payroll Adjustments are: Step 1. Navigate to BOR Menus > BOR Payroll > Benefit Reconciliation > Payroll Adjustments > Load Payroll Adjustments to GL 2. Click the Add a New Value tab. 3. Enter "Load_Adjustments" in the Run Control ID field. 4. Click the Add button. 159

160 Step 5. Business Unit field should auto-populate based on user security 6. Enter the Adjustment Transaction Dt in the From Date field. Date should be within the current accounting period. Note: If loading multiple adjustments at once enter the earliest Transaction Dt. 7. Enter the Adjustment Transaction Dt in the To Date field. Date should be within the current accounting period. Note: If loading multiple adjustments at once enter the latest Transaction Dt. 8. Click the Save button. 9. Click the Run button. 160

161 Step 10. Click the Process Monitor link. 11. Once the Load Adjustment process is successfully completed adjustment queries may be run and adjustments may be Journal Generated. 161
162 Payroll Adjustments Not Posted query Overview: The Payroll Adjustments Not Posted query was developed to assist in determining if any adjustments have been created but not loaded/posted to the PERS_SERV_BOR & HR_ACCTG_LINE tables. The output data from this query will provide Transaction ID rows for any adjustment not loaded/posted, including the adjustment date, status and amount. This query is intended as a support tool to ensure completion of the adjustment process. Procedure The steps run the Payroll Adjustments Not Posted query are: Step 1. Navigate to BOR Menus > BOR Payroll > Benefit Reconciliation > Payroll Adjustments > Payroll Adjustments Not Posted 2. Enter the business unit in the Business Unit field. 3. Output data may be downloaded to Excel. 162

163 Print Payroll Adjustments query Overview: The Print Payroll Adjustments query provides adjustment row data by Transaction ID, date and status. Business Unit, Transaction ID, Transaction Date and Adjustments Status are required fields to run this query. Query output may be downloaded to Excel, saved and printed to support adjustment journals. Procedure The steps run the Print Payroll Adjustments query are: Step 1. Navigate to BOR Menus > BOR Payroll > Benefit Reconciliation > Payroll Adjustments > Payroll Adjustments Not Posted 2. Enter the business unit in the Business Unit field. 3. Enter transaction ID in the Transaction ID field. 4. Enter the adjustment begin date in the From Date field. 5. Enter the adjustment end date in the To Date field. 6. Select the appropriate adjustment Status from the dropdown list. 7. Output data may be downloaded to Excel. 163

164 164
165 Journal Generate Adjustments Overview: Institutions can create journal entries in the General Ledger once the Payroll Adjustment processes are complete. A new accounting entry definition has been created (PYRLADDEF) to isolate the Payroll Adjustment Entries. Adjustment journal entries can be identified by the Journal ID Mask of AD and a journal source of PAY. Note: The creation of these entries will not be included in the nightly batch schedule as institutions expressed a desire to run the process on demand. Prerequisite: Create/Enter Payroll Adjustments Prerequisite: Validate Payroll Adjustments Prerequisite: Load Payroll Adjustments Related Process: Journal Edit, Budget Check and Post Procedure The steps required to Journal Generate Payroll Adjustments are: Step 1. Navigate to BOR Menus > BOR Payroll > Benefit Reconciliation > Payroll Adjustments > Jrnl Generate Adjustments 2. Click the Add a New Value tab. 3. Enter "Jrnl_Gen_Adjustments" in the Run Control ID field. 4. Click the Add button. 165
166 Step 5. Journal Processing Options are institution specific. Generally Edit and Budget Check boxes are checked on, but NOT Post. 6. Click the Always option on for Processing Frequency. 7. Enter the institution SETID in the SetID field. 8. Enter "PYRLADDEF" in the Accounting Definition Name field. Note: The creation of a new accounting entry definition prevents any other journal generation process from picking up Payroll Adjustment Lines. 9. Enter the institution business unit in the Application Business Unit field. 10. Enter ACTUALS in the Ledger Group field. 11. Enter PAYROLL_AD in the Template field. 12. Enter Specify Date in the From Date Option field. 13. Enter the beginning date of the payroll adjustment in the From Date field. 14. Enter Specify Date in the To Date Option field. 15. Enter the ending date of the payroll adjustment in the To Date field. 16. Click the Save button. 166

167 Step 17. Click the Run button. 18. Click the OK button. 167

168 Step 19. Click the Process Monitor link. 20. Click in the Details column of the completed journal generate 168
169 Step 21. Click the Message Log link. 169

170 Step Review the message log. There should be a message stating 1 journal entry has been created. The journal number and date should be shown. Go to Main Menu > General Ledger > Journals > Journal Entry > Create/Update Journals to review, submit and print journal 170
Integration - ADP/EV5 and PeopleSoft Financials
 Integration - ADP/EV5 and PeopleSoft Financials Periodic Reporting Tools TABLE OF CONTENTS Type of Recon Report Year End Month End Auditor Tools Report/Query Name Page # ADP Employee Paycheck 2 ADP Payroll
Revenue Summary Report
 PeopleSoft Reports: Revenue Summary Report Revised November 2013 1 Before You Begin You will not be given access to Peoplesoft Financials until you have attended Beginning and Intermediate Budget Report
Exporting Budget Prep into OneUSG and Completing the Budget Prep Process
 Exporting Budget Prep into OneUSG and Completing the Budget Prep Process The purpose of this job aid is to show users how to complete the FY2019 Budget Prep process after the budget has been approved.
Maintaining Budget Change Requests
 Maintaining Budget Change Requests This document describes the functions used in TEAMS to enter and approve requests to move funds from one General Ledger account to another. In this document: Request
Introduction to Client Online
 Introduction to Client Online Trade Finance Guide TradeFinanceNewClientsV2Sept15 Contents Introduction 3 Welcome to your introduction to Client Online 3 If you have any questions 3 Logging In 4 Welcome
Munis General Ledger. Procedural Documentation. For more information, visit
 Munis General Ledger Procedural Documentation For more information, visit www.tylertech.com. TABLE OF CONTENTS Chart Manager... 3 Account Master... 12 General Journal Entry/Proof... 25 Recurring General
OPERATING REPORTS HANDBOOK
 OPERATING REPORTS HANDBOOK Second Edition Office of Budget and Finance Accounting and Financial Reporting Contact Information: reporting@utdallas.edu Table of Contents Table of Contents... i Getting Started
OPERATING REPORTS HANDBOOK
 OPERATING REPORTS HANDBOOK First Edition Office of Budget and Finance Accounting and Financial Reporting Contact Information: reporting@utdallas.edu Table of Contents Table of Contents... i Getting Started
University of Wisconsin System SFS Business Process AP Working with 1099 Transactions. Contents
 Contents Instructions for 1099 Process Overview... 2 I. 1099 Voucher Clean Up... 3 II. Run Update Withholdings Process (This will be Run Centrally by UWSA)... 14 III. Run Queries for Validation and to
Introduction to Client Online
 Introduction to Client Online Bibby Factors International Guide 1 InternationalFactoringNewClientBibbyUKopsSept15 Introduction 3 Logging In 5 Welcome Screen 6 Navigation 7 Viewing Your Account 9 Invoice
FY 2018 Budget Prep Training Manual
 FY 2018 Budget Prep Training Manual Prepared by Office of Budget Services Winter, 2017 Table of Contents Introduction... 3 Chapter 1: Getting Started... 4 Chapter 2: Personal Services Budgets... 5 Updating
Banner Finance. Self Service Manual
 Banner Finance Self Service Manual 12/06/2011 Table of Contents Logging into Banner Finance Self Service... 2 Budget Queries... 5 Saving Budget Queries... 15 Encumbrance Queries... 21 Budget Transfers...
Introduction to Client Online
 Introduction to Client Online Construction Finance Guide ConstructionFinanceNewClientsV2Sept15 Contents Introduction 3 Welcome to your introduction to Client Online 3 If you have any questions 3 Logging
University of Wisconsin System SFS Business Process GL.2.01 Edit, Budget Check, Submit for Approval and Post Journals
 Contents Edit, Budget Check, and Post Journal Process Overview... 1 Process Detail... 1 I. Edit Journal... 1 II. Edit Errors... 3 III. Budget Check Journals... 4 IV. Budget Checking Exceptions... 4 V.
Banner Budget Reallocation Step-by-Step Training Guide. Process Opens March 12 and Closes April 5PM
 Banner Budget Reallocation Step-by-Step Training Guide Process Opens March 12 and Closes April 20th @ 5PM 1 Sign in to the CC Single Sign-In System Click on Banner 2 Select Finance from either the tabs
Using FastCensus for Plan Sponsors
 Using FastCensus for Plan Sponsors FastCensus is a secure, online tool for Plan Sponsors to access, edit, validate and submit census data to their Third Party Administrator for the purposes of year-end
ShelbyNext Financials: Credit Card Tracking (Course #N211)
") ShelbyNext Financials: Credit Card Tracking (Course #N211) Presented by: Dave Heston Shelby Consultant 2017 Shelby Systems, Inc. Other brand and product names are trademarks or registered trademarks of
ShelbyNext Financials: Credit Card Tracking (Course #N211) Presented by: Dave Heston Shelby Consultant 2017 Shelby Systems, Inc. Other brand and product names are trademarks or registered trademarks of
Web-Based Budgeting Departmental User Manual
 North Dakota State University Web-Based Budgeting Departmental User Manual PeopleSoft Web-Based Budgeting (WBB) 4-18-2018 Web Based Budgeting Departmental Operating Budget Entry for Non-Appropriated Funds
University of Wisconsin System SFS Business Process PO.2.07 PO Year-End Processing. Contents. PO Year-End Processing Overview
 Contents PO Year-End Processing Overview... 1 Process Detail... 2 I. Identify Purchase Orders to Close... 2 II. Close Purchase Order Identified in Section I... 7 III. Budget Check the Closed Purchase Orders...
Make sure the client aged receivables balance to the general ledger total. Write off client balances. Pick a date that makes sense: a. b. c. d.
 Overview This document provides conversion tips and instructions for entering client and general ledger beginning balances Entering beginning balances in Nexsure entails bringing balances forward from
ACS YEAR-END FREQUENTLY ASKED QUESTIONS. General Ledger
 ACS YEAR-END FREQUENTLY ASKED QUESTIONS This document includes answers to frequently asked questions about the following ACS modules: General Ledger Payroll Accounts Payable Accounts Receivable General
BUDGET CALL Training Manual
 2018-19 BUDGET CALL Training Manual Finance Department November 2017 This document is also available online at www.yorku.ca/finance/ TABLE OF CONTENTS Introduction... 2 Budget Call Communication... 2 Budget
BUDGET CALL Quick Reference Training Guide
 2018-19 BUDGET CALL Quick Reference Training Guide Finance Department November 2017 This document is also available online at www.yorku.ca/finance/ TABLE OF CONTENTS Introduction... 2 Budget Call Communication...
Banner Finance Budget Development Training Workbook
 Banner Finance Budget Development Training Workbook January 2007 Release 7.3 HIGHER EDUCATION What can we help you achieve? Confidential Business Information -------------------------------------------------------------------------------------------------------------------------------------------------------------------------------
PNC HSA Funding & Contribution Guide for Employers
 PNC HSA Funding & Contribution Guide for Employers How to set up and send employer-directed HSA Contributions with PNC Bank 20180924AHNJ Document Updates The table below details updates made to the document
Arkansas State University Banner Finance Self-Service
 Arkansas State University Banner Finance Self-Service Contents Self Service Menu... 2 Approving Documents... 3 Viewing Documents... 5 Budget Transfers... 7 Multiple-Line Budget Transfers... 9 Budget Queries...
OMNI AR/Billing: Adjusting Invoices (Crediting & Rebilling) Detailed Business Process Guide ABILL3
 Detailed Business Process Guide ABILL3") OMNI AR/Billing: Adjusting Invoices (Crediting & Rebilling) Detailed Business Process Guide ABILL3 Use this document to understand how to correct a bill after it has been invoiced. This document shows
OMNI AR/Billing: Adjusting Invoices (Crediting & Rebilling) Detailed Business Process Guide ABILL3 Use this document to understand how to correct a bill after it has been invoiced. This document shows
X-Charge Credit Card Processing
 X-Charge Credit Card Processing OpenEdge (Formerly X-Charge) Payment Processing Setup... 1 Setting Permissions for Credit Card Processing... 1 Setting Up X-Charge Payment Processing in SuccessWare 21...
Guide to the Labor Distribution Module
 Labor Distribution Module Guide to the Labor Distribution Module The Labor Distribution module of the Kuali Financial System (KFS) manages the accounting aspects of compensationrelated expenses such as
Tips & Tricks General Ledger Infinite Visions Enterprise Edition: General Ledger
 Tips & Tricks General Ledger Infinite Visions Enterprise Edition: General Ledger CLASS DESCRIPTION Let s learn something new in the General Ledger module that can help with your daily data entry and also
Bank Reconciliation Processing SYSTEM ADMINISTRATION AND PROCESSING GUIDE. Last revised: 8/19/10 12:22 PM
 Bank Reconciliation Processing SYSTEM ADMINISTRATION AND PROCESSING GUIDE Last revised: 8/19/10 12:22 PM New World Systems 1 CONTENTS Contents... 1 Introduction... 3 System Administrator Guide... 4 Company
Table of Contents. Genoa User Guide. Policy Setup Bridge User Guide Policy Setup
 Table of Contents 0 Genoa User Guide Policy Setup 4.2.3 4.2.3 Bridge User Guide Policy Setup Table of Contents 0 Table of Contents TABLE OF CONTENTS... Searching For a Policy... 1 Searching for the Latest
Master User Manual. Last Updated: August, Released concurrently with CDM v.1.0
 Master User Manual Last Updated: August, 2010 Released concurrently with CDM v.1.0 All information in this manual referring to individuals or organizations (names, addresses, company names, telephone numbers,
FAST Budget Budget Transfers
 FAST Budget Budget Transfers User Guide Millennium FAST The user guide was created using FAST Version 4.2.18 CSU FAST 4.2.18 BUDGET TRANSFER User Guide v0.4.docx (FOAP = FUND ORGANISATION ACCOUNT PROGRAM)
This training guide describes the process of correcting journal errors which are discovered during the edit/budget check process.
 Correcting Common Actuals Journal Errors This training guide describes the process of correcting journal errors which are discovered during the edit/budget check process. Before you begin... Upon completion
Upload Budget Item Rates
 Upload Budget Item Rates Who: Why: When: Sys Admin When tight control of Project costing is necessary and the same items are required on many Orders within the Project View. When Project Views are set
Finance Self Service Financial Systems
 Finance Self Service Financial Systems Finance Self Service Financial Systems 2008 University of North Florida Center for Professional Development & Training 1 UNF Drive, Jacksonville, Fl 32224 904.620.1707
Account Reconciliation Reports
 Account Reconciliation Reports Agenda Navigate to Reconciliation Reports Create Reports and enter report options Submit Reconciliation Reports Select and review Summary Financial Report Select and review
Sage Bank Services User's Guide. May 2017
 Sage 300 2018 Bank Services User's Guide May 2017 This is a publication of Sage Software, Inc. 2017 The Sage Group plc or its licensors. All rights reserved. Sage, Sage logos, and Sage product and service
FY13 Budget Prep New Functionality
 HR Refresh Functionality It is now possible to refresh the HR data for a single DeptID in Position Budgeting. The process is simple, but care is necessary to avoid unintentional errors. The process begins
The Chart of Accounts can be modified at any time. Existing accounts can be modified and new accounts can be added.
 Chart of Accounts Maintenance Overview The Chart of Accounts can be modified at any time. Existing accounts can be modified and new accounts can be added. Navigate to: General Ledger>Maintenance>General>Chart
Microsoft Dynamics GP Year-End Close. Manual
 Microsoft Dynamics GP Year-End Close Manual 2017 Contact FMT Consultants Support Customer Care customercare@fmtconsultants.com (760) 930-6400 option 1 Sales Felipe Jara fjara@fmtconsultants.com (760) 930-6451
ShelbyNext Financials: Credit Card Tracking
 ShelbyNext Financials: Credit Card Tracking (Course #F211) Presented by: Dave Heston Shelby Consultant 2018 Shelby Systems, Inc. Other brand and product names are trademarks or registered trademarks of
Sage Bank Services User's Guide
 Sage 300 2017 Bank Services User's Guide This is a publication of Sage Software, Inc. Copyright 2016. Sage Software, Inc. All rights reserved. Sage, the Sage logos, and the Sage product and service names
TBR Service Center MANAGING THE BUDGET DEVELOPMENT CYCLE
 MANAGING THE BUDGET DEVELOPMENT CYCLE Description: TCATs prepare their budget with the assistance of the Service Center in the March / April timeframe for the Estimated and Proposed budgets and repeat
Setting up and using the accounting module will give you detailed accounting and financial reporting.
 CHAPTER 6 ACCOUNTING To get the most out of the financial aspects of Campground Manager Astra, you should set up the Accounting module using either Cash Basis or Accrual Accounting depending on the method
Shared: Budget Adjustments Import
 Shared: Budget Adjustments Import User Guide Applies to these SAP Concur solutions: Expense Professional/Premium edition Standard edition Travel Professional/Premium edition Standard edition Invoice Professional/Premium
CASH ADVANCES TABLE OF CONTENTS
 CASH ADVANCES TABLE OF CONTENTS Overview... 2 Responsibilities... 2 Delegate Entry Authority to Other Users... 2 Cash Advance Tips and Reminders... 4 Create and Manage... 5 Create a Cash Advance for Yourself...
MARATHON FINANCIAL ACCOUNTING END OF CALENDAR YEAR
 The following instructions will guide you through the end of a calendar year process. This process includes steps for W-2 Forms, Electronic W-2 Filing, Clear Calendar Year to Date Totals, Tax Table updates
BUDGET DEVELOPMENT INSTRUCTION MANUAL
 BUDGET DEVELOPMENT INSTRUCTION MANUAL 1 Budget Office Adminstration Bldg Sam Houston State University March, 2015 Table of Contents Item Page Budget Process System Overview 3 Budget Reports 9 Salary Planner
InformationNOW Billing Fiscal Year Closeout Procedures
 InformationNOW Billing 2017-2018 Fiscal Year Closeout Procedures About this Guide This document describes the fiscal year closeout procedures in InformationNOW Billing. The Fiscal Year Closeout menu will
All About the General Ledger
 All About the General Ledger Overview In a typical month the main functions under the GL menu (General Ledger) you will use are to verify receipts entered and record them onto deposit slips, reconcile
About Year End Processes
 About Year End Processes Preparation for Year End Closing Year end closing in Microsoft Dynamics NAV involves three steps: 1. Closing the fiscal year using the Accounting Periods option. 2. Generating
Process Document Financial Aid: Originating a CommonLine Loan
 Version 1.0 Document Generation Date 7/15/2008 Date Modified 7/15/2008 Last Changed by ASDS Status Draft Originating a CommonLine Loan Concept The processing of CommonLine loans occurs in multiple steps.
SUBJECT: Reports and Query Training Page 1 of 31
 SUBJECT: Reports and Query Training Page 1 of 31 You will be completing your Reports & Query training in the FSTST environment. To access FSTST, click the FSTST Training Logon hyperlink located at the
MANAGEMENT-LEVEL FINANCIAL REPORTS
 MANAGEMENT-LEVEL FINANCIAL REPORTS TABLE OF CONTENTS REPORTS OVERVIEW... 2 Detail by Fund... 2 Summary by Fund (100,130,131,150,305,900)... 2 Summary by Fund (3xx)... 2 Summary by Fund 108... 3 All-Funds...
Budgetary Reporting System For Executive Users
 Budgetary Reporting System For Executive Users ProClarity Web Reporting Training Guide Version 3.2 4/23/2012 BOARD OF REGENTS UNIVERSITY SYSTEM OF GEORGIA Office of Fiscal Affairs 270 Washington Street,
StuckyNet-Link.NET User Interface Manual
 StuckyNet-Link.NET User Interface Manual Contents Introduction Technical Information General Information Logging In & Out Session Timeout Changing Your Password Working with the Borrowing Base Creating
SmartFusion FYE: Payroll Accruals
 INTRODUCTION Disclaimer: This handout assumes that Fund Ledger and Payroll modules have completely been closed out for the fiscal year. If you have not closed any modules yet but need to do payroll accruals,
Classification: Public ANZ TRANSACTIVE AU & NZ USER GUIDE
 Classification: Public ANZ TRANSACTIVE AU & NZ USER GUIDE 08 2015 CONTENTS INTRODUCTION... 3 PAYMENTS... 5 About Payments in ANZ Transactive AU & NZ... 5 Domestic Payments... 7 Single Payments... 8 Payment
South Dakota SCT/Banner System Procedures
 Human Resources/Finance Information Systems Budget Module Procedure Manual Table of Contents Overview.. 3 Building a Budget ID and Phases 3 Logging In to Spreadsheet Budgeting. 5 Loading a Budget Using
CitiDirect WorldLink Payment Services
 CitiDirect WorldLink Payment Services User Guide June 2009 3 Contents Overview 2 Additional Resources 2 Basics Guides 2 Online Help 2 CitiDirect Customer Support 2 Sign on to CitiDirect Online Banking
DALHOUSIE UNIVERSITY FINANCIAL SERVICES
 DALHOUSIE UNIVERSITY FINANCIAL SERVICES Table of Contents Overview... 3 Web Address... 3 Parameters for Budget Queries... 9 Budget Status by Account... 10 Creating a Query by Account... 11 Budget Query
UNIVERSITY OF OREGON. Steps and OPE Calculations For Data Entry to Banner Budget Development
 UNIVERSITY OF OREGON Steps and OPE Calculations For Data Entry to Banner Budget Development Budget and Resource Planning 4/27/2016 Overview Banner budgeting does not allow budgeting of OPE within the Salary
Budget Status by Account. SSB Training: SSB Basic Querying Tools. Logging in to Self Service Banner (SSB)
") Logging in to Self Service Banner (SSB) SSB is accessed through the CSM web portal Trailhead. To login, follow these steps: 1. Go to http://trailhead.mines.edu 2. Enter your login information 3. Click
Logging in to Self Service Banner (SSB) SSB is accessed through the CSM web portal Trailhead. To login, follow these steps: 1. Go to http://trailhead.mines.edu 2. Enter your login information 3. Click
Using REEFS Payments and Escrow Functions
 16-Nov-2017 C A Y M A N I S L A N D S MONETARY AUTHORITY Using REEFS Payments and Escrow Functions 16-Nov-2017 Page 2 of 14 Contents 1 Summary... 3 2 User Roles for accessing the features... 3 3 Payments
6.14 (c) - How to Run CAT Reports Missing from CAT Report
 - How to Run CAT Reports Missing from CAT Report") 6.14 (c) - How to Run CAT Reports Missing from CAT Report Purpose and Overview This report allows users to identify new hires and ongoing staff who exist in HRS but were not included in the CAT at the
6.14 (c) - How to Run CAT Reports Missing from CAT Report Purpose and Overview This report allows users to identify new hires and ongoing staff who exist in HRS but were not included in the CAT at the
Perform this procedure to plan adjustments to the unrestricted budget either during the Annual Development or during a Quarterly Confirmation cycle.
 Introduction Process and Trigger Perform this procedure to plan adjustments to the unrestricted budget either during the Annual Development or during a Quarterly Confirmation cycle. Prerequisites Budget
NEST Pension File Creation
 NEST Pension File Creation Introduction... 2 NEST configuration... 3 Company configuration... 3 Employee Details configuration... 3 NEST Enrolling Workers... 4 Create a NEST Enrolling Workers file:...
MSI General Ledger Version 7.5
 MSI General Ledger Version 7.5 User s Guide Harris Local Government 1860 W. Winchester Road, Ste 204 Libertyville, IL 60048 Phone: (847) 362-2803 Fax: (847) 362-3347 Contents are the exclusive property
Enterprise Planning and Budgeting 9.0 Created on 2/4/2010 9:42:00 AM
 Created on 2/4/2010 9:42:00 AM COPYRIGHT & TRADEMARKS Copyright 1998, 2009, Oracle and/or its affiliates. All rights reserved. Oracle is a registered trademark of Oracle Corporation and/or its affiliates.
UDW+ Guide to S01.-S14. Standard Reports 2013 Version 1.3
 UDW+ Guide to S01.-S14. Standard Reports 2013 Version 1.3 Program Services Office & Decision Support Group Table of Contents S01.-S14. Interactive Standard Reports... 2 S01. Budget Summary and Budget Detail
Servicer REAM Deficiency Billing System (SRDBS) User Manual. September 2014 V3.0
 User Manual. September 2014 V3.0") Servicer REAM Deficiency Billing System (SRDBS) User Manual September 2014 V3.0 2014 Fannie Mae. Trademarks of Fannie Mae. 9.26.2014 Table of Contents PURPOSE... 3 OBJECTIVES... 3 ACCESSING SRBDS 3.0...
Servicer REAM Deficiency Billing System (SRDBS) User Manual September 2014 V3.0 2014 Fannie Mae. Trademarks of Fannie Mae. 9.26.2014 Table of Contents PURPOSE... 3 OBJECTIVES... 3 ACCESSING SRBDS 3.0...
Running a Budget Position Report for a Department. Running a Budget Position Report
 Running a Budget Position Report for a Department This Addy Note explains how to run a Budget Position report for a department from within UCF Financials. It discusses how to: Run a Budget Position report
MSI Calendar and/or Fiscal Year End Processing For year ending December 31, 2013
 MSI Calendar and/or Fiscal Year End Processing For year ending December 31, 2013 User s Guide NOTE: Screen shots for this document have been taken from the version 7.0 MSI Payroll system. Municipal Software,
Release Notes. Powerpay Version 4.3
 Release Notes Powerpay Version 4.3 New Functionality Version 4.3 Purpose Release Notes are created prior to the release of each new version of Powerpay Web, and offer detailed information regarding new
Oracle CRL-Financials Enabled Projects
 Oracle CRL-Financials Enabled Projects Concepts and Procedures Release 11i April 2000 Part No. A83646-01 Expenditures This topic group provides: A description of new or modified tasks A description of
North Dakota University System
 North Dakota University System FSA Manual PeopleSoft Version 9.1 DISCLAIMER Written by the North Dakota University System, September, 2006. Updated October 2008; November 2008 Updated to 9.1 June 2011
Kuali Coeus Research Management (KCRM) User Guide: Create a new Budget document for a Child Award
 User Guide: Create a new Budget document for a Child Award") Kuali Coeus Research Management (KCRM) User Guide: Create a new Budget document for a Child Award Version 5.0: August 2014 Purpose: To create detailed or modular budget for a child (or grandchild) award.
Kuali Coeus Research Management (KCRM) User Guide: Create a new Budget document for a Child Award Version 5.0: August 2014 Purpose: To create detailed or modular budget for a child (or grandchild) award.
Lesson Thirteen Using General Journal and Banking Tasks
 Lesson Thirteen Using General Journal and Banking Tasks The General Ledger is updated by each journal in Sage 50 as transactions are posted. The General Journal Entry task can be used to affect accounts
Payroll Processing Previous Tax Year Payslip Adjustments
 Payroll Processing Previous Tax Year Payslip Adjustments Capturing of Adjustments for February in the Previous Tax Year In order to capture adjustments for previous Tax Years it is necessary to process
For example, a cost adjustment occurs on or between projects. (Changing business line, location or expenditure type use this spreadsheet)
") OVERVIEW This job aid details the process of performing a project cost adjustment from Projects to Projects.The steps detailed will provide a step-by-step guide to the essential measures necessary. PROJECT
OVERVIEW This job aid details the process of performing a project cost adjustment from Projects to Projects.The steps detailed will provide a step-by-step guide to the essential measures necessary. PROJECT
DUS DocWay TM Loan Documents User Guide. January 2019
 DUS DocWay TM Loan Documents User Guide January 2019 Table of Contents Getting Started with DUS DocWay... 1 Welcome Page Navigation... 3 Loan Documents Navigation... 6 Update Document Category and Type...
CENTRAL SUSQUEHANNA INTERMEDIATE UNIT FIS Insurance Processing Learning Guide
 CENTRAL SUSQUEHANNA INTERMEDIATE UNIT FIS Insurance Processing Learning Guide 2017 Central Susquehanna Intermediate Unit, USA INTRODUCTION This Learning Guide will review the steps to process insurances
CHAPTER 8: PERIOD-END PROCEDURES
 Chapter 8: Period-End Procedures CHAPTER 8: PERIOD-END PROCEDURES Training Objectives Actively participating in this chapter helps you: Understand the procedures that are completed at the end of an accounting
CHAPTER 2: GENERAL LEDGER
 Chapter 2: General Ledger CHAPTER 2: GENERAL LEDGER Objectives Introduction The objectives are: Explain the use of the Chart of Accounts in Microsoft Dynamics NAV 5.0. Explain the elements of the G/L Account
IFS Year End Training 2017 Closing the Year
 Important Facts About Closing A Year On IFS The following is a summary of important facts to know about closing a year in the Integrated Financial System. * Vouchers that are transferred to Accounts Payable
FMS Account Summary Inquiry View Budget Information
 FMS Account Summary Inquiry View Budget Information Account Summary Inquiry The Account Summary Inquiry (ASI) in our Financial Management System (FMS) displays budget, expenditure, encumbrance, and available
Changing the General Ledger Fiscal Year End
 Changing the General Ledger Fiscal Year End (while retaining journal detail) Note: This document provides instructions to change the fiscal year end and import journal detail for the current fiscal year.
07/21/2016 Blackbaud CRM 4.0 Revenue US 2016 Blackbaud, Inc. This publication, or any part thereof, may not be reproduced or transmitted in any form
 Revenue Guide 07/21/2016 Blackbaud CRM 4.0 Revenue US 2016 Blackbaud, Inc. This publication, or any part thereof, may not be reproduced or transmitted in any form or by any means, electronic, or mechanical,
Non-Grant Billing and Receivables User Training Session 3
 Non-Grant Billing and Receivables User Training Session 3 August 2018 R E V I S I O N H I S T O R Y Version Date 1.0 Document Created Paulette King 08/20/2018 Page 1 of 15 TABLE OF CONTENTS REVISION HISTORY...
The Budget Transaction Detail Report provides detail information of the following transactions:
 BUDGET TRANSACTION DETAIL REPORT The Budget Transaction Detail Report provides detail information of the following transactions: Pre-Encumbrances : Requisitions (taxes not included) Encumbrances : Purchase
CRM (Blackbaud) Year-End Procedures 2018
 Year-End Procedures 2018") CRM (Blackbaud) Year-End Procedures 2018 Introduction In order to close the year, there a several processes required to be completed in CRM. You can run the necessary reports to create a listing of all
CRM (Blackbaud) Year-End Procedures 2018 Introduction In order to close the year, there a several processes required to be completed in CRM. You can run the necessary reports to create a listing of all
FMS View Expense Budget Information
 FMS View Expense Budget Information Budget Information Queries To view your operating expense budget (Fund 110) in the Financial Management System (FMS), you create a budget query with specific criteria;
Budget Workbook for Agencies Job Aid
 Budget Workbook for Agencies Job Aid The process flow below outlines the steps which need to be completed in order for the Budget Definition to become a Budget Contract. Agency Supplier Budget Definition
Policy. Chapter 6. Accessing the Policy. Nexsure Training Manual - CRM. In This Chapter
 Nexsure Training Manual - CRM Policy In This Chapter Accessing the Policy Adding a Thank You Letter Editing the Policy Adding, Editing and Removing Assignments Admitted Carrier Identification Summary of
Lender Connect Collaboration
 Lender Connect Collaboration When working in files that were originated via RealEC/Closing Insight, the Lender will send over a Closing product with Event Code 431 - Closing Instructions. Below provides
Expedient User Manual Debtors Module
 Volume 2 Expedient User Manual Debtors Module Gavin Millman & Associates Pty Ltd 281 Buckley Street Essendon VIC 3040 Phone 03 9331 3944 Web www.expedientsoftware.com.au Table of Contents Accounting Overview...2
Web Benefits Admin User Guide
 Web Benefits Admin User Guide. Table of Contents Navigate to Web Benefits... 3 Accessing Employee User Accounts... 4 Employee profile... 4 Active coverage... 5 Event history... 6 Family... 6 Adding a New
Epicor Tax Connect for Eclipse. Release 9.0.3
 Epicor Tax Connect for Eclipse Release 9.0.3 Disclaimer This document is for informational purposes only and is subject to change without notice. This document and its contents, including the viewpoints,