Developed by Bounty Limited. CLUBline Hospitality Management Solutions
|
|
|
- Lee Shields
- 5 years ago
- Views:
Transcription

1 CLUBline Financial Management Training Manual v1.0b CLUBline Hospitality Management Solutions Developed by Bounty Limited For technical support or assistance, please call our toll-free support hotline on
2
3 Change History Version Date Description Author First draft H Brown Final draft H Brown Release M S Bannon Information in this document, including URL and other Internet Web site references, is subject to change without notice. Unless otherwise noted, the example companies, organisations, products, domain names, addresses, logos, people, places, and events depicted herein are fictitious, and no association with any real company, organisation, product, domain name, address, logo, person, places or events is intended or should be inferred. Complying with all applicable copyright laws is the responsibility of the user. Without limiting the rights under copyright, no part of this document may be reproduced, stored in or introduced into a retrieval system, or transmitted in any form or by any means (electronic, mechanical, photocopying, recording, or otherwise), or for any purpose, without the express written permission of Bounty Limited. Bounty Limited may have patents, patent applications, trademarks, copyrights, or other intellectual property rights covering subject matter in this document. Except as expressly provided in any written license agreement from Bounty Limited, the furnishing of this document does not give you any license to these patents, trademarks, copyrights, or other intellectual property Bounty Limited. All rights reserved 1
4 2
5 CLUBline FinMan Essentials Table of Contents Change History...1 Table of Contents...3 Figures...10 Getting Started...14 Using The Manual...15 What The Icons Mean Table Of Contents Assistance Overview...16 Unit Focus What is FinMan? FinMan Features Assumptions Starting Financial Management...18 Favourites Operators Menu...21 Login Operator Control Operator Groups To create a new group: To change the access for a group: Operators To create a new Operator: To delete an Operator: Change Password: Chart Menu...27 New Account To create a new account:
6 Category/Header Maintenance To maintain Categories and Headers: To Create a New Header: To Create a New Category: To View a List of Headers: Change Account To Change Account Details: Suspended Accounts To Suspend an Account: Viewing Chart Balances To View Account Details: Delete Account To Delete an Account From the Chart: Renumber Account To Delete an Account From the Chart: Quick Budget Setup To Quickly Setup the Budgets: Import Budgets from CSV To Import Budgets from a CSV File: Export Chart Movements Chart List Chart List Alpha Chart List by Type Chart List by Creation Date Assets...43 Asset Menu The Address Book Adding Custodians to the Address Book: Removing Custodians from the Address Book: Adding a Photograph to a Custodian: Printing Custodian Details and Asset List: Calendar Understanding the Calendar Filtering the Calendar Printing Events
7 CLUBline FinMan Essentials Asset List How to display only Disposed Assets: How to Print the List: How to See More Details of the Selected Asset: Edit an Existing Asset: How To Search The List: Asset Grouping Adding a Header: Adding a New Group: Removing a Group: Editing an existing Group: Moving Assets into a Group: Moving Assets from a Group: Asset Details Adding a New Asset: Search for an Asset: Attaching a Photo to the Asset: Renumber an Existing Asset: Revalue an Asset: Duplicate an Asset: Adding a Component to an Existing Asset What is the new Effective Life Field? Override a Month Depreciation: How to Dispose an Asset: Asset History Asset Depreciation Forecasting What is Private Use? Depreciation Reports Understanding the Depreciation Schedule Screen: Running a Depreciation Schedule: Send Depreciation to EOM Journal: Creditors...67 Creditors Menu New Creditor Change Creditor
8 Creditors History Delete Creditor To delete a creditor from the system: Creditor Invoice Posting Sanyo POS Magic Bevlink POS OzQuip POS Micros POS Wincheck Import Generic Import Creditors Manual Payments Payments Creditors Payments - EFT Cancel Invoice To Delete a Creditor s Invoice: Creditor Group Creditors Default General Ledger Accounts Control Account Group Creditors History To View The Details of a Transaction: Creditor Reports To Print a Creditors Report: Creditors Report Samples Short List Detailed List Creditors ABN List Invoice List for period Unpaid Invoice List for period (Trial Balance) Unpaid Invoice List for period (Single Creditor) Aged Trial Balance (30, 60, 90) Aged Future Payments Short Inv List (no GL codes) for period Posting Date Invoice List Paid Invoice List for period Creditors Summary Debtors
9 CLUBline FinMan Essentials Debtors Menu Debtor Group New Debtor To set up a new debtor: Control Account Group Change Debtor Debtors History To View the Details of a Transaction: Debtors Reports To Print a Debtors Report: Debtors Report Samples Short List Detailed List Debtors ABN List Invoice List for Period Short Inv List (no GL codes) for period Invoice Sequence List for Period Paid Invoice List for Period Bulk Bills Statements Single Debtor Statement Unpaid Invoice List (Trial Balance) Overdue Invoice List Aged Trial Balance Debtors Deposits Debtors Summary Bank Reconciliation Bank Reconciliation Menu Bank Rec Bank Reconciliation Report Samples Unpresented Cheque Report Presented Cheque Report Uncredited Deposits Report Credited Deposits Report Present Payments Quickly
10 To present cheques quickly: Present Payments Individually To present an individual payment: Cancel Cheque To cancel a cheque: Posting Manual Posting Important features of Manual Posting To process a transaction using the Manual Posting option:111 Creditors Invoices Posting account payable: Reports Transaction Reports Trial Balance Ledger Reports Account Enquiry GST Reports Journal Reports Actuals Budgets Receipts/Payments Budget Report Bar Chart Standing Notations List Management Reports Report Exporting Settings Club/Firm Details Change G/L Posting Month Change Creditors Posting Month Change Debtors Posting Month Interface Details EFT Details To set up the EFT details: Special Month Ends
11 CLUBline FinMan Essentials Set Control Accounts Add a Control Account Group GST Settings Utilities Unit Focus Introducing Utilities Recalculate Month Balances Backup Database To Backup a database: To Backup a database: Restore a Database Year End Script Checker Fix Imbalance FRF Generator Unit Focus Introducing Builder Logging In to the RF Builder Main Screen Printing FRF Header Report Configuration Report Setup Report Body Commands
12 Figures Figure 2.1 Logging In...18 Figure 2.2 Main Screen...18 Figure 2.3 Add Favourite...19 Figure 2.4 New Favourite...19 Figure 3.1 Operators...21 Figure 3.2 Operators - Logging In...22 Figure 3.3 Operators Operator Management...22 Figure 3.4 Operators Operator Groups...23 Figure 3.5 Operators Operator Setup...25 Figure 4.1 Chart Menu...27 Figure 4.2 Chart New Account...27 Figure 4.4 Category/Header Maintenance...29 Figure 4.5 Category/Header List...30 Figure 4.6 Chart Change Account...30 Figure 4.7 Chart Suspend Account...32 Figure 4.8 Chart View Account...32 Figure 4.9 Chart Delete Account...33 Figure 4.10 Chart Delete Account Confirmation...34 Figure 4.11 Chart Delete Account Denied...34 Figure 4.12 Chart Renumber Account...35 Figure 4.13 Chart Renumber Account Confirmation...35 Figure 4.14 Chart Quick Budget Setup...36 Figure 4.15 Chart Import Budget from CSV...37 Figure 4.13 Chart Import Budget Confirmation...37 Figure 4.14 Chart Export Chart Movements...38 Figure 4.15 Chart Export Chart Movements...38 Figure 4.16 Chart Chart List Numerical...39 Figure 4.17 Chart Chart List Alpha...39 Figure 4.18 Chart Chart List Grouped...40 Figure 4.19 Chart Chart List By Create Date...41 Figure 5.1 Asset Menu...43 Figure 5.2 Adding Custodians...44 Figure 5.3 Removing Custodians...45 Figure 5.3 Adding Photos...46 Figure 5.4 Asset Calendar...47 Figure 5.5 Calendar Filter...49 Figure 5.6 Asset Reports...49 Figure 5.7 Asset List
13 CLUBline FinMan Essentials Figure 5.8 Display Only Disposed Assets Figure 5.9 Display Asset Details Figure 5.10 Asset Grouping Figure 5.11 Padlock Figure 5.12 Adding an Asset Figure 5.14 Cropping Photo Figure 5.15 Asset History Figure 5.16 Asset Disposal Figure 6.1 Creditors Menu Figure 6.2 Creditors - Main Screen Figure 6.3 Creditors Creditor History Figure 6.4 Creditors Delete Creditor Figure 6.5 Creditors Delete Creditor Successful Figure 6.6 Creditors Delete Creditor Failed Figure 6.7 Creditors Creditor Invoice Posting Period Advice Figure 6.8 Creditors Creditor Invoice Posting Post Another Figure 6.9 Creditors Creditors Manual Payments Select Period 74 Figure 6.10 Creditors Creditors Manual Payments - Main Figure 6.11 Creditors Payments Figure 6.12 Creditors Payments Invoices Due For Payment Figure 6.13 Creditors Delete Creditor Invoice Figure 6.14 Creditors Delete Creditor Invoice Confirmation Figure 6.15 Creditors Delete Creditor Invoice Message Figure 6.16 Creditors - Creditor Groups Figure 6.17 Creditors Control Accounts Figure 6.18 Creditors Creditors Reports Figure 6.19 Creditors Creditor History Figure 6.20 Creditors Creditor Details Report Figure 6.21 Creditors Creditors Reports Figure 7.1 Debtors Menu Figure 7.2 Debtors - Main Figure 7.3 Debtors Debtors Group Figure 7.4 Debtors Control Accounts Figure 7.5 Debtors Debtors Reports Figure 7.6 Debtors Terms Figure 7.7 Debtors Debtor History Figure 7.8 Debtors Debtors Details Report Figure 7.9 Debtors Debtors Reports Figure 8.1 Bank Reconciliation Menu Figure 8.2 Bank Reconciliation - Main Figure 8.3 Bank Reconciliation Present Payments Quickly Figure 8.3 Bank Reconciliation Warning
14 Figure 8.4 Bank Reconciliation Present Payments Individually..105 Figure 8.5 Bank Reconciliation Cheque Presented Figure 8.6 Bank Reconciliation Warning Figure 8.7 Bank Reconciliation Cheque Number Error Figure 8.8 Bank Reconciliation Cancel Cheque Figure 9.1 Posting Menu Figure 9.2 Posting Proceed Confirmation Figure 9.3 Posting Change Posting Period Figure 9.4 Posting Confirm Period Figure 9.5 Posting Change Creditor Posting Period Figure 9.5 Posting Creditor Invoice Posting Figure 10.1 Report Menu Figure 10.2 Transaction Reports Figure 10.3 Transaction Report Figure 10.4 Trial Balance Figure 10.5 Ledger Reports Figure 10.6 Year Ledger Report Figure 10.7 Account Enquiry Figure 10.8 GST Reports Figure 10.9 GST Report example Figure Journal Reports Figure Journal Report example Figure Actuals Sub-Menu Figure This Years Actual Movements Figure This Years Actual Movements Figure Last Years Actual Movements Figure Twelve Months Actuals and Budgets Report Figure Budgets Sub-Menu Figure This Years Budget Movements Figure Next Years Budget Movements Figure Receipts/Payments Budget Report Figure Bar Chart Window Figure Bar Chart Period Options Figure Bar Chart Accounts Range Figure Bar Chart Periods Covered Figure Bar Chart Periods Covered Figure Bar Chart 2D/3D Control Figure Bar Chart 2D/3D Control Figure Standing Notations Error Message Figure Management Reports Sub-Menu Figure Management Reports Period Options Figure Statement of Performance Include Account Numbers133 12
15 CLUBline FinMan Essentials Figure Statement of Performance Figure Statement of Performance sub a/c summary Figure Statement of Performance summarised Figure Statement of Performance Year Comparison Figure Statement of Performance Year Summary Figure Statement of Performance Year Summary Figure 11.1 Settings Menu Figure 11.2 Settings - Main Figure 11.3 Settings - Change GL Posting Month Figure 11.4 Settings Change Creditors Posting Month Figure 11.5 Settings Change Debtors Posting Month Figure 11.6 Settings Interface Details Figure 11.7 Settings EFT Details Figure 11.8 Settings Add Control Account Group Figure 11.9 Settings GST Code Setup Figure 12.1 Utilities Main Menu Figure 12.2 Utilities Backup Database Figure 12.3 Utilities Backup in Progress Figure 12.4 Utilities Backup Complete Figure 12.5 Utilities Restore Database Figure 12.3 Utilities Backup in Progress Figure 13.1 FRF Generator Main Menu Figure 13.2 FRF Generator File Header Figure 13.3 RF Generator Column Information Drop Down Figure 13.4 RF Generator Body & Print Period Commands
16 Getting Started W elcome to the Financial Management User Manual. This manual provides you with all necessary information for the efficient operation of CLUBline s Financial Management system.. What this Manual is about The purpose of this manual is to provide you with a reference to assist with the following: Navigation: ϖ ϖ Orientation around the Financial Management program Key features Manage the following tasks: ϖ ϖ ϖ Debtors and Creditors: Bank Reconciliations Posting transactions Reports ϖ ϖ ϖ ϖ Transaction Taxation Journal Banking 14
17 CLUBline FinMan Essentials Using The Manual What The Icons Mean Throughout this manual, icons have been used as visual prompts. The icons and their meanings are explained below. Knowledge Builder - An activity that is intended to increase your knowledge and understanding of the topic. Definition Definition - A concise description of the topic being discussed.! Important Note - An important piece of information. Table Of Contents The Table of Contents is an index of sections and sub-sections within the manual and their page location within it. Assistance For further assistance you should contact your systems administrator or the CLUBline Software helpdesk. support is available by ing your query to support@bountylimited.com. Telephone support is available through our Help Desk on
18 1. Overview Unit Focus This unit provides you with an overview of CLUBline s Financial Management program. What is FinMan? CLUBline s Financial Management (FinMan) software provides a comprehensive debtors and creditors module, cash book, general ledger and bank reconciliation facility to automate the major tasks involved in Club financial management operations. FinMan also hosts a fully integrated Asset Register to record, track, add and dispose of assets according to the prevailing accounting standards. FinMan is designed to integrate with all of CLUBline s Management Software systems and EFT payment facilities such as CLUBline Payroll & Rostering. CLUBline Software also provides phone and modem support ensuring seamless operation of the product. FinMan Features The following key features are supported by CLUBline s Financial Management package: FinMan is fully integrated, which means that as a creditor s invoice is entered, the creditors and general ledgers are automatically updated no duplicate manual entries. FinMan s Chart of Accounts caters for up to 9999 ledger accounts with up to 99 sub ledgers. Posting to Creditors, Debtors and General Ledger can be done concurrently to different periods. The General Ledger is fully integrated with Debtors and Creditors 16
19 CLUBline FinMan Essentials ledgers. Standing Journals providing easy entry of daily receipts and payments. Financial reports are fully customisable and cater to any Chart of Accounts. Monthly or quarterly GST reports simplify BAS reporting. Asset Register is fully integrated with the CLUBline Financial Management System. Asset reporting periods can be based on calendar months or be user defined. Assumptions This manual is prepared for people with the following skill set: A good working knowledge of Windows based operating systems Familiarity with connecting with your ISP (Network) provider A basic knowledge of an program Basic knowledge of computer maintenance Professional accounting skills. End of Unit 1 17
20 2. Starting Financial Management Select the Financial Management icon on your desktop. The Login window will display. Figure 2.1 Logging In Use the drop down arrow to select the desired database Enter the User name and Password assigned to you. If unknown, contact your administrator/bounty Limited for this password. Single Click on the Login button. You will then see the Financial Management MAIN SCREEN. The Financial Management MAIN SCREEN includes the new format navigation tree as shown below. Figure 2.2 Main Screen 18


21 CLUBline FinMan Essentials All of your interaction with this program will be using the menu items to navigate through the CLUBline Financial Management program. Favourites The favourites section allows you to create shortcuts to menu items by dragging them from the menu. To create a favourite: Click the category from the main menu. Left click and drag the desired menu item from the list down to the favourites section. Figure 2.3 Add Favourite Click Yes to confirm that you want to add the menu item to favourites. The menu item will now appear in the favourites section. Figure 2.4 New Favourite 19

22 End of Unit 2 20
23 CLUBline FinMan Essentials 3. Operators Menu If your organisation has a number of operators using the Financial Management program, it is advisable that each operator be set-up with an individual Operator Number and Password to enable secure access to the data. The Login Directory provides the ability to setup and maintain all operators using the system. Figure 3.1 Operators Login Login allows entry to the CLUBline Financial Management program. To Login, or change from one logged in operator to another: Select Login from the navigation tree. Select Login in the drop down sub-directory. The following window will display. Type your Operator name then press the TAB key. Type in your Password. As you type your password, an * will appear in the PASSWORD WINDOW as representation of each 21
24 character that you type. If you make a mistake, press the BACKSPACE KEY to delete the * and retype as necessary. Figure 3.2 Operators - Logging In Press the ENTER KEY. You will return to the Financial Management MAIN SCREEN. Your operator login details will display on the TITLE BAR of the Financial Management MAIN SCREEN and you will be ready to start using CLUBline Financial Management. An Invalid Password, please retry message appearing could indicate that a keying error has been made or that the desired operator has not been set up through the New Operator option. Operator Control If your organisation has a number of operators using the CLUBline Financial Management program, it is advisable that Operator Control be utilised to ensure that only operators with appropriate clearance can access certain sensitive areas of the system. Access to specific areas and/or functions can be achieved through assigning and maintaining different Permission Levels. Figure 3.3 Operators Operator Management 22
25 CLUBline FinMan Essentials Operator Groups The Operator Groups function allows an administrator to create different categories of operator, each with permission to access different areas of the Financial Management system. Four groups are created for you and are usually adequate for most venues. These groups are: Supervisor Master Update Query Figure 3.4 Operators Operator Groups 23

26 To create a new group: Click on the New button Enter a name for the group. Click OK. To change the access for a group: Select the group from the list on the left side. Click on or off the resources on the right side. Note: A padlock indicates no access while a key indicates access. Click on save when you have made your changes. Operators Operators are the people who use the Financial Management system and are assigned membership to an appropriate Operator Group. Three default Operators are created for you at time of installation. You then create new Operators as required. The Operator name is listed on the left with the Operator Group indicated at the bottom. You can check what a particular group has 24

27 CLUBline FinMan Essentials access to using the Group Resources section on the right. Figure 3.5 Operators Operator Setup To create a new Operator: Click on the New button Enter the Operators name in the Username field Enter a password into the Password field Select the appropriate Group from the list of Groups. Click Save To delete an Operator: Select the Operator from the list of Operators on the left Click on the Delete button at the top of the screen You will be prompted to confirm that you want to delete the operator Change Password: There are times where an operator s password will need to be changed. This could be initiated for security reasons (all passwords changed on a regular basis) or for reasons of loss or fraud. To 25
28 change an authorised user s password: Make sure you are logged on as a user with permission to use the Operator Control screen Select the operator from the list of operators under the Operator Control screen. Overwrite the existing password with a new password. Click Save. An Operator Details Saved message indicates that the password is now changed. End of Unit 3 26
29 CLUBline FinMan Essentials 4. Chart Menu CLUBline Financial Management has been developed to easily create and maintain your chart of accounts. Ledger account maintenance access is dependant upon the operator login being used. Budget and actual figures can be maintained for Last Year History, This Year and Next Year. Figure 4.1 Chart Menu New Account Creating a new account is done through the Chart Menu. Accounts can be numbered from 1 to 9999 and sub accounts can be set up from.01 to.99. All new account details can be set-up by all login permission levels. To create a new account: Select Chart from the navigation tree. Select New Account in the drop down sub-directory. The following window will appear. Figure 4.2 Chart New Account 27

30 IMPORTANT: When entering the details for the new account, note that each set of figures should be completed and saved before switching to another set. (I.e. input this years history and save before switching to last Year History). Enter the new account details as desired. Note that all accounts except Header accounts are normally Posting Accounts. Select or create a new category from the drop down list. Single click on the Save button. Single click on the Exit door. You will return to the Financial Management Main Screen. IMPORTANT: When entering the details for a new account, remember that the Report Format files need to be checked and edited as necessary to include any new accounts. Category/Header Maintenance This is where you set up the Categories and Headers as you want them to appear on different reports. 28

31 CLUBline FinMan Essentials To maintain Categories and Headers: Select Category/Header Maintenance from the Create New Account Screen. The following window will appear: Figure 4.4 Category/Header Maintenance The Headers are listed in Header Number order and associated Categories can be sorted by applying a sort order to them either when creating the Category or by editing an existing Category. To Create a New Header: Enter a name for the new header in the Header Name field. Click Save New. The Header will be assigned the next available header number. To Create a New Category: Enter a name for the new Category in the Category Name field. Select the Header under which this Category will appear. Assign a sort order. Click Save New. 29
32 To View a List of Headers: Click List at the top of the screen. The following window will appear: Figure 4.5 Category/Header List Change Account Account details can be maintained only the more senior login permission levels. To Change Account Details: Select Chart from the navigation tree. Select Change Account in the drop down sub-directory. The following window will appear. Change details as required. Single click on the Save button. Single Click on the Exit door. You will be returned to the Financial Management Main Screen. Figure 4.6 Chart Change Account 30

33 CLUBline FinMan Essentials IMPORTANT: When entering the details for the new account, note that each set of figures should be completed and saved before switching to another set. (i.e. input this years history and save before switching to last Year History). Suspended Accounts You can flag accounts as being suspended in the Change Account option in the Chart directory. This will prevent accidental posting to the account of creditors invoice details. To Suspend an Account: Select Chart from the navigation tree. Select Change Account in the drop down sub-directory. The following window will display. Single click in the Suspended field. Single click on the Save button. Single click on the EXIT DOOR. You will return to the Financial Management MAIN SCREEN. 31

34 Figure 4.7 Chart Suspend Account Viewing Chart Balances Chart balances can be viewed by displaying a Trial Balance for the desired month. Alternatively the balances for This Year, Last Year and Next Year Budget and Actual can be viewed from the Chart - Change Account menu option. No values should ever be altered here unless previously referred to CLUBline. These balances are calculated based on transactions processed to each account during each period. To View Account Details: Select Chart from the navigation tree. Select Change Account in the drop down sub-directory. The following window will display. View details as required. Single click on the Save button. Single click on the EXIT DOOR. You will return to the Financial Management MAIN SCREEN. Figure 4.8 Chart View Account 32
35 CLUBline FinMan Essentials Delete Account The Delete Account option is only available for user logins with Senior Update level or greater. An account may only be deleted from the chart where there are no existing transactions. To Delete an Account From the Chart: Select Chart from the navigation tree. Select Delete Account in the drop down sub-directory. The following window will appear. Enter the number of the account to be deleted. The account details will appear. Single click on the Delete button. A message box will appear. The account has been deleted from the system, single click on the O.K. button. You will return to the Financial Management MAIN SCREEN. Figure 4.9 Chart Delete Account 33

36 Figure 4.10 Chart Delete Account Confirmation IMPORTANT: If the account has transactions against it, it cannot be deleted and the following message box will display. Figure 4.11 Chart Delete Account Denied Single click on the OK button. You will return to the Delete account window. Single click on the EXIT DOOR. You will return to the Financial Management MAIN SCREEN. Renumber Account 34 The Renumber Account option is only available for user logins with


37 CLUBline FinMan Essentials Senior Update level or greater. To Delete an Account From the Chart: Select Chart from the navigation tree. Select Renumber Account from the Chart Menu. The following window will appear. Figure 4.12 Chart Renumber Account Enter the number of the account to be deleted. The account details will display. Enter the new chart number in the new chart number field. The following message box will appear. Click on the O.K. button. You will return to the Financial Management MAIN SCREEN. Figure 4.13 Chart Renumber Account Confirmation 35

38 Quick Budget Setup Budgets can be set up for each ledger account. Budget figures can be entered manually when adding a new account or through the Quick Budgets Setup option which is a much more time effective way when a global adjustment needs to be made to a range of accounts. To Quickly Setup the Budgets: Select Chart from the navigation tree. Select Quick Budget Setup in the drop down sub-directory. The following window will display. Figure 4.14 Chart Quick Budget Setup Enter the Account Range you wish to establish budgets for. Enter the Period Range for the months you wish to establish budgets. Select the Adjustment to apply to the budget base. Select the Budget Base. Select the Budget Year for Setup. Budgets can be established for either the current year or next year Once all selections have been made, single click on the Save button 36
 file.")
39 CLUBline FinMan Essentials Single click on the EXIT DOOR. You will return to the Financial Management MAIN SCREEN. Import Budgets from CSV Budgets can be imported from a Comma Separated Value (CSV) file. This file must be created with the first column dedicated to the account number, and subsequent columns representing the budget figures for each period. Budgets can be imported for the current year or next year. To Import Budgets from a CSV File: Select Chart from the navigation tree. Select Import Budgets from CSV in the drop down sub-directory. The following window will appear. Figure 4.15 Chart Import Budget from CSV Select the Period Range. Select the Budget Year. Select the Proceed to Import button to open the Import Budgets form. Enter the CSV file to be imported and select Open. The budget figures will be imported. The following window will appear. Figure 4.13 Chart Import Budget Confirmation 37


40 Single click on the O.K. button to return to the Import Budgets window. Single click on the EXIT DOOR. You will return to the Financial Management MAIN SCREEN. Export Chart Movements Chart movements can be exported to a text file. Select Chart from the navigation tree. Select Export Chart Movements from the Chart Menu. The following window will appear. Figure 4.14 Chart Export Chart Movements Enter the period number for which movements are to be exported. Once complete the following window will appear. Click on the OK button to return to the Charts Menu. Figure 4.15 Chart Export Chart Movements Chart List To view a numerical Chart List: 38
41 CLUBline FinMan Essentials Select Chart from the navigation tree. Select Chart List in the drop down sub-directory. The following report will appear. Figure 4.16 Chart Chart List Numerical The report can be viewed and printed, and exported as required. By using the binoculars, you can search for specific details. Single click on the EXIT DOOR. You will return to the Financial Management MAIN SCREEN. Chart List Alpha To view an alphabetical Chart List: Select Chart from the navigation tree. Select Chart List Alpha in the drop down sub-directory. The following report will appear. The report can be viewed and printed, and exported as required. By using the binoculars, you can search for specific detail. Single click on the EXIT DOOR. You will return to the Financial Management MAIN SCREEN. Figure 4.17 Chart Chart List Alpha 39
42 Chart List by Type To view the Chart of Accounts sorted by the Account type: Select Chart from the navigation tree. Select Chart List by Type in the drop down sub-directory. The following report will appear. Figure 4.18 Chart Chart List Grouped 40
43 CLUBline FinMan Essentials The report can be viewed and printed, and exported as required. By using the binoculars, you can search for specific details. Single click on the EXIT DOOR. You will return to the Financial Management MAIN SCREEN. Chart List by Creation Date To view the Chart of Accounts sorted by the date that the account was added to the Financial Management system: Select Chart from the navigation tree. Select Chart List by Creation Date in the drop down sub-directory. The following report will appear. Figure 4.19 Chart Chart List By Create Date 41
44 The report can be viewed and printed, and exported as required. By using the binoculars, you can search for specific details. Single click on the EXIT DOOR. You will return to the Financial Management MAIN SCREEN. Other reports can be run to show transaction history for a particular ledger account or a range of ledger accounts. Refer to the Reports section of this manual for further details. End of Unit 4 42
45 5. Assets Asset Menu The assets menu contains selections relating to the setting up and handling of your Clubs asset holdings. The asset register provides the ability to manage your assets and calculate depreciation monthly, yearly or year-to-date. Figure 5.1 Asset Menu The Address Book Asset Management contains a built-in address book for maintaining a list of Custodians who may handle or possess the Assets you manage. Not only does the address book allow for information such as; address, phone, to be saved, but it also provides for a simple way to store a photograph of each custodian. The address book is instantly searchable, making it easy to find a custodian quickly especially when there are many entries in your 43

46 address book. The Address Book also offers a list of Assets currently in possession of the Custodian. This makes it easy to identify the items the custodian should have in the event of the custodian leaving the workplace or when receiving new/updated assets. Adding Custodians to the Address Book: Figure 5.2 Adding Custodians Follow the steps below to add a custodian to the Address Book. Click the New icon, Change the First name from New Entry to the name of the custodian, Using the Tab key to move from one item to the next. Filling in details where applicable, The Note field allows you to record miscellaneous information, When finished click the Save icon, Repeat from Step 1 if you need to add another custodian. 44

47 CLUBline FinMan Essentials Removing Custodians from the Address Book: Follow the steps below to permanently remove a custodian from the Address Book. Select a Custodian from the list of Custodians on the left, Click the Delete button, You may receive has assets warning, Click Yes to asking do you really wish to delete the custodian Repeat from Step 1 if you need to remove other custodians. When you attempt to remove a custodian who has one (1) or more assets in possession, you will receive a warning dialog stating the Custodian has assets in possession and continuing will remove the link between the custodian and the list of assets. Figure 5.3 Removing Custodians Adding a Photograph to a Custodian: A single photograph can be added to a Custodian, this photograph may appear in the Asset Details screen, and may also appear in 45

48 some asset reports. Select a Custodian from the list of Custodians on the left, Click the Photo button, a new window will pop-up, Figure 5.3 Adding Photos Click the Choose button, From the file dialog select the photo you wish to assign to this custodian, If the photo is too large or too small use the zoom slider to move into the custodian s face. You can centre the photo by clickingand-dragging the photo until you get the crop perfect, When you are satisfied with the photo click Set. Printing Custodian Details and Asset List: You may print out the details of a custodian, and the assets they hold. 46

49 CLUBline FinMan Essentials Select a Custodian from the list of Custodians on the left, Click the Print button, You will now see a print preview of the custodian and asset list. At this point you may press the print icon, or close the print preview if you wish not to print it. Calendar The Calendar system in Asset Management is designed to let you know upcoming scheduled events occurring in your Asset list. The Calendar will analyse all assets in the system and identify the following events: Life Ending Warranty expires Asset Service required Disposal Figure 5.4 Asset Calendar You may filter the items in the Calendar reducing the displayed events; this will be discussed further in this document. 47
50 The same list of event, and filtering, is automatically displayed on the Asset Management main menu. Understanding the Calendar There are three (3) core parts to the Calendar: The Calendar itself The Year view The Asset list The Calendar will display all unfiltered events in the Month. They will be listed on the day of the month that the event occurs. If you would like to move to a different month, click the month name at the top of the calendar, a drop-down list will display and you may select a new Month. This also applies when changing the year of the calendar. The Asset list to the left of the calendar displays the same information that appears in the Calendar view, but is just a list based representation. The Year view is a great little tool that allows you to quickly move between the months of the selected year. Some interesting points of the Year view are: Months with one (1) or more events will display as bold, The selected month will display with a light-blue background, To change the selected year, click the year and type the new year. Filtering the Calendar To restrict the type of events displayed within the Calendar you can use the filter. Click Filter button, Select the items you want displayed or suppressed. Ticked event types will be display, unticked will not display, Click Save when finished with your selection, 48

51 CLUBline FinMan Essentials Figure 5.5 Calendar Filter These filter preferences are remembered by Asset Management, and your selections will also be used by the calendar on the Main Menu. Printing Events The Calendar is great for viewing event details about the Assets, but what if you would like to print the results? This can be easily achieved by using the Asset Reports; Go back to the Main Menu, Click Assets > Asset Report, Select from the list; o o o Servicing Log Report, Warranty Report, Life Ending Report. Figure 5.6 Asset Reports 49
 of each Asset is displayed alongside.")
52 Asset List The Asset List screen also allows you to see all your Assets in a topdown list. It will display each Asset Group (in bold), and the Assets within that Group. Critical information (Acquired date, Cost, and Opening Written Down Value) of each Asset is displayed alongside. The list also allows for easy searching for any asset, or displaying assets that only belong to specified Group. Assets that have been disposed will appear in ghosted-grey text. Figure 5.7 Asset List 50

53 CLUBline FinMan Essentials How to display only Disposed Assets: Click the Display only Disposed Assets checkbox, Figure 5.8 Display Only Disposed Assets You can filter the list of displayed assets by selecting the Asset Group from the drop-down. 51

54 How to Print the List: Click the Print button, Note, that this will print exactly as the list displays, with the exact information in the list. How to See More Details of the Selected Asset: You may find that the critical detail provided in the Asset List is not enough, it s easy to quickly find more information about the selected Asset; Right click the selected Asset and click Display Details Figure 5.9 Display Asset Details Or Select the Asset from the list, Click Details icon, Edit an Existing Asset: If you identify an Asset that requires some changes you can quickly 52
55 CLUBline FinMan Essentials switch to the Asset Details window by; Make sure you have correctly selected the Asset, Right click the Asset, Select Edit Asset from the popup menu. How To Search The List: It is easy to search for Assets by name from the Asset List. Simply select the Search textbox and enter the name of the Asset to search for. If you have selected an Asset Group filter, this will restrict the search to only assets in the filter group. Asset Grouping CLUBline Asset Management requires an Asset to belong to an Asset Group. Grouping is not only a logical way to gather similar assets together, but also so you have logical reporting and an easy method Journal the depreciation. You may also notice that there is a Header group. The header may only used to hold Groups immediately under it. To help visualise the hierarchy; Header Groups Assets Asset Grouping functionality is found at Main Menu > Assets > Asset Grouping. Figure 5.10 Asset Grouping 53

56 Adding a Header: Ensure that the padlock is unlocked, if it is not click the padlock, Figure 5.11 Padlock Click the Add icon, 54
57 CLUBline FinMan Essentials Click Yes, when asked Would you like to make this a Header? Enter a Header name, press Enter, Enter the Header number, Click the Save icon. Adding a New Group: Ensure that the padlock is unlocked, if it is not click the padlock, Select a Header that you want the Group to come under, Click Add, Click No, when asked Would you like to make this a Header? Enter the name of the Group, press Enter, Enter the details for the Group, o o o Group Number, Expense Account, Accumulated Depreciation, Click the Save icon. Removing a Group: Ensure that the padlock is unlocked, if it is not click the padlock, Select the Group to delete, Click the Delete icon, Click Yes to confirm deletion. Editing an existing Group: Ensure that the padlock is unlocked, if it is not click the padlock, Select the Header or Group to edit, Modify the details to the right. Click the Save icon. 55
58 Moving Assets into a Group: Select the Group from the list, Click the Move Assets into this Group button, The list on the left displays all Assets and the Group they belong to, the list on right displays the Assets in the previously selected Group, Tick the Asset(s) from the list on the left you want to move into selected Group, Click the! button. Note: You can filter the left-hand list by using the Group dropdown button. Moving Assets from a Group: Select the Group from the list, Click the Move Assets into this Group button, The list on the left displays all Assets and the Group they belong to, the list on right displays the Assets in the previously selected Group, Tick the Asset(s) from the list on the right that you no longer need in the selected group. Click the button. Note: If you change the Group filter on the left-hand list and click the button, those Assets will move into that filter Group. Asset Details Adding a New Asset: Click the Extra icon, Click Add Asset from the list, Enter an unused Asset Number, if the asset number is already in use you will be informed, Enter an Asset Name, 56
 Tax")
59 CLUBline FinMan Essentials Figure 5.12 Adding an Asset Click Save, Ensure that you fill in some essential details; o o o o o Acquisition Cost, Acquisition Date, Effective Date, Accounting Depreciation (Depn type and Life) Tax Depreciation (Depn type and Life) Click the Save icon. Search for an Asset: There are two different ways to search for Assets, the first being; Using the Asset Number drop-down box, Either enter the Asset Number or the Asset Name Note: If you enter by the Asset Name several Assets may be returned as there may be multiple Assets with the same or similar 57

60 names The second way to search for Assets is; Click the button, In the new open window click the icon and select either; o o o Asset Name, Asset No, Barcode. Type in the search-box, press Enter, The results of the search will be listed, you can click on any item in the list and it will be shown in the Asset Details window. Attaching a Photo to the Asset: Search for the Asset to attach the photo, Make sure the Depreciation tab is selected, Click on Click to set image from the low-right of the window, Click the Choose button, From the file dialog select the photo you wish to assign to this custodian, Figure 5.14 Cropping Photo If the photo is too large or too small use the zoom slider to move 58
61 CLUBline FinMan Essentials into the custodian s face. You can centre the photo by clickingand-dragging the photo until you get the crop perfect, When you are satisfied with the photo click Set. Renumber an Existing Asset: Search for the Asset, Click the Extra icon, Click Renumber Asset from the popup list, Enter a New Asset Number, if the number is already in use you will be informed, Click the Save new Asset No button, Click the Close icon. Revalue an Asset: If an Asset has been revalued, and it is identified that the Asset has been depreciated to much/little using the Revalue feature allows you to adjust the value of the Asset, while maintaining full auditing of the adjustment(s). Search and display the Asset, Click the Extra icon, Click Revalue Asset from the popup-list, Enter an adjustment Adjust Cost by textbox, (i.e. If asset was valued at $1000 and revalued value is $2000, then enter $1000 into this box), If item has dropped further in value then use a negative value, Give a reason for adjustment in Comment field, Click Save to commit change. Duplicate an Asset: Search for the Asset, 59
62 Click the Extra icon, Click the Duplicate Asset item from the popup-list, Enter the New Asset Number (if a Number is already in use you will be informed), Enter the New Asset Name, Click the Save icon, Asset is now Duplicated. Adding a Component to an Existing Asset At times you may need to add a component to an existing Asset. For example, a new computer screen is added to the CEO Desktop Computer asset. This new screen would be considered a component of the CEO Desktop Computer asset. To add a component to an existing Asset; Search and display the Asset, Click the Extra icon, Click the Add Component item from the popup-list, Enter the New Asset Number, it has to be prefixed with the parent asset number, Enter the New Asset Name, Click the Save icon, Enter the details for the New Component Asset, Click the Save icon. Note: All component assets will begin with parent asset number followed by the - symbol and then the component number. For example the second component of COMP0001 will be COMP What is the new Effective Life Field? Asset Management, unlike previous iterations of CLUBline Asset products, revolves its depreciation calculation around the Asset s Effective Life as opposed to the rate of depreciation. When entering Effective Life the Rate will be automatically calculated for you, or 60

63 CLUBline FinMan Essentials visa-versa. By using the Effective Life of the Asset ensures that depreciation calculations are more accurate and that calculations are precisely made to the day. Note: The document CLUBline followed for ATO compliant depreciation calculation is called NAT pdf, and can be found in the location where Asset Management is installed. Override a Month Depreciation: In the circumstance where you need to change the calculated depreciation it is indeed possible to override the monthly depreciation of an asset. You may need to do this because you ve identified an asset that depreciated too much/little, or from advice from your accountant/auditor. Search and display the Asset, Click the History tab, Figure 5.15 Asset History Ensure the Depreciation History option is selected, Select either the Accounting Book or the Tax Book, Move the mouse cursor over the Mnth Depn, you will notice a 61
64 appear beside the column, Click the row to modify, Enter the Override Depreciation amount, Enter a Comment why the change has been made, Click the Save icon. Note: You can only override a previous month s depreciation; you cannot enter a future month depreciation. It is best to run a Depreciation Schedule, and then modify the month depreciation before sending the depreciation to the EOM journal. Note: A month that has an overridden depreciation will not be overridden by the Depreciation Schedule in the event that the schedule is re-run for that given month. E.g., Asset #1 has a month depreciation of $10.00, you override with $ The depreciation schedule will remain at $12.50 as opposed to reverting to $ How to Dispose an Asset: Search for the Asset, Click the Disposal tab, Click the Dispose or Write-Off this Asset button, Enter the Type of disposal, Enter a Comment explaining the disposal, Enter the Date of disposal, If the disposal is not a Write-Off enter the Proceed ($) of the disposal, Click the Save icon. Note: You can cancel a disposal before you Save by clicking the Cancel button. Figure 5.16 Asset Disposal 62

65 CLUBline FinMan Essentials Note: If the Asset is already disposed across the Disposal tab a red line will appear, and the Dispose or Write-Off this Asset button will not be visible. Note: You cannot enter a Proceed when the Asset is written-off. Asset History Asset History can be found from in the History tab. Asset History is broken into two different categories; Depreciation History and Activity History. Depreciation History will show the entire list of depreciation calculations for the shown asset. From the history you are able to see how your asset has been depreciating since its effective date. Here you may also override the previous month depreciation, please see Override a Month Depreciation above. Activity History will show any notable changes that occurred to this Asset and the date it occurred on. Such as Component added, Asset Disposed, Depreciation override, Revalued. This is more 63
66 audit type history and doesn t affect depreciation history. Asset Depreciation Forecasting When adding a new asset you may be interested to approximately know the Asset will depreciate. Using the Forecast tab you may be able to solve your depreciation questions. The Forecast system will look at the Asset s; Original Cost, Depreciation type, Effective Life for both the Accounting and Tax Books. When the Forecast is displayed you will note that each row will display the depreciation for each year of the Life of the Asset. The Forecast will also display the calculated fields for Opening Written Down Value, Life To Date Depreciation, and Closing Written Down Value. Note: The forecast shows depreciation for full years irrespective of the Effective Date. The forecast is a guide only. What is Private Use? Private Use is a percentage of use of the business asset used during non-business times or means. For example, a business car driven by an employee private (over the weekend). Let say that an asset depreciates at $100 a month and we have 10% Private Use configured. The $100 depreciation is still shown in the depreciation history and will be journaled, but when a Private Use report is run it will be shown that 10% or $10 of that month depreciation was for Private Use. This private use figure is generally only taken into account annually and generally for taxation purposes. Note: Setting a Private Use percentage will not affect the figure being sent to the journal. Depreciation Reports 64
67 CLUBline FinMan Essentials Understanding the Depreciation Schedule Screen: The Reporting Period list on the left displays the current year periods as well as next years periods. The selection made in this list will affect both the depreciation schedule and reports. A period that displays a padlock cannot run another depreciation schedule. The previous year periods can never be unlocked or rerun. This year s periods may be locked and unlocked at any time by the user (right-click the period). If a period is shown in greyed text, this means that that period already has had a Depreciation Schedule run. The option buttons to the left of the screen are the Reporting Options. Based on the selection in this list, when then Preview icon is clicked is the report and various options that will be displayed. Ensure you correctly select the Accounting or Tax books. The Preview icon will run and preview the selected reporting options. The Calculate Depreciation icon will begin Asset Management calculating the depreciation for all the Assets in the database. While this is occurring you will be presented with a progress bar and the current asset being calculated. The Send Depn to EOM Journal will take the depreciation calculations from the selected period into CLUBline Financial Management. Running a Depreciation Schedule: When running a calculating depreciation the calculation will run across all Assets for a selected period, it is not possible to single out an Asset for depreciation. When the depreciation calculation begins both the Accounting and Tax books will be calculated simultaneously, it is not possible to single out a book for depreciation. Follow these steps to calculate a month depreciation; Select the Period for calculation, 65
68 o o Periods that are greyed have already been run, Locked periods cannot be calculated, Click the Calculate Depreciation icon, Click Yes when asked to confirm calculation, Wait for calculations, When Calculation complete it will be ready for reporting or sending to EOM Journal. Note: A period that has been locked by a user cannot be recalculated until the period has been unlocked. To lock or unlock a period right-click the period and select from the pop-up menu. Note: In the event of re-running a calculation for a month and an Asset has had its month s depreciation overridden by the user will not be recalculated. Send Depreciation to EOM Journal: You can only send depreciation to the EOM Journal where the calculation has been performed for the selected period. It can be clearly noted which months have had depreciation calculated as they display in grey within the list. Please follow these steps to send depreciation to EOM Journal; Select the Period for calculation, Click the Send Depn to EOM Journal icon, Wait for data to be transferred to CLUBline Financial Management Click Done to close screen. End of Unit 5 66
69 CLUBline FinMan Essentials 6. Creditors Creditors Menu CLUBLINE Financial Management provides easy maintenance of accounts payable that is totally integrated with the General Ledger to enable comprehensive management reporting. Posting to creditors can be done concurrently to different periods. The Creditors Directory provides the ability to set-up and maintain all creditor accounts. Figure 6.1 Creditors Menu The Creditors Menu contains the following menu items: New Creditor Change Creditor Creditors History Delete Creditor Creditor Invoice Posting 67
70 Sanyo POS Magic Bevlink POS OzQuip POS Micros POS Wincheck Import Generic Import Creditors Manual Payments Payments Modify Manual Payment Mode Cancel Creditors Invoice Creditors Reports Figure 6.2 Creditors - Main Screen New Creditor To add a new Creditor: Select New Creditor from the Creditor Menu. The program will automatically assign a Creditor number. Change 68
71 CLUBline FinMan Essentials this only if you have a specific reason to do so. Enter a Short Name for the Creditor. Enter address, telephone, and contact details for the Creditor. Complete the Credit Details section: o o o o The Terms field specifies the payment terms agreed with this Creditor. Adding a value of 100 will cause the term apply to the following month. Set the Payment Method to EFT for a Creditor payed electronically or to Cheque. Print Advice allows remittances to be sent if that is the option that is chosen when doing a payment run. If faxing remittances then leave this unchecked. Enter a Reference Number to be printed on the Payment Advice. Select the appropriate GST setting. If payment is to be made electronically, complete the EFT details section. Click on the Select General Ledger Default Account to assign a default account to this creditor. An example would be assigning the creditor Australia Post a default account being Postage Expenses. This is a great time saver when posting invoices. Associate the Creditor to a Control Account Group and add a comment if you wish. Click Save to record these details. Click the Exit button to return to the Creditors Menu. Change Creditor To edit Creditor details: Select Change Creditor from the Creditor Menu. Edit the details as required. Click Save to record your changes Click the Exit button to return to the Creditors Menu. Creditors History 69

72 To view Creditor History: Select Creditor History from the Creditor Menu. The following screen will appear: Figure 6.3 Creditors Creditor History Select the Creditor by entering the Creditor number into the search field and pressing Enter on your keyboard, or scrolling left and right with the arrow buttons. A summary of the Creditors History will appear in the main window. There are 4 report options available from the Creditors History screen: o o o o List provides a complete list of Creditors. O/S Inv - provides a list of outstanding invoices for the selected Creditor. History displays Creditor history for the selected Creditor. Pay History - displays Payment History for the selected Creditor. You can also double click on an invoice payment to show details of the posting. Click Exit to return to the Creditors Menu. 70

73 CLUBline FinMan Essentials Delete Creditor The Delete Creditor option is only available for user logins with Senior Update level or greater. A creditor may only be deleted from the system where there are no existing transactions. To delete a creditor from the system: Select Creditors from the navigation tree. Select Delete Creditor in the drop down sub-directory. The following window will appear. Figure 6.4 Creditors Delete Creditor Enter the number of the creditor to be deleted. The creditors details will appear. Single click on the Delete button. The following message box will appear. Figure 6.5 Creditors Delete Creditor Successful 71


74 The account has been deleted from the system, single click on the O.K. button. You will return to the Financial Management MAIN SCREEN. IMPORTANT: If the creditor has transactions against it, it cannot be deleted and the following message box will appear. Figure 6.6 Creditors Delete Creditor Failed Single click on the O.K. button. You will return to the Delete Creditor window. Single click on the EXIT DOOR. You will return to the Financial Management MAIN SCREEN. Creditor Invoice Posting To post a Creditors Invoice: Select Creditor Invoice Posting form the Creditors Menu. A message indicating the current period will appear: Figure 6.7 Creditors Creditor Invoice Posting Period Advice o o Click Yes to proceed. Click No to change the posting period. 72

75 CLUBline FinMan Essentials o Click Cancel to abort the process. Select the Creditor by entering the Creditor Number into the search field or by using the left and right arrows. Enter the details of the invoice and Click on the Post button. The following message will appear: Figure 6.8 Creditors Creditor Invoice Posting Post Another o o Click Yes to post another invoice for this Creditor Click No to return to the Post Creditor Invoice screen. Click Exit to return to the Creditors Menu. Sanyo POS Magic Point Of Sale interfaces are configured at time of installation. Contact CLUBline support for further assistance. Bevlink POS Point Of Sale interfaces are configured at time of installation. Contact CLUBline support for further assistance. OzQuip POS Point Of Sale interfaces are configured at time of installation. Contact CLUBline support for further assistance. Micros POS Point Of Sale interfaces are configured at time of installation. 73
76 Contact CLUBline support for further assistance. Wincheck Import Point Of Sale interfaces are configured at time of installation. Contact CLUBline support for further assistance. Generic Import Point Of Sale interfaces are configured at time of installation. Contact CLUBline support for further assistance. Creditors Manual Payments To make a manual payment for a Creditor: Select Creditors Manual Payments from the Creditors Menu. The following message will appear: Figure 6.9 Creditors Creditors Manual Payments Select Period o o o Click Yes to accept the Posting Period. Click No change the Posting Period. Click Cancel to cancel the Manual Payment. Select Yes and the Creditors Manual Payments window will appear: 74

77 CLUBline FinMan Essentials Figure 6.10 Creditors Creditors Manual Payments - Main Select the Creditor by entering the Creditor Number into the search field or by using the left and right arrows OR just type in the first few letters of the creditors name and enter. Enter the details of the Manual Payment and Click on the Post button. The Payment is made and details of the transactions are removed from the screen. Click Exit to return to the Creditors Main Screen. Payments Click on Payments from the Creditors Menu. The following screen will appear: Select the Bank Account from which payments will be made. Click View Invoices Due for Payment. Information for these invoices is now displayed in the main window as shown below. Confirm the details of displayed invoices Uncheck the invoices you do not want to pay in this payment list. Click Bind Payment in List to lock the payment list in. *Note: if you want to remove an invoice from the payment list you will need to 75

78 Click Cancel Bound Payment List, make your changes and rebind the payment list. Figure 6.11 Creditors Payments Figure 6.12 Creditors Payments Invoices Due For Payment Once you are happy with the payment list Click on the Print 76
79 CLUBline FinMan Essentials Cheques button. Follow the prompts to complete cheque printing. CAUTION!!! ONCE YOU SELECT FINAL PAYMENTS REGISTER THERE IS NO GOING BACK! YOU WILL NEED TO PROCESS CREDIT NOTES FOR ALL INVOICES PAID IN ERROR. Once complete Click on Final Payment Register to print a summary of cheque payments made. Click Exit to return to the Creditors Main Screen. Creditors Payments - EFT Select Payments from the Creditors Menu. Check for correct bank account number (top left side). Select EFT (under payment type). Select order for viewing invoices Numeric or Alpha. Input payment due date for viewing invoices. Make sure the dates are correct for processing the EFT and remittance advices. Click view invoices due for payment button top right hand side (tick box below if there are also non ABN creditors beforehand viewing). All invoices will now show and will all be ticked for payment, if you do not wish to pay all creditors untick the select all invoices box and tick the required creditor invoices for payment. When finished click the Bind payment list button, print and check report if not correct cancel the bound payment list and adjust invoices, then bind again. You can now fax, print, or print & your advices. Please note that if you select fax or only you will not get a printed copy for your records. If you are ing, all addresses need to be in creditor details and you need Microsoft Outlook. This process can not bed used through Outlook Express. You now need to create your EFT file by clicking Create EFT button (bottom right) and import into you banking program, once you have completed this you can do your Final Payment Register. Please Note: If you forget to create your EFT file and process your final payment register you can not go back and create the EFT file. 77
80 If this happens you will have to cancel the payments through the cancel cheque feature under Bank Reconciliation and start again. Cancel Invoice To cancel a creditor s invoice you will need to know the Creditor Number, Invoice Number and the Date of the invoice. To Delete a Creditor s Invoice: Select Creditors from the navigation tree. Select Cancel Invoice in the drop down sub-directory. The following window will appear. Figure 6.13 Creditors Delete Creditor Invoice Enter the Creditor Number, Invoice Number and the Date of the invoice. Select the Find Invoice Details button. The Original Posting Details will appear. Select the Confirm button to delete the invoice. The following message box will appear. Figure 6.14 Creditors Delete Creditor Invoice Confirmation 78

81 CLUBline FinMan Essentials The invoice has been deleted, single click on the O.K. button. You will return to the Financial Management MAIN SCREEN. IMPORTANT: If the invoice cannot or has already been deleted, the following message box will display. Figure 6.15 Creditors Delete Creditor Invoice Message Single click on the O.K. button. You will return to the Cancel Invoice window. Single click on the EXIT DOOR. You will return to the Financial Management MAIN SCREEN. Creditor Group When a creditor is set up, it is linked to a Trade Creditors Control Account. The CLUBline Financial Management system provides the ability to create as many Trade Creditors Control Accounts as desired through the Control Accounts option in the Settings directory. Using more than one Trade Creditors Control Account provides the ability to group creditors in the General Ledger. All creditors reports can then be selected on the entire ledger (ALL) or limited to a particular Control Account Group. Figure 6.16 Creditors - Creditor Groups 79


82 Figure 6.17 Creditors Control Accounts 80

83 CLUBline FinMan Essentials Figure 6.18 Creditors Creditors Reports Creditors Default General Ledger Accounts To utilise the automated General Ledger account feature in the posting of Creditors invoices, the Financial Management system provides the ability to store general ledger accounts that are appropriate to the type of goods/services that the creditor provides. Control Account Group One Trade Creditors Control Account is set up by default. However, a number of Trade Creditors Control Accounts can be set up and tailored to a club/firm's individual needs. The naming of the general ledger accounts and the Trade Creditors Control Account groups is a club/firm preference. Creditors History To display the history for a particular creditor: Select Creditors from the navigation tree. Select Creditors History in the drop down sub-directory. The Creditors Payment History window will open. Enter the Creditor Number to view the details. A list of the selected Creditor s Invoices & Payments will appear. Figure 6.19 Creditors Creditor History 81

84 To View The Details of a Transaction: Single click on the corresponding line and a Creditors Details Report will appear. Figure 6.20 Creditors Creditor Details Report Single click on the corresponding line and a Creditors Details Report will display. The report can be viewed and printed, and exported as required. Single click on the EXIT DOOR. You will return to the Creditors Payment History screen. Single click on the EXIT DOOR. You will return to the Financial 82

85 CLUBline FinMan Essentials Management MAIN SCREEN. Creditor Reports There are various creditors reports available under the Creditors Reports option from the Creditors directory. These can be displayed or printed as required. Below are samples of each of the Creditors Reports available. Each sample has been generated using the default settings in the Creditors Reports window. All Creditors reports can be printed for the period selected, can be numerical or alphabetical in appearance for all or individual Creditor Control Groups. To Print a Creditors Report: Select Creditors from the navigation tree. Select Creditors Reports in the drop down sub-directory. The following window will appear. Figure 6.21 Creditors Creditors Reports Select the Period and Creditors Group that you want to view on the report. Select either Numerical or Alphabetical sort type. Select the desired report from the list. The report will display to 83

86 the screen. View, print or export this report as desired. Single click on the Windows CLOSE button. You will return to the Creditors Report window. Single click on the EXIT DOOR. You will return to the Financial Management MAIN SCREEN. Creditors Report Samples Short List Detailed List Creditors ABN List 84


87 CLUBline FinMan Essentials Archived Creditors Invoice List for period Unpaid Invoice List for period (Trial Balance) Unpaid Invoice List for period (Single Creditor) 85
88 Aged Trial Balance (30, 60, 90) Aged Future Payments Short Inv List (no GL codes) for period Posting Date Invoice List 86

89 CLUBline FinMan Essentials Paid Invoice List for period Creditors Summary End of Unit 6 87
90 7. Debtors Debtors Menu CLUBLINE Financial Management provides easy maintenance of accounts receivable that is totally integrated with the General Ledger to enable comprehensive management reporting. Posting to debtors can be done concurrently to different periods. The Debtors Directory provides the ability to set-up and maintain all debtor accounts. Throughout this manual, reference to a debtors account can also be interpreted as referring to accounts receivable ledger accounts. Figure 7.1 Debtors Menu 88


91 CLUBline FinMan Essentials Figure 7.2 Debtors - Main Debtor Group When a debtor is set up, it is linked to a Trade Debtors Control Account. Figure 7.3 Debtors Debtors Group The CLUBline Financial Management system provides the ability to 89

92 create as many Trade Debtors Control Accounts as desired through the Set Control Accounts option in the Settings directory. Figure 7.4 Debtors Control Accounts Using more than one Trade Debtors Control Account provides the ability to group debtors in the General Ledger. Figure 7.5 Debtors Debtors Reports All debtors reports can then be selected on the entire ledger (ALL) 90
93 CLUBline FinMan Essentials or limited to a particular Control Account Group. New Debtor Prior to entering transactions for a new debtor, the debtor must be created. To set up a new debtor: Select Debtors from the navigation tree. Select New Debtor in the drop down sub-directory. The following window will open and the next available Debtor Number will be displayed automatically. Modify this in need or accept the one on offer. Figure 7.6 Debtors Terms The Terms field will calculate the due date based on terms as follows: o o o 99 - last day of current calendar month last day of current accounting month day in the following month, add 100 (e.g. 131) but if 91
94 >129 it will find last day of next month. o 0-98 add the number of days onto the invoice date to that will become the due date. Enter the Name of the new debtor. Enter a Short name for the debtor. Enter the debtors details in the Address Details section. Complete the Payment Details section including the Terms. Check the Print Statement box if a Statement is to be printed. Single click on the Select General Ledger Default Accounts button to select any accounts/appropriate to the type of goods/services the debtor uses regularly. Select the desired Trade Debtors Control Account from the Control Account Group field. Enter any Standard Comments as required. Single click on the SAVE button. Single click on the EXIT DOOR. You will return to the Financial Management MAIN SCREEN. Control Account Group One Trade Debtors Control Account is set up by default. However, a number of Trade Debtors Control Accounts can be set up and tailored to a club/firm's individual needs. The naming of the general ledger accounts and the Trade Debtors Control Account groups is a club/firm preference. Change Debtor Periodically debtors details may need to be changed. To change details for a debtor: Select Debtors from the navigation tree. Select Change Debtor in the drop down sub-directory. The Debtors Details window will open. See the Debtors Directory New Debtor section for detail. 92

95 CLUBline FinMan Essentials Enter the number of the debtor to be changed and make modifications as required. Single click on the SAVE button. Single click on the EXIT DOOR. You will return to the Financial Management MAIN SCREEN. Debtors History To display the history for a particular debtor: Select Debtors from the navigation tree. Select Debtors History in the drop down sub-directory. The Debtors Payment History window will open. Enter the Debtor Number to view the details. A list of the selected Debtor s Invoices & Payments will display. Figure 7.7 Debtors Debtor History To View the Details of a Transaction: Single click on the corresponding line and a Debtor s Details Report will display. 93
96 Figure 7.8 Debtors Debtors Details Report Single click on the corresponding line and a Debtors Details Report will display. The report can be viewed and printed, and exported as required. Single click on the EXIT DOOR. You will return to the Debtors Payment History screen. Single click on the EXIT DOOR. You will return to the Financial Management MAIN SCREEN. Debtors Reports There are various debtors reports available under the Debtors Reports option from the Debtors directory. These can be displayed or printed as required. Below are samples of each of the Debtors Reports available. Each sample has been generated using the default settings in the Debtors Reports window. Debtors reports can be printed for the period selected, can be numerical or alphabetical in appearance for all or individual Debtor Control Groups. To Print a Debtors Report: Select Debtors from the navigation tree. Select Debtors Reports in the drop down sub-directory. The following window will appear. Figure 7.9 Debtors Debtors Reports 94

97 CLUBline FinMan Essentials Select the Period and Debtors Group that you want to view on the report. Select either Numerical or Alphabetical sort option. Select the desired report from the list. The report will display to the screen. View, print or export this report as desired. Single click on the Windows CLOSE button. You will return to the Debtors Report window. Single click on the EXIT DOOR. You will return to the Financial Management MAIN SCREEN. Debtors Report Samples Short List 95


98 Detailed List Debtors ABN List Invoice List for Period Short Inv List (no GL codes) for period Invoice Sequence List for Period 96
99 CLUBline FinMan Essentials Paid Invoice List for Period Bulk Bills You can also reprint invoices from the Bulk Bills screen or through Debtors history. In Debtors History reprinted invoices will print marked COPY. Statements 97
100 Single Debtor Statement Unpaid Invoice List (Trial Balance) Overdue Invoice List 98
101 CLUBline FinMan Essentials Aged Trial Balance Debtors Deposits Debtors Summary 99
102 End of Unit 7 100
103 CLUBline FinMan Essentials 8. Bank Reconciliation The Bank Reconciliation Directory provides the ability to reconcile your set of accounts to your bank balance. Cheques can be presented either individually or quickly. Banking Deposits can be presented and cheques can be cancelled. Various reports can be printed through the Bank Reconciliation option. Figure 8.1 Bank Reconciliation Menu Bank Reconciliation Menu There are 6 different options under the Bank Reconciliation: Bank Rec. Present Payments Quickly Present Payment Individually Credit Deposits Credit Deposits Individually Cancel Cheque Bank Rec. 101

104 A bank reconciliation report can be produced each period to ensure that your set of accounts reconciles to your bank balance. Prior to running bank reconciliations, you must ensure that all bank account movements have been accounted for including: Entering all presented cheques into the program. This can be either individually or in bulk. Entering all credited deposits into the program. Processing all automatic debit and credit transfers from and to your bank account by either a manual posting or standing journal. The Bank Reconciliation window provides the ability to calculate receipts and payments, outstanding cheques and Uncredited Deposits. Figure 8.2 Bank Reconciliation - Main Bank Reconciliation Report Samples 102
105 CLUBline FinMan Essentials Unpresented Cheque Report Presented Cheque Report This is a totalled report. Uncredited Deposits Report Credited Deposits Report This is a totalled report. 103

106 Present Payments Quickly Select the Present Payments Quickly sub menu option from the Bank Reconciliation menu to present a large number of cheques in a posting session. To present cheques quickly: Select Bank Reconciliation from the navigation tree. Select Present Cheques Quickly in the drop down sub-directory. The following window will appear. Figure 8.3 Bank Reconciliation Present Payments Quickly Enter the Bank account number from your chart of accounts to display any unpresented cheques. Select (by placing a tick in the square) any cheque that is to be presented. Change the date as required. 104
107 CLUBline FinMan Essentials Once selection has been made, single click on the Save button. All selected cheques will be presented and dropped off this list. Repeat selections for dates as required, once complete, Single click on the EXIT DOOR. You will return to the Financial Management MAIN SCREEN. IMPORTANT: When entering the chart of accounts number for the bank account, if the account number selected does not have the Type set to Bank, the following warning will appear, select o.k. then enter a correct chart of accounts bank account number. Figure 8.3 Bank Reconciliation Warning Present Payments Individually Select the Present Payments Individually sub menu option from the Bank Reconciliation menu to present a cheque. To present an individual payment: Select Bank Reconciliation from the navigation tree. Select Present Cheques Individually in the drop down subdirectory. The following window will appear. Figure 8.4 Bank Reconciliation Present Payments Individually 105


108 The default Bank account number from your chart of accounts will display. Enter the number of the cheque that is to be presented. Change the date as required. Once selection has been made, single click on the Save button. Repeat selections for cheques as required, once complete, Single click on the EXIT DOOR. You will return to the Financial Management MAIN SCREEN. IMPORTANT: When entering the cheque to be presented, if the cheque has previously been presented the following warning will appear, Figure 8.5 Bank Reconciliation Cheque Presented To Cancel the Individual Presentation of This Cheque: Single click on the Yes button. You will return to the Presented Cheques window. 106
109 CLUBline FinMan Essentials To continue with the individual presentation of this cheque: Single click on the No button. IMPORTANT: When entering the chart of accounts number for the bank account, if the account number selected does not have the Type set to Bank, the following warning will display, select o.k. then enter a correct chart of accounts bank account number. Figure 8.6 Bank Reconciliation Warning IMPORTANT: When entering the number for the cheque, if the cheque selected has not been posted to the bank account selected above, the following warning will display, select o.k. then enter a correct chart of accounts bank account number. Figure 8.7 Bank Reconciliation Cheque Number Error Cancel Cheque To cancel a cheque: Select Bank Reconciliation from the navigation tree. Select Cancel Cheque in the drop down sub-directory. The following window will appear. 107

110 Figure 8.8 Bank Reconciliation Cancel Cheque Enter the bank account from which the original cheque was issued. Enter the number of the cheque to be cancelled. The cheque details will display. Check the posting details and enter in the date for cancelling the cheque. Single click on the Confirm button to cancel the cheque. Single click on the EXIT DOOR. You will return to the Financial Management MAIN SCREEN. Re-process the cheque payment as normal. End of Unit 8 108
111 CLUBline FinMan Essentials 9. Posting The Posting Directory provides the ability to enter transactions for all Creditor and Debtor needs including, Manual Posting and Payments, Standing Journals, Invoicing, Debtor Deposits and much more. Transactions and Manual Payment Modes can be modified through the Posting Directory as well. Figure 9.1 Posting Menu Manual Posting Manual Posting can be used to enter bank fees and charges, Journal between accounts on an ad-hoc basis, make corrections to account allocations, process transactions within the program bypassing the creditors/debtors system, enter automatic electronic deposits into bank accounts (e.g. rent receipts) or to enter automatic electronic transfers out of bank accounts (e.g. lease payments, rent payments). 109
112 Important features of Manual Posting Receipt Process receipts that are not processed through Standing Receipts. These amounts will appear on the All Receipts transaction report and be recorded for Bank Reconciliation purposes. Deposit Can be used as for receipts to identify deposits independently from cash receipts. These amounts will also appear on the All Receipts transaction report and be recorded for Bank Reconciliation report. Miscellaneous Receipt Record receipts that need independent reporting such as automatic electronic deposits into bank accounts. These amounts will appear on the All Receipts transaction report but will be excluded from the calculation of outstanding deposits in the bank reconciliation. Credit Journal Chosen when making manual postings through two different ledger accounts. This selection credits the account selected. A debit journal should also be selected to allocate the debit side of the transaction. Fee/Tax Regular Payment Normally used to process bank fees and charges. Chosen to record journals relating to regular payments made by electronic transfer directly out of the bank account. These amounts will be included in the All Payments transaction report but will be excluded from the calculation of outstanding cheques/payments in the bank reconciliation. Debit Journal Chosen when making manual postings through two different Ledger accounts. This selection debits the account selected. A credit journal should also be selected to allocate the credit side of the transaction. Payment Can be used for processing payments outside the creditors system. These amounts will appear on the All Payments transaction report and will be included in the bank reconciliation. 110
113 CLUBline FinMan Essentials To process a transaction using the Manual Posting option: Select Posting from the navigation tree. Select Manual Posting in the drop down sub-directory. The following message will appear. Figure 9.2 Posting Proceed Confirmation Select Cancel to return to the Financial Management MAIN SCREEN. OR To change the current posting period select No. The following window will appear. Figure 9.3 Posting Change Posting Period OR Select Yes to proceed to Manual Posting. 111


114 Creditors Invoices Posting account payable: Select Posting from the navigation tree. Select Creditors Invoices in the drop down sub-directory. The following window will display prompting a check that the current posting month is correct. If the current posting month displayed is correct Click YES. Figure 9.4 Posting Confirm Period Select Cancel to return to the Financial Management MAIN SCREEN. OR To change the current creditor posting period select No. The following window will appear. Figure 9.5 Posting Change Creditor Posting Period OR Select Yes to proceed to Creditors Invoices. The following window will appear. 112

115 CLUBline FinMan Essentials Figure 9.5 Posting Creditor Invoice Posting Enter in the Creditors Account Number to display the account name and Short Name. Enter in the Invoice Date. This date must be within the current posting period. The Payment Date is automatically calculated by the system based on the Terms of credit established when the creditors details were originally entered. To check these details select the Creditors Menu, choosing Change Creditor details sub-menu option. Enter in an Invoice Number and Comment. The comment appears in detailed transaction reports in the creditors (accounts payable) general ledger entry. It also displays in creditors journal transaction reports, invoice list creditors report and creditors Trial Balance creditors report. This comment also appears on the Creditor History. Enter in the Total amount for this individual creditors invoice. Enter in the corresponding General Ledger accounts for this invoice. End of Unit 9 113

116 10. Reports The Reports Directory provides access to financial and analysis reports within the program. Transaction, account and ledger reports are all available as well as GST and management reports. Figure 10.1 Report Menu Transaction Reports Select Transaction Reports from the Reports menu and the General Ledger Transaction Reports window will appear see Figure

117 CLUBline FinMan Essentials Figure 10.2 Transaction Reports The Transaction Report screen is made up of several parts. These are: ϖ Period Selection Select the reporting period you want to display by clicking the relevant radio button. When using the Month selection you will need to specify the Report Period Number. Next to this field will be displayed the date range of the month selected. Use the Year option to display annual information. If you select Single Day/Range you will be prompted to enter the range of dates you wish to report on. ϖ ϖ ϖ ϖ Transaction Report Type Use the radio buttons to specify the Type of report you want to produce. Account Range Select the accounts you want included in your report by entering the account number range into the account fields. Tick the Sub Account Check Box to specify the sub accounts you want to be included. Options The Options area lets you filter what is included in the report. You can specify the accounts shown by specifying a minimum and maximum account balance. You can specify a particular GST Code you want to view and enter a specific account number to be displayed. Report Type expand the tree by clicking on the + next to General Reports. The available Transaction Reports will be listed. Clicking on a report name will cause the system to produce the report based on 115

118 the selections you have made. See Figure 10.3 Figure 10.3 Transaction Report ϖ Transaction Processing Report Select the dates from and to and click Display Transaction Processing Report and the program will produce a record of all transactions within the period sorted by operator. Trial Balance Select Trial Balance from the Reports menu and the General Ledger Transaction Reports window will appear see Figure Note: You can click on the individual line items within the report and view details of the account. The Trial Balance screen is made up of several parts. These are: ϖ ϖ ϖ ϖ Period selection Report Type Period Selection select Month and specify the period number, or select Year to view a Trial Balance for the year. Report Type select Normal, Wide or Summarised. Tick the Show All Accounts check box to include all accounts. 116


119 CLUBline FinMan Essentials Figure 10.4 Trial Balance Ledger Reports Select Ledger Reports from the Reports menu and the Ledger Reports Selections window will appear see Figure Figure 10.5 Ledger Reports The Ledger Report Selection screen is made up of two parts. These are: 117
120 Period covered Account Range Period Covered select Month and specify the period number, or select Year to view a Ledger Reports for the year. Account Range select Month and specify the period number, or select Year to view a Ledger Reports for the year. Once you have made you selections click the tick at the top of the screen and the report will Appear. See Figure Figure 10.6 Year Ledger Report 118

121 CLUBline FinMan Essentials Account Enquiry Select Account Enquiry from the Reports menu and the Account Enquiry window will appear see Figure Figure 10.7 Account Enquiry The Account Enquiry screen is made up of three parts. These are: General Ledger Account select the account you want to view either by enter the account number and pressing enter or scroll through the list of available accounts using the navigation buttons. Period Covered select Month and specify the period number, or select Year to view a Ledger Reports for the year. Click View to produce account history for the period. Period Range select the period from and to and Click View to produce account history for the period. GST Reports 119

122 Select GST Reports from the Reports menu and the GST Report Options window will appear see Figure Figure 10.8 GST Reports The GST Report Options screen contains the following option: Period Covered Period Covered select Month and specify the period number, or select Quarter or Year. Click OK to produce a GST Report for the period. See Figure Figure 10.9 GST Report example Journal Reports Select Journal Reports from the Reports menu and the Journal Report Options window will appear see Figure Figure Journal Reports 120

123 CLUBline FinMan Essentials The Journal Report Options screen contains the following options: Report Period specify the period number. Journal Type specify the category of Journal you want to view or select All Journal Types to display them all. Journal Selection you can select a specific journal or select ALL. Figure Journal Report example Actuals Select Actuals from the Reports menu and the Actuals sub-menu window will appear see Figure Figure Actuals Sub-Menu 121
124 The Actuals Sub-Menu screen contains the following options: This Years Actual Movements This Years Actual Movements Grouped Last Years Actual Movements Twelve Months Actuals and Budgets Report This Years Actual Movements See figure Figure This Years Actual Movements This Years Actual Movements Grouped see Figure Figure This Years Actual Movements 122
125 CLUBline FinMan Essentials ϖ Last Years Actual Movements see Figure Figure Last Years Actual Movements ϖ Twelve Months Actuals and Budgets Report see Figure Figure Twelve Months Actuals and Budgets Report Budgets Select Budgets from the Reports menu and the Budgets sub-menu window will appear see Figure
126 Figure Budgets Sub-Menu The Budgets Sub-Menu screen contains the following options: ϖ ϖ This Years Budget Movements Next Years Budget Movements ϖ This Years Budget Movements See figure Figure This Years Budget Movements 124
127 CLUBline FinMan Essentials ϖ Next Years Budget Movements See figure Figure Next Years Budget Movements Receipts/Payments Budget Report Select Receipts/Payments Budget Report from the Reports menu and the Receipts/Payments Budget Report will appear see Figure 125

128 Figure Receipts/Payments Budget Report Bar Chart Select Bar Chart from the Reports menu and the Bar Chart window will appear see Figure Figure Bar Chart Window The Bar Chart screen contains the following options: Period Options 126
129 CLUBline FinMan Essentials Account Range Periods Covered Chart Type 2D/3D View Selection Copy Button Period Options controls which periods are displayed on the Bar Graph - See figure Figure Bar Chart Period Options Accounts Range allows you to specify the accounts that are included on the Graph - See figure Figure Bar Chart Accounts Range 127
130 Periods Covered is a control which specify s which financial periods are included on the Graph - See figure Figure Bar Chart Periods Covered Chart Type specify s the type of chart which is displayed. The 128

131 CLUBline FinMan Essentials options are Bar or Line Graph - see figure Figure Bar Chart Periods Covered 2D/3D Control allows you to display the graph in either 2 or 3 dimensions. When shown in 3D an operator can manipulate the view by holding down the CNTRL key, clicking the left mouse button and moving the mouse. The displayed graph will rotate in the direction of the mouse movement - see figure Copy Button Once you have produced the graph in the format you desire you can copy and paste it into 3 rd party applications such as Microsoft Word. To do so click the copy button at the top of the screen - see figure Figure Bar Chart 2D/3D Control 129

132 Figure Bar Chart 2D/3D Control Standing Notations List 130

133 CLUBline FinMan Essentials Select Standing Notations List from the Reports menu and the Standing Notations Error Message will appear see Figure Figure Standing Notations Error Message The Standing Notations Error message is meaningless and unhelpful and only provides you with little option but to acknowledge this system limitation and move on. Management Reports Select Management Reports from the Reports menu and the Management Reports sub-menu will appear see Figure Figure Management Reports Sub-Menu The Management Report Sub-Menu contains the following report options: Management Reports Init Is where you can produce customised 131

134 reports from the system. When selected the Management Reports Options window appears - see figure Select the period to be included in the report and click the Tick. Figure Management Reports Period Options Next select the required report from the list of customised Reports - See figure ϖ Figure Management Reports RF selection. Statement Of Performance click Yes to include Ledger Account Numbers or No to exclude them - see figure


135 CLUBline FinMan Essentials Figure Statement of Performance Include Account Numbers The Statement of Performance appears see figure Figure Statement of Performance Statement Of Performance sub a/c Summary see figure Figure Statement of Performance sub a/c summary 133

136 Statement Of Performance Summarised see figure Figure Statement of Performance summarised Statement Of Performance Year Comparisons see figure Figure Statement of Performance Year Comparison 134

137 CLUBline FinMan Essentials Statement Of Performance Year Summary see figure Figure Statement of Performance Year Summary Report Exporting Most reports can be exported in a range of different formats such as Excel, Comma Separated Values (CSV) and Lotus. To do this 135

138 select the Export button at the top of the screen as shown in Figure Figure Statement of Performance Year Summary End of Unit
139 CLUBline FinMan Essentials 11. Settings The Settings Directory provides the ability to set-up and maintain the CLUBline Financial Management programs default settings. Club specific details are recorded here such as name, address and banking details. Default printer settings can be viewed along with any Interface details. Figure 11.1 Settings Menu Club/Firm Details General Club/Firm details used by the program are updated from this option under the Settings directory. To enter and maintain Club/Firm details: Select Settings from the navigation tree. Select Club/Firm Details in the drop down sub-directory. The following window will appear. Figure 11.2 Settings - Main 137

140 The default account numbers for the bank, Funds, GST, Creditors, Debtors and Writeoff are also nominated on this screen. Note: Selecting the Alpha Lookup option enables finding account by their account number rather than their name. Enter or change details as required. Single click on the SAVE button. Single click on the EXIT DOOR. You will return to the Financial Management MAIN SCREEN. Change G/L Posting Month To change the posting period for the general ledger: Select Settings from the navigation tree. Select Change G/L Posting Month in the drop down sub-directory. The following window will appear. Change to the desired period as required. Notice that the dates displayed will change to match the selection made. Single click on the O.K. button. 138
141 CLUBline FinMan Essentials Figure 11.3 Settings - Change GL Posting Month Single click on the EXIT DOOR. You will return to the Financial Management MAIN SCREEN. Change Creditors Posting Month To change the posting period for Creditors: Select Settings from the navigation tree. Select Change Creditors Posting Month in the drop down subdirectory. The following window will appear. Figure 11.4 Settings Change Creditors Posting Month Change to the desired period as required. Notice that the dates 139
142 displayed will change to match the selection made. Single click on the O.K. button. Single click on the EXIT DOOR. You will return to the Financial Management MAIN SCREEN. Change Debtors Posting Month To change the posting period for Debtors: Select Settings from the navigation tree. Select Change Debtors Posting Month in the drop down subdirectory. The following window will appear. Figure 11.5 Settings Change Debtors Posting Month Change to the desired period as required. Notice that the dates displayed will change to match the selection made. Single click on the O.K. button. Single click on the EXIT DOOR. You will return to the Financial Management MAIN SCREEN. Interface Details 140

143 CLUBline FinMan Essentials The Point Of Sale (POS) system used (Bevlink or Sanyo) can be nominated here for ease of importing Creditors invoices. To set up the interface details: Select Settings from the navigation tree. Select Interface Details in the drop down sub-directory. The following window will appear. Figure 11.6 Settings Interface Details Change as required Single click on the O.K. button. Single click on the EXIT DOOR. You will return to the Financial Management MAIN SCREEN. EFT Details Club EFT details are entered through the Settings directory. These details are required to enable EFT creditor s payments. This is where the path is selected for the EFT file that is created. To set up the EFT details: 141

144 Select Settings from the navigation tree. Select EFT Details in the drop down sub-directory. The following window will appear. Figure 11.7 Settings EFT Details Enter all details as required Single click on the O.K. button. Single click on the EXIT DOOR. You will return to the Financial Management MAIN SCREEN. Special Month Ends CLUBline Financial Management can cater to clubs/firms wishing to end their periods outside normal calendar months. The month ends can be set under the Settings Directory. Set Control Accounts 142 One Trade Control Account each is set up by default for Creditors and Debtors. The naming of the general ledger accounts and the
145 CLUBline FinMan Essentials Trade Creditors/Debtors Control Account groups is a club/firm preference. When a creditor or a debtor is set up, it is linked to a Control Account Group. Using more than one Trade Control Account provides the ability to group creditors and debtors in the General Ledger. All creditors and debtors reports can then be selected on the entire ledger (ALL) or limited to a particular Control Account Group. The program provides the ability to create as many Trade Creditors Control Accounts as desired. Add a Control Account Group To add a new Control Account Group: Select Settings from the navigation tree. Select Set Control Accounts in the drop down sub-directory. The following window will appear. Figure 11.8 Settings Add Control Account Group Add Control Accounts as desired. Note: Once a Group has been set up, individual creditors or debtors will need to have this Control Account selected in their account details. 143
 and 15-20 (supplies) being available for individual customisation.")
146 GST Settings Every transaction is flagged with a GST code that reflects its GST status. The codes are detailed below. The default codes are 0-4 and 10-14, with codes 5-10 (acquisitions) and (supplies) being available for individual customisation. By implementing customised codes, totals can be displayed on the GST report for each category to provide additional flexibility in reconciling GST for the Business Activity Statement. To change GST setup: Select Settings from the navigation tree Select GST Settings in the drop down sub-directory. The following window will appear. Figure 11.9 Settings GST Code Setup Enter details as required. Single click on the Save button. Single click on the EXIT DOOR. You will return to the Financial Management main screen. 144
147 CLUBline FinMan Essentials End of Unit
148 12. Utilities Unit Focus Definition The objective of this unit is to provide you with the knowledge and skills you will need to use the Utilities contained within the Financial Management program. Introducing Utilities The Utilities Menu is located on the Drop Down Menus. Figure 12.1 Utilities Main Menu Recalculate Month Balances This feature should not be used except under the guidance of CLUBline support personnel. Backup Database 146 The Financial Management program should be regularly backed up. It is the responsibility of the venue to ensure that appropriate


149 CLUBline FinMan Essentials backup and restore procedures are in place. To Backup a database: Select Backup Database from the Utilities Menu. The following message will appear: Figure 12.2 Utilities Backup Database Click OK to acknowledge the path to the backup file. The Database Backing Up message will appear. Figure 12.3 Utilities Backup in Progress When the backup is finished a message will appear as shown in figure Click OK to close the window and return to the Utilities Menu. Figure 12.4 Utilities Backup Complete 147

150 To Backup a database: Select Restore Database from the Utilities Menu. The following message will appear: Figure 12.5 Utilities Restore Database Navigate to the location of a valid backup file and click Open. Figure 12.3 Utilities Backup in Progress Restore a Database This feature should not be used except under the guidance of CLUBline support personnel. 148
151 CLUBline FinMan Essentials Year End This feature should not be used except under the guidance of CLUBline support personnel. Script Checker This feature should not be used except under the guidance of CLUBline support personnel. Fix Imbalance This feature should not be used except under the guidance of CLUBline support personnel. End of Unit

152 13. FRF Generator Unit Focus Definition The objective of this unit is to provide you with the knowledge and skills you will need to use the Financial Management Report Format Generator utility supplied with the Financial Management program. Introducing Builder The CLUBline Financial Management Report Format Generator is designed to provide operators with the ability to report on their chart of accounts. FRF Builder gives the operator, the ability to easily and dynamically develop custom multi-column reports on Financials data spanning periods. The Financial Report Format (FRF) files are structured in a sequential language giving scope and latitude to the operator to build structured account reports. Figure 13.1 FRF Generator Main Menu Logging In to the RF Builder The FRF Builder does not require a login as it is purely a reporting tool 150
153 CLUBline FinMan Essentials and is also a separate install to the CLUBline Financial Management it means that it is not accessible to all operators. Main Screen From all screens you have access to the toolbar which will allow you to change the period and page orientation for reporting purposes. The toolbar also contains the Open, Save, Print Preview and Print commands. The front screen is the main screen which allows you to configure the main features of your report. The body screen is used to customise the report that you re using. From here it is a drag and drop operation to create and modify report information. As you drag command objects from the right hand side of the screen the system will colour code them into their groups. Commands once placed on the command list it will open its associated dialog window asking for its configuration options. When a print or combine command is first placed on the command list the computer will halt and gather records from your chart of accounts. This will only happen once and when completed it will move on to its required screen. Some commands such as the COLUMN command, have optional customisable options which will display on the right hand side of the screen below the list of commands. These also need to be figured for the report to work. Along with the easy drag and drop abilities you can also remove a line or even move it up or down the list using the sub toolbar which is located above the command list. Figure 13.1 Format Tool Bar The output screen gives you a copy of the pre-compiled report code. Every time you enter this screen it regenerates the output for you for use. At this point you can also use the output sub toolbar to save the output or copy it to the clipboard so you can put it in a text file for debugging purposes. Printing 151
 command from the preview toolbar it needs to recompile the code again in order to print")
154 Once you re happy with your report code you can print preview or print it directly to a printer. Because of the compile nature of the report builder if you print preview a report and then select the (Print) command from the preview toolbar it needs to recompile the code again in order to print it out. Figure 13.2 FRF Generator File Header Display Information Turns on and off various objects in the final output. Report Information Report information sets font and reporting attributes. Headings Report Header and Sub Heading are set here. FRF Header The Display Information section contains the following options customise the overall look and feel of the customised report: Show Page Numbers Turns on and off Page Numbers. Show Horizontal Lines Turns on and off Horizontal Lines. Show Vertical Lines Turns on and off Vertical Lines. Show Account Numbers Displays Account Numbers on the report. Show Account Names Displays the Account Names on the report. Use Colour Toggles colour in the report. Use FinMan Logo Prints the CLUBline Financial Management Logo on your report. Report Configuration The Report Configuration section defines options that affect the overall 152
155 CLUBline FinMan Essentials report. These options are: Heading Sets the Report Heading to be printed on every page of the report. Sub Heading Sets the Report Sub Heading which can be changed via the report code later. Codes can be inserted into the subheading to enable dynamic headings. %d = Current Date (e.g.: 01/01/2005) %dr = Period Date Range (e.g.: 01/01/2005 to 31/01/2005) %p = Period Number %e = Period End Date (e.g.: 01/01/2005) Report Setup The Report Setup section defines the layout of the report, including the number of columns to be printed, font to be used for printing as well as the number of variables that will need to be maintained during the generation of the report: Number of Columns Determines the number of columns on your report. Twelve Month Reporting Enables your report to run over a twelve month period. (May slow report generation) Number of Variables Informs the compiler the number of variable you wish to use. Roaming Variables Informs the compiler of the number of roaming variables you wish to use. Font Sets the font that you want to in the output of your report. Size Sets the font size that you want to use in the output of your report (Note using a smaller font is recommended with 12 month or multi-column reporting.) Report Body Commands The report body is generated using one or more commands that specify 153
156 the content of the body of the report as well as commands to allow the grouping and printing of information. The following Report Body commands are available: COLUMN: Must be used to specify what each column is to return in the report. The number of the column must be specified after the word COLUMN. This is followed by the field name and the column title separated by a colon. E.g.: COLUMN 1 ACTUALYTD:YTD You can also add an extra colon to specify the month to report when producing twelve month reports. E.g.: COLUMN 1 ACTUALYTD:JAN:1 COLUMN 2 ACTUALYTD:FEB:2 GROUP: The group command is used to initiate a group on the output report. The tag is followed by a group name, which will be printed on the report. The group total will be reset to zero prior to accumulating any values from the report. E.g.: GROUP MONTHLYTOTAL TITLE: The title command creates a title for the report being built it must be contained inside a group command. A title command will also reset all counters used to accumulate figures. You can also point a title to a variable. Later on in the reporting you can reprint a title total by calling a VPRINT command. E.g.: TITLE GROSS PROFIT % SALES:1 PRINT: The print command will cause a single body line on the report to be printed. The print command requires the account number to be printed to be specified. To display a name for the account rather than the account number, an account number can be specified; separating it from the account number with a colon. In addition, the case of the printed object can be changed by adding a - symbol separated by a semi colon. E.g.: PRINT :TEST;- 154
157 CLUBline FinMan Essentials TO: The (to) command is a subset command of the print command and allows an operator to print a range of accounts into one line. AND: The (and) command is a subset command of the print command and allows an operator to print two accounts not in range into one line on the report. COMBINE: The Combine command allows an operator to combine multiple accounts into a roaming variable. The combine command will NOT print to the screen but rather store the figure in a roaming variable for use later in the VPRINT command. The command will allow for four accounts to be parsed in and will act as the AND subset command by default but the first instance can be used as a TO command which will allow for larger ranges of accounts in the one account. Separate the function and the roaming variable with a colon and then you can also specify a change case attribute by placing (-) at the end of the code line with a semi-colon. E.g.: COMBINE 130_129,131,132:1;- TOTAL: This command will close off the TITLE command and write any outstanding variables to the variable collection. Once another TITLE command is found the values will be reset but not in the variables. To reset a variable you must use the RESET command. You can also specify an (N) at the end of the code line to suppress the printing of the object. ENDGROUP: This command will create the end of a group and ready it for printing. This works the same as the TOTAL command but will calculate the totals for the group rather than the title. You can also specify a (N) at the end of the code line to suppress the printing of the object. VPRINT: The Vprint command is used to create formula based lines on the screen. Any variables or roaming variables used can also be printed using the Vprint command. The formulas can be as complex as you like them to be and combine any and all variables used. Variables need to be contained in square brackets in order to work other wise they ll be treated as numbers. It is also very important to bracket your formulas correctly otherwise unexpected results may occur in the calculations. 155
158 You can use a colon in the code line to specify a heading for the line and also specify a format by parsing a (%) at the end of the code line following a semi-colon. E.g.: VPRINT (([1]/[2]) [3]):GROSS % PROFFIT;% RESET: This command will reset a variable to zero. E.g.: RESET 1 RRESET: This command acts the same as the RESET command but will reset a roaming variable rather than a static one. NEWPAGE: The Newpage command will create a new page on your report. It can also be used to change the sub heading on the next page by parsing into it a heading line after the NEWPAGE command. TEXT: The Text command allows a line of text to be placed in the report as either an explanation of guide to the report object itself. This can also be handy for third parties to debug your reports. The line of text does not print on the report. E.g.: TEXT This is a line of placed text. CREATING A REPORT Creating a report using the RF Builder can be done using the following steps: Select the report HEADER tab.. Select the options on the main tab to specify the layout of the report. Secondly enter a heading and sub heading for your report and then finally configure the report information to determine columns, variables and fonts. Select the report MAIN tab. Select a column from the command list. Using the configuration window located on the right hand side of the screen. Configure the field name, display name and period integer (required for twelve month reporting only) 156

159 CLUBline FinMan Essentials Figure 13.3 RF Generator Column Information Drop Down Drag out a GROUP command and place it on the command list. (When dragging items on the command list you ll notice a red arrow on the left hand side indicating where the command will be placed when dropped. A dialog will appear prompting you for a title for the group command. Drag out a TITLE command and place it in the command list directly below the GROUP command. A dialog will appear prompting you for a title for the title command and a variable number if required. Drag out a print command and place it directly below the TITLE command. The system will halt while it gathers a list of your chart of accounts. A dialog will appear prompting you for an account to print. If you select two accounts another option will appear referring to changing it to a TO subset command else an AND subset will be used by default. You can also tick the (change case) option to change any negative figures to positive for reporting purposes only. When the required commands have been placed on the command list. Select the output tab to build the pre-compiled code for the report. At this point you can save the file or print or print preview it to ensure you have it correct. Specifying Print Periods Click on the (More Options) button on the toolbar. Enter a period number in the window that appears. Click the small cross on the window to close it when finished. Figure 13.4 RF Generator Body & Print Period Commands 157

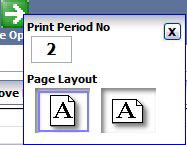
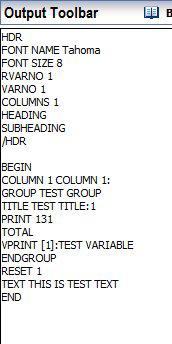
160 End of Unit
SAS2000. Financial 2. Training Manual
 SAS2000 Financial 2 Training Manual Tribal SchoolEdge Level 1, 17 Madden Grove RICHMOND VIC 3121 Support Centre: Web: https://support.schooledge.com.au/ Email: support.schooledge@tribalgroup.com Tel: 1300
Introduction to Client Online
 Introduction to Client Online Trade Finance Guide TradeFinanceNewClientsV2Sept15 Contents Introduction 3 Welcome to your introduction to Client Online 3 If you have any questions 3 Logging In 4 Welcome
Sage Tax Services User's Guide
 Sage 300 2017 Tax Services User's Guide This is a publication of Sage Software, Inc. Copyright 2016. Sage Software, Inc. All rights reserved. Sage, the Sage logos, and the Sage product and service names
Microsoft Dynamics GP. Electronic Bank Management
 Microsoft Dynamics GP Electronic Bank Management Copyright Copyright 2010 Microsoft. All rights reserved. Limitation of liability This document is provided as-is. Information and views expressed in this
Standard Accounts User Guide
 Standard Accounts User Guide v. 8.1, Windows February 2016 Table of Contents Table of Contents INTRODUCTION... 4 Installation and Starting of Standard Accounts... 4 Starting Standard Accounts for the first
INTUIT PROA DVISOR PR O G RAM. QuickBooks Desktop Certification
 INTUIT PROA DVISOR PR O G RAM QuickBooks Desktop Certification Getting Started Guide Table of Contents TABLE OF CONTENTS QuickBooks ProAdvisor Training Objectives... 1 What s in the Workbook?... 2 Chapter
Sage Bank Services User's Guide
 Sage 300 2017 Bank Services User's Guide This is a publication of Sage Software, Inc. Copyright 2016. Sage Software, Inc. All rights reserved. Sage, the Sage logos, and the Sage product and service names
VisionVPM General Ledger Module User Guide
 VisionVPM General Ledger Module User Guide Version 1.0 VisionVPM user documentation is continually being developed. For the most up-to-date documentation please visit the VisionVPM website at www.visionvpm.com
Entering a Price SQL. Sell Prices. Fieldnames. Variables. Examples. MYOB EXO Business User Guide
 Sell Prices The sell prices that you see in the Sell Prices panel on the Details 1 tab of the Stock Item Details window (see page 161) are those you set in EXO Business Config > Admin > Stock > Price Names.
WinTen² Budget Management
 Budget Management Preliminary User Manual User Manual Edition: 4/13/2005 Your inside track for making your job easier! Tenmast Software 132 Venture Court, Suite 1 Lexington, KY 40511 www.tenmast.com Support:
Introduction to Client Online
 Introduction to Client Online Bibby Factors International Guide 1 InternationalFactoringNewClientBibbyUKopsSept15 Introduction 3 Logging In 5 Welcome Screen 6 Navigation 7 Viewing Your Account 9 Invoice
Introduction to Client Online
 Introduction to Client Online Construction Finance Guide ConstructionFinanceNewClientsV2Sept15 Contents Introduction 3 Welcome to your introduction to Client Online 3 If you have any questions 3 Logging
Sage Bank Services User's Guide. May 2017
 Sage 300 2018 Bank Services User's Guide May 2017 This is a publication of Sage Software, Inc. 2017 The Sage Group plc or its licensors. All rights reserved. Sage, Sage logos, and Sage product and service
TAA Scheduling. User s Guide
 TAA Scheduling User s Guide While every attempt is made to ensure both accuracy and completeness of information included in this document, errors can occur, and updates or improvements may be implemented
DUS DocWay TM Loan Documents User Guide. January 2019
 DUS DocWay TM Loan Documents User Guide January 2019 Table of Contents Getting Started with DUS DocWay... 1 Welcome Page Navigation... 3 Loan Documents Navigation... 6 Update Document Category and Type...
ShelbyNext Financials: Credit Card Tracking (Course #N211)
") ShelbyNext Financials: Credit Card Tracking (Course #N211) Presented by: Dave Heston Shelby Consultant 2017 Shelby Systems, Inc. Other brand and product names are trademarks or registered trademarks of
ShelbyNext Financials: Credit Card Tracking (Course #N211) Presented by: Dave Heston Shelby Consultant 2017 Shelby Systems, Inc. Other brand and product names are trademarks or registered trademarks of
Advanced Financial Statements
 Sage 100 Fund Accounting Advanced Financial Statements STUDENT WORKBOOK SAGE LEARNING SERVICES Important Notice: Authentic Sage 100 Fund Accounting training guides display a holographic image on the front
CCH Fixed Asset Register Quick Start Guide
 CCH Fixed Asset Register 2017.1 Quick Start Guide Legal Notice Disclaimer Wolters Kluwer (UK) Limited has made every effort to ensure the accuracy and completeness of these Release Notes. However, Wolters
Microsoft Dynamics GP. Receivables Management
 Microsoft Dynamics GP Receivables Management Copyright Copyright 2012 Microsoft. All rights reserved. Limitation of liability This document is provided as-is. Information and views expressed in this document,
STRATA Master Version 8.0 Upgrade. Participant Workbook
 STRATA Master Version 8.0 Upgrade Participant Workbook NOT TO BE REPRODUCED IN ANY WAY Copyright Reserved 2015 The staff of Rockend Technology Pty Limited has taken due care in preparing this Training
BUILDSMART DEBTORS. SmartAct. Authorized Training Manual
 BUILDSMART DEBTORS SmartAct Authorized Training Manual - 1 - - 2 - SmartAct Authorized Training Manual Notice This document and the Buildsmart software may be used only in accordance with the accompanying
Margin Direct User Guide
 Version 2.0 xx August 2016 Legal Notices No part of this document may be copied, reproduced or translated without the prior written consent of ION Trading UK Limited. ION Trading UK Limited 2016. All Rights
SAS2000 Release Notes Build nd August New Improved Fixed
 Release Scorecard: 22 53 41 The new features and improvements have been a direct result of the continued and positive feedback from schools using SAS2000. Thank you for your helpful input. If you would
Setting up a new company
 Setting up a new company This guide will show you how to create a new company within your current subscription. As a subscription owner or administrator, you can create multiple company flies under the
Expedient User Manual Banking Module
 Volume 5 Expedient User Manual Banking Module Gavin Millman & Associates (Aust) Pty Ltd 281 Buckley Street Essendon VIC 3040 Phone 03 9331 3944 Web www.expedientsoftware.com.au Table of Contents Debtor
MUNSOFT 5.2 INCOME: SUNDRY DEBTORS MANUAL. Y Walters B.Sc. (Math Science) Hons
 Hons") MUNSOFT 5.2 INCOME: SUNDRY DEBTORS MANUAL 1 Y Walters B.Sc. (Math Science) Hons SUNDRY DEBTORS... 4 Enquiries... 4 Sundry Enquiries... 4 Account Search... 5 Master Files... 6 Account Master... 6 Account
MUNSOFT 5.2 INCOME: SUNDRY DEBTORS MANUAL 1 Y Walters B.Sc. (Math Science) Hons SUNDRY DEBTORS... 4 Enquiries... 4 Sundry Enquiries... 4 Account Search... 5 Master Files... 6 Account Master... 6 Account
Exact Globe Next Cash Flow. User Guide
 Exact Globe Next Cash Flow User Guide Exact Globe Next Cash Flow Despite the continued efforts of Exact to ensure that the information in this document is as complete and up-to-date as possible, Exact
Credit Control Administrators Guide DOCUMENTATION. Phone: Fax:
 Credit Control Administrators Guide DOCUMENTATION Phone: 01981 590410 Fax: 01981 590411 E-mail: information@praceng.com CHANGE HISTORY ORIGINAL DOCUMENT AUTHOR: MICHELLE HARRIS DATE: OCT 2013 AUTHOR DATE
Gatekeeper Module Gatekeeper Version 3.5 June
 Title Budget of document & Business Planning Sub Setup heading & Quick i.e version Start xxx Guide Gatekeeper Module Gatekeeper Version 3.5 June 2016 www.farmplan.co.uk 01594 545022 Gatekeeper@farmplan.co.uk
Setting Up Custom Line Functions
 Setting Up Custom Line Functions To set up EXO Business for Custom Line Fields: 1. Add fields to the EXO Business database to hold the CLF data. 2. Set up the Extra Fields that will be used by the CLF
Processing a BAS using your MYOB software
 Processing a BAS using your MYOB software Contents How to use this guide 2 1.0 Checking the accurateness of your transactions 3 1.1 Reconcile your accounts 3 1.2 Review your accounts and reports 3 1.3
Policy. Chapter 6. Accessing the Policy. Nexsure Training Manual - CRM. In This Chapter
 Nexsure Training Manual - CRM Policy In This Chapter Accessing the Policy Adding a Thank You Letter Editing the Policy Adding, Editing and Removing Assignments Admitted Carrier Identification Summary of
Expedient User Manual Debtors Module
 Volume 2 Expedient User Manual Debtors Module Gavin Millman & Associates Pty Ltd 281 Buckley Street Essendon VIC 3040 Phone 03 9331 3944 Web www.expedientsoftware.com.au Table of Contents Accounting Overview...2
Financial Statements Guide. October Version 2013 Release 2
 Financial Statements Guide October 8 2013 Version 2013 Release 2 Copyright NetSuite, Inc. 2009 2013 All rights reserved. This document is the property of NetSuite, Inc., and may not be reproduced in whole
Synaptic Analyser USER GUIDE
 Synaptic Analyser USER GUIDE Version 1.0 October 2017 2 Contents 1 Introduction... 3 2 Logging in to Synaptic Analyser... 3 3 Client Screen... 5 3.1 Client Details... 6 3.2 Holdings... 6 3.3 Income Sources...
Microsoft Dynamics GP. Taxes On Returns
 Microsoft Dynamics GP Taxes On Returns Copyright Copyright 2010 Microsoft. All rights reserved. Limitation of liability This document is provided as-is. Information and views expressed in this document,
Microsoft Dynamics GP Fixed Assets Enhancements
 Microsoft Dynamics GP 2013 Fixed Assets Enhancements Copyright Copyright 2012 Microsoft Corporation. All rights reserved. Complying with all applicable copyright laws is the responsibility of the user.
Booklet 2. e1 Training Guidance Notes. Purchases and Payments
 Booklet 2 e1 Training Guidance Notes Purchases and Payments (Revised September 2014) Table of Contents Introduction... 2 1. Purchase Orders... 3 1.1 New orders... 3 1.2. Setting up Contacts Suppliers/Customers...
Atradius Atrium. July version 3.0. Atradius Atrium. User manual. Atradius Atrium - User Manual Version 3.0
 July 2018 - version 3.0 User manual 1 - User Manual Version 3.0 Drive your business forward with powerful, easy-to-use credit management tools is the Atradius online platform, which offers you one place
Classification: Public ANZ TRANSACTIVE AU & NZ USER GUIDE
 Classification: Public ANZ TRANSACTIVE AU & NZ USER GUIDE 08 2015 CONTENTS INTRODUCTION... 3 PAYMENTS... 5 About Payments in ANZ Transactive AU & NZ... 5 Domestic Payments... 7 Single Payments... 8 Payment
Microsoft Dynamics GP. GST and Australian Taxes
 Microsoft Dynamics GP GST and Australian Taxes Copyright Copyright 2010 Microsoft. All rights reserved. Limitation of liability This document is provided as-is. Information and views expressed in this
Attaché Payroll 2017/18. End of Year Procedures
 Attaché Payroll 2017/18 End of Year Procedures Table of Contents Which Version of Attaché Do I Need to Process End of Year?... 4 Checking that All Operators have Exited Attaché... 5 Blocking Access to
Microsoft Dynamics GP. GST and Australian Taxes
 Microsoft Dynamics GP GST and Australian Taxes Copyright Copyright 2008 Microsoft Corporation. All rights reserved. Complying with all applicable copyright laws is the responsibility of the user. Without
Microsoft Dynamics GP Payable Management. Series GP 2018
 Microsoft Dynamics GP Payable Management Series GP 2018 Contents Course Objectives 7 Payables Management Setup 11 1.1 Payables Management Setup 15 1.2 Payables Setup Options 21 1.3 Creditor Class Maintenance
Medici Lending Training Guide
 Medici Lending Training Guide This publication was written for Medici Publication Information Medici Lending Training Guide Material ID Number: 280816 Revision: January, 2013 Distributed Subject to Terms
Processing a BAS using your MYOB software. Processing a BAS. using your MYOB software
 Processing a BAS using your MYOB software Processing a BAS using your MYOB software Processing a BAS using your MYOB software Processing a BAS using your MYOB software Business Activity Statements (BAS)
X-Charge Credit Card Processing
 X-Charge Credit Card Processing OpenEdge (Formerly X-Charge) Payment Processing Setup... 1 Setting Permissions for Credit Card Processing... 1 Setting Up X-Charge Payment Processing in SuccessWare 21...
Fixed Assets Inventory
 Fixed Assets Inventory Preliminary User Manual User Manual Edition: 2/3/2006 For Program version: 2/3/2006 Your inside track for making your job easier! Tenmast Software 132 Venture Court, Suite 1 Lexington,
PRO Package Procedures Guide
 PRO Package Procedures Guide Procedures This is what Guide you dofor PRO Users Welcome to Paxton Charities Accounting. Please follow the steps below to ensure a smooth implementation of The following
Vivid Reports 2.0 Budget User Guide
 B R I S C O E S O L U T I O N S Vivid Reports 2.0 Budget User Guide Briscoe Solutions Inc PO BOX 2003 Station Main Winnipeg, MB R3C 3R3 Phone 204.975.9409 Toll Free 1.866.484.8778 Copyright 2009-2014 Briscoe
Guide to Credit Card Processing
 CBS ACCOUNTS RECEIVABLE Guide to Credit Card Processing version 2007.x.x TL 25476 (07/27/12) Copyright Information Text copyright 1998-2012 by Thomson Reuters. All rights reserved. Video display images
Chapter 5 Accounting ibais User Manual BA Insurance Systems
 Chapter 5 Accounting ibais User Manual BA Insurance Systems ibais User Manual BA Insurance Systems Chapter 5 - Table of Contents CHAPTER 5 - ACCOUNTING... 5-1 OVERVIEW... 5-1 HOW TO ACCESS ACCOUNTING FUNCTIONS...
Finance Self Service Financial Systems
 Finance Self Service Financial Systems Finance Self Service Financial Systems 2008 University of North Florida Center for Professional Development & Training 1 UNF Drive, Jacksonville, Fl 32224 904.620.1707
Quality Control Advisor SM. User Guide. January 2018
 Quality Control Advisor SM User Guide January 2018 Notice The information in this document is intended to provide general guidance to Freddie Mac Seller/Servicers. The information is offered as an aid
USERGUIDE MT4+ TRADE TERMINAL
 TABLE OF CONTENTS. INSTALLATION OF THE PAGE 03. OVERVIEW OF THE PAGE 06 3. MARKET WATCH PAGE 09 A. PLACING BUY / SELL ORDERS PAGE 09 B. PLACING OF PENDING ORDERS PAGE 0 C. OCO (ONE-CANCELS-OTHER) ORDERS
Multifamily Securities Investor Access Desk Reference Manual
 Multifamily Securities Investor Access Manual February 2013 Contents 1 Application Overview... 3 2 Minimum Browser Requirements... 3 3 Contacting Investor Access Tool Administrator... 3 4 Accessing and
Finance Manager: Budgeting
 : Budgeting Overview is a module that facilitates the preparation, management, and analysis of fiscal year budgets. Streamlined for efficiency and designed to solve the cumbersome process of budget creation,
User guide for employers not using our system for assessment
 For scheme administrators User guide for employers not using our system for assessment Workplace pensions CONTENTS Welcome... 6 Getting started... 8 The dashboard... 9 Import data... 10 How to import a
Bank Reconciliation Processing SYSTEM ADMINISTRATION AND PROCESSING GUIDE. Last revised: 8/19/10 12:22 PM
 Bank Reconciliation Processing SYSTEM ADMINISTRATION AND PROCESSING GUIDE Last revised: 8/19/10 12:22 PM New World Systems 1 CONTENTS Contents... 1 Introduction... 3 System Administrator Guide... 4 Company
Sage 50 Accounts Credit Control
 Sage 50 Accounts Credit Control Sage (UK) Limited Copyright Statement Sage (UK) Limited, 2008. All rights reserved If this documentation includes advice or information relating to any matter other than
Contents. Introduction
 Getting Started Introduction O&M Profiler User Guide (v6) Contents Contents... 1 Introduction... 2 Logging In... 2 Messages... 3 Options... 4 Help... 4 Home Screen... 5 System Navigation... 5 Dashboard...
ShelbyNext Financials: Credit Card Tracking
 ShelbyNext Financials: Credit Card Tracking (Course #F211) Presented by: Dave Heston Shelby Consultant 2018 Shelby Systems, Inc. Other brand and product names are trademarks or registered trademarks of
MSI Calendar and/or Fiscal Year End Processing For year ending December 31, 2013
 MSI Calendar and/or Fiscal Year End Processing For year ending December 31, 2013 User s Guide NOTE: Screen shots for this document have been taken from the version 7.0 MSI Payroll system. Municipal Software,
Draftworx Manual. Thank you for choosing Draftworx
 Draftworx Manual Thank you for choosing Draftworx Contents Installing the program... 4 Activating the program... 5 Getting going... 6 Training videos... 6 Filter bar... 6 Regional Settings... 8 Client
Enhanced General Ledger Quick Steps version 8.016
 Enhanced General Ledger Quick Steps version 8.016 The General Ledger module is designed to handle journal entries for various transactions that are not accounted for in other modules (A/P, Payroll etc.).
Certifying Mortgages for Freddie Mac. User Guide
 Certifying Mortgages for Freddie Mac User Guide December 2017 The Freddie Mac Single-Family Seller/Servicer (Guide) requires a Seller/Servicer selling Mortgages to Freddie Mac to forward the Notes, assignments
Master User Manual. Last Updated: August, Released concurrently with CDM v.1.0
 Master User Manual Last Updated: August, 2010 Released concurrently with CDM v.1.0 All information in this manual referring to individuals or organizations (names, addresses, company names, telephone numbers,
Currency Manager Release 2015
 Currency Manager Release 2015 Disclaimer This document is provided as-is. Information and views expressed in this document, including URL and other Internet Web site references, may change without notice.
8.0 BANKING. 8.1 Overview. 8.2 Multiple Bank Accounts Funds Transfers Cancelling a Funds Transfer
 8.0 BANKING 8.1 Overview As you enter receipts from your customers and payments to your suppliers and expense accounts, Payperwork automatically updates the relevant bank account. The default bank account
Using the Clients & Portfolios Module in Advisor Workstation
 Using the Clients & Portfolios Module in Advisor Workstation Disclaimer - - - - - - - - - - - - - - - - - - - - - - - - - - - - - - - - - - - - - 1 Overview - - - - - - - - - - - - - - - - - - - - - -
How to Use Fundamental Data in TradingExpert Pro
 Chapter VII How to Use Fundamental Data in TradingExpert Pro In this chapter 1. Viewing fundamental data on the Fundamental Report 752 2. Viewing fundamental data for individual stocks 755 3. Building
PROFITstar November PROFITstar Budget Manager Reference Guide. Hosted Version
 Table of Contents Welcome to Budget Manager... 1 Budget Administrators... 2 Prerequisites for Completing a Budget... 2 Exporting Data... 2 User Setup and Permissions... 4 Fixed Asset Setup...10 Open Budget
Hansa Financials HansaWorld
 Hansa Financials HansaWorld Integrated Accounting, CRM and ERP System for Macintosh, Windows, Linux, PocketPC 2002 and AIX Volume 4: General Modules Assets, Cash Book, Consolidation, Expenses and Quotations
Online Contribution Processing CIPQ BERT 2 BEWT
 EMPLOYER HELP GUIDE Online Contribution Processing CIPQ BERT 2 BEWT Disclaimer: All employer and member details used throughout this guide are fictitious and have been created for training and educational
FATCA Administration and Configuration Guide. Release April 2015
 FATCA Administration and Configuration Guide Release 6.2.5 April 2015 FATCA Administration and Configuration Guide Release 6.2.5 April 2015 Part Number: E62969_14 Oracle Financial Services Software, Inc.
QuickSuper. User Guide.
 QuickSuper User Guide www.clearinghouseapp.hostplus.com.au QuickSuper User Guide Document History Date Description 26 Jul 2010 Initial release 20 May 2011 Updated to include EFT payment method. 03 Nov
FATCA Administration and Configuration Guide. Release 2.0 May 2014
 FATCA Administration and Configuration Guide Release 2.0 May 2014 FATCA Administration and Configuration Guide Release 2.0 May 2014 Document Control Number: 9MN12-62310026 Document Number: 14-FCCM-0002-2.0-01
QuickBooks Pro Manual
 QuickBooks Pro Manual for Development Organisations Fifth version prepared December 2009 for users of QuickBooks Pro 2006. For limited circulation within Mango and selected NGOs (further information from
GENERAL ACCOUNTING AND END-OF-PERIOD PROCEDURES: MERCHANDISING BUSINESS
 GENERAL ACCOUNTING AND END-OF-PERIOD PROCEDURES: MERCHANDISING BUSINESS LEARNING OBJECTIVES At the completion of this chapter, you will be able to: 1. Complete the end-of-period procedures. 2. Change the
Interest Calculation Add-on Supernova Add-on for SAP Business One
 User Manual Supernova Add-on for SAP Business One Date: October 2013 Copyright 2013 Supernova Consulting Ltd. All rights reserved. This content may not be reproduced or transmitted in any form or by any
Microsoft Dynamics GP. COA Ecuador
 Microsoft Dynamics GP COA Ecuador Copyright Copyright 2010 Microsoft. All rights reserved. Limitation of liability This document is provided as-is. Information and views expressed in this document, including
Microsoft Dynamics GP. Date Effective Tax Rates
 Microsoft Dynamics GP Date Effective Tax Rates Copyright Copyright 2012 Microsoft. All rights reserved. Limitation of liability This document is provided as-is. Information and views expressed in this
Total Order Plus Integrated Accounting Series General Ledger
 Total Order Plus Integrated Accounting Series General Ledger Mindware Corporation Of America Integrated ted Accounting Series Total Order Plus General Ledger User Guide Copyright 1999 by Mindware Corporation
Central Budget Entry Munis - Financials: Central Budget Entry
 MU-FN-8-F, MU-FN-14-C Central Budget Entry Munis - Financials: Central Budget Entry CLASS DESCRIPTION This class will provide an overview of the Central Budget Entry program that is new to Munis version
Commsec Adviser Services User Guide
 Commsec Adviser Services User Guide Welcome to the CommSec Adviser Services trading website, offering market-leading functionality to help you get more from your online trading and investing: Powerful
Manual Asset Based Finance Manager
 Deutsche Bank Global Transaction Banking Manual Asset Based Finance Manager January 2018 Table of Contents 1. Working with Deutsche Bank Asset Based Finance Manager (ABF Manager) 03 2. Before you start
IQ DEBTORS INTEREST CHARGING
 IQ DEBTORS INTEREST CHARGING PREFACE This is the guide for IQ Retail (PTY) Ltd Accounting Software Systems. It will cover in detail, the technical aspects which are applicable to the IQ Enterprise 7 Accounting
Computerised Accounting
 Preface Computerised Accounting using MYOB Accounting v18 This workbook has been written to cover Cash Book, General Ledger, Accounts Receivable and Accounts Payable information on how to use MYOB Accounting,
Westpac WinTrade User Guide. Trade Finance. Westpac Banking Corporation ABN incorporated in Australia (New Zealand division).
.") Westpac WinTrade User Guide Trade Finance Westpac Banking Corporation ABN 33 007 457 141 incorporated in Australia (New Zealand division). Westpac Banking Corporation 2008 This document is copyright protected.
Westpac WinTrade User Guide Trade Finance Westpac Banking Corporation ABN 33 007 457 141 incorporated in Australia (New Zealand division). Westpac Banking Corporation 2008 This document is copyright protected.
Seventh-day Adventist Church (SPD) Limited. The New Online SPD Tithes & Offerings Reporting System. Training Manual
 Limited. The New Online SPD Tithes & Offerings Reporting System. Training Manual") Seventh-day Adventist Church (SPD) Limited The New Online SPD Tithes & Offerings Reporting System Training Manual Local Church Treasurers & Assistants Page 2 of 35 Version 1.1 Authorised By: Table of Contents
Seventh-day Adventist Church (SPD) Limited The New Online SPD Tithes & Offerings Reporting System Training Manual Local Church Treasurers & Assistants Page 2 of 35 Version 1.1 Authorised By: Table of Contents
Accounts Receivable Instructor Guide
 Instructor Guide Rutherford and Associates August 2012 All rights reserved. All rights reserved. The reproduction or use of this document in any form or by any electronic, mechanical, or other means, now
Sage (UK) Limited Copyright Statement
 Limited Copyright Statement") Sage (UK) Limited Copyright Statement Sage (UK) Limited, 2011. All rights reserved We have written this guide to help you to use the software it relates to. We hope it will be read by and helpful to lots
Sage (UK) Limited Copyright Statement Sage (UK) Limited, 2011. All rights reserved We have written this guide to help you to use the software it relates to. We hope it will be read by and helpful to lots
COUNT ONLINE BROKING USER GUIDE
 Welcome to the Count Online Broking website, offering market-leading functionality to help you get more from your online trading and investing: Powerful charting giving you valuable insight into client
Simple Fund Trustee s
 Simple Fund Trustee s Training Manual BGL Corporate Solutions Pty Ltd Suite 2, 606-608 Hawthorn Road, Brighton East, Victoria, 3187, Australia PO Box 8063, Brighton East, Victoria, 3187, Australia Email:
Tutorial. Morningstar DirectSM. Quick Start Guide
 April 2008 Software Tutorial Morningstar DirectSM Quick Start Guide Table of Contents Quick Start Guide Getting Started with Morningstar Direct Defining an Investment Lineup or Watch List Generating a
Attaché Payroll 2014/15 End of Year Procedures
 Attaché Payroll 2014/15 End of Year Procedures Table of Contents Which Version of Attaché Do I Need to Process End of Year?... 4 Checking that All Operators have Exited Attaché... 5 Blocking Access to
Chapter 6. Company Tasks. In this chapter:
 Chapter 6 Company Tasks This chapter covers the tasks contained within Sage 50 Accounts Company module. The chapter introduces the topics of prepayments, accruals, budgeting, fixed asset handling and VAT
Chapter 7 Reporting ibais User Manual BA Insurance Systems
 Chapter 7 Reporting ibais User Manual BA Insurance Systems ibais User Manual BA Insurance Systems Chapter 7 Table of Contents CHAPTER 7 - REPORTING... 7-1 OVERVIEW... 7-1 HOW TO ACCESS THE REPORTING FUNCTIONS...
Plan Access ABA-RF Guide
 Plan Access ABA-RF Guide September 1, 2014 Copyright Copyright 2009, 2014 Voya Institutional Plan Services, LLC All rights reserved. No part of this work may be produced or used i4 any form or by any means
v.5 Financial Reports Features & Options (Course V46)
") v.5 Financial Reports Features & Options (Course V46) Presented by: Ben Lane Shelby Senior Staff Trainer 2017 Shelby Systems, Inc. Other brand and product names are trademarks or registered trademarks
v.5 Financial Reports Features & Options (Course V46) Presented by: Ben Lane Shelby Senior Staff Trainer 2017 Shelby Systems, Inc. Other brand and product names are trademarks or registered trademarks