Campus Solutions- Student Financials. Maintaining Setup Values
|
|
|
- Kathleen Price
- 5 years ago
- Views:
Transcription
1 Maintaining Setup Values Version 9.0 1
2 Table of Contents Understanding Effective Dates... 3 Payment Application Processing... 6 Charge Priorities... 6 Overall Payment Priorities Item Type Set up Setting up a New Item Type Understanding Term Rollover Adjustment Calendar Billing and Due Date Calendar Application Fee Course Fee Class Fee Copying Class Or Course Fees in Batch Tuition Calculation Controls SF Term Defaults GL Interface Rollover Setting up Cashier Values
3 Understanding Effective Dates What is an Effective Dating? Effective Dating is a method of dating information in PeopleSoft applications. You can predate information to add historical data to your system, or postdate information in order to enter it before it actually goes into effect. By using effective dates, you don't delete values; you enter a new value with a current effective date. This functionality allows you to maintain history of your key set-ups in PeopleSoft. This has many advantages including the ability to report with historical set up values. It also is extremely useful when trouble shooting, because the values used when a transaction is processed is maintained. It will also allow you to make a change to a record as soon as you become aware of the change, even if the change should not yet be in effect. For example, if you told in March, starting the next fiscal ear, parking fines will be coded to a different revenue account, you can immediately make the adjustment to the accounting information on the Parking Fines item type and just make it effective July 1, 20XX. This will result will be that the parking fine revenue will continue to be coded to the original account until the effective date of the new information (July, 1). Once the effective date of the change has past, the revenue will automatically be coded to the new account. 3
4 Using Effective Dating When you update an existing record, you usually do not want to overwrite the data that already existed in the database. Therefore, whenever updating data on an existing record you should insert a new Effective Dated row. The Effective Date becomes part of the Key for the record. A Key is the one or more fields that uniquely identify each row in a table. Some tables contain only one field as the key, while others require a combination. Key fields on a record cannot be changed once the record has been saved. So on the table, there will be a unique row for each version of the record. These rows can be classified in one of three ways. They are either historical rows, current effective dated rows, or future dated rows. SetID Origin ID Eff Date Status Descr WSC01 WEB 1/1/1901 A Web WSC01 WEB 7/1/2004 A Web Transactions WSC01 WEB 7/1/2006 I Web Transactions Historical Row Current Effective Dated Row Future Dated Row From the application there are two options for viewing data on a record. Update/Display and Include History. In Update/Display mode, which is the most common mode, will list all current and future dated rows. Include History will also display any Historical rows in the system. There is also an option called Correction Mode. In Student Financials, only CAMPUS SOLUTIONS SF TEAM staff has access to Correction Mode. When in Correction Mode, you can update information on a record without maintaining the history of what the data was originally. Correction Mode should therefore only be used to make minor changes such as correcting spelling errors. 4
5 Inactivating Data You will also use Effective Dates when inactivating control codes. When a control code is inactivated, you will still be able to view the data from the component used to maintain the control codes. However, it will no longer be displayed in drop down lists or be available for use by processes that reference that control code. For example, if a Waiver is inactivated as of July 1, 2004, the tuition calculation process will no longer be able to access that waiver after that date, even if you are calculating a term in which the waiver is still active. Because of that fact, careful consideration should be given to when data should be activated and inactivated. The standard recommendation is to use the start of a fiscal year as the day to activate and inactivate control codes. If you do need to change that effective date of a change, please contact CAMPUS SOLUTIONS SF TEAM and they should be able to update the value for you. NOTE: One of the most common reasons an expected value is not displayed in a drop down box is because of Effective Dates. If the Effective Date of the code is after the Effective date of the record on which it is being referenced, the value will not be displayed in the drop down box. Contact CAMPUS SOLUTIONS SF TEAM and they should be able to correct the problem. 5

6 Payment Application Processing Charge Priorities Overview Charge priority rules are the first step in determining how the system applies a payment. You define exactly what charges are eligible for payment and if payments can be applied to charges from various time periods. You can also establish a priority order for allowed charges. Charge priority lists are dependent on item type trees to identify which charge items are qualified for the particular type of payment. Because charge priority list details are defined at the tree node level, you can make payment restrictions as broad or narrow as you would like. Setting Up and/or reviewing a Charge Priority NOTE: Please discuss the need for setting up a new Charge Priority with Campus Solutions SF Team. Completing this set up on your own is not recommended. 1. Enter Charge Priority Identification Information A. Navigate to Charge Priority Set up SACR>Product Related>Student Financials>Charges and Payments>Charge Priority List B. You can add a new Charge Priority by clicking on the Add a New Value link. The following page will be displayed. C. Enter the correct SetID. This should default in from your operator preferences. D. Enter the 8-character code that will represent the Charge Priority. E. Click on the Add icon and the following page will be displayed. 6
7 2. Enter the Charge Priority Description Information. A. Enter the Effective Date. Once we are live, the Effective Date should be set to the first day of the of the academic year in which the new code will be used. B. Enter a 30-character Description of the Charge Priority C. Enter a 10- character Short Description of the Charge Priority for you on pages and reports were space is limited. D. Optionally, you can enter a Long Description of up to 254 characters explaining how the Charge Priority should be used. E. Enter the Tree Name of the tree that will be used to build the Charge Priority. Typically this should be set to ITEM_SECURITY. 3. Enter the detail information regarding what the Charges can be paid by Item Types with this Priority A. Click on the Details tab and the following page will be displayed. 7

8 B. Specify the Permission Form that would be used to grant access to payments. Typically, this will only be set on Financial Aid, Drawdown, or Credit related Charge Priorities. If you feel you may need an additional Permission Form set up please contact Campus Solutions. C. In the Allowable Charges field, select a Node from the tree listed on the previous page that will contain the charges that credits associated with this Charge Priority can pay. D. Specify the Term restrictions for charges within this node. Allowable Values are as follows: Yes: Select this value if you want the system to apply payments with no restrictions to charges in this time period. No: Select this value if you do not want the system to apply payments to any charges in this time period. Neg. Perm. (negative permission): Select this value if you want the system to apply payments as necessary to charges in this time period, unless the student expressly prevents it. Permission forms can be used in conjunction with negative permission. Permission Needed: Select this value if you want the system to require specific permission before applying payments to charges in this time period. Permission forms can be used in conjunction with permission needed. E. Select a value to control if payments may be applied to charges for the current term. F. Enter the maximum amount of the credit that can be applied to the current term, typically that is per transaction. If there is no ceiling for this payment, you can leave this field blank. This is the typical setup. G. Select a value to control if payments may be applied to charges for the prior term. 8
9 H. Enter the maximum amount of the credit that can be applied to the prior term, typically that is per transaction. If there is no ceiling for this payment, you can leave this field blank. This is the typical setup. I. Select a value to control if payments may be applied to charges for the prior academic year. J. Enter the maximum amount of the credit that can be applied to the prior year, typically that is per transaction. If there is no ceiling for this payment, you can leave this field blank. This is the typical setup. K. Select a value to control if payments may be applied to charges for future terms. L. Enter the maximum amount of the credit that can be applied to the future term, typically that is per transaction If there is no ceiling for this payment, you can leave this field blank. This is the typical setup. M. Assign a Priority level for each tree node used to define allowable charges. The system uses this priority value ONLY when you select Charge Tree Node as one of the Sort Payment Field values in your Payment Overall Priority setup. A priority of 1 is higher than a priority of 2. For additional information see the next section of this document. 4. Press the Save Icon to commit your changes to the database 9
10 Overall Payment Priorities Overview If a payment is made that does not fully cover all eligible charges, you might want those charges paid in a particular order. Use the Payment Overall Priority component to define the order of the payment allocation. Setting Up and/or reviewing Overall Payment Priorities NOTE: Please discuss the need for setting up a new Charge Priority with Campus Solutions SF Team. Completing this set up on your own is not recommended. 1. Enter General Information related to the Overall Payment Priority. A. Navigate to Overall Priorities Set up SACR>Product Related>Student Financials>Charges and Payments> Payment Overall Priority B. You can add a new Overall Priority by clicking on the Add a New Value link. The following page will be displayed. C. Enter the 8-character code that will represent the Overall Priority. D. Click on the Add icon and the following page will be displayed. 10

11 E. Enter the Effective Date. Once we are live, the Effective Date should be set to the first day of the of the academic year in which the new code will be used. F. The Status should be set to Active. G. Enter a 30-character Description of the Overall Priorities. H. Enter a 10- character Short Description of the Overall Priority for you on pages and reports were space is limited. I. Select an Allocation Method. There are two valid values for this field: By Oldest First: Select if you want to use sort payment fields to sort the eligible charges. If you elect this option, the last sort, regardless of the sort orders specified below, is to order the eligible charges by the oldest item number first. Equal Percentages: Select if you want to pay an equal portion of each eligible charge. If you elect to pay by equal percentages, the sort payment fields are not used. J. Pay Propionate Tax should be unchecked. K. You can define up to four levels of Charge Sort Criteria. Remember, that all sort rules defined for the Overall Priority apply only to charges already selected by the Charge Priority. Choose from the seven valid values for each sort field. Academic Year: Select to sort active charges by academic year, beginning with active charges from the earliest year. Academic Year, Current First: Select to sort active charges by the academic year, using the current academic year first. Once the system selects eligible charges for the current academic year, it sorts the remaining charges by academic year from the oldest to the most recent Charge Tree Node: Select to sort active charges by the priority value of the charge tree nodes established in the charge priority list definition being used. Item Charge Due Date: Select to sort active charges by charge due date, beginning with the active charge with the earliest due date. Term, Current First: Select to sort active charges by term, using the current term first. You determine the definition of current term using the Default Term Control field on 11
12 the Posting Setup page of the SF Business Unit component. Therefore, it is not necessarily the chronological current term. Once the system selects eligible charges for the current term, it sorts the remaining charges by term from the oldest to the most recent. Term, Oldest First: Select to sort active charges by terms, using the oldest term first. Term, Payment Term First: Select to sort active charges by terms, using the term for which the payment applies first. If no term is specified with the payment, the system uses the SF default term. Once the system selects eligible charges for the payment term, it sorts the remaining charges by term from the oldest to the most recent. 2. Press the Save Icon to commit your changes to the database. Item Type Set up Overview: Item Types classify item types into usable account groupings. Differentiating charges into multiple accounts enables flexibility in billing and assessing late fees. For example, creating a separate Item Type for housing enables you to bill and assess late fees for housing charges differently than you do for tuition charges. Item Type Numbering Item Types are organized into set numerical grouping on the ITEM_SECURITY tree. This tree, and the corresponding numerical groups, is used to control processing in several places in the system including payment application process and payment plan calculation. It is important to understand that PeopleSoft functionality that references trees and tree nodes only looks at the Item Type Number to determine how to complete the processing. Item type description and/or the account to which the item type is assigned has not impact what so ever. Below is the standard a representation of the tree and item number ranges that should be used when creating new item types. 12


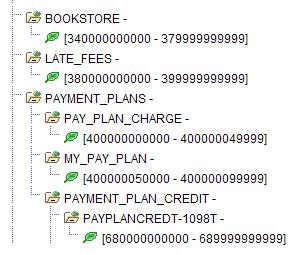
13 13 SITS-CAMPUS SOLUTION

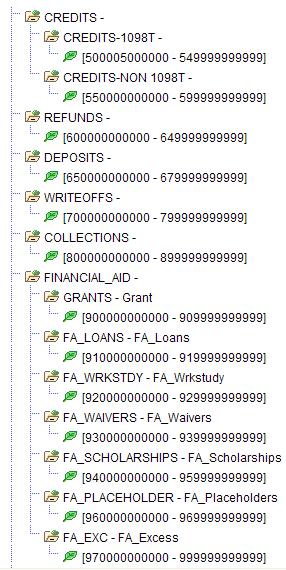
14 14 SITS-CAMPUS SOLUTION

15 Setting up a New Item Type 1. Navigate to Item Types Set up SACR>Product Related>Student Financials>Item Types>Item Types A. You can add a new Item Type by clicking on the Add a New Value link. The following page will be displayed. B. Enter the correct SetID. This should default in from your operator preferences. C. Enter the 12-digit code that will represent the Item Type. Keep the following in mind when selecting a number. 15

16 SITS-CAMPUS SOLUTION The number should fall with in the numerical range specified on the Tree Node that Item Type will pertain to. For example, if you are entering an Item Type that will be used to record Tuition charges make sure the number used to identify the Item Type is between Make sure to leave room between your numbers by leaving a range between your numbers. This will make it easier if you need to insert a new Item Type at a later date. D. Click on the Add icon and the following page will be displayed. 2. Enter descriptive information regarding the Item Type. A. Enter the Effective Date. The Effective Date typically should be set to the first day of the academic term in which the new code will be used. B. The Status should be set to Active. C. Enter a 30-character Description of the Item Type. D. Enter a 10- character Short Description of the Item Type for you on pages and reports were space is limited. E. Enter up to three Keywords. These Keywords will help locate the Item Type in drop down lists. F. Select the Item Type Classification. Choose from the following options. Application Fee - Select if you are defining an item type used for an application fee. Application Fee transactions result in a charge on the student s account. 16
17 SITS-CAMPUS SOLUTION Billing - Select to define an item type used to create billing entries. For example, if a student participates in a prepayment plan, you may use a billing item type for the monthly installment due. Charge - Select if you are defining a charge item type. Charge transactions result in a charge on the student s account and, depending on your GL setup, may create a receivable. Contributor Relations - Select if you are defining a contributor relations item type. NOTE: NDUS will not use this classification. Deposit - Select if you are defining a deposit item type. If the deposit classification is selected, a Tuition Deposit check box is also activated. If this item type is used for a tuition deposit, both the Deposit classification and the Tuition Deposit check box must be selected. Deposit and Tuition Deposit transactions result in a credit on the student s account. Financial Aid - Select if you are defining a financial aid item type. Financial Aid transactions result in a credit (payment) on the student s account. NOTE: Financial Aid will set up their own item types. GL Interface Only - Reserved for future use. Interest - Select if you are defining an item type for interest charges for payment plans. Interest transactions result in a charge on the student s account. Payment - Select if you are defining a payment item type. Payment transactions result in a credit (payment) on the student s account. Pay Plan Credit - Do not use this selection. It is no longer a valid option. Pre-Paid Tuition - Do not use this selection. It is no longer a valid option. Transfers - Do not use this selection. It is no longer a valid option. Refund - Select if you are defining an item type used for an overpayment refund. Refund transactions result in a charge on the student s account Waiver - Select if you are defining an item type used for waivers. Waiver transactions result in a credit (payment) on the student s account. This is for the type of waivers calculated by the tuition calculation engine only. RA waivers should be flagged as payments. Withholding - Select if you are defining an item type for tax withholding. Withholding transactions result in a charge on the student s account. Write-off - Select if you are defining an item type used for bad debt write-off. Writeoff transactions result in a credit on the student s account. G. Select the Tuition Deposit box to the Item Type is for a tuition deposit. This check box is only active when the Deposit item type classification is selected. H. Select the GL Interface Required to invoke the Financials edits to ensure you have correct data entered for your general ledger and to indicate that accounting entries will be generated for transactions using this Item Type. This will almost always be on. The exception would be Item Types used for converting legacy balances, since those amounts have already been posted to ledger. 17

18 I. Select the Course/Class Specific checkbox if you want to override the GL Interface defined for this item type and use one that is defined specifically for certain courses or classes. When the check box is selected, the GL Interface defined for the item type is overridden if an interface has been defined at the course or class level only. This will be generally unchecked at NDUS. J. Set the Accounting Date Control. Typically, this will be set to Item Effective Date, although you can chose from the following options. Run Date: Select to use the GL interface process date (the date the process is run) as the accounting date. This is the default value for this field. Item Effective Date: Select to use the effective date of the transaction (item) as the accounting date. Term Start Date: Select to use the beginning of the term as the accounting date. For example, suppose students at your institution register for fall term courses in the spring, but you want the system to put the tuition income from those registrations into a fall accounting period. By selecting term start date as your accounting date control and specifying the fall term on your tuition transaction, the system posts the charges to the fall period. NOTE: Before setting the Accounting Date Control option to anything other that Item Effective Date, please check with both your Accounting Staff and Campus Solutions SF Team. 3. Establish Item Amount Edits and Tax Control for the Item Type A. Click on the Amount Edits Tab and the following page will be displayed. 18
19 B. Select the optional Minimum Transaction Amount for each transaction using this Item Type. The system uses these amounts as edits for Posting. C. Select the optional Maximum Transaction Amount for each transaction using this Item Type. The system uses these amounts as edits for Posting. D. Select the optional Default Transaction Amount for each transaction using this Item Type. The system will populate this amount on each transaction for which the item type is used. This is particularly useful when you are entering a charge or payment for something with a fixed cost (for example, a parking ticket). You can override this default amount whenever necessary. E. The currency should always be set to USD. F. Select the T4A Income check box to indicate this item type is considered income per the T4 definition (and, therefore, needs to be reported as income). A process in tax reporting generates the payroll interface necessary to generate a T4 transaction as an interface to the payroll system. G. If the T4 check box is selected, enter a corresponding Wage Loss Plan. A process in tax reporting generates the payroll interface necessary to generate a T4 transaction as an interface to the payroll system. H. Select the T2202A check box if this item is an eligible educational expense for Canadian Taxes. I. Select T2202A Offset if item is to be used to offset eligible educational expenses. For example, waivers may reduce the total fees paid by the student and would, therefore, be considered an offset. J. Select 1098T if this item is an eligible educational expense for US taxes. This field is only available for Item Types designated as charges. 19
20 4. Define Miscellaneous parameters for the Item Type. These will vary depending on whether or not this is a charge or a credit Item Type. A. Enter the following values if this is a Charge Item Type. Leave the Adjustment Calendar blank. This field is reserved for future use. Leave the Payment Terms blank. This field is reserved for future use. Select a Tax Code for charges that are taxable. For example, purchases made at a campus bookstore might be subject to state and/or local sales taxes. I do not believe this will be used at NDUS. Select NRA Offset if this item type can offset (reduce) tax liability for nonresident aliens. This field is used with Application Fee, Billing, Charge, GL Interface Only, Interest and Withholding item type classifications. If NRA Offset ID selected, the Earnings Code field becomes active and you can identify the item type with its corresponding payroll earnings code. B. Enter the following values if this is a Credit Item Type. 20
21 Select the Charge Priority you want to use to control which charges are eligible for payment with this item type. Leave the Payment Terms blank. This field is reserved for future use. Select the Payment Overall Priority definition that you want to use to control the order in which payments are applied to eligible charges using this Item Type. Enter Days to Encumber to establish a period of time between when a payment is made and when the funds are available for a refund. The number that you enter in this field establishes how many business days must pass before the refund can be made. Select NRA Taxable Credit if this item type is considered taxable income for nonresident aliens. When you select this option, the Earnings Code field becomes active and you can identify the item type with its corresponding payroll earnings code. Click on the Refundable Indicator to designate a payment/credit as refundable. If this box is not checked any credit balances associated with this Item Type could not be refunded to the student. For all refundable payments enter an Earnings Code. Select from the following. o Enter SRO for student payments/credits that may be refunded. o Enter SRE for excess financial aid payments. Select Tender Specific if you want to specify the form of tender used with this item type. For example, if you set up an item type to be used for credit card payments, you should select this check box and specify the desired tender form in 21

22 the Tender Category field. Typically, this functionality is only used in conjunction wit Application Payment item types. Select Payment Priority Flag to assign a priority ranking to this payment/credit. When you select this check box, the Priority field is activated. If you do not select this option, they system ignores values in the Priority field and the payment has the lowest priority ranking (999). THIS BOX SHOULD BE CHECKED FOR ALL CREDIT ITEM TYPES. Enter a Priority value. Payment priority is used to effect payment swapping whereby payments with a higher priority can actually displace lower priority payments. The following values should be used when setting up a new credit item type. o Standard Payments - should be set to 750 o Financial Aid Payments -- should be set to 750 o Third Party Payments -- should be set to 500 o Waivers -- should be set to 250 o Credits -- should be set to 50 Pick Up Receivables from Charge should be checked on all credit Item Types. If this is a Write Off Item Type click on the Match Charge Write Offs. 5. External Awards- will be used in the future- new feature in Define any posting restrictions that may apply to the Item Type. A. Click on the Posting Restrictions Tab and the following page will be displayed. B. Enter the number of Days In The Past an item may be Effective-Dated. The effective date will usually default to the day of the transaction, but can be overridden for accounting purposes. 22
23 C. Enter the number of Days In The Future an item may be Effective-Dated. The effective date will usually default to the day of the transaction, but can be overridden for accounting purposes D. Enter the number of Days In The Past a Due Date may be set when posting a charge. E. Enter the number of Days In The Future a Due Date may be set when posting a charge. F. Select Appropriate Term Enroll Req for Posting if you want the system to make sure the student is enrolled in the appropriate term before posting the charge. If the student is not enrolled the charge is left with the status un-posted. Use this feature to avoid posting charges that have a high probability of being cancelled. 7. Define the Account Types that are associated with the Item Type. A. Click on the Account Types Tab and the following page will be displayed. 23

24 B. Enter the SetID that includes both the account type and the item type. This will be the SetID you have been using throughout the process. C. Enter an Account Type that you want to associate with the item type. This will control on which line on the student s account the charges will be displayed. Account types also provide information for prompting when performing data entry. 8. Define the accounting information for the Item Type. A. Click on the GL Interface Tab and the following page will be displayed. 24

25 B. Start by entering a Term. Typically this will be 0000, meaning the same accounting information will apply to all terms in which the item type is used. Occasionally, however, you may wish to specify accounting information differently depending on the term. For example, the student activity fee may be allocated differently in the fall and spring than in the summer when fewer programs are active on campus. Under such circumstances the specific term to which the accounting information applies should be entered. NOTE: If you specify accounting information by a specific term, you will need to roll that set up over from term to term for your transactions to interface properly. C. Session will typically be left blank. This would only be used to designate different accounting entries depending on the session in which the item type is used. Currently there is no need for the functionality at NDUS. D. Enter the Effective Date of the accounting set up. Typically, the initial value is equal to the initial effective date of the item type, otherwise if updating should be current date. Auditors do not favor backdating. E. The Effective Status should be set to Active. F. Jrnl Set should always be left blank. 25
26 G. The Db/Cr indicator is used to define which side of the transaction is being specified on the current line. For each item type you will need to specify at least two lines, one for the Debit information and one for the credit information. H. Always set the Timing to Assessment. I. GL Pct indicates the percent of the amount applied to the student s account that will be coded to that Chart Field string. This allows you to code an item type to multiple chart field strings. If there are multiple rows, ensure they add up to 100% for each the Db/Cr rows. J. Enter an optional Priority Amount that you want distributed to a GL account. If you specify a priority amount, the amount specified will be distributed to the GL account definition with the highest priority. The remaining balance will be distributed to the remaining GL accounts as defined. K. Enter a maximum monetary amount that you want to distribute to the specified GL account in the Account Limit field. For example, if you set the GL Pct field to 25% and the Account Limit field to 100 USD, 25% of a debit or credit up to a maximum of 100 USD will be distributed to the specified GL account. L. Click on the Jrnl Set ChartFields link and the following screen appears 26
27 M. Enter the GL Business Unit. This should be defaulted in N. Always enter a Ledger value of ACTUALS. O. Enter the Fund, Department and Account in the corresponding fields. (these are required fields) P. Optionally you may also enter a value in the Program or Project fields. Q. If you enter a value in the Project Field you must also populate the following two fields. Enter the GL Business Unit value again in the Chartfield 1 field. Populate the Chartfield 2 field with the number 1 NOTE: On the Accounting set up page, the Accounts Receivable Account, , should always be either debited or credited. Because all item types affect the student s balance in the subsidiary ledger they also need to adjust the balance in the control account. 27
28 NOTE: Student Financials does not do business unit or fund balancing. These transactions will occur on the General Ledger side. Therefore it is ok to set up debit and credit lines that do not post to the same fund and/or business unit. As long as total debits = total credits the transaction will be successful. Because of this often on payment item types, a general or clearing fund is used. NOTE: All Charge Item Types must have GL information populated even if they will not be interfaced to the General Ledger (conversion item types). If this information is left off the item type, when the charge is paid, the accounting information generated by the payment will not interface correctly. 9. Press the Save Icon to commit your changes to the database. 28
29 Understanding Term Rollover Term Rollover Process Most of the Tuition Calculation Controls are Term specific as opposed to maintained by effective dating. One of the implications of this is that all of your Tuition Calculation Controls need to be rolled over from one term to the next. The following are the steps that will need to be performed to roll over your fee calculation set up from one term to another. 1. Copy the Adjustment Calendar 2. Copy the Billing and Due Date Calendar 3. Copy Application Fees and update amounts as necessary (only if amount changes) 4. Copy Term Fees and update amounts as necessary 5. Copy Course Fees and update amounts as necessary 6. Copy Class Fees and update amounts as necessary 7. Copy Tuition Calculation Controls 8. Update Term Default 9. If using term specific GL set up, copy GL information to the new term You will need to complete the Term Rollover process shortly before enrollment for that term begins even if your tuition rates have not been completely finalized. This is because when a student enrolls, the tuition calculation required flag is set on the STDNT_CAR_TERM record. When that flag is set, tuition calculation is automatically invoked when the student brings his account information up on self-service. If the tuition calculation set up has not been rolled over, the student will receive and error and will be unable to view his/her account information. 29
30 Adjustment Calendar Overview Adjustment calendars determine the refund schedules that you apply to the students dropping or withdrawing from classes. The system uses the number of days a class has been in session to determine the percentage of refund due. The system calculates these figures using date and time stamps located in the STDNT_ENRL table. Each refund schedule and drop reason combination will need to be copied from term to term. However, because NDUS has determined that they will refund based on percentage of class length, no other changes should be required, unless there are changes in Board policy. Copying Adjustment Calendars for a new Term NOTE: Please to not change any information regarding the adjustment calendar beyond rolling it over from term to term. If you feel set up changes or additional calendars are required, please discuss your requirements with Campus Solutions SF Team. Any changes made to this set up could result in your institution no longer being in compliance with board policy. 1. Enter Adjustment Calendar Information A. Navigate to Adjustment Calendar Setup SACR>Product Related>Student Financials>Tuition and Fees> Adjustment Calendars 30
31 B. Enter the correct SetID. This should default in from your operator preferences. C. Enter the 8-character code that will represent the Adjustment Code. D. Optionally, you can enter all of part of the Adjustment Calendar Description E. Press the Search icon and a list of the Adjustment Calendars matching that search criteria will be displayed. F. Click on the required Adjustment Calendar and the set up related to that code will be displayed. 31

32 2. Copy the existing Calendar from one term to another. A. Click on the button and the following page will be displayed. B. Enter in the From Term field the value of the term from which you will be copying. Typically this is the most recent term, although you do not have to copy terms consecutively. You may for example go Spring to Spring instead of Fall to Spring. C. Enter in the To Term field the term to which you are copying the calendar. D. You should not need to enter session information. E. Click on the button and you will be returned to the previous page. This time however a new row will have been inserted. 32
33 3. Use the scroll icons to move to each individual adjust reason and repeat step Press the Save Icon to commit your changes to the database. NOTE: This process will need to be repeated for each Adjustment Calendar used at your institution. You will need to perform the copy once for each row. Note the new term 33
34 Billing and Due Date Calendar Overview Billing and due date calendars are associated with tuition calculation and are used to determine the percentage of specific fees due to be paid by a particular time. When creating your billing and due date calendar, you have the flexibility to specify that the payment of a fee is due in full at a particular date, or you can create a payment schedule. You can also design the system so that a due date for a fee is designated at the time that you create a bill or post a charge. This set up also controls when a charge will first be displayed on a students invoice. Therefore, even if charges were calculated several months in advance of the term, the student would not actually receive a bill for these charges until shortly before the term begins. Copying Billing and Due Date Calendars for a new Term 1. Enter Billing and Due Date Calendar Information A. Navigate to Billing and Due Date Calendar Setup SACR>Product Related>Student Financials>Tuition and Fees> Billing and Due Calendars 34

35 B. Enter the correct SetID. This should default in from your operator preferences. C. Enter the 8-character code that will represent the Billing and Due Date Code. D. Optionally, you can enter all of part of the Billing and Due Calendar Description. E. Press the Search icon and a list of the Billing and Due Date Calendars matching that search criteria will be displayed. F. Click on the required Billing and Due Calendar and the set up related to that code will be displayed. NOTE: This indicates the first day tuition charges from this term can appear on an invoice. This indicates that until 45 days prior to the start of the term, the charges generated by the tuition calculation process will be viewable on the student s account but will not appear on an invoice. 2. Copy the existing Calendar from one term to another. A. Click on the button and the following page will be displayed. 35
36 B. Enter in the From Term field the value of the term from which you will be copying. Typically this is the most recent term, although you do not have to copy terms consecutively. You may for example go Spring to Spring instead of Fall to Spring. C. Enter in the To Term field the term to which you are copying the calendar. D. You should not need to enter session information. E. Click on the button and you will be returned to the previous page. This time however a new row will have been inserted. 3. Press the Save Icon to commit your changes to the database. 36
37 Application Fee Overview You must define the rules your institution uses to assess application fees. Each application fee code you define represents one or more individual fee charges (sub fees). There is a one-to-one relationship between an application fee and an application center. You can only define one application fee for an application center. However, an application fee can have multiple sub fees. At NDUS, sub fees are calculated based on Admit Type. The term that used in calculating an app fee is the term in which a student applies, not the term to which the student applies. Therefore, if a student applied in September 2004 for admission in fall 2005, they will be calculated using the application fee set up for 0510 not NOTE: Please to not change any information regarding the application fees beyond rolling it over from term to term. If you feel set up changes or additional calendars are required, please discuss your requirements with Campus Solutions SF Team. Any changes made to this set up could result in your institution no longer being in compliance with board policy. Copying Application Fees for a new Term 1. Enter Application Fee Information A. Navigate to Application Fee Setup SACR>Product Related>Student Financials>Admission Fees>Application Fees 37
38 B. Enter the correct SetID. This should default in from your operator preferences. C. Enter the 8-character code that will represent the Application Fee Code. D. Optionally, you can enter all of part of the Billing and Due Calendar Description. E. Press the Search icon and a list of the Application Fees matching that search criteria will be displayed. F. Click on the required Application Fee and the set up related to that code will be displayed. 38

39 2. Copy the existing Application Fee from one term to another. A. Click on the button and the following page will be displayed. B. Enter in the From Term field the value of the term from which you will be copying. Typically this is the most recent term, although you do not have to copy terms consecutively. You may for example go Spring to Spring instead of Fall to Spring. C. Enter in the To Term field the term to which you are copying the calendar. D. Click on the and you will be returned to the previous page. This time however a new row will have been inserted. 3. Press the Save Icon to commit your changes to the database. 39
40 Additional Notes NOTE: You can review and/or update the item types associated with the application fee by clicking in the Application Fee Item Types Link. If you are receipting Application Fee Payments in the Admissions Office you should have a payment item type listed for each tender (cash, checks, credit card) that your Admissions Office is eligible to accept. 40

41 NOTE: You can review the amount charged for each Admit Type by clicking on the Application Sub Fees page. However, this information should not ever be changed unless otherwise instructed by Campus Solutions SF Team. 41
42 Term Fee Overview Term fee codes are the most generalized method of establishing rates for tuition and fees. Each term fee code is made up of one or more term fee definitions. Each term fee definition is made up of one or more term sub fee codes. And, each term sub fee code is made up of one or more term sub fees. This multilevel structure provides flexibility and convenience. By using different fee triggers and calculation methods at the lower levels, one term fee code can control how tuition is calculated for a wide range of unique student situations. For the most part, now that your term fees have been set up, you will just need to copy them from term to term and occasionally updating the amounts that are charged. If you need to make a more significant change to your tuition calculation set up, please contact Campus Solutions SF Team to assist you. Copying Term Fees for a new Term 1. Enter Term Fee Information A. Navigate to Term Fee Set Up SACR>Product Related>Student Financials>Tuition and Fees>Term Fees 42
43 B. Enter the correct SetID. This should default in from your operator preferences. C. Enter the 8-character code that will represent the Term Fee Code. D. Optionally, you can enter all of part of the Billing and Due Calendar Description. E. Press the Search icon and a list of the Term Fees matching that search criteria will be displayed. F. Click on the required Term Fee and the set up related to that code will be displayed. Copy the existing Term Fee from one term to another. A. Click on the Term Fees tab. The following page will be displayed. B. Click on the button and the following page will be displayed. 43

44 C. Enter in the From Term field the value of the term from which you will be copying. Typically this is the most recent term, although you do not have to copy terms consecutively. You may for example go Spring to Spring instead of Fall to Spring. D. Enter in the To Term field the term to which you are copying the calendar. E. You should not need to enter session information. F. Click on the button and you will be returned to the previous page. This time however a new row will have been inserted. 2. Update the Term Fee amounts, if necessary. A. Click on the Term Sub Fees tab. The following page will be displayed. 44
45 B. Update the Amount/Unit and/or the Flat Amount as required to increase the Term Sub Fees for that term. Make sure to update all of the rows for the Term Sub Fee using the Scroll areas to move through the various rows. 4. Press the Save Icon to commit your changes to the database. NOTE: If you make changes to a term fee after Tuition Calculation has already been run for a specific term, you will need to contact Campus Solutions SF Team and request that tuition calc be re-run in for All Students, not just Required Students. Copy Term Fees Process 1. Navigate to Copy Term Fees Process page. Setup SACR>Product Related>Student Financials>Tuition and Fees>Copy Term Fees A. The first time this process is run a new Run Control ID will need to be created. Click on the link, enter the run control ID of TERM_COPY and click the button. 45
46 B. For future use of the Term Fee Copy program click the button to select the run control or just input the run control in the field. 2. Enter the Term Fee Copy Criteria A. Select a Copy Option of Copy All Term Fees. Although you can copy and individual term fee using this process it is typically easier to copy an individual fee from the Term Fees component. B. Enter the SetID that contains the Term Fees you wish to copy. C. Enter in the From Term field the value of the term from which you will be copying. Typically this is the most recent term, although you do not have to copy terms consecutively. You may for example go Spring to Spring instead of Fall to Spring. D. Enter in the To Term field the term to which you are copying the calendar. E. Initiate the Process A. Click on the Run button and the following page will be displayed. 46


47 B. Leave Server Name field blank C. Click. You will be returned to the previous page. 4. To make sure your term copy request was successfully processed, click on Process Monitor. The following page will appear. A. To ensure the process ran successfully, you will want to confirm that the Run Status displays Success. B. If necessary, you can view additional information regarding the process by clicking on the Details link. NOTE: NOTE: The fact that a Success message was generated does not mean that the process had the expected results. It simply means that it executed all of its code 47
48 without failing. You should always verify that the process had the expected results through inquiry panels in the application. NOTE: Also note, this process will perform the copy of your Term Fees only. You will still need to update the Term Fee Amounts if you have had a tuition increase. Course Fee Overview Course fees provide you with additional flexibility in assessing fees. For example, you can define extra fees for courses with lab or studio sections. You could also override the term fees calculation rules for a particular course and charge a different fee altogether. Course Fees apply to all sections of a given course. If there is only one instance of the course, the course fee acts as the class fee. However, if there is a difference between a course fee and a class fee, the class fee overrides the course fee Copying Course Fees for a new Course 1. Enter Course Fee Information A. Navigate to Course Fee Setup SACR>Product Related>Student Financials>Course and Class Fees> Course Fees 48
49 B. Enter the correct SetID. This should default in from your user default C. Enter the 8-character code that will represent the Course Fee Code. D. Optionally, you can enter all of part of the Course Fee Description. E. Press the Search icon and a list of the Course Fees matching that search criteria will be displayed. F. Click on the required Course Fee and the set up related to that code will be displayed. 2. Copy the existing Course Fee from one Course to another. A. Click on the button and the following page will be displayed. 49
50 B. Enter in the From Term field the value of the Course from which you will be copying. Typically this is the most recent Course, although you do not have to copy Courses consecutively. You may for example go Spring to Spring instead of Fall to Spring. C. Enter in the To Term field the Course to which you are copying the calendar. D. You should not need to enter session information. NOTE: The exception to this will be LRSC. They will also need to roll Course Fees from Session to Session. E. Click on the button and you will be returned to the previous page. This time however a new row will have been inserted. 3. Update the Course Fee amounts, if necessary. 50

51 A. Click on the Course Sub Fees tab. The following page will be displayed. B. Update the Amount/Unit and/or the Flat Amount as required to increase the Course Sub Fees for that Course. Make sure to update all of the rows for the Course Sub Fee using the Scroll areas to move through the various rows. 4. Press the Save Icon to commit your changes to the database. NOTE: If you make changes to a course fee after Tuition Calculation has already been run for a specific term, you will need to contact Campus Solutions SF Team and request that tuition calc be re-run in for All Students, not just Required Students. 51
52 Setting up an new Course Fee 1. Navigate to Course Fees Setup SACR>Product Related>Student Financials>Course and Class Fees> Course Fees A. You can add a new Course Fee by clicking on the Add a New Value link. The following page will be displayed. B. Enter the SetID that contains the Course for which you will be setting up the fee. Typically, this will default from your user default. C. Select the Course ID for which you will be establishing the fee from the drop down list. D. Click on the Add icon and the following page will be displayed. 52

53 2. Enter detailed information regarding the Course and Term in which the fee will be charged. A. If there is more than one Component of the course, select the component for which you want to define the fee. Otherwise, you can leave this field blank. B. Specify the Institution to which the course belongs. Typically this will be the same value as the SetID. C. Specify the Campus to which the course belongs. If the fee is assessed regardless of the campus, you can leave this field blank. D. Specify the Location to which the course belongs. If the fee is assessed regardless of the location, you can leave this field blank. E. Select the Term in which the fee is charged. F. If applicable, select the Session in which the fee is charged. G. Select a Charge Method. This will determine how the Tuition Calc process will determine how this fee is charged in relation to the other term fees charged to the student. Select from the options below. Always: If you select this option, the fee is charged in addition to term fees. For example, the lab fee would be charged in addition to the course s term fee (regular tuition). 53

54 Not include in term tuition: If you select this option, the course is excluded from the term fee calculation and the course fee becomes the total charge for the class. NOTE: If fees are charged in this manner, no caps for total credit hours taken will be applied. H. Click on the Charge for Wait Listed check box if the fee is to be charged to wait listed students. I. Select Include In Pro Rata if this course fee is included in pro rata refund calculations. Typically this field will be checked. J. Select Include In Other Withdrawal to include this fee in other withdrawal calculations. Typically this field will be checked. 3. Enter detailed information regarding the amount of the charge and which Item Type will be used to track the charge. A. Click on the Course Sub Fees tab. The following page will be displayed. B. Check the Audit Rate Specified check box to define a unique rate for audited courses. If the check box is clear, students auditing the course are charged the regular rate. C. Specify the Account Type in which the charge for the class will be displayed on the student s account. Typically this will be TUT. D. Specify the Item Type that will be used to place the Charge on the student s account. E. If this fee is only charged to certain students, select a Fee Trigger. This is tied to the Criteria set up to determine what student characteristics are required to charge this fee. F. Specify the Amount of the Charge by placing a value in one of the following fields: 54
55 SITS-CAMPUS SOLUTION Specify the amount that you want to charge per unit. Specify a flat amount that you want to charge regardless of units taken. You can also specify a minum and maximum amount of the charge. Typically this is used in conjunction with a Charge Per Unit seloection. For example, a music lab has a charges an $50 per creit hour, but has a 2 credit hour minimum charge ($100) and a 6 credit hour maximum ($300) regardless of the number of credits the student receives. G. Select the Adjustment Code (calendar) that you want to associate with this Course Fee. Typically this will be REFUND1. H. Select the Due Date Code (calendar) that you want to associate with this Course Sub. Typically this will be Regular. I. If a Waiver can be used to reduce the amount of the charge specify the Waiver Group here. 4. Press the Save Icon to commit your changes to the database. NOTE: If you make add a course fee after Tuition Calculation has already been run for a specific term, you will need to contact Campus Solutions SF Team and request that tuition calc be re-run in for All Students, not just Required Students. 55
56 Class Fee Overview Class Fees allow you to set up charges at an even more specific level. Class Fees are associated with a specific section of a Course and, therefore, can be used different rates for offering held at different times or have different class make up, such as dual credit. You could also override the term fees calculation rules for a particular Class and charge a different fee altogether. If there is a difference between a Class fee and a class fee, the class fee overrides the Class fee Setting up an new Class Fee 1. Navigate to Class Fees Setup SACR>Product Related>Student Financials>Course and Class Fees> Class Fees A. You can add a new Class Fee by clicking on the Add a New Value link. The following page will be displayed. B. Enter the SetID that contains the Class for which you will be setting up the fee. Typically, this will default from your user ID. C. Select the Course ID for which you will be establishing the class fees from the drop down list. NOTE: Because of the limited searching methods when adding a new class fee it s recommended that you obtain a list of the course that require additional class fees be established prior to beginning your data entry. 56

57 D. Click on the Add icon and the following page will be displayed. 2. Enter detailed information regarding the Class and Term in which the fee will be charged. A. Enter the Offer Number of the class for which you \ need to asses a charge. B. Select the Term in which the fee is charged. C. If applicable, select the Session in which the fee is charged. D. Specify the Section of the class, which will require an additional fee be assessed. E. Select a Charge Method. This will determine how the Tuition Calc process will determine how this fee is charged in relation to the other term fees charged to the student. Select from the options below. Always: If you select this option, the fee is charged in addition to term fees. For example, the lab fee would be charged in addition to the Class s term fee (regular tuition). Not include in term tuition: If you select this option, the Class is excluded from the term fee calculation and the Class fee becomes the total charge for the class. NOTE: If fees are charged in this manner, no caps for total credit hours taken will be applied. F. Click on the Charge for Wait Listed check box if the fee is to be charged to wait listed students. G. Select Charge for Course Fee if you want to charge course fees in addition to class fees. If this check box is clear, class fee definitions override course fee definitions for the same class. H. Select Include In Pro Rata if this Class fee is included in pro rata refund calculations. Typically this field will be checked. 57

58 I. Select Include In Other Withdrawal to include this fee in other withdrawal calculations. Typically this field will be checked. 3. Enter detailed information regarding the amount of the charge and which Item Type will be used to track the charge. A. Click on the Class Sub Fees tab. The following page will be displayed. B. Check the Audit Rate Specified check box to define a unique rate for audited Class. If the check box is clear, students auditing the Class are charged the regular rate. C. Specify the Account Type in which the charge for the class will be displayed on the student s account. Typically this will be TUT. D. Specify the Item Type that will be used to place the Charge on the student s account. E. If this fee is only charged to certain students, select a Fee Trigger. This is tied to the Criteria set up to determine what student characteristics are required to charge this fee. F. Specify the Amount of the Charge by placing a value in one of the following fields: Specify the amount that you want to charge per unit. Specify a flat amount that you want to charge regardless of units taken. You can also specify a minum and maximum amount of the charge. Typically this is used in conjunction with a Charge Per Unit seloection. For example, a music lab has a charges an $50 per creit hour, but has a 2 credit hour minimum charge ($100) and a 6 credit hour maximum ($300) regardless of the number of credits the student receives. G. Select the Adjustment Code (calendar) that you want to associate with this Class Fee. Typically this will be REFUND1. 58
59 H. Select the Due Date Code (calendar) that you want to associate with this Class Sub. Typically this will be Regular. I. If a Waiver can be used to reduce the amount of the charge specify the Waiver Group here. 4. Press the Save Icon to commit your changes to the database. NOTE: If you make add a Class fee after Tuition Calculation has already been run for a specific term, you will need to contact Campus Solutions SF Team and request that tuition calc be re-run in for All Students, not just Required Students. 59
60 Copying Class or Course Fees in Batch Copy Class Course Fee Rollover Process 1. Navigate to do a Copy Course/Class Fees Process page. SITS-CAMPUS SOLUTION Set Up SACR>Product Related>Student Financials>Course and Class Fees>Class/Course Fees Rollover A. The first time this process is run a new Run Control ID will need to be created. Click on the button. link, enter the run control ID of TERM_COPY and click the B. For future use of the Course Fee Copy program click the button to select the run control or just input the run control in the field. 60
61 2. Enter the Course/Class Fee Copy Criteria A. Enter the SetID that contains the Course Fees you wish to copy. B. Enter in the From Term field the value of the Course from which you will be copying. Typically this is the most recent Course, although you do not have to copy Courses consecutively. You may for example go Spring to Spring instead of Fall to Spring. C. Enter in the To Term field the Course to which you are copying the calendar. D. You should not need to enter session information. NOTE: The exception to this will be LRSC. They will also need to roll Course Fees from Session to Session. E. Click override existing set up, to replace any setup that already exists for a given term (the To Term) with the data being copied (the From Term). F. Indicate the values you wish to roll over by using the check boxes the right hand side of the page. You can rollover all fees during a single run of the process or roll over one type of fee at a time. 61

62 3. Initiate the Process SITS-CAMPUS SOLUTION A. Click on the Run button and the following page will be displayed. B. Sever Name field should be left blank C. Click. You will be returned to the previous page. To make sure your Course copy request was successfully processed, click on Process Monitor. The following page will appear. D. To ensure the process ran successfully, you will want to confirm that the Run Status displays Success. E. If necessary, you can view additional information regarding the process by clicking on the Details link. NOTE: The fact that a Success message was generated does not mean that the process had the expected results. It simply means that it executed all of its code without failing. You should always verify that the process had the expected results through inquiry panels in the application. NOTE: Also note, this process will perform the copy of your Course/Class Fees only. You will still need to update the Course/Class Fee Amounts if you have had a tuition increase. 62
63 Tuition Calculation Controls Overview Tuition calculation controls determine the academic careers that are eligible for tuition and fee calculation each term. These values should not need to be adjusted, just rolled from term to term. If you feel the need to make changes, please discuss those requirements with Campus Solutions SF Team prior to making any changes. Changes in this set up can significantly impact tuition calculation processing. Copying Tuition Calculation Controls 1. Enter Tuition Calculation Control Information A. Navigate to the Tuition Calculation Controls Set up SACR>Product Related>Student Financials>Tuition and Fees>Tuition Calculation Controls G. Enter the correct SetID. This should default in from your operator preferences. H. Press the Search icon and the following page will be displayed. 63

64 2. Enter all Careers associated to your campus A. Click on the insert row icon and a new line will be inserted with same information B. Enter the new Term for which you are copying the information. C. Check the Auto Calculation Tuition box to enable T Calc when inquiring on a students account D. Check the Auto Calculation Waivers box to enable T Calc to include waivers to also calculate and make adjustments when needed E. No institutions are handling wash periods, so the bottom section of the page should not be populated 3. Copy the refund calculation controls from one term to another. A. Click on the Refund Calculation Controls tab and the following page will be displayed. 64


65 B. Click on the insert row icon and a new line will be inserted with same data as previous terms C. Enter the new Term for which you are copying the information. 4. Copy the error/warning controls from one term to another. A. Click on the Display Error/Warning Controls tab and the following page will be displayed. B. Click on the insert row icon and a new line will be inserted with same data as previous term C. Enter the new Term for which you are copying the information. 5. Press the Save Icon to commit your changes to the database. 65
66 Setting up SF Term Default Overview A default term value simplifies data entry. If no term is specified on a transaction, PeopleSoft will look to the current default term for the information. Typically, it is most beneficial to change the default term value at the beginning of each term. Using effective dating functionality, you can predefine default term values in advance and have them automatically change on the first day of the term. Updating the SF Term Default 1. Enter Term Default Information A. Navigate to the SF Term Default page. Set Up SACR>Product Related>Student Financials>Charges and Payments> SF Term Default B. Enter the correct SetID. This should default in from your user default. C. Press the Search icon and the following page will be displayed. 66
67 2. Click on the insert row icon and a new line will be inserted. A. The Effective Date will default to the current date. It is recommended you set this to the start of the term. It is on this date the system will begin using this term as the default. B. Enter the value of the Term you are adding. C. Enter the Term Begin Date and the Term Ending Date. D. Enter the Academic Year in which contains the term. E. Enter the Anticipated Aid Term From and Anticipated Aid Term To terms. This is what will be displayed on the students account as anticipated aid (awarded but not disbursed) for the term. 3. Press the Save Icon to commit your changes to the database. 67

68 GL Interface Rollover GL Term Copy Process NOTE: This process will only need to be performed if you have set up term specific accounting information on your item types. At the time of this writing, no institutions had done this set up. 1. Navigate to do a GL Term Copy Fees Process page. Set up SACR>Product Related>Student Financials>General Ledger Interface>Copy Term> GL Term Copy A. The first time this process is run a new Run Control ID will need to be created. Click on the button. link, enter the run control ID of TERM_COPY and click the B. For future use of the Course Fee Copy program click the button to select the run control or just input the run control in the field. 2. Enter the GL Term Copy Criteria A. Enter the SetID that contains the Item Type s GL Information you wish to copy. B. Select the effective date to be used for the copy C. Enter in the From Term field the value of the Item Type s GL Information from which you will be copying. Enter in the To Term field the Item Type s GL Information to which you are copying the calendar. 68
69 D. You should not need to enter session information. NOTE: The exception to this may be LRSC. They may also need to roll Item Type s GL Information from Session to Session. E. Indicate the types of item types you wish to roll over by using the check boxes the bottom of the page. You can rollover all item types during a single run of the process or roll over one kind at a time. 69
70 3. Initiate the Process SITS-CAMPUS SOLUTION A. Click on the Run button and the following page will be displayed. B. Verify the Server Name is PSNT. C. Click. You will be returned to the previous page. 4. To make sure your Course copy request was successfully processed, click on Process Monitor. The following page will appear. F. To ensure the process ran successfully, you will want to confirm that the Run Status displays Success. G. If necessary, you can view additional information regarding the process by clicking on the Details link. NOTE: The fact that a Success message was generated does not mean that the process had the expected results. It simply means that it executed all of its code without failing. You should always verify that the process had the expected results through inquiry panels in the application. 70

71 Setting up Cashier Values Setting up a new Cashier 1. Navigate to set up a new cashier Set Up SACR>Product Related>Student Financials>Cashiering>Valid Cashiers 1. Enter your Business Unit 2. Enter the Cashier s Office you want the cashier to work in 3. Enter the Cashier s userid- should be with the dotted identifier 4. Click on the Add button and the following screen will appear 71

72 1. Click on the Supervisor box, we are not using the Approval Required Switch or Department Only Cashier 2. Leave the Supervisor Operator ID blank 3. If you are wanting to have a receipt print automatically, boxes should be checked in the Print Receipt Automatically section 4. Need to assign a register to the cashier- if cashier can be assigned to more than one register hit the + button to add additional rows 5. Click on the SAVE button Setting up a new Tender Key Set up SACR>Product Related>Student Financials>Cashiering>Tender Keys 72
 3.")
73 1. Click on Add a New Value 2. Enter the Business Unit 3. Enter the Tender Key (Ex: cash, check, credit card) 4. Click on the Add button Enter the Effective Date to which you want to use the new tender key for cashiering 2. Enter a description (3 fields to enter short/long descriptions) 3. Tender Category: from the drop down menu select the function that this tender is used for. The tender category tells the system which tender details must be entered before the cashier can conduct the transaction
74 4. Check the box Change allowed if the cashier is able to give change for a transaction 5. Enter a service impact code (NO CHECKS, NO CASH, NO CC) if you want this tender to look at service indicators on a students account with this impact. This will prevent the cashier from receipting in the payment for the student s account if a service impact is attached to the record 6. Transaction Amount: Enter a minimum and maximum amount a cashier can enter for a single receipt 7. Out Amount: Enter the minimum and maximum amount a cashier can give out 8. Drawer Warning Amount: Enter the minimum and maximum amounts the drawer can contain before the system generates a warning message 9. Drawer Error Amount: Enter the minimum and maximum amounts the drawer can contain before the system generates an error message and the transaction can no longer process 10. Check the GL interface required box. Doing so will send all transactions associated to this tender to the GL 11. Need to enter the Chartfield string associated to the tender 12. Enter the Short and Over Chartfield string if a drawer is over or short when closing at the end of business day 13. Click on the second tab Tender Key Valid Cashiers 74
 2. Click the + button to add additional cashiers 3.")
75 Adding New Target Keys 1. Add all cashiers that are able to use this tender key. Check the In and Out allowed boxes to give them security to accept the tender and give back any amount due back (typically cash only) 2. Click the + button to add additional cashiers 3. Click on the SAVE button Set up SACR>Product Related>Student Financials>Cashiering>Target Keys 1. Enter your Business Unit 75
 3.")
76 2. Enter the new Target Key to be used 3. Click on the Add button SITS-CAMPUS SOLUTION 1. Enter the Effective Date that this new target key can be used 2. Descriptions can be entered in the next three fields (Long and Short) 3. When selecting this target key in a transaction you can choose to have a default amount to populate- this is an optional field 4. Enter the minimum amount that this target key should be used for 5. Enter the maximum amount that this target key should be used for 6. Via PeopleBooks for the GL interface required fields: Select to include transactions for this target key when you run the cashiering GL interface process. Click the Target GL Entry link to specify ChartFields. Select the ChartField values that correspond to the general ledger account into which you record transaction information associated with the target key. The chart of accounts that you define on this page provides the credit side of the GL entry. For a cashiering receipt to properly interface with your general ledger system, both the target key and the tender key associated with the receipt must have the GL Interface Required check box selected. You can also specify a SpeedType on this page. To specify the Speed Type, click on the link and select the SpeedType that you have already set up. 76
Student Financials Tuition Waivers. PeopleSoft 9.0 version
 Student Financials Tuition Waivers PeopleSoft 9.0 version Table of Contents Setting up Waivers... 3 Overview... 3 Business Purpose... 3 Objectives... 3 Process Steps... 3 Set up Waiver Item types... 4
Setting Up Student Financials Self Service
 CHAPTER 1 This chapter discusses how to: Set up Payment merchants. Set up SF merchants. Set up institution sets. Set up self-service options. Set up miscellaneous fees. Set up self-service payment messages.
Web-Based Budgeting Departmental User Manual
 North Dakota State University Web-Based Budgeting Departmental User Manual PeopleSoft Web-Based Budgeting (WBB) 4-18-2018 Web Based Budgeting Departmental Operating Budget Entry for Non-Appropriated Funds
Greenshades Garnishments User Guide
 Greenshades Garnishments User Guide 1. 1. General Overview... 4 1.1. About this Guide... 4 1.2. How Greenshades Garnishments Works... 4 1.3. Default Deduction Setup within GP... 5 1.4. Employee Deduction
University of Wisconsin System SFS Business Process AP Working with 1099 Transactions. Contents
 Contents Instructions for 1099 Process Overview... 2 I. 1099 Voucher Clean Up... 3 II. Run Update Withholdings Process (This will be Run Centrally by UWSA)... 14 III. Run Queries for Validation and to
Sage Bank Services User's Guide. May 2017
 Sage 300 2018 Bank Services User's Guide May 2017 This is a publication of Sage Software, Inc. 2017 The Sage Group plc or its licensors. All rights reserved. Sage, Sage logos, and Sage product and service
ASDS. Draft. Use the Maintain Term Budgets component to manually create or maintain an existing term budget.
 Version 1.0 Document Generation Date 9/26/2008 Date Modified 10/28/2008 Last Changed by ASDS Status Draft Revising a Budget Manually Concept Use the Maintain Term Budgets component to manually create or
Funding Swaps and Lump Sum Payments
 Funding Swaps and Lump Sum Payments VERSION: 7/24/2014 Table of Contents Understanding Commitment Accounting 2 Using the Funding Grid 8 Understanding Funding Information on epar Forms 13 Entering a Funding
Enhanced General Ledger Quick Steps version 8.016
 Enhanced General Ledger Quick Steps version 8.016 The General Ledger module is designed to handle journal entries for various transactions that are not accounted for in other modules (A/P, Payroll etc.).
Reference Document. Customer Refunds
 Document Overview This document is being provided to explain how to generate a refund check to a customer. This document explains the process, setup involved and how the transaction affects the general
Financial Aid System. Understanding the FAM to FMS Interface. FAM/FMS Interface, Part I
 Financial Aid System Understanding the FAM to FMS Interface FAM/FMS Interface, Part I SBCTC-IT 3101 Northup Way, Suite 100 Bellevue WA 98004-1449 Phone 425.803.9700 support@sbctc.edu Documentation Index
Microsoft Dynamics GP. Receivables Management
 Microsoft Dynamics GP Receivables Management Copyright Copyright 2012 Microsoft. All rights reserved. Limitation of liability This document is provided as-is. Information and views expressed in this document,
Customer Refunds. Reference Guide For Versions Last Revised: December 29, SedonaOffice
 Reference Guide For Versions 5.7.24+ Last Revised: December 29, 2015 SedonaOffice 8401 Chagrin Blvd. Suite 15B 45185 Joy Road Chagrin Falls, OH 44023 Canton, MI 48187 440.247.5602 Table of Contents About
Activant Prophet 21. Cash Receipts Application and Posting Customer Payments
 Activant Prophet 21 Cash Receipts Application and Posting Customer Payments This class is designed for Accounts Receivable personnel in charge of cash application and deposits Objectives Post Cash Receipts
IFS Year End Training 2017 Closing the Year
 Important Facts About Closing A Year On IFS The following is a summary of important facts to know about closing a year in the Integrated Financial System. * Vouchers that are transferred to Accounts Payable
Sage Bank Services User's Guide
 Sage 300 2017 Bank Services User's Guide This is a publication of Sage Software, Inc. Copyright 2016. Sage Software, Inc. All rights reserved. Sage, the Sage logos, and the Sage product and service names
Using Student Financials Self Service
 CHAPTER 1 Using Student Financials Self Service This chapter provides an overview of the PeopleSoft Student Financials self-service application and discusses how students can: View outstanding charges,
OPERATING REPORTS HANDBOOK
 OPERATING REPORTS HANDBOOK First Edition Office of Budget and Finance Accounting and Financial Reporting Contact Information: reporting@utdallas.edu Table of Contents Table of Contents... i Getting Started
Fiscal Year End: Manual PO Rollover
 Fiscal Year End: Manual PO Rollover PO encumbrances on all budgets, except for grants budgets, must have the encumbered amount moved from the previous fiscal year budget to the new fiscal year budget.
MSI Calendar and/or Fiscal Year End Processing For year ending December 31, 2013
 MSI Calendar and/or Fiscal Year End Processing For year ending December 31, 2013 User s Guide NOTE: Screen shots for this document have been taken from the version 7.0 MSI Payroll system. Municipal Software,
University of Wisconsin System SFS Business Process GL.2.01 Edit, Budget Check, Submit for Approval and Post Journals
 Contents Edit, Budget Check, and Post Journal Process Overview... 1 Process Detail... 1 I. Edit Journal... 1 II. Edit Errors... 3 III. Budget Check Journals... 4 IV. Budget Checking Exceptions... 4 V.
Additional Medicare Tax User Guide for QuickBooks
 Additional Medicare Tax User Guide for QuickBooks Beginning tax year 2013, a new Additional Medicare Tax (a provision of the Affordable Care Act) of 0.9 percent applies to individuals Medicare taxable
Set Up Employees Quick Reference Card
 Quick Reference Card Getting Started Before you begin setting up an employee, have the following documents available: W-4. This document is used to find Federal, State, and Local tax information such as
Chapter 17 School Cash Catalog
 Chapter 17 School Cash Catalog In Palm Beach County, schools have the ability to accept online payments from parents, guardians, other relatives, and members of the public. Acceptable methods of payment
Benefit Reconciliation. User s Guide. GeorgiaFIRST
 Benefit Reconciliation User s Guide GeorgiaFIRST TABLE OF CONTENTS BENEFIT ACCOUNTING...3 BENEFIT PROCESSES... 4 CREATE BENEFIT ACCOUNTING ENTRIES... 5 Load and Validate Accounting... 6 Load Error Correction...
Make sure the client aged receivables balance to the general ledger total. Write off client balances. Pick a date that makes sense: a. b. c. d.
 Overview This document provides conversion tips and instructions for entering client and general ledger beginning balances Entering beginning balances in Nexsure entails bringing balances forward from
Georgia Institute of Technology
 Georgia Institute of Technology Electronic Cost Transfers for Campus Administrators Publication Date: March 2006 Latest Revision Date: January 2011 Electronic Cost Transfer Table of Contents OVERVIEW KEY
OPERATING REPORTS HANDBOOK
 OPERATING REPORTS HANDBOOK Second Edition Office of Budget and Finance Accounting and Financial Reporting Contact Information: reporting@utdallas.edu Table of Contents Table of Contents... i Getting Started
Maintain Term Budget. After looking up a student, you will see their budget for the current semester.
 s Path: Financial Aid > Budgets > s Students are assigned budget items on a term basis. A student must have an active FA Term record in order for a budget to be created. A fixed number of Budget Categories
Recurring Payments. Navigate to: Accounts Payable>File Maintenance/Lists>Recurring Payments
 Recurring Payments Overview Recurring payments can be created for payments that should be generated on a user-defined periodic basis. Recurring payments are typically set up for payments that are a fixed
Microsoft Dynamics GP Year-End Close. Manual
 Microsoft Dynamics GP Year-End Close Manual 2017 Contact FMT Consultants Support Customer Care customercare@fmtconsultants.com (760) 930-6400 option 1 Sales Felipe Jara fjara@fmtconsultants.com (760) 930-6451
Funding Swaps and Lump Sum Payments
 Funding Swaps and Lump Sum Payments VERSION: 7/24/2014 Table of Contents Understanding Commitment Accounting 2 Using the Funding Grid 8 Understanding Funding Information on epar Forms 13 Entering a Funding
Setting Up Direct Deposit for the First Time
 Setting Up Direct Deposit for the First Time Overview Setting up direct deposit for student refunds is a 2-step process: 1) Adding the checking or savings account to the student s bank account profile
IQ DEBTORS INTEREST CHARGING
 IQ DEBTORS INTEREST CHARGING PREFACE This is the guide for IQ Retail (PTY) Ltd Accounting Software Systems. It will cover in detail, the technical aspects which are applicable to the IQ Enterprise 7 Accounting
GENERAL LEDGER TABLE OF CONTENTS
 GENERAL LEDGER TABLE OF CONTENTS L.A.W.S. Documentation Manual General Ledger GENERAL LEDGER 298 General Ledger Menu 298 Overview Of The General Ledger Account Number Structure 299 Profit Center Processing
Fees - Standard Mode Guide
 Fees - Standard Mode Guide Release 2018 May 2017 SISFSAUG-010103 The Edupoint software and any form of supporting documentation are proprietary and confidential. Unauthorized reproduction or distribution
The Chart of Accounts can be modified at any time. Existing accounts can be modified and new accounts can be added.
 Chart of Accounts Maintenance Overview The Chart of Accounts can be modified at any time. Existing accounts can be modified and new accounts can be added. Navigate to: General Ledger>Maintenance>General>Chart
Exact Globe Next Cash Flow. User Guide
 Exact Globe Next Cash Flow User Guide Exact Globe Next Cash Flow Despite the continued efforts of Exact to ensure that the information in this document is as complete and up-to-date as possible, Exact
Module: Budget Processing Topic: Next Year Budget Entry Next Year Budget Entry Munis Version 11
 Module: Budget Processing Topic: Next Year Budget Entry Next Year Budget Entry Munis Version 11 Objective This document provides instructions on how to enter next year budget requests. Overview Departments
FEES REFERENCE DATA QRG
 FEES REFERENCE DATA QRG 1. Introduction This Quick Reference Guide focuses on how to create and maintain fees Reference Data in Client. It includes guidance that is specific to Smart & Skilled Offerings.
RESOLV CONTAINER MANAGEMENT DESKTOP
 RESOLV CONTAINER MANAGEMENT DESKTOP USER MANUAL Version 9.2 for HANA Desktop PRESENTED BY ACHIEVE IT SOLUTIONS Copyright 2016 by Achieve IT Solutions These materials are subject to change without notice.
Checkbook Table of Contents. Receive Money Overview Spend Money Overview
 Checkbook Table of Contents Receive Money Overview Spend Money Overview Changing Receive Money transactions To change a Receive Money transaction To change a recurring Receive Money template's name or
Budget Overview Job Aid - Expenses
 - Expenses The Budget Overview page will show specific budget details for a single fund/project or a range of funds/projects. Criteria entered by the user will specify the values that identify controlled
Basic Application Training
 Basic Application Training Class Manual 99.273 The documentation in this publication is provided pursuant to a Sales and Licensing Contract for the Prophet 21 System entered into by and between Prophet
Nexsure Training Manual - Accounting. Chapter 16
 Nexsure Training Manual - Accounting Month-End Review In This Chapter Overview Analyzing Month-End Financial Reports Month-End Accounting & Management Reports Month-End Balancing Month-End Corrections
Navigation: PeopleSoft Menu > Set up HCM > Product Related > Commitment Accounting > UC Customizations > Funding Entry
 -By- Guide UCLA UCPATH Update Funding for Positions Use this task to Update funding for an unfilled of filled position. NOTE: Refer to the job aid called Update Funding for Positions with Salary Caps or
Entering Cash Receipts
 1 Customers: Using CounterPoint Entering Cash Receipts Overview Cash receipts are entered when payments are received on customer accounts. This document explains how to enter cash receipts using Customers
MUNSOFT 5.2 INCOME: SUNDRY DEBTORS MANUAL. Y Walters B.Sc. (Math Science) Hons
 Hons") MUNSOFT 5.2 INCOME: SUNDRY DEBTORS MANUAL 1 Y Walters B.Sc. (Math Science) Hons SUNDRY DEBTORS... 4 Enquiries... 4 Sundry Enquiries... 4 Account Search... 5 Master Files... 6 Account Master... 6 Account
MUNSOFT 5.2 INCOME: SUNDRY DEBTORS MANUAL 1 Y Walters B.Sc. (Math Science) Hons SUNDRY DEBTORS... 4 Enquiries... 4 Sundry Enquiries... 4 Account Search... 5 Master Files... 6 Account Master... 6 Account
ShelbyNext Financials: Credit Card Tracking (Course #N211)
") ShelbyNext Financials: Credit Card Tracking (Course #N211) Presented by: Dave Heston Shelby Consultant 2017 Shelby Systems, Inc. Other brand and product names are trademarks or registered trademarks of
ShelbyNext Financials: Credit Card Tracking (Course #N211) Presented by: Dave Heston Shelby Consultant 2017 Shelby Systems, Inc. Other brand and product names are trademarks or registered trademarks of
North Dakota University System Campus Solutions Financial Aid Aid Year Rollover Contents
 Contents Pre-Rollover Preparation... 2 Review Term/Session Table Setup... 2 Post-Rollover Steps... 3 Review FA Term Dates... 3 Update Disb/Authorization Calendars... 7 Update/confirm Disbursement Date
OPEN ENROLLMENT ELECTIONS
 OPEN ENROLLMENT ELECTIONS The purpose of this unit is to provide you with instructions on how to enroll in the various benefit plans. This training unit assumes all dependents are already loaded in your
Manual Input. Earnings & Deductions Trinity Health. All Rights Reserved. 1
 Manual Input Earnings & Deductions 2014 Trinity Health. All Rights Reserved. 1 1 Housekeeping Do not place us on hold Close other programs Ask questions by raising your hand or by using Chat You may be
Cash Register Software Release ivue 1.6 Patch 1 March 2005
 Frameworks Install/Update Alerts Added the functionality to display Installment Loans alerts. (CR 113372) Launcher Replaced the current Cash Register (CR) Launcher icon with a new icon and changed the
Posting Deposits in Munis Monroe County, WI
 2014 Posting Deposits in Munis Monroe County, WI The Treasurer s Office is responsible to the proofing and posting of receipt batches. This documents outlines the daily deposit procedure in Munis. Staff,
Central Budget Entry Munis - Financials: Central Budget Entry
 MU-FN-8-F, MU-FN-14-C Central Budget Entry Munis - Financials: Central Budget Entry CLASS DESCRIPTION This class will provide an overview of the Central Budget Entry program that is new to Munis version
ShelbyNext Financials: General Ledger Best Practices
 ShelbyNext Financials: General Ledger Best Practices (Course #F213) Presented by: Dave Heston Shelby Consultant 2018 Shelby Systems, Inc. Other brand and product names are trademarks or registered trademarks
Munis General Ledger. Procedural Documentation. For more information, visit
 Munis General Ledger Procedural Documentation For more information, visit www.tylertech.com. TABLE OF CONTENTS Chart Manager... 3 Account Master... 12 General Journal Entry/Proof... 25 Recurring General
Setting up and using the accounting module will give you detailed accounting and financial reporting.
 CHAPTER 6 ACCOUNTING To get the most out of the financial aspects of Campground Manager Astra, you should set up the Accounting module using either Cash Basis or Accrual Accounting depending on the method
FMS View Expense Budget Information
 FMS View Expense Budget Information Budget Information Queries To view your operating expense budget (Fund 110) in the Financial Management System (FMS), you create a budget query with specific criteria;
PCGENESIS FINANCIAL ACCOUNTING AND REPORTING (FAR) SYSTEM OPERATIONS GUIDE
 SYSTEM OPERATIONS GUIDE") PCGENESIS FINANCIAL ACCOUNTING AND REPORTING (FAR) SYSTEM OPERATIONS GUIDE 4/1/2011 Section A: Budget Account Master Processing, V2.1 Revision History Date Version Description Author 04/1/2011 2.1 11.01.00
PCGENESIS FINANCIAL ACCOUNTING AND REPORTING (FAR) SYSTEM OPERATIONS GUIDE 4/1/2011 Section A: Budget Account Master Processing, V2.1 Revision History Date Version Description Author 04/1/2011 2.1 11.01.00
How To Guide X3 Bank Card Processing Sage Exchange
 How To Guide X3 Bank Card Processing Sage Exchange Table of Contents Introduction... 2 Credit Card Parameters GESXA0... 3 Payment Types GESTPY... 6 Invoicing Method GESBPC... 6 Sales Order Processing -
MSI General Ledger Version 7.5
 MSI General Ledger Version 7.5 User s Guide Harris Local Government 1860 W. Winchester Road, Ste 204 Libertyville, IL 60048 Phone: (847) 362-2803 Fax: (847) 362-3347 Contents are the exclusive property
Getting Started with The Professional Landlord
 with The Professional Landlord Version 12 The PROMAS Landlord Software Center 311 Maple Avenue West, Ste D Vienna, VA 22180 800-397-1499 www.promas.com 1 1 with The Professional Landlord You have the option
Processing Customer Credit Memos and Refunds
 Processing Customer Credit Memos and Refunds If a job completed for a customer requires the processing of a refund or credit you can create a credit memo for the customer that will be reflected on the
Bank Reconciliation Processing SYSTEM ADMINISTRATION AND PROCESSING GUIDE. Last revised: 8/19/10 12:22 PM
 Bank Reconciliation Processing SYSTEM ADMINISTRATION AND PROCESSING GUIDE Last revised: 8/19/10 12:22 PM New World Systems 1 CONTENTS Contents... 1 Introduction... 3 System Administrator Guide... 4 Company
Fiscal Software User s Guide, BSA April Chapter 6 - Project Maintenance
 Chapter 6 - Project Maintenance This Section Includes: 6.1 Project Definition and Use 6.2 Adding Projects 6.3 Managing Deferred Projects 6.3.1 Allocations 6.3.1.1 Monthly Allocation of Deferred Values
Lesson 2: Banks and Credit Cards
 QuickBooks Premier 2013 Level 2 Lesson 2: Banks and Credit Cards Lesson Objectives In this lesson you will learn how to set up and use the bank reconciliation feature in QuickBooks. You will also work
FMS Account Summary Inquiry View Budget Information
 FMS Account Summary Inquiry View Budget Information Account Summary Inquiry The Account Summary Inquiry (ASI) in our Financial Management System (FMS) displays budget, expenditure, encumbrance, and available
PCGENESIS FINANCIAL ACCOUNTING AND REPORTING (FAR) SYSTEM OPERATIONS GUIDE
 SYSTEM OPERATIONS GUIDE") PCGENESIS FINANCIAL ACCOUNTING AND REPORTING (FAR) SYSTEM OPERATIONS GUIDE 9/3/2015 Section A: Budget Account Master Processing, V2.5 Revision History Date Version Description Author 9/3/2015 2.5 15.03.00
PCGENESIS FINANCIAL ACCOUNTING AND REPORTING (FAR) SYSTEM OPERATIONS GUIDE 9/3/2015 Section A: Budget Account Master Processing, V2.5 Revision History Date Version Description Author 9/3/2015 2.5 15.03.00
This training guide describes the process of correcting journal errors which are discovered during the edit/budget check process.
 Correcting Common Actuals Journal Errors This training guide describes the process of correcting journal errors which are discovered during the edit/budget check process. Before you begin... Upon completion
Budget Adjustment Journals (Source Codes 135, 136, 137 & 138)
") This document outlines the purpose and process for preparing budget entries, which facilitate financial reporting and compliance management for sponsored research. Purpose of Budget Adjustment Journals
This document outlines the purpose and process for preparing budget entries, which facilitate financial reporting and compliance management for sponsored research. Purpose of Budget Adjustment Journals
SALES TAX. Sales Tax Maintenance Canadian Sales Tax Copy Print Report Print Summary Set Date Tax Exemption End of Month End of Year
 Sales Tax Maintenance Canadian Sales Tax Copy Print Report Print Summary Set Date Tax Exemption End of Month End of Year This manual contains reference information about software products from Activant
GL Budgets. Account Budget and Forecast. Account Budgets and Forecasts Menu
 Account Budget and Forecast The Account Budget and Forecast function allows you to enter and maintain an unlimited number of budgets and/or forecasts values and types. When setting up the account budgets
Microsoft Dynamics AX Features for Israel. White Paper. Date: November 2009
 Microsoft Dynamics AX 2009 Features for Israel White Paper Date: November 2009 Table of Contents Introduction... 4 Enabling the Israel-specific features... 4 Validations... 4 Company information... 5 Employees...
myzou Cashiering Module 2
 This module outlines how to take cash, check or credit card payments for a transcript request and properly post them to the student s account. Step 1 Step 2 Step 3 Step 4 Enter Student ID Complete Target
X-Charge Credit Card Processing
 X-Charge Credit Card Processing OpenEdge (Formerly X-Charge) Payment Processing Setup... 1 Setting Permissions for Credit Card Processing... 1 Setting Up X-Charge Payment Processing in SuccessWare 21...
Accounts Receivables Accruals
 Accounts Receivables Accruals For FY18 June 20, 2018 Information Technology Understanding the Accrual Process The goal of year-end accrual process is to recognize revenues and expenses in the period in
CitiDirect WorldLink Payment Services
 CitiDirect WorldLink Payment Services User Guide June 2009 3 Contents Overview 2 Additional Resources 2 Basics Guides 2 Online Help 2 CitiDirect Customer Support 2 Sign on to CitiDirect Online Banking
Open MSI Budget Planning Module
 MSI Budgeting Open MSI Budget Planning Module 1) Enter MSI password 2) Click OK Under Maintenance Menu, click on Budget Entry If you do not Tab you will pull up the entire chart of accounts which will
Vivid Reports 2.0 Budget User Guide
 B R I S C O E S O L U T I O N S Vivid Reports 2.0 Budget User Guide Briscoe Solutions Inc PO BOX 2003 Station Main Winnipeg, MB R3C 3R3 Phone 204.975.9409 Toll Free 1.866.484.8778 Copyright 2009-2014 Briscoe
Chapter 24. Tips, Tricks and Error Messages
 Chapter 24 Tips, Tricks and Error Messages This Page Left Blank Intentionally CTAS User Manual 24-1 Tips and Tricks: Introduction The (OSA) often receives questions about CTAS from the program's users.
Introduction to Client Online
 Introduction to Client Online Trade Finance Guide TradeFinanceNewClientsV2Sept15 Contents Introduction 3 Welcome to your introduction to Client Online 3 If you have any questions 3 Logging In 4 Welcome
North Dakota University System
 North Dakota University System FSA Manual PeopleSoft Version 9.1 DISCLAIMER Written by the North Dakota University System, September, 2006. Updated October 2008; November 2008 Updated to 9.1 June 2011
Financial Arrangements/Fee Schedules
 it just makes sense Summary This Feature Summary will be divided into four sections, Financial Arrangements Fee Schedules Financial Arrangement Document Template Financial Arrangement Questionnaires Each
Accounts Receivables Accruals
 Accounts Receivables Accruals For FY16 June 16, 2016 Information Technology Understanding the Accrual Process The goal of year-end accrual process is to recognize revenues and expenses in the period in
Region IV RMIC. SMART HR Retiree and COBRA Insurance Setup & Processing
 Region IV RMIC SMART HR Retiree and COBRA Insurance Setup & Processing Revised May 2009 Contents COBRA Checklist... 3 Retiree and COBRA Insurance Processing in SMART HR... 4 Coverage Continuation Notices
Accounts Receivable Instructor Guide
 Instructor Guide Rutherford and Associates August 2012 All rights reserved. All rights reserved. The reproduction or use of this document in any form or by any electronic, mechanical, or other means, now
Advanced Financial Statements
 Sage 100 Fund Accounting Advanced Financial Statements STUDENT WORKBOOK SAGE LEARNING SERVICES Important Notice: Authentic Sage 100 Fund Accounting training guides display a holographic image on the front
Employee Instructions for Setting up Direct Deposit
 Employee Instructions for Setting up Direct Deposit Please call 617-552-4772 for Help at any time with your Direct Deposit set up Navigation Select Payroll & Compensation from the Self-Service Menu CLICK:
University of Wisconsin System SFS Business Process PO.2.07 PO Year-End Processing. Contents. PO Year-End Processing Overview
 Contents PO Year-End Processing Overview... 1 Process Detail... 2 I. Identify Purchase Orders to Close... 2 II. Close Purchase Order Identified in Section I... 7 III. Budget Check the Closed Purchase Orders...
Introduction to Client Online
 Introduction to Client Online Bibby Factors International Guide 1 InternationalFactoringNewClientBibbyUKopsSept15 Introduction 3 Logging In 5 Welcome Screen 6 Navigation 7 Viewing Your Account 9 Invoice
BCS Reporting Manual Table of Contents
 BCS Reporting Manual Table of Contents INTRODUCTION TO THE BUDGET CONTROL SYSTEM AND REPORTING... 1 BCS AVAILABLE BALANCE... 2 DRILL-DOWN FUNCTIONALITY... 9 BCS NET BALANCE REPORT... 15 BCS BUDGET LINE
User Document: Merchant Partners First Mile Middleware Electronic Payment Processing
 User Document: Merchant Partners First Mile Middleware Electronic Payment Processing R.O. Writer Version 1.31 R.O. Writer Version 2.0 October 2016 The R.O. Writer name and logo are properties and registered
Finance Self Service Financial Systems
 Finance Self Service Financial Systems Finance Self Service Financial Systems 2008 University of North Florida Center for Professional Development & Training 1 UNF Drive, Jacksonville, Fl 32224 904.620.1707
Kuali Budget Construction Training Guide
 Kuali Budget Construction Training Guide May 2016 Table of Contents SECTION 1 INTRODUCTION TO BUDGET CONSTRUCTION... 2 Accessing Budget Construction in KFS... 3 General Concepts when Using Budget Construction...
Banner Finance Self Service Budget Development Training Guide
 Banner Finance Self Service Budget Development Training Guide Table of Contents Introduction and Assistance...3 FOAPAL....4 Accessing Finance Self Service...5 Create a Budget Development Query... 6 Query
Deduction Codes Configure Company
 A deduction code is a code or abbreviation used in payroll in order to code amounts that are deducted from an employee s pay. In this system, users will be able to configure deduction codes in order to
Getting started. UltraBranch Business Edition. alaskausa.org
 Getting started UltraBranch Business Edition alaskausa.org Contents 2 4 6 8 9 11 13 14 15 21 22 23 24 Key features Getting started Company permissions Setting & exceeding limits Configuring ACH & tax payments
Church Accounting Icon Systems Inc.
 IconCMO Church Software by Icon Systems Inc. All rights reserved. No parts of this work may be reproduced in any form or by any means - graphic, electronic, or mechanical, including photocopying, recording,
MARATHON FINANCIAL ACCOUNTING END OF CALENDAR YEAR
 The following instructions will guide you through the end of a calendar year process. This process includes steps for W-2 Forms, Electronic W-2 Filing, Clear Calendar Year to Date Totals, Tax Table updates