FY 2019 Budget Instruction Manual Table of Contents
|
|
|
- Britton Hines
- 5 years ago
- Views:
Transcription
1 FY 2019 Budget Instruction Manual Table of Contents INTRODUCTION...3 IMPORTANT REMINDERS...4 Navigation Buttons...4 Saving Your Work...4 Assigning Department-Level Users...4 WHAT S NEW OR NOTABLE IN FY 2019?...5 Cost Recovery Subcodes...5 Union Salary Increases...5 Valid Reference Codes...5 Disabled Subcodes...5 TARGET BUDGET EXHIBITS AND SCHEDULES...6 Exhibit A and Schedules Exhibit B...8 Exhibit C...8 Exhibit D...8 Exhibit E...8 Note on Printing Target Budget Exhibits...9 NAVIGATING THE BUDGET PROCESS MODULE Logging into the Budget Process Module Basic Navigation RC-Level Security Department-Level Security Adding a Single User to a Single Department Adding a Single User to Multiple Departments Printing a Record of Department Level Security Assignments Data Entry Screens RC Selection Status Levels Department Selection Budget Entry Screen
2 Exporting the Budget Entry Screen to Excel Navigating Data Entry Fields, Entering Budget Figures and Comments, and Saving Adding Subcodes/Reference Codes Copy Loaded Budget Button Marking a Department as Entered Special Notes on Financial Aid Accounts (including the Mark Entered All button) Special Notes on Auxiliary and Non-Auxiliary Accounts What do the Buttons Mean? Reviewing, Reconciling, and Submitting at the RC Level Detail and Summary Views Available for Reviewing Marking Departments Approved Reconciling to the Target Budget Marking Your RC s Budget as Submitted Distributed Expense Forms OTHER RESOURCES PRISM Subcode Table 52 PRISM Subcode Guidelines 71 PRISM Reference Codes..79 Salary Subcode Table.87 Entity 03 Subcodes Excluded from Overhead.. 91 Quick Tips on the Budget Process Module 92 Other Reminders..94 2
3 INTRODUCTION Welcome to the FY 2019 Budget Submission process. This instruction manual contains the following sections (you may navigate through the sections using the bookmarks that appear on the left side of your screen): Important Reminders even if you are a seasoned user, please read this section to avoid processing errors that users have encountered. What s New or Notable in FY 2019? Target Budget Exhibits and Schedules provides a description of each of the exhibits and supporting schedules that comprise an RC s target budget. Navigating the Budget Process Module detailed description of how to: o log into the Budget Process Module; o establish RC-level and department-level users; o navigate the data entry screens; and o review, reconcile, and submit your RC s budget Other Resources provides reference materials, such as subcode tables, and quick reference tips for working in the Budget Process Module. 3
4 IMPORTANT REMINDERS Even if you are a seasoned user, please review the following are important reminders. Navigation Buttons The regular Windows command area at the top of the screen does not apply within the Budget Process Module. DO NOT use your browser s Back/ Forward arrow or the Home commands to move within the budget screens (see red boxes below). Using these buttons could cause adverse and/or unexpected results, including interfering with the application s ability to properly update an account s status. For most screens, click on the Home link within the Budget screen area to return to the login screen (see green circles below). Since any unsaved changes will be lost after you click on the Home button, use this button only when necessary and only after saving your work. Saving Your Work It is important when performing data entry to Tab out of the field you have just updated before clicking on the Save button, any other buttons, or elsewhere on the page. In the design of Oracle R12, tabbing out of the field prompts the database to perform data validation, which is required before performing another task, such as saving. If a user clicks on the Save button before tabbing out of a field, the system will ignore the instruction to save. Assigning Department-Level Users RC-level users should not also be established as department-level users. Doing so will prevent buttons from appearing that are needed as an RC-level user. 4
5 WHAT S NEW OR NOTABLE IN FY 2019? Cost Recovery Subcodes In FY 2018, the Controller s Office began transitioning the subcodes used for the credit side of cost recovery transactions from the 84xx series of subcodes to the xx98 series of subcodes. Programming in the PRISM Budget Module has not yet caught up to this change. If your RC has been instructed by the Controller s Office to begin using the xx98 series of subcodes for cost recovery that you budget in entity 02, submit your budget using the 84xx series of subcodes instead, so that it will flow to your Recon screen properly, notify Budget & Financial Reporting (B&FR) with your submission, and B&FR will process a BMR in SEP-18, so that your September level reports and reports from PBCS will reflect your budget in the correct subcode. Union Salary Increases For FY 2019, union bases are not backed out on Schedule 4, so they were allocated the general salary pool increase in your target budget. The analysis of union bases and increases from collective bargaining agreements will be sent to you in October, and BMRs will be processed at that time to adjust your budget. Valid Reference Codes Note that the reference code table that starts on page 79 was updated in fiscal year If you are using reference codes in your budget submission, please consult this resource to ensure you are using valid values. Disabled Subcodes In FY 2017, subcodes 5710 (Chief Medical Residents) and 5715 (Graduate Medical Trainees) were disabled. 5
6 TARGET BUDGET EXHIBITS AND SCHEDULES The FY 2019 budget guidelines represent the compilation of budgetary decisions for FY 2019 as they affect each RC. The budget guidelines contain five components: Exhibit A - Calculation of Approved Operating Expenditure Budget for FY 2019 Exhibit B - Calculation of Approved Operating Revenue Budget Exhibit C - FY 2019 Overhead Rates Exhibit D - FY 2019 Debt Service Budgets Exhibit E - FY 2019 Financial Aid Budgets Exhibit A and Schedules 1-5 An RC s operating expenditure budget is generally that portion of its budget that is accounted for in Entity 02 (subcode range 5000 through 9999) and is funded from general University sources of revenue (commonly referred to as "hard money"). Expenditures related to non-auxiliary activities and to auxiliary enterprises are not included in the RC s operating expenditure budget as presented in Exhibit A. Financial aid accounts (purposes 07###) are also excluded from Exhibit A because they are allocated on Exhibit E. The starting point for the calculation of the approved operating expenditure budget for FY 2019 is the approved operating expenditure budget for FY 2018 (as of July 1, 2017) as submitted by the RC in September This budget, and all information related to the budget calculation, is provided by the following categories: faculty salary (excluding fringe benefits) non-faculty salary (excluding fringe benefits) fringe benefits calculated on faculty and non-faculty salaries GSA/TA/TF/GSR salary (excluding fringe benefits) fringe benefits calculated on GSA/TA/TF/GSR salaries other costs (excluding cost recovery) cost recovery Student salaries recorded in subcodes 5700 through 5785 are included in non-faculty salaries. Schedule 1 of Exhibit A details changes that have occurred in fiscal year 2018 to an RC s budgets from the transfer of departments, or from permanent Budget Modification Requests (BMRs). In cases where a permanent BMR created partial year funding, additional amounts to provide funding for a full year are given as annualization of permanent BMRs. Details of annualizations are also presented in Schedule 1 of Exhibit A. Details of fully and partially cost recovered accounts and certain income-based accounts are found in Schedule 2 of Exhibit A. Fully cost recovered accounts, the recovered portion of partially cost recovered accounts, and certain income-based accounts are removed from the RC s budget prior to calculating increases or other adjustments. As in previous years, increased costs in these accounts for fiscal year 2019 will not be centrally funded; these increases should be funded through increased income and/or cost recovery. 6
7 Schedule 3 of Exhibit A provides for required reductions or reallocations of the budget. Schedule 4 of Exhibit A provides a calculation of the compensation increase and fringe benefit adjustment. The following items should be noted: The details to the increase of the adjusted salary budget for staff, faculty, GSAs, GSRs, TAs, and TFs (total percentage increase pool and percentage increases for satisfactory performance and merit, market, and equity) are outlined in the cover letter that accompanies your budget materials. Union increases are based on collective bargaining agreements. [For FY 2019, union bases will not be backed out on Schedule 4, so they will receive the general salary pool increase in your target budget. The analysis of union bases and increases based on collective bargaining agreements will be sent to you in October, and BMRs will be processed to adjust your budget.] Fringe benefits have been included in the target budget at the approved FY 2019 rates. Fringe benefits will be budgeted on salaries using various rates depending upon employee classification. The same rates should be used whether the budgets are for regular salaries or overload salaries. A table detailing the FY 2019 approved rates can be found in the Other Resources section of this manual. Funding has been adjusted on Schedule 4 to reflect the changes in fringe benefit rates from the FY 2018 rates. Therefore, any movement of salary dollars requires a movement of fringes at the applicable FY 2019 rate(s). Additional fringes will not be centrally funded for movement between salary subcodes. Schedule 5 of Exhibit A details any program changes that affect the RC that have been approved through the budget process. No increase has been provided for other costs for FY The result of the above calculations is the approved operating expenditure budget for FY 2019 for the RC, excluding fully and partially cost recovered accounts and certain income-based accounts. To arrive at the total approved operating expenditure budget for FY 2019, fully and partially cost recovered accounts and certain income-based accounts are added back at the FY 2018 budgeted amounts, plus any permanent BMRs processed during the year to such accounts. The approved operating expenditure budget for FY 2019 is calculated at the RC level. When the RC head receives the FY 2019 target budget guidelines, he/she must distribute the approved funding to the departments within the RC. Operating expenditure budget data for each department will be collected on the data entry screens of the PRISM Budget Process Module. See the Navigating the Budget Process Module section of this manual. 7
8 Exhibit B The approved operating expenditure budget for an RC assumes that a consistent level of operating revenues associated with that RC will be achieved. These operating revenues, accounted for in Entity 02 (subcode range 4000 through 4999) of the PRISM general ledger accounts, are detailed in Exhibit B. Permanent BMRs have been incorporated in the amounts on Exhibit B. The operating revenue budget represents the amount of revenue that must be achieved in FY 2018 to support the budgeted expenditures. If an RC budgets more revenue than this amount, the RC can increase its expenditure budget by the incremental amount. Likewise, if the RC budgets less revenue than this amount, the RC must decrease its expenditure budget by a corresponding amount. Operating revenue budget data will be collected on the revenue portion of the data entry screens. Exhibit C Some RCs have auxiliary operations and / or non-auxiliary activities, which are accounted for in Entity 03 of the PRISM general ledger accounts. Exhibit C lists the required overhead rate to be applied to auxiliary/ non-auxiliary accounts when calculating total expenditure budgets. The expenditure budgets must include the appropriate amount of overhead in subcode 8302 Distributed University Overhead. As expenditure budgets are entered and saved, the system will automatically calculate overhead by applying the rate found on Exhibit C to Modified Total Direct costs (MTDC), and enter that amount in subcode A listing of the subcodes excluded from MTDC to determine overhead can be found in the Other Resources section of this manual. To manually calculate overhead for an account, start with total expenses (before overhead) and subtract subcodes excluded from MTDC. Multiply this net result by the applicable overhead rate from Exhibit C. This is the amount of overhead that should be budgeted in subcode Exhibit D For RCs required to include debt service in their budgets, the appropriate entity, department, and amounts are provided in Exhibit D. You may not enter a budget in subcode 8210 unless it is included on Exhibit D. Exhibit E Exhibit E provides Undergraduate and Graduate Financial Aid budgets by RC. These budgets have been allocated to the RCs by the Office of the Provost or by the Office of the Senior Vice Chancellor for the Health Sciences, as applicable. Based on this exhibit, each RC should determine the allocation of its financial aid budget by account and complete the separate financial aid data entry tab on the Entity 02 screen. Please note that these budgets may not be reclassified between Undergraduate and Graduate. These financial aid budgets are not part of the Approved Operating Expenditure Budget on Exhibit A. This is a separate targeted amount. Therefore, RCs should not incorporate the budget of these accounts in their Reconciliation. Final Approvers should, however, ensure the financial aid budget to be submitted equals (or reconciles) to the target budget shown on Exhibit E, which also appears at the bottom of the Department Selection screen. 8

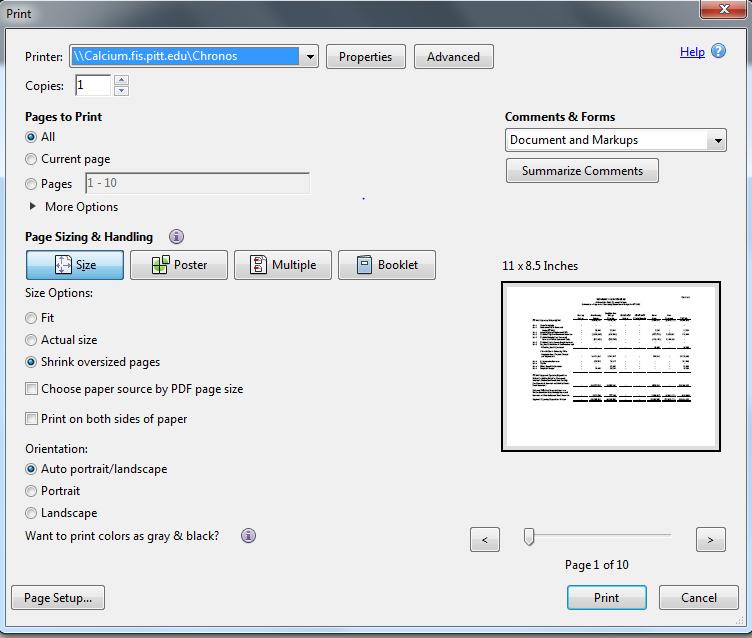
9 Note on Printing Target Budget Exhibits Your target budget exhibits may be printed directly to your printer, and all pages should print in the format appearing on your screen. One reason the print copy may appear differently is because your printer setting is not set to the proper scaling. Another reason may be that the auto-rotate/orientation setting needs to be changed. If you are having difficulty, check to insure that Shrink to Printable Area or Shrink oversized pages and Auto-Rotate or Auto portrait/landscape are selected. Or: 9
10 10
11 NAVIGATING THE BUDGET PROCESS MODULE Logging into the Budget Process Module Log into PRISM: 1. Access PRISM by navigating to the University Portal at my.pitt.edu 2. Enter your University computing account username and password 3. Select the PRISM Login link, or 4. Select the My Resources tab, then PRISM, then PRISM Login 5. Select GL BUD Annual Budget User from your list of responsibilities 6. Click on Budget Selecting the Budget User responsibility takes the user to the screen pictured below. Only RCs to which a user has been granted access will appear. 11
.")
12 Basic Navigation 1. The regular Windows command area at the top of the screen does not apply within the Budget Process Module. DO NOT use your browser s Back/ Forward arrow or the Home commands to move within the budget screens (see red boxes below). Using these buttons could cause adverse and/or unexpected results, including interfering with the application s ability to properly update an account s status. For most screens, click on the Home link within the Budget screen area to return to the login screen (see green circle below). Since any unsaved changes will be lost after you click on the Home button, use this button only when necessary and only after saving your work. 2. Note that an individual user s screen size and resolution may cause the screens to appear a little differently than pictured in this instruction manual. Take notice of whether scroll bars appear (see yellow and orange arrows above); if they do, that indicates that there is more to see than is shown. If a scroll bar appears where indicated by the orange arrow, it may be easier for you to navigate the module if you have your screen magnification set to 100%: 12
. 4. To log out of the Budget Process Module, select the Logout link (see purple arrow in screen shot on previous page under item 1).")
13 3. To navigate to another PRISM responsibility (for example, to research something in General Ledger), save your work and select Navigate at the top of the screen (see green arrow in screen shot on previous page under item 1). 4. To log out of the Budget Process Module, select the Logout link (see purple arrow in screen shot on previous page under item 1). This will log you out of PRISM completely. If you only want to change PRISM responsibilities, use the Navigate menu (see green arrow in screen shot on previous page under item 1). 5. The Status column on the right side of the screen indicates one of six levels of completion. The various status levels are discussed in more detail on the Data Entry Screens section of this manual. 6. Various buttons will appear at the bottom of the screen which allow specific tasks within the Budget Module, such as moving to other screens, saving your work, and updating the status of your work. Which buttons appear or work on an individual user s screen is dependent upon the user s level of access and the status level of the department. The buttons are explained in more detail in a later section of this manual (see What do the Buttons Mean?). 7. In most instances, you will use the Tab key on your keyboard or your mouse to navigate through the fields on the screen. It is important when performing data entry to Tab out of the field you have just updated before clicking on the Save button, any other buttons, or elsewhere on the page. In the design of Oracle R12, tabbing out of the field prompts the database to perform data validation, which is required before performing another task, such as saving. If a user clicks on the Save button before tabbing out of a field, the system will ignore the instruction to save. 8. When editing a field that already contains a number, delete the entire contents of the field and enter the revised number. Attempting to edit only a character or two in a field can yield unreliable results. 13

14 9. After 30 minutes of non-activity, you will lose your Budget Module connection and your entries since the last save. 10. To retrace your steps through different screens in the budget module, use the breadcrumbs at the top of the screen. An example from a data entry screen: The path the user used to navigate to the present screen is listed at the top of the screen. Click on the level to which you would like to return. Be sure to save first. 11. Warning and error messages appear at the top of the screen, as in this example: 12. Some screens have Print buttons that will bring up a printer-friendly window, from which you may print a hard copy or save as a PDF file for your records. 13. In some cases the Export to XLS function takes some time to complete. Be patient. 14
15 RC-Level Security The first level of security that needs to be established is at the RC level. Any users established at this level will have access to all departments under an RC. For the FY 2019 budget submission process, RCs were asked in July to confirm the security designations at this level and submit Data Access Form(s) for any changes. There are three roles that can be assigned at the RC level: Final Approver o Each RC MUST designate one, and only one, Final Approver o The Final Approver CANNOT be given view-only rights o May enter/edit data o May assign department-level access rights to other users o Can mark departments as Entered and Approved, and can reverse approvals and reopen departments for data entry (as long as the RC s budget has not yet been submitted to Budget & Financial Reporting (B&FR)) o Is responsible for reconciling the RC s submitted budget to its target budget and completing other submission forms (as necessary), or reviewing the reconciliation and other submission forms completed by another RC-Level User o Is responsible for submitting the RC s budget to B&FR RC Budget User o May do everything a Final Approver can, except: Reverse approvals of departments Submit the RC s budget to B&FR RC View Only o Has view-only rights to all departments under the RC RC-level users should not also be established as department-level users. An RC-level user has all of the access privileges as a department-level user (as long as the user is not restricted to View Only rights), so there is no need to set up an RC-level user as a department level user. Doing so will prevent buttons from appearing that are needed as an RC-level user. Note that RCs that report to the Provost have Kristin Gusten and Shari Manges established as an RC Budget User with View Only rights to their RCs. RCs that report to the Senior Vice Chancellor, Health Sciences have Rich Henderson established as an RC Budget User with View Only rights to their RCs. Because Kristin, Shari, and Rich will have the ability to view their respective RCs submitted budgets and required forms, RCs do not need to forward their submission forms to them. However, any supplemental communication to B&FR should include a cc to Kristin and Shari or Rich. 15
16 Department-Level Security An RC Final Approver or RC Budget User is able to assign data-entry capabilities to individuals at the department level. We refer to these users as Department Users. Department Users can be assigned data-entry or view-only rights to specific (or all) departments under an RC. The assignment of these rights is performed using the Department Security button. Note that: Data Access forms are not required for department users The instructions that follow include printing a record of Department User assignments that can be kept for reference. RC-level users should not also be established as department-level users. An RC-level user has all of the access privileges as a department-level user (as long as the user is not restricted to View Only rights), so there is no need to set up an RC-level user as a department level user. Doing so will prevent buttons from appearing that are needed as an RC-level user. Adding a Single User to a Single Department From the RC Selection screen, click on the Department Security button. 16


17 The next screen you will see will look very similar to the RC Selection screen, except that it will be titled the Department Security RC List screen. Select your RC, which will bring you to a screen that looks like the following: This screen lists all departments within the chosen RC, the names of the people who have already been assigned access privileges (none, if you are assigning rights for the first time, as in the example above), and if privileges are view-only (a (V) following the user s name). Assignments of Department Users that were established for the 2018 budget submission process have been carried over to the FY 2019 process. Select a department by left-clicking on the link in blue. The system will bring up a screen indicating the security assignments that have been made for that department, or a message that no users have been defined for this department (see screen shot below). To add a person, select the Add button, enter at least a portion of the last name of the person to be added in the Person box, and hit Tab or click on the magnifying glass icon. (Note that the Person box is not case-sensitive.). The system will bring up a dialog box with the names meeting the selection criteria from individuals in the current HR system. Click the round Select button to the left of the listing for the 17
: The next screen appears as follows: The default setting of access is No for all budget types OP,")

18 appropriate person, then the rectangle Select button below and to the right of the list of names (red arrows): The next screen appears as follows: The default setting of access is No for all budget types OP, FA, AUX, NON-AUX. You must change the default setting of at least one budget type for the newly added individual before hitting Save. If you hit save before specifying a budget type, the system generates an error message: 18

19 Click on the drop down arrows within each account type column to define an individual s access to the various account types: OP=operating, FA=financial aid, AUX=auxiliary, NON-AUX=non auxiliary; Yes = data entry privileges, No=no data entry or view privileges, View only=no data entry privileges. Note: When assigning access to a user, either select Yes, No, or View Only for all account types, or be careful to match the level of access you are granting to the proper account type for the department. In the example above, department is an operating account with 07xxx purpose code financial aid accounts. If you have No selected under the OP and FA account types, and Yes selected for AUX and NON AUX account types, Kelly will not have data-entry rights to the OP or FA account. The data entry screen will appear as follows, and Kelly will not be able to perform any data entry: Back at the Department Security screen, click on Save and the system will insert the budget user responsibility on that individual s PRISM responsibility listing. Note that on the Department Security screen, you must press Save for any changes you have made to be applied. After a correct save, the system returns to the security listing with the names sorted alphabetically: 19


20 Selecting Department Security RC List > from the breadcrumbs listed at the top of the screen reflects the changes. Additionally, note that users with View Only access will have a (V) after their name: To delete an individual s privileges just click on the trash can icon on the line on which the individual s name appears: You will be asked to confirm the deletion: 20

21 Select yes, then at the Edit Department Security screen, you must click Save for the deletion to be applied: Click on Department Security RC List RC xx >. Note that the deletion is reflected. Adding a Single User to Multiple Departments To assign a person to selected or all departments within an RC, click on the Assign Multiple Depts button. The system will bring up the Assign Multiple Departments screen: 21

22 Enter at least a portion of the last name of the individual and click on the magnifying glass icon. If multiple people meet the criteria, the system shows a listing: 22


23 Choose the appropriate individual and click Select. The next screen appears as follows: From the listing of departments, click on the appropriate department records to place a check in the Select box, or Select All at the top of the column: 23

24 The default setting for budget types is No for all budget types. To change the default, click on the type setting Yes No View Only. Either select Yes for all account types for a department, or be careful to match the level of access you are granting to the proper account type for the department. In the example above, department is an operating account. If you have No selected under the OP account type, and Yes selected for all other account types, Heather will not have data-entry rights to the OP accounts. Click Save to save your entries. Note: If you do not change the budget type settings, no security access will be granted for the checked departments even if you save the screen. If you want to delete multiple department assignments for one person you can use the Assign Multiple Depts button, clicking on the check boxes of the departments that person should not have access to, selecting No for the respective account type(s), then clicking Save. 24

25 Printing a Record of Department Level Security Assignments From the Department Security screen, select the Print button at the bottom of the screen: A new window will open with a printer-friendly version of the screen. You can either select File/Print from your browser s menu at the very top of the screen to print a hard-copy for your records. If available, you can use the the Convert drop-down menu and Convert Web Page to PDF option to produce a PDF version of the screen that you can save to your network drive: 25

26 26

27 Data Entry Screens Once the security levels have been defined for an individual, the following screens will appear upon logging into the application. The number of RCs, departments, and account types that will appear depends on the security settings for the individual user. RC Selection This screen lists the RC number, RC description, the number of departments within the RC, and the RC status. Only RCs to which a user has been granted access will appear for that user. Users that have access to multiple RC s are able to download data for all of those RC s at one time and into one file by using the Export to XLS: ALL RCs button. Note that it may take the system several minutes to complete the export. Be patient. See below for an explanation of the various status levels. NOTE: The status on the RC Selection screen is dependent upon the lowest status of any account within any department within the RC aside from the default, Not Processed. Click on the RC link (blue text) to select an RC. 27
28 Status Levels Not Processed The department has not had activity, or data has not yet been entered into the form. A department can move directly from Not Processed to Approved. In other words, if the RC s Final Approver does not want to load a budget for this department, nothing further needs to be done. In Progress Data has been entered and saved into the form. If a department s status has been changed to In Progress, it must be marked Entered and Approved before the RC s budget can be submitted to B&FR. Entered Data entry for this department is complete (form is locked from the data entry user) and the data is ready for review by the RC Budget User or Final Approver. The RC Budget User and Final Approver have the ability to unlock the data for edit by a department user, or make their own edits without re-opening the department. Approved The department has been reviewed and approved by an RC-Level User, and is ready for submission. The form is locked for all RC and department data users, however the Final Approver can reverse the approval for edits or data entry. Submitted - All departments within the RC have been reviewed, approved, and submitted to B&FR by the Final Approver. The data is now locked from the Final Approver and all other RC or department users. All departments must be in either Not Processed or Approved status in order for the RC to submit its budget. Only B&FR can re-open the RC for edits. Transferred B&FR has reviewed the submission, any issues have been resolved, and the budget has been imported and loaded into PRISM. A note on status levels at the RC level: If all of an RC s departments are either Not Processed or Entered, the RC s status will show as Entered. If one department s status is then changed to Approved, the RC s status will go back to In Progress (a lower status than Entered). The RC s status will remain In Progress until all departments are approved, at which time the RC s status will be changed to Approved. 28

29 Department Selection The above screen indicates the department numbers and descriptions, the totals of the entries of accounts by account type, and department status. Again, only departments to which a user has been granted access will appear on his or her screen. For an RC-Level User, the bottom of the screen will display the data entry totals for the entire RC (A), the target budget(s) for the RC (B), and the difference between the budgets input and the target budget (A- B). For a Department User, only the RC Total by User will be displayed since the target numbers and the difference have no relevance at the individual department user level. Department status is dependent upon the lowest level of individual account statuses aside from the default, Not Processed. (Note that only Entity 02 departments with financial aid accounts (purpose 07xxx) can have more than one account per department number.) Click on the department link (blue text) to select a department and go to the budget entry screen. Only accounts with budget or actual activity in FY 2018 will be available for a user to enter a budget through the Budget Process Module. New accounts cannot be added. If on the department selection screen, a department that is blank across the account type columns indicates that the account is valid in PRISM but it did not have financial activity (either budget or actual) during the prior fiscal year. This means you may not budget in it through the Budget Process Module. If you would select that department, the budget entry screen would appear as follows: 29

30 Note that the breadcrumbs the message above refers to are circled in red. If you want to establish a budget in such an instance, you may process a BMR after the budget is loaded into the General Ledger. Budget Entry Screen This screen indicates the RC number, department number and description (red arrow), department status (blue arrow), account type tabs (yellow arrow), and budget and actual amounts for the prior fiscal year (as of early-july close of June activity) at the subcode and reference segment level. To navigate back to the department selection or RC selection screens, use the breadcrumbs at the top of the screen (orange arrow). Note that the buttons that will appear on an individual user s screen (green arrow) will depend on the user s access rights (see section below, What Do the Buttons Mean?). The prior year budget amounts have been broken down into: 1. the initial loaded budget 2. permanent BMRs 3. temporary BMRs 30
 At the bottom of the screen, the system summarizes entered and saved data for each column into the following categories: Total compensation, excluding")
31 4. ending total budget (sum of 1+2+3, shown on the level reports) 5. ending permanent budget (sum of 1 and 2 only) At the bottom of the screen, the system summarizes entered and saved data for each column into the following categories: Total compensation, excluding external cost recovery (5880) Total other costs, excluding cost recovery (84xx s; see page 5) Total cost recovery (84xx s, 5880; see page 5) Total expenses Net revenues and expenses Exporting the Budget Entry Screen to Excel A useful feature of the Budget Process Module is the ability for a user to export data from certain screens for analysis purposes. A user can do this first, creating a worksheet that can be used to analyze prior year budget and actuals to determine an appropriate budget for the next fiscal year (see Tip below). A user can also use the export function after the budget figures have been entered in order to check his or her work, or to have a copy of the budget for reference purposes. Tip: if you choose to perform your analysis while working in the budget application, and if you want to investigate something in PRISM, you will have to log out of your budget user responsibility in PRISM, log back in under your general ledger (GL) responsibility, log back out under GL, and then log back in under budget. Exporting data to Excel will minimize going back and forth between PRISM responsibilities. At the budget entry screen, the Export to XLS button opens a web version of Excel containing the records on the displayed screen, but without subtotaling and formulas. At the initial dialog box, you can choose 31

32 to either open the spreadsheet or save it to a network drive. Note that the web version of Excel does not have the full functionality of the PC version of Excel. You can view the records and print but if you require other functionality, you need to save the file to a network drive and then open it with your PC version of Excel. Select Save and save to a network drive. You may also receive the following message; just click Yes. Although the screen for budget entries shows sub-totals and summaries, neither subtotals nor the summary numbers are exported to Excel: The above example is simple, but for departments that have much more data, Excel s PivotTable, filter, and table functions can assist the user in quickly and efficiently summarizing or drilling down into the data at any level of detail the user wants. If you are not familiar with these functions, use Help in Excel to learn more about tables and filters. Instructional videos on Excel PivotTables are available through CSSD s on-line technology training via Lynda.com: Log in to my.pitt.edu, Click on My Resources, Select Tech Training from CSSD, Select Access the Lynda askcathy Task link, Select the blue Start button in the upper right corner of your screen, Either Ctrl+click on hyperlinks below, or search on lynda.com for the course that is appropriate for your version of Excel: o Excel 2007: PivotTables for Data Analysis o Excel 2010: PivotTables in Depth o Excel 2013: PivotTables in Depth o Excel 2016: PivotTables in Depth Each course is divided into chapters and topics, so you can choose which topics are relevant to you. 32
 will calculate automatically and populate the appropriate subcode at each save. These fields are protected from data entry (red arrow).")
33 Navigating Data Entry Fields, Entering Budget Figures and Comments, and Saving Back at the data entry screen: The white boxes are the fields available for data entry. Note that fringe benefits and overhead (as applicable) will calculate automatically and populate the appropriate subcode at each save. These fields are protected from data entry (red arrow). In most instances, you will use the Tab key on your keyboard or your mouse to navigate through the fields on the screen. It is important when performing data entry to Tab out of the field you have just updated before clicking on the Save button, any other buttons, or elsewhere on the page. In the design of Oracle R12, tabbing out of the field prompts the database to perform data validation, which is required before performing another task, such as saving. If a user clicks on the Save button before tabbing out of a field, the system will ignore the instruction to save. When editing a field that already contains a number, delete the entire contents of the field and enter the revised number. Attempting to edit only a character or two in a field can yield unreliable results. Budget entries are made in whole dollar amounts (no cents, commas or formulas). If you enter a nonnumeric character, the system will issue an error message. The system will format the numbers with commas when you tab out of the field. Revenue entries are normally credit balances (negative numbers). If you enter a debit balance (positive number), the system gives you a warning, but does not prevent you from making the debit entry: 33
34 The Comments field allows you to note relevant information about your budget entry. Comments can be up to 30 characters. They will not appear in the General Ledger, but are included in any exports to Excel. To save your work, click the Save button at the bottom left of the screen (see red circle on the full screen shot on the previous page). Note that this action will update the subtotal, fringe benefit, and overhead calculations, and repaint the screen (necessary because the save action is updating the database underlying the interface you see), bringing you back to the top of the budget entry screen. Use the scroll bar to return to where you left off. Adding Subcodes/Reference Codes The budget entry screens will already be populated with any subcode/reference combination that had budget or actual activity in the prior fiscal year. However, if a user wants to add a subcode or reference code that has not been used in the past, clicking the Add Sub/Ref Code button on the budget entry screen will take the user to the following screen (minus the error message, which is explained below): 34
35 The account must be in the Not Processed or In Progress status for a user to be able to add a subcode or reference code. Certain restrictions have been programmed to prevent certain types of errors. In the example above, the user attempted to add a subcode that is not allowed by PRISM s cross-validation rules. While not all cross-validation rules have been programmed into the Budget Process Module, all of them are outlined in the subcode table included in this instruction manual. Please refer to the subcode table to ensure any subcodes you are adding are valid for the account to which you are budgeting. Users will also get an error message if they attempt to add an un-enabled subcode/reference value, or a duplicate subcode/reference code combination. If you incorrectly add a subcode/reference code that you do not want to use, leave the budget field blank or enter a zero. The system will not allow you to delete a subcode/reference code. 35
36 Copy Loaded Budget Button This button enters the data for the prior year s initial budget load into the data entry fields for the new budget year. Copying the prior year s loaded budget prior to making any entries for the new budget year allows you the opportunity to use the old figures where the budgets do not change from year to year. Although the Copy Loaded Budget action can be initiated at any time, we recommend that it be performed prior to any other data entries, because the action will overwrite most previous entries to the new budget year s budget fields. If you have entered a value in a field that had no budget loaded in the prior year, the value you entered will not be overwritten. If the Copy Loaded Budget button is selected after entries have already been made for the new fiscal year, the system will bring up a warning message: Yes will allow the system to copy the prior year s budget entries. No will bring you back to the data entry screen. You MUST click Save to update the calculations for subtotals, totals, fringe benefits, and overhead. Note that fringe benefits and overhead will calculate using the new budget year s applicable rates and cost base. Marking a Department as Entered Once you are done entering the budget in an account and the account is ready for the next level of review, click on the Mark Entered button, which changes the account s status to Entered. If you are a Department User, you will still be able to view the account, but will not be able to make further edits unless an RC-Level User re-opens the account for data entry. Once an account is marked Entered, an RC- Level User is able to make edits without re-opening the account for data entry. Special Notes on Financial Aid Accounts (including the Mark Entered All button) If a department has financial aid accounts associated with it, its screen will have two tabs in the upper left corner. The drop-down menu on the Entity 02 Financial Aid (07xxx) tab allows the user to select the individual financial aid account to view or edit. 36

37 NOTE: Be especially careful in updating the status of a department that has financial aid accounts. The status of a department as a whole is dependent upon the lowest status of any account within the department. In the example on the previous page, for department to move from In Progress to Entered, all six financial aid accounts under that department must be marked Entered. If, at the Department Selection screen a department is showing a lower status than you think it should, check the status of the financial aid accounts within the department. The Financial Aid tab has a Mark Entered All button, which when selected changes the status of all of the department s Entity 02 Financial Aid accounts to Entered. Special Notes on Auxiliary and Non-Auxiliary Accounts The Budget Process Module automatically calculates overhead. As budgets are entered and saved, the system calculates the appropriate budget for overhead, applying the applicable rate for the account to Modified Total Direct Costs (MTDC; the current MTDC table is included in the Other Resources section of the instruction materials), and populating subcode 8302 (a protected field). See the Target Budget Exhibits and Schedules, Exhibit C section of the instruction materials for an explanation of how to manually calculate overhead. 37


38 The Budget Module will not allow a user to move the status of an Auxiliary or Non-Auxiliary account past In Progress if revenues and expenses do not balance. In the example below, revenues and expenses do not balance, and the user tried to mark the account as Entered. An error message prevents the user from marking the account as Entered until revenues and expenses balance: 38
39 What do the Buttons Mean? Buttons are listed in alphabetical order. Boldface buttons are available only to RC-Level Users. Underlined buttons are the only buttons available to view-only users. Certain buttons will be available only at certain levels of completion (e.g., once a department has been marked entered, the Mark Entered button will no longer appear, unless the department is re-opened for data entry). Add Sub/Ref Code Add a new subcode and/or reference number within the established rules subcode restrictions by entity or department. This button can only be used when a department s status is either Not Processed or In Process. Approve/Reverse Approval Appears on the department selection screen and allows an RC-Level User Multiple Depts to approve/reverse the approval of more than one department at a time. Assign Multiple Depts Back to Budget Entry Copy Loaded Budget Department Security Export to XLS Export to XLS: All RCs Export to XLS Subcode Export to XLS SUM Allows an RC-Level User to assign more than one department to a Department User. Appears on the department security screen, and directs the user back to the budget entry screens. Copies the prior year s non-zero loaded budget into the data entry fields for the new budget year. Fringe benefits, overhead, and subtotals recalculate upon saving, using the appropriate rates and cost base for the new budget year. Prior year non-zero values overwrite any previous data entered for the new budget year. Appears on the RC selection screen, and directs the user to the screens used to create or edit rights for Department Users. Exports the detail records within the budget entry screens to a web version of Excel; if initiated at an RC screen, exports all records for an RC; if initiated at a department screen, exports the records for the department. Available to RC-Level Users. Exports to a web version of Excel all detailed records for all RCs to which the user has rights. Appears on screen the user is taken to by selecting the RC Total by Subcode button. Exports the RC subcode/reference totals to Excel (without totals). If a user has been given access to only certain departments in the RC, this button should be disregarded. Exports to Excel total revenues and expenses for the RC by department and account type. 39
40 Mark All Entered Mark Approved Mark Entered Print RC Recon RC Total by Subcode Re-open for Data Entry Reverse Approval Save Submit Budget Applicable only to Entity 02 Financial Aid (purpose ID 07xxx) accounts. Changes the status of all of a department s Financial Aid accounts to Entered, indicating that the accounts are ready for review at the next level. See description for Mark Entered below for further information. After a higher level user has reviewed and approved the entries in an account, that user can indicate that the account is ready for review by the Final Approver at the RC level. After an account s status changes to Approved, a data entry user is not permitted to make further changes. Only a Final Approver can reverse the approval and re-open the account for data entry, or make edits. The approval must be reversed and the account must be re-opened for data entry if a new subcode or reference code needs to be added. Changes the account s status to Entered, indicating that the account is ready for review at the next level. After an account s status changes to Entered, a department user is not permitted to make further changes. Only an RC-Level User can re-open the account for data entry or make edits. The account must be re-opened for data entry if a new subcode or reference code needs to be added. Opens a new window with a printer-friendly view of the current screen. Available to RC-Level Users. Moves user to screen for viewing or completing the reconciliation between the submitted and target budgets. Opens a new screen to show totals input for all departments within an RC by account type and subcode/reference number. If a user has been given access to only certain departments in the RC, this button should be disregarded. Changes the status of an account from Entered back to In Progress to allow changes to be made by a department user. Changes the status from Approved to Entered to allow for additional changes by an RC-Level User. Saves the entries made to the database, updates fringe benefit, overhead, subtotal, and total calculations since the last save. Available only to the Final Approver. After the Final Approver has determined that all entries within the RC have been completed appropriately, and the reconciliation is complete with all differences from the target budget explained, the Final Approver can change the status of all accounts within the RC to Submitted and indicate to B&FR that the RC is ready for B&FR review. 40
41 Reviewing, Reconciling, and Submitting at the RC Level Once individual departments are at the Entered status level, an RC Budget User or the Final Approver can review the departments individually, in groups of Entered departments, or in total. Detail and Summary Views Available for Reviewing Keep in mind with each of the options below, Excel s filter, table, and PivotTable functions can assist the user to quickly and efficiently summarize or drill down into the data at any level of detail the user wants. If you are not familiar with these functions, see the Exporting the Budget Entry Screen to Excel section for on-line tutorials and reference materials on these functions. To review departments individually, an RC Budget User or the Final Approver can navigate to the department s data entry screen and click on the Export to XLS button, which will export that department s data to a web version of Excel, containing the records on the displayed screen, but without subtotaling and formulas. At the initial dialog box, you can choose to either open the spreadsheet or save it to a network drive. Note that the web version of Excel does not have the full functionality of the PC version of Excel. By selecting Open, you can view the records and print, but if you require other functionality, you need to save the file to a network drive and then open it with your PC version of Excel. The export may take a few minutes. Be patient. Select Save and save to a network drive. You may also receive the following notifications; just click Yes. To review departments in groups or in total, an RC Budget User or the Final Approver can navigate to the RC s Department Selection screen and click on the Export to XLS button, which will export the account/subcode/reference code detail for all departments in your RC. (Again, choose to save the file rather than open it in the web version of Excel, and use the filter, table, and PivotTable functions to summarize the data for review. The export may take a few minutes. Be patient.) If you would also like to view your RC s budget by subcode in total by account type, click on the RC Total by Subcode button, which will take you to the following screen. The screen can be used in your final review, or as you input to view a running total of the budget entries to date by account type and by subcode/reference code: 41

42 The Export to XLS Subcode button will export the data, excluding the summarizations at the bottom of the screen. 42
 before the RC s budget can be submitted. NOTE: Be especially careful in updating the status of departments that have financial aid accounts.")
43 Marking Departments Approved Each department that is in a status of other than Not Processed (no data entered and saved) must be marked Approved (having gone from Not Processed to In Progress to Entered to Approved) before the RC s budget can be submitted. NOTE: Be especially careful in updating the status of departments that have financial aid accounts. The status of a department as a whole is dependent upon the lowest status of any account within the department. If, at the Department Selection screen a department is showing a lower status than you think it should, check the status of the financial aid accounts within the department. Once an RC-Level User has reviewed the budget in a department and the account is ready to be included in the RC s budget submission, the RC-Level User clicks on the Mark Approved button, which changes the department s status to Approved. At this point, only the Final Approver is able to reverse the approval (changing the department s status back to Entered), or make edits without re-opening the department for data entry. If a new subcode or reference code is to be added, the Final Approver must reverse the approval on the department before making that change. To approve more than one department at a time, an RC-level user can use the Approve Multiple Depts button that appears on the department selection screen: Selecting the Approve Multiple Depts button brings the user to this screen: 43
44 Departments that are in the proper status in order to be marked Approved are automatically selected. Make any changes you want to, and select the Approve Selected Departments button. (Note that if a department is in a status that does not allow for approval (such as In Progress), the department s status will not be changed to Approved. Use the breadcrumbs at the top of the screen (see red arrow) to return to the Department Selection screen. 44

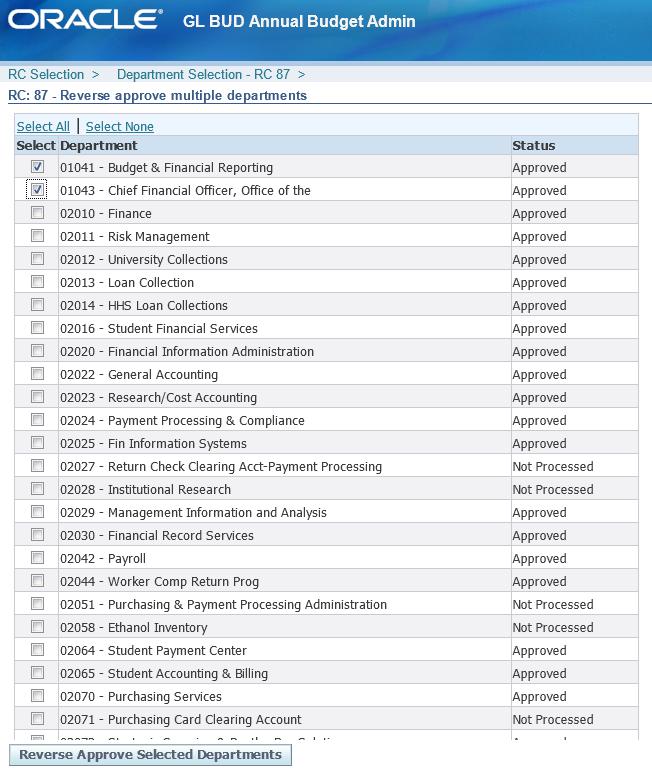
45 Likewise, to reverse the approval of multiple departments, select the Reverse Approval Multiple Depts button: Then check the boxes of the departments for which you want to reverse the approval and select Reverse Approve Selected Departments: 45
46 46

47 Reconciling to the Target Budget There are two screens an RC-level user can use to reconcile their completed budget to their target budget. First is the Department Selection screen: o The RC Total by User row summarizes the total entered and saved OP revenues and expenses, FA expenses, AUX revenues and expenses, and NON-AUX revenues and expenses (for an RC-Level User, this row will include all departments for the RC; for a Department User, this screen will only show the RC Total by User, and not the RC Target Total and Difference to Explain rows). o RC Target Total represents the RC s target budgets for OP revenues (per target letter Exhibit B), OP expenses (per target letter Exhibit A) and FA expenses (per target letter Exhibit E). Note that target budgets are not given for AUX and NON-AUX account types, as they are required to budget equal revenues and expenses. o The resulting difference to explain. This view can also be used during the process of completing your budget, helping you track where you are in relation to your target budget, and ensuring that AUX and NON-AUX revenues and expenses balance. The Export to XLS SUM button (circled in red above) will export the data to Excel, although the RC Total, RC Target Total and Difference to Explain rows will not be included in the exported data. 47

48 The Print button can be used to print a hard copy of the screen (looks best in landscape orientation), or save it as a PDF file if the version of Office you are using offers that as an option. RCs are not required to print this screen or submit anything further to B&FR regarding this screen. Second is the Reconciliation screen, which is applicable only to OP accounts, and is accessed by selecting the RC Recon button on the Department Selection screen (circled in blue above). The Reconciliation screen appears as follows: On this screen: o Line 1 summarizes what the RC has input in its to-be-submitted budget for all OP departments (entity 02, purpose ID 00000) within an RC in expense categories as follows: 48
49 Column Heading Summarizes Subcodes Faculty salary Non-faculty salary , except 56xx, 5880 Faculty/Non-faculty Fringe benefits 59xx, except 5911, 5913 GSA/TA/TF Salary GS/TA/TF Fringe benefits 5911, 5913 Other costs , except cost recovery Cost recovery 5880, (see page 5) o Line 2 displays the RC s to-be-submitted expense budget, excluding cost recovery and income-based accounts (note the RC must perform the steps described below to obtain the proper total here); o Line 3 displays the RC s target expense budget excluding cost-recovery and income-based accounts (will already be populated, and will tie to Exhibit A of your target letter); o Line 4 calculates the difference between lines 2 and 3, which needs to be explained in the Comments section; o Line 5 displays the RC s target revenue budget (will already be populated, and will tie to Exhibit B of your target letter); o Line 6 displays the RC s to-be-submitted revenue budget; and o Line 7 calculates the difference between lines 5 and 6, which needs to be explained in the Comments section. To get from Line 1 to Line 2, use the Add New Line button for each department that is fully or partially cost recovered, or is an income-based account. The system will refresh the screen and display a blank line, as shown under Partially Cost Recovered Accounts above. Enter the account number (02.xxxx) and description in the first field, then tab through the columns and enter the appropriate figures (without commas) in the appropriate column to allocate your cost recovery across cost categories. You can choose to save after each line or just click Add New Line to add another line. You must save before exiting this screen or you will lose your entries. The system will only recalculate the Total column and lines 2 and 4 when you save your entries. Both the cost recovery column on line 2 and the total column between lines 1 and 2 must be zero. If you have a difference between target and submitted revenue budgets calculated on Line 7, you should have an equal difference on Line 4 (i.e., if you increase or decrease your submitted revenue budget from the target budget on Exhibit B, you should have a corresponding increase or decrease in your submitted expense budget; see area circled in red on the previous page). You 49

50 may have other circumstances affecting Line 4, but a difference calculated on Line 7 should be part of the difference on Line 4. The Comments section is a free form text block that allows a user to enter an explanation up to 10 lines and 2,000 characters long. A completed reconciliation example follows: RCs are not required to print this screen or submit anything further to B&FR regarding this screen, although you may use the Print button to print a copy for your records (looks best if set to landscape print orientation). Note that Kristin Gusten and Shari Manges have read-only access to RCs that report to the Provost and Rich Henderson has read-only access to RCs that report to the Senior Vice Chancellor, Health Sciences, so the only further action needed for these areas is notifying Kristin and Shari or Rich that your budget is complete and submitted to B&FR. Marking Your RC s Budget as Submitted Once your RC s budget is complete and reconciled to your target budget, the Final Approver may submit your RC s budget to B&FR for review by selecting the Submit Budget button on the Department Selection screen. This action will change the status of all departments in your RC to Submitted. Although you may still review the budget information, it can no longer be edited by your RC. Please ensure that you are very confident that your budget is complete and properly reconciled before you submit it. However, if you have an extenuating circumstance and need to make a change to the budget you have already 50
Internet Budgeting Solution Training Guide
 Internet Budgeting Solution Training Guide Table of Contents Introduction... 1 Chapter 1: Chapter 2: Chapter 3: Chapter 4: Chapter 5: Chapter 6: Chapter 7: Appendix Getting Started Objectives & Overview...
Quick Reference Guide: General Budget Change
 Quick Reference Guide: General Budget Change In the USC Kuali system, every type of transaction is created and submitted in the form of an electronic document referred to as an edoc. The Kuali Financial
StuckyNet-Link.NET User Interface Manual
 StuckyNet-Link.NET User Interface Manual Contents Introduction Technical Information General Information Logging In & Out Session Timeout Changing Your Password Working with the Borrowing Base Creating
FMS View Expense Budget Information
 FMS View Expense Budget Information Budget Information Queries To view your operating expense budget (Fund 110) in the Financial Management System (FMS), you create a budget query with specific criteria;
Master User Manual. Last Updated: August, Released concurrently with CDM v.1.0
 Master User Manual Last Updated: August, 2010 Released concurrently with CDM v.1.0 All information in this manual referring to individuals or organizations (names, addresses, company names, telephone numbers,
User Guide to the Budget Process
 User Guide to the Budget Process 2/22/2018 Contents 1. Adaptive Insights... 2 2. Browsers... 2 3. Nomenclature... 2 4. User Security - Roles and Levels... 2 5. Logging into Adaptive Insights... 3 6. Budget
Construction Budget Application Using Procorem
 Construction Budget Application Using Procorem User Guide Updated: August 2, 2018 Trademarked names may appear throughout this document. Rather than list the names and entities that own the trademark or
Banner Finance Self Service Budget Development Training Guide
 Banner Finance Self Service Budget Development Training Guide Table of Contents Introduction and Assistance...3 FOAPAL....4 Accessing Finance Self Service...5 Create a Budget Development Query... 6 Query
Chapter 18. Indebtedness
 Chapter 18 Indebtedness This Page Left Blank Intentionally CTAS User Manual 18-1 Indebtedness: Introduction The Indebtedness Module is designed to track an entity s indebtedness. By entering the principal
Middlebury s Planning
 and Budgeting Cloud Services (PBCS): Middlebury s Planning Last update: 1/19/2016, Version 4 Table of Contents Introduction to Planning:... 3 Middlebury's Planning: Logging-In.. 5 Planning Administration:..7
BUDGET PREPARATION & MAINTENANCE SYSTEM EXPERIENCED USER MANUAL FY 2019 WORKING BUDGET
 BUDGET PREPARATION & MAINTENANCE SYSTEM EXPERIENCED USER MANUAL FY 2019 WORKING BUDGET Office of the Vice President Administration & Finance UNIVERSITY OF MARYLAND OFFICE OF THE VICE PRESIDENT-ADMINSTRATION
Budget - By Salesperson
 Budget - By Salesperson Entering a budget is easy. Follow these five steps to get started. Version 2013.12.21.01 1 Create a template. Before you can enter a budget, you first need to create a template.
Introduction to Client Online
 Introduction to Client Online Trade Finance Guide TradeFinanceNewClientsV2Sept15 Contents Introduction 3 Welcome to your introduction to Client Online 3 If you have any questions 3 Logging In 4 Welcome
BEx Analyzer (Business Explorer Analyzer)
") BEx Analyzer (Business Explorer Analyzer) Purpose These instructions describe how to use the BEx Analyzer, which is utilized during budget development by account managers, deans, directors, vice presidents,
BEx Analyzer (Business Explorer Analyzer) Purpose These instructions describe how to use the BEx Analyzer, which is utilized during budget development by account managers, deans, directors, vice presidents,
Certifying Mortgages for Freddie Mac. User Guide
 Certifying Mortgages for Freddie Mac User Guide December 2017 The Freddie Mac Single-Family Seller/Servicer (Guide) requires a Seller/Servicer selling Mortgages to Freddie Mac to forward the Notes, assignments
BBPadmin s WebCOBRA On Demand Employer User s Guide. BBPadmin s Employer User s Guide to
 BBPadmin s Employer User s Guide to 1 Table of Contents Introduction to Employers... 5 Chapter 1: Getting Started... 6 Purpose of WebCOBRA... 6 For Employers... 6 For Participants... 6 Getting Started
Bank Reconciliation Processing SYSTEM ADMINISTRATION AND PROCESSING GUIDE. Last revised: 8/19/10 12:22 PM
 Bank Reconciliation Processing SYSTEM ADMINISTRATION AND PROCESSING GUIDE Last revised: 8/19/10 12:22 PM New World Systems 1 CONTENTS Contents... 1 Introduction... 3 System Administrator Guide... 4 Company
Financial Edge (FE) Instructions
 Instructions") Financial Edge (FE) Instructions Welcome to the CU Foundation s accounting system! Please report any issues or make suggestions to accounting@cufund.org. Step 1: Password Set up and Change at the Manage
Financial Edge (FE) Instructions Welcome to the CU Foundation s accounting system! Please report any issues or make suggestions to accounting@cufund.org. Step 1: Password Set up and Change at the Manage
DUS DocWay TM Loan Documents User Guide. January 2019
 DUS DocWay TM Loan Documents User Guide January 2019 Table of Contents Getting Started with DUS DocWay... 1 Welcome Page Navigation... 3 Loan Documents Navigation... 6 Update Document Category and Type...
2014 EMPLOYEE SELF SERVICE GUIDE
 2014 EMPLOYEE SELF SERVICE GUIDE CONTENTS Click any topic below to go directly to that page. HOW TO USE SELF SERVICE 1.1 How to Access, Log In and Navigate Employee Self Service BENEFITS 2.1 Enrollment
BudgetPak User Guide FY1718
 BudgetPak User Guide FY1718 Contents Overview... 2 About Your FY1718 Budget... 2 Logging In to BudgetPak... 3 Reviewing Current and Historical Budget and Actual Information... 4 Creating Your FY1718 Budget...
Using My Budget on the My.luther Website
 Using My Budget on the My.luther Website What is My.luther? Where to Find Instructions on: Logging on Page 1 Account selection Page 3 Specified date range Page 7 Add l account selections Page 8 Saving
BUDGET PREPARATION & MAINTENANCE SYSTEM TRAINING AND USER MANUAL FY 2012 WORKING BUDGET
 BUDGET PREPARATION & MAINTENANCE SYSTEM TRAINING AND USER MANUAL FY 2012 WORKING BUDGET Office of the Vice President Administrative Affairs UNIVERSITY OF MARYLAND OFFICE OF THE VICE PRESIDENT-ADMINISTRATIVE
14. Roster Processing
 14. Roster Processing Plan processing Roster processing Roster processing roster list You can create rosters by entering data manually or by using the file import capability. If you want to create the
Introduction to Client Online
 Introduction to Client Online Bibby Factors International Guide 1 InternationalFactoringNewClientBibbyUKopsSept15 Introduction 3 Logging In 5 Welcome Screen 6 Navigation 7 Viewing Your Account 9 Invoice
Introduction to Client Online
 Introduction to Client Online Construction Finance Guide ConstructionFinanceNewClientsV2Sept15 Contents Introduction 3 Welcome to your introduction to Client Online 3 If you have any questions 3 Logging
Contents. Introduction
 Getting Started Introduction O&M Profiler User Guide (v6) Contents Contents... 1 Introduction... 2 Logging In... 2 Messages... 3 Options... 4 Help... 4 Home Screen... 5 System Navigation... 5 Dashboard...
Web-Based Budgeting Departmental User Manual
 North Dakota State University Web-Based Budgeting Departmental User Manual PeopleSoft Web-Based Budgeting (WBB) 4-18-2018 Web Based Budgeting Departmental Operating Budget Entry for Non-Appropriated Funds
ORACLE HYPERION PLANNING USER TRAINING
 ORACLE HYPERION PLANNING USER TRAINING University of North Texas Page 1 of 35 TABLE OF CONTENTS I. INTRODUCTION... 3 A. Hyperion Terminology... 3 B. Chartfields... 3 II. INTRODUCTION TO HYPERION PLANNING...
TRAVEL PORTAL INSTRUCTIONS
 TRAVEL PORTAL INSTRUCTIONS Date: June 22, 2018 Version: Version 3.1 Prepared By: Berkley Canada Table of Contents 1 ACCESSING THE PORTAL... 3 1.1 LOGIN & LOGOUT... 3 1.2 RESET YOUR PASSWORD... 3 2 THE
Medical School Revenue & Expense Budgeting Model Overview September, 2013
 Medical School Revenue & Expense Budgeting Model Overview September, 2013 Important Note: This guide is designed for those users who have knowledge of the prior year s budgeting models. If you are a brand
SMHS/SPHHS Budget Development Application User Guide Original 12/07/2006 Updated 01/28/2014
 SMHS/SPHHS Budget Development Application User Guide Original 12/07/2006 Updated 01/28/2014 Table of Contents Logging On... 3 Navigating the Budget Worksheet... 4 Navigating to other Fund Centers... 5
Brown University Tidemark Users Guide
 Brown University Tidemark Users Guide Updated March 26, 2015 Table of Contents Tidemark Overview... 2 What is Tidemark?... 2 Logging In and Out of Tidemark... 2 Panels... 2 Panel Layout... 3 Data Slice
Sage Bank Services User's Guide. May 2017
 Sage 300 2018 Bank Services User's Guide May 2017 This is a publication of Sage Software, Inc. 2017 The Sage Group plc or its licensors. All rights reserved. Sage, Sage logos, and Sage product and service
Sage Tax Services User's Guide
 Sage 300 2017 Tax Services User's Guide This is a publication of Sage Software, Inc. Copyright 2016. Sage Software, Inc. All rights reserved. Sage, the Sage logos, and the Sage product and service names
Salary Planner and Budget Development Manual
 UNIVERSITY OF OREGON Salary Planner and Budget Development Manual FY18 Budget and Resource Planning 2/1/2017 Table of Contents FY18 BUDGET PROCESS TRAINING... 2 Overview... 2 Security/access... 2 Chart
Advanced Financial Statements
 Sage 100 Fund Accounting Advanced Financial Statements STUDENT WORKBOOK SAGE LEARNING SERVICES Important Notice: Authentic Sage 100 Fund Accounting training guides display a holographic image on the front
Individual Taxpayer Electronic Filing Instructions
 Individual Taxpayer Electronic Filing Instructions Table of Contents INDIVIDUAL TAXPAYER ELECTRONIC FILING OVERVIEW... 3 SUPPORTED BROWSERS... 3 PAGE AND NAVIGATION OVERVIEW... 4 BUTTONS AND ICONS... 5
FMS Account Summary Inquiry View Budget Information
 FMS Account Summary Inquiry View Budget Information Account Summary Inquiry The Account Summary Inquiry (ASI) in our Financial Management System (FMS) displays budget, expenditure, encumbrance, and available
Salary Planner and Budget Development Manual
 UNIVERSITY OF OREGON Salary Planner and Budget Development Manual FY17 Budget and Resource Planning 5/4/2016 Table of Contents FY17 BUDGET PROCESS TRAINING... 2 Overview... 2 Security/access... 2 Chart
Chapter 13 Bank Reconciliations
 Chapter 13 Bank Reconciliations The Bank Reconciliation module of school cash allows Treasurers to quickly perform bank reconciliations and print month end reports for the Principal s review and approval.
Fundriver Reporting For Departmental Users
 For Departmental Users For Departmental Users Accessing Fundriver... 1 Fund Summary Screen... 1 Selecting a Fund... 1 Fund Drop Down List... 2 Find Button... 2 Fund Summary Data... 4 General Information...
Fiscal Closing Methods Summary
 Fiscal Closing Methods Summary Update 1/27/2017 FALSC 1 What is Fiscal Close? In general terms, Fiscal Closing is the process of closing one set of financial books at the end of the current fiscal year
Finance Self Service Financial Systems
 Finance Self Service Financial Systems Finance Self Service Financial Systems 2008 University of North Florida Center for Professional Development & Training 1 UNF Drive, Jacksonville, Fl 32224 904.620.1707
Dartmouth College. Fundriver Training. For. Development and Stewardship Staff
 Dartmouth College Fundriver Training For Development and Stewardship Staff For Development and Stewardship Staff I N D E X What is Fundriver... 1 Accessing Fundriver... 1 Signing In... 3 Information on
BUDGET CALL Training Manual
 2018-19 BUDGET CALL Training Manual Finance Department November 2017 This document is also available online at www.yorku.ca/finance/ TABLE OF CONTENTS Introduction... 2 Budget Call Communication... 2 Budget
BUDGET CALL Quick Reference Training Guide
 2018-19 BUDGET CALL Quick Reference Training Guide Finance Department November 2017 This document is also available online at www.yorku.ca/finance/ TABLE OF CONTENTS Introduction... 2 Budget Call Communication...
Accessing Lawson Self-Services
 Accessing Lawson Self-Services Contents Lawson Self-Service Access 3 Signing into Lawson 4 Switching between modules 4 Accessing your pay remittances 4 Updating your direct deposit 5 Updating your tax
BUDGET DEVELOPMENT INSTRUCTION MANUAL
 BUDGET DEVELOPMENT INSTRUCTION MANUAL 1 Budget Office Adminstration Bldg Sam Houston State University March, 2015 Table of Contents Item Page Budget Process System Overview 3 Budget Reports 9 Salary Planner
ELECTRONIC BILL PAYMENT OVERVIEW
 ELECTRONIC BILL PAYMENT Our online electronic bill payment system allows you to pay bills through our secure Internet server. You may schedule a payment; schedule recurring payments to be issued automatically;
P&C Rate Data Collection and Management System. PCRDCMS Rate Collection User Manual
 State of Florida Department of Financial Services Office of Insurance Regulation P&C Rate Data Collection and Management System (PCRDCMS) PCRDCMS Rate Collection User Manual Author: Vendor: Version: Jon
BudgetPak Getting Started Guide for Users
 BudgetPak Getting Started Guide for Users Overview This Getting Started Guide contains instructions for how to complete your FY2016 Budget. BudgetPak supports several levels of users. In your budget there
Standard Accounts User Guide
 Standard Accounts User Guide v. 8.1, Windows February 2016 Table of Contents Table of Contents INTRODUCTION... 4 Installation and Starting of Standard Accounts... 4 Starting Standard Accounts for the first
Fundriver Reporting For Departments and Schools
 For Departments and Schools For Departments and Schools Accessing Fundriver... 1 Fund Summary Screen... 1 Selecting a Fund... 1 Fund Drop Down List... 2 Find Button... 2 Fund Summary Data... 4 General
BUDGET PREPARATION & MAINTENANCE SYSTEM NEW USER MANUAL FY 2018 WORKING BUDGET
 BUDGET PREPARATION & MAINTENANCE SYSTEM NEW USER MANUAL FY 2018 WORKING BUDGET Office of the Vice President Administration & Finance UNIVERSITY OF MARYLAND OFFICE OF THE VICE PRESIDENT-ADMINSTRATION &
Sage Bank Services User's Guide
 Sage 300 2017 Bank Services User's Guide This is a publication of Sage Software, Inc. Copyright 2016. Sage Software, Inc. All rights reserved. Sage, the Sage logos, and the Sage product and service names
IPO VITAL SIGNS. Participant Training Guide
 IPO VITAL SIGNS http://ipovitalsigns.com February, 2008 Table of Contents Introduction...2 Course Objectives...2 IPO Vital Signs Login...3 Search IPO Vital Signs...4 Using the IPO Process for Law Firms
Navigating Bill It Now
 Version 3 9/16/2011 Navigating Bill It Now Using your internet browser, go to www.billitnow.com Click on the Log In link located at the top right hand corner of the screen to display the BMS Login Screen,
Maintaining Budget Change Requests
 Maintaining Budget Change Requests This document describes the functions used in TEAMS to enter and approve requests to move funds from one General Ledger account to another. In this document: Request
USU Budget Process FAQ
 USU Budget Process FAQ Web Resources Budget Process Tips - Why? - The data in production Banner and Salary Planner are independent. - Will I see the new year budget before it goes into effect? - How are
FSG Department User Student Guide
 Student Guide Copyright University of Pittsburgh. All rights reserved Table of Contents 1 7/13/2004 12:25 PM Table of Contents Oracle Financial Statement Generator Reports...1-1 General Description of
MUNSOFT 5.2 INCOME: SUNDRY DEBTORS MANUAL. Y Walters B.Sc. (Math Science) Hons
 Hons") MUNSOFT 5.2 INCOME: SUNDRY DEBTORS MANUAL 1 Y Walters B.Sc. (Math Science) Hons SUNDRY DEBTORS... 4 Enquiries... 4 Sundry Enquiries... 4 Account Search... 5 Master Files... 6 Account Master... 6 Account
MUNSOFT 5.2 INCOME: SUNDRY DEBTORS MANUAL 1 Y Walters B.Sc. (Math Science) Hons SUNDRY DEBTORS... 4 Enquiries... 4 Sundry Enquiries... 4 Account Search... 5 Master Files... 6 Account Master... 6 Account
Account Reconciliation Reports
 Account Reconciliation Reports Agenda Navigate to Reconciliation Reports Create Reports and enter report options Submit Reconciliation Reports Select and review Summary Financial Report Select and review
GREAT BASIN COLLEGE PURCHASING CARD PROGRAM PAYMENTNET CARDHOLDER GUIDE
 GREAT BASIN COLLEGE PURCHASING CARD PROGRAM PAYMENTNET CARDHOLDER GUIDE July 26, 2010 GBC PaymentNet Cardholder Guide July 2010 1 Table of Contents Logging into PaymentNet... 3 Changing Pass Phrase (password)...
UCAA Expansion Application Insurer User Guide December 2017
 UCAA Expansion Application Insurer User Guide December 2017 2017 National Association of Insurance Commissioners All rights reserved. Revised Edition National Association of Insurance Commissioners NAIC
THE UNIVERSITY OF IOWA BUDGET AND SALARY PLANNING APPLICATION
 THE UNIVERSITY OF IOWA BUDGET AND SALARY PLANNING APPLICATION TABLE OF CONTENTS Login / Access Rights 2 Main Menu 3 Filled Positions Entering Salary Data 4 Master File Key (MFK) Information 5 Increases/User
PROFITstar November PROFITstar Budget Manager Reference Guide. Hosted Version
 Table of Contents Welcome to Budget Manager... 1 Budget Administrators... 2 Prerequisites for Completing a Budget... 2 Exporting Data... 2 User Setup and Permissions... 4 Fixed Asset Setup...10 Open Budget
Nexsure Training Manual - Accounting. Chapter 16
 Nexsure Training Manual - Accounting Month-End Review In This Chapter Overview Analyzing Month-End Financial Reports Month-End Accounting & Management Reports Month-End Balancing Month-End Corrections
Training Guide Budgeting. v. April 2017
 Training Guide Budgeting v. April 2017 Table of Contents 1. System Navigation... 3 a. Logging into uplan... 3 b. Setting User Preferences... 4 c. Navigation Flows... 5 i. Changing Chartfield Intersection...
Medical School Revenue & Expense Budgeting Model Overview October, 2012
 Medical School Revenue & Expense Budgeting Model Overview October, 2012 Important Note: This guide is designed for those users who have knowledge of the prior year s budgeting models. If you are a brand
User guide for employers not using our system for assessment
 For scheme administrators User guide for employers not using our system for assessment Workplace pensions CONTENTS Welcome... 6 Getting started... 8 The dashboard... 9 Import data... 10 How to import a
SAS2000. Financial 2. Training Manual
 SAS2000 Financial 2 Training Manual Tribal SchoolEdge Level 1, 17 Madden Grove RICHMOND VIC 3121 Support Centre: Web: https://support.schooledge.com.au/ Email: support.schooledge@tribalgroup.com Tel: 1300
Dartmouth College. Fundriver Training. For. Departmental Financial Officers. Access and Reporting
 Dartmouth College Fundriver Training For Departmental Financial Officers Access and Reporting Fundriver Access and Reporting For Departmental Financial Officers I N D E X What is Fundriver... 1 Accessing
Business Intelligence (BI) Budget Reports Training Manual
 Budget Reports Training Manual") Business Intelligence (BI) Budget Reports Training Manual Topic Page Initial Setup 2 BI Login 3 Running BI Reports 4 Personalization 5 Understanding Report Content 7 Basic Navigation / Toolbar Legend 13
Business Intelligence (BI) Budget Reports Training Manual Topic Page Initial Setup 2 BI Login 3 Running BI Reports 4 Personalization 5 Understanding Report Content 7 Basic Navigation / Toolbar Legend 13
Benefit Elections Guide
 Benefit Elections Guide Revised: October 2017 Workday version 29 Note: Workday provides two updates per year and there may be slight differences between the screen shots in this guide and the actual Production
Multifamily Securities Investor Access Desk Reference Manual
 Multifamily Securities Investor Access Manual February 2013 Contents 1 Application Overview... 3 2 Minimum Browser Requirements... 3 3 Contacting Investor Access Tool Administrator... 3 4 Accessing and
Central Budget Entry Munis - Financials: Central Budget Entry
 MU-FN-8-F, MU-FN-14-C Central Budget Entry Munis - Financials: Central Budget Entry CLASS DESCRIPTION This class will provide an overview of the Central Budget Entry program that is new to Munis version
Margin Direct User Guide
 Version 2.0 xx August 2016 Legal Notices No part of this document may be copied, reproduced or translated without the prior written consent of ION Trading UK Limited. ION Trading UK Limited 2016. All Rights
Plan Access ABA-RF Guide
 Plan Access ABA-RF Guide September 1, 2014 Copyright Copyright 2009, 2014 Voya Institutional Plan Services, LLC All rights reserved. No part of this work may be produced or used i4 any form or by any means
Reference Guide. Sales and Use Tax e-services Webinar January 2018
 Reference Guide Sales and Use Tax e-services Webinar January 2018 This course is a live demonstration of e-services related to Minnesota sales and use tax. The webinar is designed for e- Services users
Perform this procedure to plan adjustments to the unrestricted budget either during the Annual Development or during a Quarterly Confirmation cycle.
 Introduction Process and Trigger Perform this procedure to plan adjustments to the unrestricted budget either during the Annual Development or during a Quarterly Confirmation cycle. Prerequisites Budget
Product Eligibility and Pricing Services. Loan Originator User Guide
 Product Eligibility and Pricing Services Loan Originator User Guide Table of Contents Table of Contents Log In... 1 Enter New Loan Data... 1 Evaluate Products... 6 Analyze Search Results... 6 Update Search
Vivid Reports 2.0 Budget User Guide
 B R I S C O E S O L U T I O N S Vivid Reports 2.0 Budget User Guide Briscoe Solutions Inc PO BOX 2003 Station Main Winnipeg, MB R3C 3R3 Phone 204.975.9409 Toll Free 1.866.484.8778 Copyright 2009-2014 Briscoe
MARATHON FINANCIAL ACCOUNTING END OF CALENDAR YEAR
 The following instructions will guide you through the end of a calendar year process. This process includes steps for W-2 Forms, Electronic W-2 Filing, Clear Calendar Year to Date Totals, Tax Table updates
University of Rhode Island PeopleSoft Grants 9.1
 University of Rhode Island PeopleSoft Grants 9.1 Grants Portal User Procedures Table of Contents Overview... 2 Award Information... 2 Project Information... 5 Transaction Inquiries... 7 Accessing Attachments...
~FY18~ STOP SLOW IFAS INSTRUCTIONS. Budget Preparation RED X STOP! YELLOW DOT Caution or warning. GREEN CHECK MARK GO!! Record Accepted!
 I02 Budget Preparation Guide Office of Finance ~FY18~ Budget Preparation IFAS INSTRUCTIONS STOP RED X STOP! Your record has not been accepted due to error(s). You must correct the error(s) and hit enter
2018 IRS ACA Reporting Completing Your Confirmation Page
 Revised Oct. 23, 2018 2018 IRS ACA Reporting Completing Your Confirmation Page SB-25770-XXXX Need Help? You are welcome to call your consultant with any questions at 800-654-8489 and their extension: Kim
FINANCIAL FORECAST Guideline and Training Manual
 FINANCIAL FORECAST Guideline and Training Manual Financial Reporting Department This document is also available online at www.yorku.ca/finance/documents.htm Table of Contents Definition of a Forecast...
UNIVERSITY OF GHANA OFFICE OF RESEARCH, INNOVATION AND DEVELOPMENT (ORID) Grant Application Guide
 Grant Application Guide") UNIVERSITY OF GHANA OFFICE OF RESEARCH, INNOVATION AND DEVELOPMENT (ORID) Grant Application Guide Step 1: Login Process 1. Visit the UG-Research Management Application Portal (UG-ReMAP) to initiate your
UNIVERSITY OF GHANA OFFICE OF RESEARCH, INNOVATION AND DEVELOPMENT (ORID) Grant Application Guide Step 1: Login Process 1. Visit the UG-Research Management Application Portal (UG-ReMAP) to initiate your
Eastern Kentucky University Banner Self-Serve Budget Development Training Manual
 Eastern Kentucky University Banner Self-Serve Budget Development May 25, 2007 Revision 1 Table of Content Introduction to Finance Budget Development... 3 Accessing Finance Self-Serve Budget Development...
DALHOUSIE UNIVERSITY FINANCIAL SERVICES
 DALHOUSIE UNIVERSITY FINANCIAL SERVICES Table of Contents Overview... 3 Web Address... 3 Parameters for Budget Queries... 9 Budget Status by Account... 10 Creating a Query by Account... 11 Budget Query
BudgetPak User Guide. Lewis & Clark College. October 2016
 BudgetPak User Guide Lewis & Clark College October 2016 Contents Overview... 2 Definitions and Set Up... 2 Logging In to BudgetPak... 3 Reviewing Current and Historical Budget and Actual Information...
Budget Development in BannerWeb
 Budget Development in BannerWeb BannerWeb can be accessed directly from the Middlebury College and MIIS homepages, which bring you first to Banner Self-Service. Or from your web browser, type go/bw. Login
Seventh-day Adventist Church (SPD) Limited. The New Online SPD Tithes & Offerings Reporting System. Training Manual
 Limited. The New Online SPD Tithes & Offerings Reporting System. Training Manual") Seventh-day Adventist Church (SPD) Limited The New Online SPD Tithes & Offerings Reporting System Training Manual Local Church Treasurers & Assistants Page 2 of 35 Version 1.1 Authorised By: Table of Contents
Seventh-day Adventist Church (SPD) Limited The New Online SPD Tithes & Offerings Reporting System Training Manual Local Church Treasurers & Assistants Page 2 of 35 Version 1.1 Authorised By: Table of Contents
For Lenders. Accessing LOS: LOS is a web based program that can be accessed at the following URL address: https://los.chfa.org/los
 Accessing LOS: LOS is a web based program that can be accessed at the following URL address: https://los.chfa.org/los A User ID and Password will be assigned to all users by the designated account administrator
STUDY PLANNER STUDENT SUPPORT GUIDE
 GLOBAL MOBILITY STUDY PLANNER STUDENT SUPPORT GUIDE Table of Contents Summary of Subject Approval Process... 3 Getting Started... 4 Student Homepage... 5 Creating a Draft Exchange Plan... 6 Exchange Plan
CitiDirect WorldLink Payment Services
 CitiDirect WorldLink Payment Services User Guide June 2009 3 Contents Overview 2 Additional Resources 2 Basics Guides 2 Online Help 2 CitiDirect Customer Support 2 Sign on to CitiDirect Online Banking
Frank Winston Crum Billing Quick Reference Guide. Version 3 9/16/2011
 Frank Winston Crum Billing Quick Reference Guide Version 3 9/16/2011 Navigating Bill It Now Using your internet browser, go to www.billitnow.com Click on the Log In link located at the top right hand corner
Chapter 6. Cash Control
 Chapter 6 Cash Control This Page Left Blank Intentionally CTAS User Manual 6-1 Cash Control: Introduction The Cash Control section allows you to enter the beginning balances for the fiscal year. This section
v.5 Financial Reports Features & Options (Course V46)
") v.5 Financial Reports Features & Options (Course V46) Presented by: Ben Lane Shelby Senior Staff Trainer 2017 Shelby Systems, Inc. Other brand and product names are trademarks or registered trademarks
v.5 Financial Reports Features & Options (Course V46) Presented by: Ben Lane Shelby Senior Staff Trainer 2017 Shelby Systems, Inc. Other brand and product names are trademarks or registered trademarks