IRAdirect User Guide Fully-Administered Program
|
|
|
- Pamela McKinney
- 6 years ago
- Views:
Transcription

1 IRAdirect User Guide Fully-Administered Program
2 It is understood that the publisher is not engaged in rendering legal or accounting services. Every effort has been made to ensure the accuracy of the material presented within the manual. But retirement plan forms, government regulatory positions, and laws are subject to change, so we cannot guarantee the accuracy of the material. The material in this manual reflects the law and regulatory interpretations as of the publication date of December Much of the information contained in this manual is based on the operation of the financial organizations to which we provide services. Some of your procedures may vary if your organization is not a member organization served by us. Ascensus makes no representations regarding compliance of the manual with any state laws, state regulations, or federal securities law Ascensus, Inc. All Rights Reserved. This material may not be reproduced in whole or in part in any form or means without written permission from the publisher. Printed in the United States of America. Ascensus and the Ascensus logo are registered trademarks of Ascensus, Inc. IRAdirect, Retirement Central, and Simplifier are registered trademarks of Ascensus, Inc. Internet Explorer is either a registered trademark or trademark of Microsoft Corporation in the United States and/or other countries. Adobe Reader is either a registered trademark or trademark of Adobe Systems Incorporated in the United States and/or other countries. 2
3 TABLE OF CONTENTS GETTING STARTED Supported Browsers Enabling Cookies Plug-In Requirements INTRODUCTION Our Role Your Responsibility System Availability NAVIGATION IRAdirect Home Link and Breadcrumbs Financial Organization Identification Search Main Body Pending Action Reminders User Identification and Logout Calendar The Link Newsletter eresource Center Frequently Asked Questions Contact Us User Guide & Manuals IRAdirect Training Videos FORMS
4 Application Completing the Form Wizard Signing the Form Printing and Saving the Form Beneficiary Designation/Change Completing the Form Wizard Printing and Saving the Form Change Notice Completing the Form Wizard Printing and Saving the Form Contribution Completing the Form Wizard Printing and Saving the Form Death Notice Completing the Form Wizard Printing and Saving the Form Direct Transfer Instructions Request Completing the Form Wizard Printing and Saving the Form Incoming Beneficiary Account Transfer Completing the Form Wizard Printing and Saving the Form Post 70½ Periodic Payment Completing the Form Wizard Printing and Saving the Form Pre 70½ Periodic Payment Completing the Form Wizard Printing and Saving the Form Traditional IRA Periodic Payment Change Completing the Form Wizard
5 Printing and Saving the Form Withdrawal Completing the Form Wizard Printing and Saving the Form Conversions With Withholding Electronic Signatures Electronically Signing Documents Attaching Additional Documents Archiving Signed Documents Blank Forms Getting Started Saving Forms CALCULATORS Financial Disclosure Instructions Income Attributable Post 70½ REPORTS AND QUEUES General and Ad Hoc Reports Account Owner List Fair Market Value Contributions Withdrawals Death Claim Status Report User Activity Report Periodic Payment List Periodic Payment Distribution Report (historical) Verification Reports Account Owners Over 70.5/71.5 Scheduled Payment Status Report
6 Tax Reporting Summaries Information Reports R Totals Report Replacement RMD Notifications Sample IRA Owner Notifications Billing Report Approve Forms From General Users Instructions Approve Forms From Owners View Pending Signatures MAINTENANCE TOOLS Investment Maintenance Instructions Adding an Investment Changing the Investment Terms Changing an Investment Deleting an Investment Viewing the Investment Table Transfer Files General Upload General Download My Services TAX REPORTING Upload Tax Files Tips for Uploading Tax Files File Upload Tax Reporting Error Queue Tax Reporting Warnings etax Owner Settings
7 etax State Settings Download etax Forms Tax File Creation Previous Year Forms FINANCIAL ORGANIZATION INFORMATION Overview Programs Details General Details Contacts Details Address Details Reporting Details Summary Details OWNER INFORMATION Account Owner General Information Details Creating Accounts and Deleting Owners Comments Reading Comments Entering and Saving Comments Primary Categories Secondary Categories Record Retention
8 ACCOUNT INFORMATION Account Instructions Account Info Traditional IRA Info Reporting Options Create Contribution Create Withdrawal Delete Account Beneficiaries Periodic Payment Election Details Periodic Payment Calculation FMV Dates Prior Balances Current Balances Current Hard-To-Value Assets Making Corrections Withdrawal Creating a Withdrawal Deleting a Withdrawal Correcting a Withdrawal Annual Withdrawal Roll Up Contribution Creating a Contribution Deleting a Contribution Correcting a Contribution Annual Contribution Roll Up Death Claim
9 Beneficiaries TAX FORMS FMV/RMD Statement Navigation Details Correcting FMV/RMD Statements Duplicate FMV/RMD Statements Printing a Duplicate FMV/RMD Statement at Your Financial Organization Requesting a Duplicate FMV/RMD Statement for the Account Owner R Form Navigation Correcting Forms 1099-R Duplicate Tax Forms Printing a Duplicate Tax Form at Your Financial Organization Requesting a Duplicate Tax Form for the Account Owner Q Form Navigation Correcting Forms 1099-Q Duplicate Tax Forms Printing a Duplicate Tax Form at Your Financial Organization Requesting a Duplicate Tax Form for the Designated Beneficiary SA Form Navigation Correcting Forms 1099-SA Duplicate Tax Forms Printing a Duplicate Tax Form at Your Financial Organization Requesting a Duplicate Tax Form for the Account Owner Form Navigation Correcting Forms
10 Duplicate Tax Forms Printing a Duplicate Tax Form at Your Financial Organization Requesting a Duplicate Tax Form for the Account Owner SA Form Navigation Correcting Forms 5498-SA Duplicate Tax Forms Printing a Duplicate Tax Form at Your Financial Organization Requesting a Duplicate Tax Form for the Account Owner ESA Form Navigation Correcting Forms 5498-ESA Duplicate Tax Forms Printing a Duplicate Tax Form at Your Financial Organization Requesting a Duplicate Tax Form for the Designated Beneficiary APPENDIX Appendix A Glossary Appendix B IRAdirect Roles TECHNICAL SUPPORT
11 GETTING STARTED IRAdirect is designed to work with the following computer software components. Supported Browsers For best results, Ascensus supports Internet Explorer 11. To download the current version, go to Be aware that versions older than Internet Explorer 11 are no longer supported by Microsoft. Enabling Cookies IRAdirect tracks site activity through the use of session cookies. For the site to function properly, you must have your browser set to allow session cookies. For more information about enabling cookies in your browser, please visit the browser manufacturer s website. Plug-In Requirements Adobe Reader is used for viewing and printing Portable Document Files (PDF) generated within the site. To download the current version, go to 11
12 INTRODUCTION IRAdirect is a web-based application that enables users to enter and save financial organization information (depending upon the user s assigned role), view account transactions, submit tax reporting data, access up-to-date forms, and much more. With IRAdirect, you have a real-time connection to the Ascensus system. This direct access means that important financial organization information and account owner information is within reach whenever you need it. Because your financial organization is on our Fully-Administered Program, Ascensus is responsible for some of the operations and compliance of your program. The foundation of the Fully-Administered Program is IRAdirect, and this user guide provides the information you need to successfully utilize its features. For compliance information, click the User Guide & Manuals link in the Welcome section of the IRAdirect homepage and then click the applicable manual link under the Technical Reference Manuals section. IRA Compliance IRA Reference Service Coverdell Education Savings Account Compliance & Operations Health Savings Account Compliance & Operations Our Role Our role is to complete tax reporting and death claim processing for your financial organization s account owners, and to report to the IRS on your behalf. We are also responsible for providing you with the operating materials, program information, training opportunities, and assistance necessary for your staff to help keep your financial organization in compliance with IRS regulations. We cannot give tax advice, but we will always provide you with answers to your compliance questions. Your Responsibility Your financial organization is responsible for providing Ascensus with accurate information, for investing assets according to the instructions of account owners, and for responding to their questions. If annual tax reporting information for your organization is transmitted to us, your IT department or external data processor is responsible for complying with our transmission requirements and for submitting tax reporting data by our communicated deadlines. System Availability IRAdirect is available from 7:00 a.m. to 10:00 p.m. Central Time, Monday through Friday, and from 7:00 a.m. to 6:00 p.m. on Saturday. You will find information about system availability changes in the IRAdirect calendar. 12

13 NAVIGATION When you log into IRAdirect, the first thing you see is the homepage, which provides you with information and productivity tools that can enhance and simplify the management of your program. The homepage consists of five major sections, as illustrated in the sample page below. Details about each section appear on the following page with the corresponding section number. 13
14 1. IRAdirect Home Link and Breadcrumbs Breadcrumbs indicate where you are within IRAdirect. Clicking the IRAdirect Home link will always take you back to the homepage. 2. Financial Organization Identification This section displays your financial organization s name, CID# (Client Identification Number) and administration method. To access the information, click your organization s name in the upper right corner. Refer to the Financial Organization Information section of this guide for an explanation of all the information you can access through the Financial Organization Identification link. 3. Search You may search for an account owner by SSN, Last 4 of SSN, Last Name, Full Name (last, first), or Acct Number to access the account owner s information. IRAdirect employs masking to help ensure the privacy of an account owner s SSN (Social Security number) information. If you search by SSN, bullets appear in the Search field as the information is entered. When the account owner appears in the tree, only the last four digits of the Social Security number are displayed, with the first five digits masked as XXX-XX. If you search by Last 4 of SSN, the four numbers entered in the input field are not masked. When the account owner appears in the tree, only the last four digits of the Social Security number are displayed, with the first five digits masked as XXX-XX. To see the SSN for the account owner, place your cursor in the Social Security Number field on the General screen and click to display the full nine-digit number. To mask the information, click outside of the Social Security Number field. Refer to the Owner Information section of this guide for an explanation of all the information you can access through the Search function. 14
15 4. Main Body This section is used to access all information in IRAdirect other than your financial organization details. The components in the main body of the homepage available to Fully-Administered Program clients are listed below. Welcome Reports and Queues Forms Maintenance Tools Calculators Tax Reporting Pending Action Reminders At the top of the homepage we provide applicable reminders about things such as pending tasks requiring completion (for example, report wizards for tax reporting), or tax information we ve not yet received. Those reminders will continue to appear until the task has been completed, or the outstanding tax reporting information has been received at Ascensus and successfully processed. The following are examples of some of the reminder messages you may see on the homepage. Forms from General Users are waiting for action by an Advanced User Year End FMV Information must be submitted for your financial organization HSA Withdrawal Information must be submitted for your financial organization IRA Contribution Information must be submitted for your financial organization If you see messages that certain tax information must be submitted, it means we have not yet received what we need from you to produce those tax forms for your financial organization s account owners. If messages about tax reporting errors appear, it means you have errors in the Tax Reporting Error Queue. 5. User Identification and Logout You will find your personal security role and a logout link in this section. Security roles are outlined in Appendix B. To exit IRAdirect, click the Logout IRAdirect link beneath your financial organization s name and CID#. IRAdirect will automatically log you off after thirty minutes of inactivity. 15

16 Calendar The Calendar link provides you with access to printable IRAdirect calendars. By referring to the calendar on a weekly basis, you will have a valuable tool that keeps you on track with program-related tasks and deadlines and makes your job easier. For ease of use, the Fully-Administered calendar is provided on a quarterly basis. You will always have access to three quarters current, past, and future. Each calendar quarter is published one month in advance of the start of that quarter. For those who prefer a quick glance at what s ahead, monthly calendar checklists that provide a high level overview are available during the tax season from November through July. Each monthly calendar provides a view of the entire month, with tasks and information items listed on the applicable days. Financial organization actions are indicated with an a for action. The action icon reminds you about what needs to be done and when to keep your program running smoothly, and to ensure deadlines are met. Informational or Ascensus action items are designated with an i. The information icon alerts you to the Ascensus holiday schedules and when our behind-the-scenes programs, jobs, and enhancements affect what you see and do in IRAdirect. 16

17 Here are some examples of the information you will find in your IRAdirect calendar. Ascensus receipt deadlines for your financial organization s tax reporting information Alerts about report availability in IRAdirect Reminders about account maintenance tasks that require staff attention IRAdirect programming notices The Link Newsletter Read all about it! Ascensus The Link is your link to retirement and tax-advantaged savings account news and information. This online newsletter offers the latest operational guidance and compliance updates for IRAs, ESAs, HSAs, and employer-sponsored retirement plans. Easy-to-understand articles explain concepts in detail, using practical examples. Insightful editorials discuss new and pending legislation. Administrative solutions are given special attention in each issue. And, with a word game to test your knowledge, you ll look forward to The Link every month. Click The Link Newsletter on the homepage to access the current issue. 17

18 eresource Center Click the eresource Center link to access our eresource Center where you will find tools that will help you to build your IRA program, stay in compliance with IRS regulations, and increase the knowledge of your financial organization s staff. The eresource Center is comprised of four sections. News & Compliance You can access our newsletter, find the latest Ascensus announcements and cost-of-living adjustments, and obtain our latest technical reference manuals for your IRA, ESA, and HSA programs. Consumer Education & Marketing Materials and ideas to help you promote your program and grow your financial organization s accounts are available here. Quick Links You can access quick links to numerous IRS forms and publications, eliminating the time it takes to search for these documents on your own. Special Requests You can obtain vendor due diligence and an amendment mailing service quote by completing the templates available here. 18

19 Frequently Asked Questions Click the FAQ link on the homepage to view answers to frequently asked questions. Questions and answers on the Frequently Asked Questions page are arranged by category and updated seasonally. Here, you will find answers to questions about tax reporting, IRAdirect, the Security Administrator role, and much more. 19

20 Contact Us Click the Contact Us link to access our telephone numbers, fax numbers, and mailing addresses. User Guide & Manuals Click the User Guide & Manuals link to access this user guide, the User Guide for Security Administrators, and the etax Forms User Guide. If you re looking for compliance guidance, there is a wealth of information available to you by clicking the link to any of the following manuals. IRA Compliance Manual IRA Reference Service Coverdell Education Savings Account (ESA) Manual Health Savings Account (HSA) Manual You may also view printable job aids on this page that list the current cost-of-living adjustments for IRAs, Coverdell ESAs, HSAs, and simplified employee pension (SEP) plans. 20
21 IRAdirect Training Videos Click the IRAdirect Training Videos link in the Welcome section of the homepage to access video tutorials and training aids that cover a variety of topics, including tax reporting and IRAdirect navigation. You will also find training aids and operational tutorials. FORMS Application The New Account Application Wizard is used to establish an owner s account and save it in IRAdirect. Applications (Simplifiers ) can be completed for these account types, as applicable. Traditional IRAs (including dedicated SEP IRAs) Coverdell ESAs Roth IRAs Health Savings Accounts (HSAs) The information fields and menus in each application form wizard that are required to complete the applicable Simplifier are noted with an asterisk (*). Completing the Form Wizard 1. Click the Application link located in the Forms section of the homepage. Enter the account owner s Social Security number in the Social Security Number field and click Search. NOTE: Returning to the IRAdirect homepage before printing the form will erase all information you have entered. When there is at least one existing account in IRAdirect for the Social Security number entered, the account owner s name and date of birth information will appear in those fields on the screen. If the account owner is adding an investment to an existing account type, you will not open a new account in IRAdirect. Instead, click the applicable radio button under this statement: Select an account to contribute to an existing plan. Adding an investment to a plan does not require an application. 21
22 NOTE: Although SIMPLE IRAs may be displayed, transactions for SIMPLE accounts must be added manually to the account owner tree by an Advanced User. 22
23 When there is no existing account in IRAdirect for the Social Security number entered, an error message appears at the top of the screen. Enter the name and date of birth information for the individual in the fields provided. 2. Click the applicable radio button to select the type of account to be created and click Next. 23
24 3. Enter information in the required and applicable fields, make drop-down menu selections, and click the appropriate radio button options. To make a contribution to the new account, click the Yes radio button next to this statement: Does the owner want to make a contribution to this account? To designate beneficiaries for the new account, click the Yes radio button next to this statement: Does the owner want to designate beneficiaries for this account? To indicate that the account contains hard-to-value assets (assets with no readily available fair market value), click the Yes radio button next to this statement: Will this account contain hard-to-value assets? (For more information about hard-to-value assets, click the hard-to-value assets link on the Owner Info screen.) 4. Continue through the New Account Application Wizard by providing the required information on the subsequent screens. 24
25 Designating Beneficiaries The New Account Application Wizard allows you to enter any Primary and Contingent beneficiaries designated by the owner for the new account. If you click the Yes radio button on the Owner Info screen to indicate that the owner wants to designate beneficiaries, the Beneficiary Information screen appears. On the Beneficiary Information screen for the Primary Beneficiary, take these steps. 1. Enter the primary beneficiary s personal information in the boxes provided. 2. Enter the primary beneficiary s address information in the boxes provided. If the beneficiary s address is the same as that for the account owner, click the Copy owner s address check box, which automatically fills the address fields. 3. When all information has been entered, click the Add Beneficiary button. 4. When all primary beneficiaries have been entered, and the owner does not want to designate contingent beneficiaries, click the No radio button next to this statement: Does the owner want to designate contingent beneficiaries for this account? 5. If the owner wants to designate contingent beneficiaries, click the Yes radio button next to this statement: Does the owner want to designate contingent beneficiaries for this account? 25
26 For Coverdell ESA Applications If the account being opened is a Coverdell ESA, the form wizard contains information and address fields for the following individuals. Designated Beneficiary Depositor/Grantor Responsible Individual The designated beneficiary is the child for whom the Coverdell ESA is being established. All reporting for the ESA must be done under the name and Social Security number of the designated beneficiary. The decision of the depositor/grantor about the future status of the responsible individual (after the designated beneficiary reaches the age of majority) must be documented by clicking the applicable radio button. NOTE: If the address information for the depositor/grantor or the responsible individual is the same as that for the designated beneficiary, click the Copy designated beneficiary s address check box, which automatically fills the address fields for those roles. Signing the Form On the Signature Date screen, click the Not Married or Married radio button to indicate the new account owner s marital status and then enter the form signed date in the Account Owner s Signature Date field. If applicable, enter a date in the Spouse Signature Date field. 26
27 Printing and Saving the Form If your organization does not have electronic signatures enabled, take the following steps to print and save the form. If your organization has electronic signature functionality enabled, review the Electronic Signatures section for information about signing, printing, and saving the form. (Speak with an Ascensus Sales Representative if your organization is interested in enabling electronic signature functionality.) 1. Click the applicable Application link to print the form. 2. Have the account owner sign the printed form. 3. Provide the account owner with an Agreement and Disclosure Packet, a Financial Disclosure, and all other disclosures. (The Simplifier includes a disclosure statement.) 4. Click the check box next to this statement: Check this box if the required signatures have been obtained on a printed copy of these documents and you have provided the owner with an IRA Agreement and Disclosure Packet, a Financial Disclosure, and all other financial organization required disclosures. 5. Click the Save button. NOTE: The Save button is not enabled until the check box is clicked. A transaction completed and saved by an Advanced User will apply to IRAdirect. A transaction completed and saved by a General User will move to the Approve Forms From General Users queue to await review and approval by an Advanced User. 27

28 Beneficiary Designation/Change The Beneficiary Designation/Change Wizard is used to document the naming of Primary and Contingent beneficiaries for an owner s account. Beneficiary designations can be completed for these account types, as applicable. Traditional IRAs Coverdell ESAs Roth IRAs Health Savings Accounts (HSAs) The required information fields and menus in the form wizard are noted with an asterisk (*). Completing the Form Wizard Click the Beneficiary Designation/Change link located in the Forms section of the homepage. Enter the account owner s Social Security number in the Social Security Number field and click Search. NOTE: Returning to the IRAdirect homepage before printing the form will erase all information you have entered. When there is at least one existing account in IRAdirect for the Social Security number entered, the account owner s name and date of birth information will appear in those fields on the screen. Click the applicable radio button to select the owner s account type, and then click Next. 28
29 NOTE: Although SIMPLE IRAs may be displayed, transactions for SIMPLE accounts must be completed on a blank IRA Beneficiary Designation form, found under the Blank Forms link on the IRAdirect homepage. Fax the completed form to Ascensus at to be added manually to the account owner tree. Enter information in the required and applicable fields, and make drop-down menu selections. When all information has been entered or selected, click the Add Beneficiary button and click Next. 29
30 After adding primary beneficiaries and clicking Next, click the Yes or No radio button to respond to this question: Does the owner want to designate contingent beneficiaries for this account?* If the Yes radio button is clicked, the Contingent Beneficiary screen appears. Provide the information in the required and applicable fields and make drop-down menu selections. When all information has been entered and selected, click the Add Beneficiary button and click Next. 30
31 The Signature Date page appears. Click the Not Married or Married radio button. Enter the Account Owner s Signature Date, and if applicable, the Spouse Signature Date in the fields provided and click Next. 31

32 Printing and Saving the Form If your organization does not have electronic signatures enabled, take the following steps to print and save the form. If your organization has electronic signature functionality enabled, review the Electronic Signatures section for information about signing, printing, and saving the form. (Speak with an Ascensus Sales Representative if your organization is interested in enabling electronic signature functionality.) 1. Click the Beneficiary Designation link to print the form and have the account owner sign the printed form. (If applicable, have the account owner s spouse also sign the form.) 2. Click the check box next to this statement: Check this box if the account owner has or will have signed the printed copy of the form. 3. Click the Save button. NOTE: The Save button is not enabled until the check box is clicked. A transaction completed and saved by an Advanced User will apply to IRAdirect. A transaction completed and saved by a General User will move to the Approve Forms From General Users queue to await review and approval by an Advanced User. 32
33 Change Notice The Change Notice Wizard is used to make changes to an owner s existing account information. Changes can be made to the following information. Name Date of Birth Address Account Number Social Security Number Account Status The required information fields and menus in the form wizard are noted with an asterisk (*). Completing the Form Wizard Click the Change Notice link in the Forms section of the homepage. Enter the account owner s Social Security number in the Social Security Number field and click Search. NOTE: Returning to the IRAdirect homepage before printing the form will erase all information you have entered. When there is at least one existing account in IRAdirect for the Social Security number entered, the account owner s name and date of birth information will appear in those fields on the screen. Click the applicable radio button to select the owner s account type, and then click Next. 33
34 NOTE: Although SIMPLE IRAs may be displayed, changes for SIMPLE accounts must be added manually to the account owner tree by an Advanced User. Enter corrected or new information in the applicable fields. If there are no changes needed for a particular information field, leave the field blank. To change the Account Status, select one of the following options from the drop-down menu and click Next. No Change Close as of: Reopen NOTE: Changes to personal information (e.g. Name, Address, Social Security number, or Date of Birth) will be applied to all of the owner s accounts in IRAdirect. 34
35 Printing and Saving the Form If your organization does not have electronic signatures enabled, take the following steps to print and save the form. If your organization has electronic signature functionality enabled, review the Electronic Signatures section for information about signing, printing, and saving the form. (Speak with an Ascensus Sales Representative if your organization is interested in enabling electronic signature functionality.) 1. Click the Change Notice link to print the form and have the account owner sign the printed form. 2. Click the check box next to this statement: Check this box if the required signatures have been obtained on a printed copy of these documents. 3. Click the Save button. NOTE: The Save button is not enabled until the check box is clicked. A transaction completed and saved by an Advanced User will apply to IRAdirect. A transaction completed and saved by a General User will move to the Approve Forms From General Users queue to await review and approval by an Advanced User. 35
36 Contribution The Contribution Wizard is used to document these contribution types. Regular Indirect Rollover SEP (Traditional IRA Only) Direct Rollover Conversion (Roth IRA Only) Rollover Transfer Recharacterization The required information fields and menus in the form wizard are noted with an asterisk (*). Completing the Form Wizard Click the Contribution link located in the Forms section of the homepage. Enter the account owner s Social Security number in the Social Security Number field and click Search. NOTE: Returning to the IRAdirect homepage before printing the form will erase all information you have entered. When there is at least one existing account in IRAdirect for the Social Security number entered, the account owner s name and date of birth information will appear in those fields on the screen. Click the applicable radio button to select the account type for the contribution, and then click Next. 36

37 NOTE: Although SIMPLE IRAs may be displayed, transactions for SIMPLE accounts must be added manually to the account owner tree by an Advanced User. Click the appropriate radio button in response to this question: What type of contribution is this? Click Next. 37
38 On the Contribution Information page, the options offered will vary based on the type of account and the contribution type selected. Enter information in the required and applicable fields and click the appropriate radio button options. Click Next. NOTE: If the contribution type is Recharacterization, there are additional screens for completion. 38
39 Select the appropriate Investment Information option. If applicable, enter the investment dollar amount(s) in the field(s) associated with the Investment Name. Click Next. 39
40 Printing and Saving the Form If your organization does not have electronic signatures enabled, take the following steps to print and save the form. If your organization has electronic signature functionality enabled, review the Electronic Signatures section for information about signing, printing, and saving the form. (Speak with an Ascensus Sales Representative if your organization is interested in enabling electronic signature functionality.) 1. Click the Contribution and Investment Selection Form link to print the form. 2. Have the account owner sign the printed form. 3. Click the check box next to this statement: Check this box if the required signatures have been obtained on a printed copy of these documents. 4. Click the Save button. NOTE: The Save button is not enabled until the check box is clicked. A transaction completed and saved by an Advanced User will apply to IRAdirect. A transaction completed and saved by a General User will move to the Approve Forms From General Users queue to await review and approval by an Advanced User. 40
41 Death Notice The Death Notice Wizard is completed to report the death of an account owner to us so we can process the death claim for your financial organization. Death Notices can be completed for these account types, as applicable: Traditional IRAs Coverdell ESAs Roth IRAs Health Savings Accounts (HSAs) The required information fields and menus in the form wizard are noted with an asterisk (*). Completing the Form Wizard Click the Death Notice link in the Forms section of the homepage. Enter the account owner s Social Security number in the Social Security Number field and click Search. NOTE: Returning to the IRAdirect home page before printing the form will erase all information you have entered. When there is at least one existing account in IRAdirect for the Social Security number entered, the account owner s name and date of birth information will appear in those fields on the screen. Click the applicable radio button to select the account type for the owner s death claim. Click Next. 41
42 NOTE: Although SIMPLE IRAs may be displayed, Ascensus does not process death claims for SIMPLE IRAs. After your organization processes a SIMPLE IRA death claim, complete an Incoming Beneficiary Scheduled Payment Election form for each beneficiary, found under the Blank Forms link on the IRAdirect homepage. Handwrite the SIMPLE IRA s date-of-death value at the top of the form, which is needed for reporting purposes, and fax the completed form(s) to Ascensus at (If a beneficiary received a lump-sum distribution, also complete and fax a Traditional & SIMPLE IRA Withdrawal Authorization form.) Enter information in the required and applicable fields, make drop-down menu selections, and click the appropriate radio buttons. Click Next. Reminders Death claim processing cannot begin until your organization has received a certified copy of the account owner s death certificate. If the owner has multiple accounts you must complete a Death Notice Wizard for each account. If the deceased account owner has a Traditional IRA and was age 70½ or older upon death, the Withdrawals for deceased owner in the year of death section of the Death Notice Wizard must be completed. The contact for your financial organization should be the person who can answer questions about the death claim or provide information about the account owner s family members or other contacts. 42
43 43
44 (continued) 44
45 After all information is entered and the Next link is clicked, the Beneficiary Payment Election screen will appear. A Preliminary Beneficiary Payment Election form may be completed to expedite claim processing only if you answer Yes to the following questions on the page. 1. Is the deceased owner s marital status listed on the death certificate as Married? 2. Is the deceased owner s spouse listed as the only primary beneficiary on the designation of beneficiary form? 3. Is the surviving spouse at least 21 years old? If No is answered for any of the questions, the Preliminary Beneficiary Payment Election form may not be completed. Instead, the claim will be processed as normal. NOTE: If Yes is answered for all of the questions, the spouse beneficiary is not required to complete the Preliminary Beneficiary Payment Election form. However, the option is available to expedite processing if preferred. If you select Yes to complete the Preliminary Beneficiary Payment Election form, the next screens will ask for the spouse beneficiary s personal information and distribution, federal withholding, and state withholding elections. After entering the required information on each screen, you ll be directed to the Post screen where you can print and save the forms. 45
46 Printing and Saving the Form If your organization does not have electronic signatures enabled, take the following steps to print and save the form. If your organization has electronic signature functionality enabled, review the Electronic Signatures section for information about signing, printing, and saving the form. (Speak with an Ascensus Sales Representative if your organization is interested in enabling electronic signature functionality.) 1. Click the Death Notice link to print the form. (If applicable, also click the Preliminary Beneficiary Payment Election link to print the completed Preliminary Beneficiary Payment Election form.) 2. A financial organization representative must sign the printed Death Notice. (If applicable, the spouse beneficiary must sign the printed Preliminary Beneficiary Payment Election form.) 3. Click the Save button. A transaction completed and saved by an Advanced User or General User will apply to IRAdirect. 46
47 Follow the information provided on the Post screen, which indicates to fax the following documents to Ascensus at The completed and signed Death Notice The completed and signed Preliminary Beneficiary Payment Election form, if applicable o Applicable for use only when the sole primary beneficiary is the spouse, and is at least 21 years of age o Payment options are limited to a lump-sum or transfer o Any outstanding required minimum distribution (RMD) not received by the deceased owner will be addressed separately The account owner s death certificate (a copy of the certified original) All pages of the most current Application or Beneficiary Designation form (signed by the account owner) Other documents, if applicable (e.g. certified death certificate for a deceased beneficiary) NOTE: Do not disburse any account assets until you receive a Disbursal Authorization or Payment Notification message from Ascensus. 47
48 Direct Transfer Instructions Request The Direct Transfer Wizard is used to document an account owner s instructions for a transfer of assets to your financial organization. Using this form, the account owner can indicate the source of the transfer, the amount to transfer, and when the transfer is to occur. The required information fields and menus in the form wizard are noted with an asterisk (*). Completing the Form Wizard Click the Direct Transfer Instructions Request link in the Forms section of the homepage. Enter the account owner s Social Security number in the Social Security Number field and click Search. NOTE: Returning to the IRAdirect homepage before printing the form will erase all information you have entered. NOTE: If the individual does not yet have an account at your financial organization, complete the fields on the Account Owner Info screen. (An account should be established to accept the transfer by completing the Application Wizard.) When there is at least one existing account in IRAdirect for the Social Security number entered, the account owner s name and date of birth information will appear in those fields on the screen. Click the applicable radio button to select the account type to receive the transfer and click Next. 48
49 .NOTE: Although SIMPLE IRAs may be displayed, transactions for SIMPLE accounts must be completed on a blank Traditional & SIMPLE IRA Transfer Request form, found under the Blank Forms link on the IRAdirect homepage. These transactions are not saved to IRAdirect. Enter information in the required and applicable fields, select the appropriate radio button options, and click Next. 49
50 Enter information in the required fields, make drop-down menu selections, and click Next. 50
51 Enter information in the required and applicable fields, make drop-down menu selections, and click Next. NOTE: The Copy financial organization s information check box can be clicked to populate the fields with the destination financial organization s information. 51
52 Printing and Saving the Form If your organization does not have electronic signatures enabled, take the following steps to print and save the form. If your organization has electronic signature functionality enabled, review the Electronic Signatures section for information about signing, printing, and saving the form. (Speak with an Ascensus Sales Representative if your organization is interested in enabling electronic signature functionality.) 1. Click the Direct Transfer Instructions link to print the form. 2. Have the account owner sign the form. 3. Provide the signed Direct Transfer Instructions Request to the transferring financial organization. 52
53 Incoming Beneficiary Account Transfer The Incoming Beneficiary Account Transfer Wizard is to be used only when a beneficiary is transferring assets from another financial organization to your financial organization in the name of a deceased owner. NOTE: If a deceased owner s account is currently held at your financial organization, you must submit a death claim to track any movement of inherited assets from the deceased owner s IRA to an inherited IRA. The Incoming Beneficiary Scheduled Payment Election form is not applicable and should not be used to document assets moving from your deceased owner s account to the beneficiary s inherited IRA at your organization. Wizard Use Exceptions Estate Beneficiary An estate beneficiary of an employer-sponsored plan can never have an inherited IRA, as it is not allowed by the IRS. Thus, the Incoming Beneficiary Account Transfer Wizard (or blank form) process is not applicable. Nonperson Beneficiary If the beneficiary is a trust, estate, or organization, the Incoming Beneficiary Account Transfer Wizard cannot be used. Instead, you must manually complete the Incoming Beneficiary Scheduled Payment Election form, which is accessed by clicking the Blank Forms link in the Forms section of the homepage. Contact our IRA Call Center at if you have questions about how to complete the form. SIMPLE IRA If the incoming beneficiary account transfer is for a SIMPLE IRA (whether the assets are coming from another financial organization or from the SIMPLE IRA of a deceased owner at your financial organization), the Incoming Beneficiary Account Transfer Wizard cannot be used. Instead, you must manually complete the Incoming Beneficiary Scheduled Payment Election form, which is accessed by clicking the Blank Forms link in the Forms section of the homepage. The completed form must be faxed to Ascensus at Contact our IRA Call Center at if you have questions about how to complete the form. Under the Tax Laws Any beneficiary of an IRA can transfer inherited IRA assets to an inherited IRA of the same type. Any beneficiary of an eligible employer-sponsored retirement plan can directly roll over inherited plan assets to an inherited IRA. A spouse beneficiary also can indirectly roll over inherited plan assets to an inherited IRA. Any beneficiary of an eligible employer-sponsored retirement plan can directly roll over inherited plan assets to an inherited Roth IRA. This is a taxable transaction unless the rollover consists of designated Roth assets. An inherited Traditional IRA and inherited Roth IRA may be established to keep inherited pretax and after tax plan assets separate. A spouse beneficiary also can indirectly roll over inherited plan assets to a Roth IRA. 53
54 The Accepting IRA The IRS requires the accepting inherited IRA to be reported using the beneficiary s Social Security number (or the federal tax ID number for a nonperson beneficiary) and the following owner name format. (Beneficiary s Name) as beneficiary of (Original Owner s Name) We recommend that you use the beneficiary s Social Security number and this naming format when establishing inherited IRAs on your system. Doing so will help remind financial organization staff that inherited IRAs cannot receive any other contributions, transfers, or rollovers, with the possible exception of inherited IRA or plan assets originally owned by the same decedent. The accepting inherited IRA is subject to required life expectancy payment rules. The tax laws do not require the accepting inherited IRA to include the amount transferred or rolled over in computing the distributions for the year in which the transfer or rollover occurs. As a service to the beneficiary, verify whether the life expectancy payment for the current year has been taken. If it has not been withdrawn, suggest that the beneficiary distribute the amount needed to meet the required payment to avoid any potential penalty taxes. The Incoming Check Generally, the original financial organization or plan fiduciary must make the check payable as indicated below. (Your Financial Organization Name), for Benefit of (Beneficiary s Name) as Beneficiary of (Original Owner s Name). In certain cases where a spouse beneficiary is indirectly rolling over inherited plan assets, the original financial organization or plan fiduciary will make the check payable to the spouse beneficiary. The Accepting Financial Organization The financial organization accepting the inherited IRA or plan assets must provide the beneficiary with the following documentation. 1. The IRA Agreement and Disclosure Packet 2. A Financial Disclosure 3. Other financial organization disclosures, such as Truth-in-Savings 4. The IRA State Income Tax Withholding Election (Form 80024/2312), if applicable 5. An Inherited IRA Beneficiary Designation (Form 307/2333), if applicable* *If allowed by the accepting financial organization, we recommend that all beneficiaries who complete an Incoming Beneficiary Scheduled Payment Election form also complete an Inherited IRA Beneficiary Designation form to name their own beneficiaries for the inherited IRA. 54
55 Adding Additional Inherited Assets to an Existing Inherited IRA If an inherited IRA already exists in IRAdirect for the beneficiary, but more money is being transferred or directly rolled over from the same deceased owner s IRA or employer-sponsored retirement plan from another organization, follow the steps below to add the contribution to the existing inherited IRA in IRAdirect depending on the applicable scenario. Scenario 1: Existing Inherited IRA Originated from Deceased Owner s IRA Held at your Organization While additional inherited assets can be comingled with an existing inherited IRA that originated from the same deceased owner, IRAdirect is not programmed to accept additional assets into an inherited IRA that was created from an IRA death claim at your organization. Instead, a new inherited IRA must be created in IRAdirect and you must show the assets moving from the existing inherited IRA into the new inherited IRA. All future tax reporting will occur under the new inherited IRA. Take the following steps to document this type of transaction in IRAdirect. 1. Complete the Incoming Beneficiary Account Transfer Wizard to document the incoming additional inherited assets and have the beneficiary sign the completed form and the completed Inherited IRA Beneficiary Designation form, if applicable. 2. Print and complete a blank Withdrawal Authorization form to show the money moving from the existing inherited IRA into the new inherited IRA. Enter the original deceased owner s information in Part 1. Enter the beneficiary s information in Part 3. Enter the current balance of the existing inherited IRA in the Total Withdrawal Amount, the date in the Withdrawal Date, and check the Transfer to Another IRA box in Part 4. Complete the rest of the form, as applicable, and have the beneficiary sign the completed form. 3. Print and complete a blank Contribution and Investment Selection form. Enter the beneficiary s information in Part 1. Enter the current balance of the existing inherited IRA in the Contribution Amount, the date in the Contribution Date, and check the Transfer box in Part 3. Complete the rest of the form, as applicable, and have the beneficiary sign the completed form. 4. Provide copies of the Incoming Beneficiary Scheduled Payment Election form, Agreement and Disclosure packet, Financial Disclosure, and Inherited IRA Beneficiary Designation form, if applicable, to the beneficiary. 5. Fax the Incoming Beneficiary Scheduled Payment Election form, Withdrawal Authorization form, Contribution and Investment Selection form, and Inherited IRA Beneficiary Designation form, if applicable, to Ascensus at
56 Scenario 2: Existing Inherited IRA Originated from Deceased Owner s IRA or Employer-Sponsored Retirement Plan at a Different Organization If the existing inherited IRA was moved to your organization as an incoming beneficiary account transfer from another organization, IRAdirect is programmed to accept additional assets into this type of existing inherited IRA if the assets are from the same deceased owner. Take the following steps to document this type of transaction in IRAdirect. 1. Print and complete a blank Contribution and Investment Selection form to document the additional assets moving to your organization. Enter the beneficiary s information in Part 1. Enter the amount of additional assets moving to the existing inherited IRA in the Contribution Amount, the date in the Contribution Date, and check either the Rollover or Transfer box in Part 3, depending on the type of account moving into the existing inherited IRA. Complete the rest of the form, as applicable, and have the beneficiary sign the completed form. 2. Add the contribution documented on the Contribution and Investment Selection form to the beneficiary s tree in IRAdirect. (You must be an Advanced User.) Search for the beneficiary in the Search for account owner field. Click the existing Beneficiary Acct. Click the Create Contribution radio button in the For this Account section at the bottom of the screen. Click the Continue button. Enter the contribution information that was documented on the Contribution and Investment Selection form and click the Save button. 3. Do not fax any documents to Ascensus. NOTE: If the beneficiary did not satisfy the required minimum distribution (RMD) before moving the inherited assets to the existing inherited IRA, please contact the IRA Call Center at for assistance. The beneficiary is still required to satisfy a remaining RMD from the other inherited IRA, and the IRA Call Center will assist in calculating this amount for your organization. 56
57 Completing the Form Wizard Enter information in the required and applicable fields, make drop-down menu selections, indicate whether the inherited IRA owner wants to designate beneficiaries for the inherited IRA, and click Next. NOTE: Returning to the IRAdirect homepage before printing the form will erase all information you have entered. 57
58 Enter information in the required and applicable fields, select the appropriate radio button options, and click Next. 58

59 Enter information in the required and applicable fields, select the appropriate radio button options, and click Next. 59
60 Enter information in the required and applicable fields, make drop-down menu selections, and click the appropriate radio buttons. Click Next. 60
61 Designating Beneficiaries The Incoming Beneficiary Account Transfer Wizard allows you to enter any Primary and Contingent beneficiaries designated by the inherited IRA owner. If you clicked the Yes radio button on the Deceased Owner and Beneficiary Info screen to indicate that the inherited IRA owner wants to designate beneficiaries, the Beneficiary Information screen appears next. On the Beneficiary Information screen for the Primary Beneficiary, take these steps. 1. Enter the primary beneficiary s personal information in the boxes provided. 2. Enter the primary beneficiary s address information in the boxes provided. If the beneficiary s address is the same as that for the inherited IRA owner, click the Copy owner s address check box, which automatically fills the address fields. 3. When all information has been entered, click the Add Beneficiary button. 4. When all primary beneficiaries have been entered, and the inherited IRA owner does not want to designate contingent beneficiaries, click the No radio button next to this statement: Does the owner want to designate contingent beneficiaries for this account? 5. If the inherited IRA owner wants to designate contingent beneficiaries, click the Yes radio button next to this statement: Does the owner want to designate contingent beneficiaries for this account? 61
62 Printing and Saving the Form Completing the Incoming Beneficiary Account Transfer Wizard does not apply the transaction to IRAdirect. If your organization does not have electronic signatures enabled, take the following steps to print and save the form. If your organization has electronic signature functionality enabled, review the Electronic Signatures section for information about signing, printing, and saving the form. (Speak with an Ascensus Sales Representative if your organization is interested in enabling electronic signature functionality.) 1. Click the Incoming Beneficiary Account Transfer link to print the form. (If applicable, also click the Inherited IRA Beneficiary Designation Form link to print the beneficiary designation form.) 2. Have the beneficiary and a financial organization representative sign the form. 3. Provide the account owner with an Agreement and Disclosure Packet, a Financial Disclosure, and all other disclosures for the new inherited account. 4. Fax the Incoming Beneficiary Scheduled Payment Election form and if applicable, the Inherited Beneficiary Designation form to us for processing. 62
63 Post 70½ Periodic Payment The Post 70½ Pmt Election Wizard is used to establish an owner s Traditional IRA periodic payment election. The required information fields and menus in the form wizard are noted with an asterisk (*). Completing the Form Wizard Click the Post 70½ Periodic Payment link in the Forms section of the homepage. Enter the account owner s Social Security number in the Social Security Number field and click Search. NOTE: Returning to the IRAdirect homepage before printing the form will erase all information you have entered. When there is at least one existing Traditional IRA in IRAdirect for the Social Security number entered, the account owner s name and date of birth information will appear in those fields on the screen. Select the Traditional IRA for which the periodic payment election is being completed and click Next. 63
64 NOTE: Although SIMPLE IRAs may be displayed, transactions for SIMPLE accounts must be completed on a blank Traditional IRA Post-70½ Payment Election form found under the Blank Forms link on the IRAdirect homepage. Fax the completed form to Ascensus at to be added manually to the account owner tree. Click the check box next to each statement that is true and click Next. NOTE: If all three of the statements are true, the Spouse s Name and Spouse s Year of Birth fields will be unlocked when the check boxes are clicked. 64
65 The Payment Type screen appears. The following Payment Elections are available in the drop-down menu. RMD Term Owner Responsible Specific Amount Lump Sum Enter information in the required and applicable fields, make drop-down menu selections, click the appropriate radio button options, and click Next. NOTE: Available options vary based on the Payment Election selected. NOTE: The payment start date entered determines the first month a payment appears on the Periodic Payment List or the Periodic Payment Distribution Report (historical) for the IRA owner. 65
66 Printing and Saving the Form If your organization does not have electronic signatures enabled, take the following steps to print and save the form. If your organization has electronic signature functionality enabled, review the Electronic Signatures section for information about signing, printing, and saving the form. (Speak with an Ascensus Sales Representative if your organization is interested in enabling electronic signature functionality.) 1. Click the Traditional IRA Post-70½ Payment Election Form link to print the form. 2. Have the account owner sign the form. 3. Click the check box next to this statement: Check this box if the required signatures have been obtained on a printed copy of these documents. 4. Click the Save button. NOTE: The Save button is not enabled until the check box is clicked. A transaction completed and saved by an Advanced User will apply to IRAdirect. A transaction completed and saved by a General User will move to the Approve Forms From General Users queue to await review and approval by an Advanced User. 66
67 Pre 70½ Periodic Payment The Pre 70½ Periodic Pmt Election Wizard is used to document an account owner s Traditional IRA pre-70½ payment election. The required information fields and menus in the form wizard are noted with an asterisk (*). Completing the Form Wizard Click the Pre 70½ Periodic Payment link in the Forms section of the homepage. Enter the account owner s Social Security number in the Social Security Number field and click Search. NOTE: Returning to the IRAdirect homepage before printing the form will erase all information you have entered. When there is at least one existing Traditional IRA in IRAdirect for the Social Security number entered, the account owner s name and date of birth information will appear in those fields on the screen. Select the Traditional IRA for which the periodic payment election is being completed and click Next. 67
68 NOTE: Although SIMPLE IRAs may be displayed, transactions for SIMPLE accounts must be completed on a blank IRA Periodic Payments Before Age 70½ form found under the Blank Forms link on the IRAdirect homepage. Fax the completed form to Ascensus at to be added manually to the account owner tree. Enter information in the applicable fields and click the appropriate radio button options. Click Next. NOTE: If the owner is under age 59½ and is disabled, click the Disabled radio button. 68
69 Enter information in the required and applicable fields, make drop-down menu selections, click the appropriate radio button options, and click Next. 69
70 Printing and Saving the Form If your organization does not have electronic signatures enabled, take the following steps to print and save the form. If your organization has electronic signature functionality enabled, review the Electronic Signatures section for information about signing, printing, and saving the form. (Speak with an Ascensus Sales Representative if your organization is interested in enabling electronic signature functionality.) 1. Click the IRA Periodic Payment Before Age 70½ Form link to print the form. 2. Have the account owner sign the form. 3. Click the check box next to this statement: Check this box if the required signatures have been obtained on a printed copy of these documents. 4. Click the Save button. NOTE: The Save button is not enabled until the check box is clicked. A transaction completed and saved by an Advanced User will apply to IRAdirect. A transaction completed and saved by a General User will move to the Approve Forms From General Users queue to await review and approval by an Advanced User. If the you select Before age 59½ on the Election Type screen, you must fax the completed form to Ascensus at for processing. (A message including this information will appear after you click the Save button on the Post screen.) 70
71 Traditional IRA Periodic Payment Change The Traditional IRA Periodic Payment Change Wizard is used to document changes to a Traditional IRA owner s existing periodic payment election. Changes can be made to the following information. Payment Type Payment Method Effective Date Federal Withholding Payment Election State Withholding Payment Frequency The required information fields and menus in the form wizard are noted with an asterisk (*). Completing the Form Wizard Click the Traditional IRA Periodic Payment Change link in the Forms section of the homepage. Enter the account owner s Social Security number in the Social Security Number field and click Search. NOTE: Returning to the IRAdirect homepage before printing the form will erase all information you have entered. When there is at least one existing Traditional IRA in IRAdirect for the Social Security number entered, the account owner s name and date of birth information will appear in those fields on the screen. Select the Traditional IRA for which the periodic payment election is being changed and click Next. 71
72 NOTE: Although SIMPLE IRAs may be displayed, changes to SIMPLE IRA periodic payments must be completed on a blank Traditional IRA Periodic Payment Change form found under the Blank Forms link on the IRAdirect homepage. Fax the completed form to Ascensus at to be added manually to the account owner tree. Enter information in the required and applicable fields, make a drop-down menu selection, and click Next. 72
73 Enter information in the required and applicable fields, make drop-down menu selections, click the appropriate radio button options, and click Next. NOTE: In general, payments can be stopped only for account owners who are between the ages of 59½ and 70½, or are disabled. 73
74 Printing and Saving the Form If your organization does not have electronic signatures enabled, take the following steps to print and save the form. If your organization has electronic signature functionality enabled, review the Electronic Signatures section for information about signing, printing, and saving the form. (Speak with an Ascensus Sales Representative if your organization is interested in enabling electronic signature functionality.) 1. Click the Traditional IRA Periodic Payment Change Form link to print the form. 2. Have the account owner sign the form. 3. Click the check box next to this statement: Check this box if the required signatures have been obtained on a printed copy of these documents. 4. Click the Save button. NOTE: The Save button is not enabled until the check box is clicked. A transaction completed and saved by an Advanced User will apply to IRAdirect. A transaction completed and saved by a General User will move to the Approve Forms From General Users queue to await review and approval by an Advanced User. 74
75 Withdrawal The Withdrawal Wizard is used to document these types of withdrawals for account owners. Transfer Disability Rollover Federal Tax Levy Excess contribution withdrawal Revocations Normal Beneficiary withdrawal Before age 59½ The required information fields and menus in the form wizard are noted with an asterisk (*). Completing the Form Wizard Click the Withdrawal link in the Forms section of the homepage. Enter the account owner s Social Security number in the Social Security Number field and click Search. NOTE: Returning to the IRAdirect homepage before printing the form will erase all information you have entered. When there is at least one existing account in IRAdirect for the Social Security number entered, the account owner s name and date of birth information will appear in those fields on the screen. Select the account for which the withdrawal is to be documented and click Next. 75
76 NOTE: Although SIMPLE IRAs may be displayed, transactions for SIMPLE accounts must be added manually to the account owner tree by an Advanced User. Click the appropriate radio button option in response to this question: Why are you making this withdrawal? Click Next. NOTE: The account owner s age and type of account determine which withdrawal reasons appear. NOTE: If the withdrawal reason is Moving assets to another IRA or Eligible Employer-Sponsored Retirement Plan (401k, 403b, etc.) and it s a conversion for which the account owner elected withholding, see the Conversions With Withholding section at the end of this section for additional instructions. 76
77 The Withdrawal Info screen varies based on the type of withdrawal selected. Enter information in the required and applicable fields, make dropdown menu selections, click the appropriate radio button options, and click Next. A Trustee or Custodian Penalties and Fees section exists to enter any penalties or fees associated with the withdrawal. This amount should not be included in the Withdrawal Amount section at the top of the screen. NOTE: For each withdrawal reason, a page appears after the Reason Options screen and before the Withdrawal Info screen in order to collect additional information specific to the withdrawal reason. 77
78 The Payment Method screen appears next. On this screen, enter information in the applicable fields, click the appropriate radio button options, and click Next. The Asset (Investment) Handling Instructions section is optional and may be used to track the investments from which each withdrawal was taken. 78
79 Printing and Saving the Form If your organization does not have electronic signatures enabled, take the following steps to print and save the form. If your organization has electronic signature functionality enabled, review the Electronic Signatures section for information about signing, printing, and saving the form. (Speak with an Ascensus Sales Representative if your organization is interested in enabling electronic signature functionality.). 1. Review the withdrawal summary. 2. Click the Withdrawal Authorization Form link to print the form. 3. Have the account owner sign the form. 4. Click the check box next to this statement: Check this box if the required signatures have been obtained on a printed copy of these documents. 5. Click the Save button. NOTE: The Save button is not enabled until the check box is clicked. A transaction completed and saved by an Advanced User will apply immediately to IRAdirect. A transaction completed and saved by a General User will move to the Approve Forms From General Users queue to await review and approval by an Advanced User. 79
80 Conversions With Withholding Take the applicable steps outlined below for an account owner who elects withholding on a conversion transaction. Conversion With Withholding Account Owner Under Age 59½ For an account owner under age 59½, the online Withdrawal Wizard must be completed twice to document the transaction. A. Document the conversion from the Traditional IRA. 1. On the Reason Options screen, click the Moving assets to another IRA or Eligible Employer-Sponsored Retirement Plan radio button, and click Next. 2. On the Moving screen, click the Direct Conversion to a Roth IRA radio button and click Next. 3. On the Withdrawal Info screen, click the first radio button Amount to withdraw from account before taxes (Gross). Then in the Amount field, enter only the amount being converted to the Roth IRA after withholding. Use decimal points, but do not use commas or dollar signs. For example, if the account owner is converting ten thousand dollars from a Traditional IRA to a Roth IRA and wants to withhold 10 percent in federal income tax, you must enter in the Amount field. 4. In the Federal Withholding Election section, click the Do Not Withhold radio button. 5. In the State Withholding Election section, click the Do Not Withhold radio button. 6. If applicable, in the Trustee or Custodian Penalties and Fees section, enter the total amount of any penalties or fees associated with the withdrawal and click Next. 7. In the Withdrawal Type and Account Status section of the Payment Method screen, click the No. There will still be assets in one or more investments in this IRA radio button. 8. In the Payment Method section of the screen, select the applicable payment method: Check/Share Draft, Internal Account, or External Account. Enter the requested information for the payment method selected. (Reminder: The account owner cannot have direct access to the assets when completing a direct conversion.) 9. In the Asset (Investment) Handling Instructions section of the screen, enter any necessary asset descriptions and click Next. 10. On the Post screen, take the actions listed and click the Save button. 80
81 B. Document the withholding on the conversion amount by completing the second Withdrawal Wizard. 1. On the Reason Options screen, click the Early withdrawal (including Disability, IRS Levy, or Substantially Equal Periodic Payments) radio button and click Next. 2. On the Early withdrawal screen, click the None of the above (This withdrawal may be subject to the 10% IRS early distribution penalty) radio button, and click Next. 3. On the Withdrawal Info screen in the Withdrawal Amount section, click the first radio button Amount to withdraw from account before taxes (Gross), and enter only the amount of the taxes being withheld in the Amount field. Use decimal points, but do not use commas or dollar signs. For example, if the account owner is withholding one thousand dollars in federal taxes from the conversion, you would enter in the Amount field. 4. In the Federal Withholding Election section, enter 100 in the Withhold % (Must be 10% or greater) field. (The Amt Withheld field automatically fills with the dollar amount being withheld.) 5. If state withholding applies, complete the State Withholding Election section as applicable, and click Next. (Reminder: When state withholding applies, the converted amount must be adjusted accordingly to reflect the additional withholding. Withholding on a conversion for an IRA owner under age 59½ is subject to income tax in addition to an early withdrawal penalty tax.) 6. In the Withdrawal Type and Account Status section of the Payment Method screen, click the applicable radio button depending on whether there are any assets left in the IRA after the direct conversion. 7. In the Payment Method section of the screen, click the Cash radio button. 8. In the Asset (Investment) Handling Instructions section of the screen, enter any necessary asset descriptions and click Next. 9. On the Post screen, take the actions listed and click the Save button. C. To finish the process, complete the Contribution Wizard if the account owner is converting the assets to a Roth IRA currently held at your financial organization. 1. Click the Conversion radio button on the Contribution Type screen and click Next. 2. Complete the required and applicable fields on the Rollover/Transfer screen and click Next. 3. Complete the Investments screen as applicable, and click Next. 4. On the Post screen, take the actions listed and click the Save button. 81
82 Conversion With Withholding Account Owner Age 59½ or Older Complete the online Withdrawal Wizard as outlined to document the transaction. A. Document the conversion from the Traditional IRA. 1. On the Reason Options screen, click the Moving assets to another IRA or Eligible Employer-Sponsored Retirement Plan (401k, 403b. etc) radio button, and click Next. 2. On the Moving screen, click the Direct Conversion to a Roth IRA radio button and click Next. 3. On the Withdrawal Info screen, click the first radio button Amount to withdraw from account before taxes (Gross) and then in the Amount field, enter the full amount being converted to the Roth IRA. Use decimal points, but do not use commas or dollar signs. For example, if the account owner is converting ten thousand dollars from a Traditional IRA to a Roth IRA, you would enter in the Amount field. 4. In the Federal Withholding Election section, click the Withhold % (Must be 10% or greater) radio button and enter 10 in the percent field. 5. If state withholding is applicable, click the appropriate radio button in the State Withholding Election section. 6. If applicable, in the Trustee or Custodian Penalties and Fees section, enter the total amount of any penalties or fees associated with the withdrawal and click Next. 7. In the Withdrawal Type and Account Status section of the Payment Method screen, click the applicable radio button depending on whether there are any assets left in the IRA after the direct conversion. 8. In the Payment Method section of the screen, select the applicable payment method: Check/Share Draft, Internal Account, or External Account. Enter the requested information for the payment method selected. (Reminder: The account owner cannot have direct access to the assets when completing a direct conversion.) 9. In the Asset (Investment) Handling Instructions section of the screen, enter any necessary asset descriptions and click Next. 10. On the Post screen, take the actions listed and click the Save button. B. Complete the Contribution Wizard if the account owner is converting the assets to a Roth IRA currently held at your financial organization. 1. Click the Conversion radio button on the Contribution Type screen and click Next. 2. Complete the required and applicable fields on the Rollover/Transfer screen and click Next. 3. Complete the Investments screen as applicable, and click Next. 4. On the Post screen, take the actions listed and click the Save button. 82
83 Electronic Signatures If your organization has electronic signatures enabled, follow the procedures below for electronically signing, printing, and saving data. (If your organization does not have electronic signatures enabled and you d like to learn more, contact your Ascensus Sales Representative.) If electronic signature functionality is enabled for your organization, a Continue button will appear on the Post screen of every form wizard. After clicking the Save button, if applicable, on the Post screen of a form wizard, click the Continue button to begin the electronic signing process. Below is an example of how the Continue button will appear for most form wizards. The verbiage may appear differently for the Death Notice Wizard, Incoming Beneficiary Account Transfer Wizard, and the Direct Transfer Instructions Request Wizard, but you ll be directed to the same electronic signing page. Continue button for most form wizards: Continue button for the Death Notice Wizard: Continue button for the Incoming Beneficiary Account Transfer Wizard: Continue button for the Direct Transfer Instructions Wizard: 83
84 Electronically Signing Documents After clicking the Continue button, the Signer Information page will appear. 1. Type the name of each individual required to sign the document. (NOTE: The account owner is always required to sign the document. Additional signers must sign the document only if your organization requires their signatures.) 2. Click the How to complete the next steps for electronically signing the documents link to learn more about the process of signing the documents. 3. Click the Continue to sign button to begin signing the document. 84
85 After clicking the Continue to Sign button, you will be redirected to the Session Details page, shown below. The session opens directly to the account owner s transaction. You can confirm the signing session is for the correct individual by clicking the name of the form (BENE_DESIGNATION_CHANGE as indicated in the screenshot below) to view the account owner information, or by clicking the Eye icon to view a PDF of the completed form. To begin the signing process, simply click the Sign button. (To return to the IRAdirect homepage, click Return in the upper right corner of the screen.) 85

86 The individual(s) required to sign the document will appear on the esignature Management page, including any additional signers your organization entered on the Signer Information page. When the individual is ready to sign the document, click the Start button across from the individual s name. Sign form The next screen, shown on the following page, provides two of the three steps the individual must follow to sign the document. Step 1: Individuals must review the Disclosure and Consent to Use of Electronic Signatures and Records. The disclosure may be printed by clicking the Print button. Do not skip this step as it is important that individuals read and consent to the full disclosure. Step 2: Individuals must select how the signature will be captured by using one of the three following methods, then clicking the Accept button to accept and consent to using an electronic signature. The selection automatically defaults to Type. Contact our Commercial Software help desk at , option 2, option 2, option 1, to select a different default. Signature Pad Individuals can use a signature pad to capture their signatures. The signature pad may only be selected if your organization has this functionality enabled. After selecting this option, users must click anywhere on the actual signature pad to initiate the process. Individuals may be asked a series of questions through the signature pad before capturing their signatures. Type Individuals can use the keyboard to type their names in the field that appears. An electronic signature will appear below as each individual s name is entered. Draw Individuals can use their finger (if using a mobile phone or tablet) or the mouse to draw a signature on the screen. This feature works best if using a mobile phone or tablet. NOTE: If the Decline button is clicked, a reason for declining the esignature disclosure must be provided in the window pop-up that appears. 86

87 IMPORTANT! Owner clicks here to consent to use of electronic signatures and records 87

88 After the signature is captured on the screen, click Accept button to move to the following screen where the individual will begin Step 3 signing the document. The completed document will appear on the screen. First, confirm the document is completed correctly. NOTE: Although not required, your organization may print an unsigned copy of the document by clicking the Print UnSigned button. If at any time the individual wishes to cancel the signing process, you may click the Cancel button. 88


89 The signature line will highlight in yellow as shown on the previous page and below. Click the highlighted section that says, Click here to sign. The individual s captured signature will appear on the signature line as shown below. Click Next if there is an additional section to sign, or click the Confirm Signatures and Finish button if the signature appears correctly and no other sections of the form need to be signed by the individual. 89

90 Clicking Confirm Signatures and Finish returns you to the esignature Management page. A check mark will appear in the Status column across from the individual that has finished signing the document. If additional signatures are needed, click the Start button across from the applicable individual s name to begin the signing process for the next individual. Do not print the document until all signatures are obtained. Sign form After all signatures are obtained, the following message appears at the top of the screen, All Signatures have been completed. Please press Continue. However, before clicking the Continue button, click the Print icon to print the completed and signed document. After copies of the completed and signed form are printed, click the Continue button to return to the Session Details page where you can attach additional documents or archive the signed document, if necessary. Instructions for this process are provided on the following pages. View/print form 90

91 If you click the Continue button and realize that you forgot to print the completed, signed documents, you can still print the document by clicking the Eye icon across from the name of the form. The form will appear in a new window. To view an audit trail of the user(s) that handled the transaction, when each individual signed the form, and the IP address of each computer that was used to complete the transaction click the Eye icon across from the Session Audit section. The Session Audit will appear in a new window and can be printed and placed in the owner s file, if necessary. View/print form View/print audit trail Attaching Additional Documents For some forms, such as the Death Notice, you may need to attach additional documents with the signed, completed form. With the Death Notice, your organization can upload a certified copy of the account owner s death certificate, the most recent beneficiary designation form, and any other applicable documents needed for death claim processing after the form is electronically signed. This sends the documents to Ascensus imaging system for processing and eliminates the need to fax the documents to Ascensus. To attach additional documents with a signed and completed form, such as the Death Notice, click the Attach button. 91
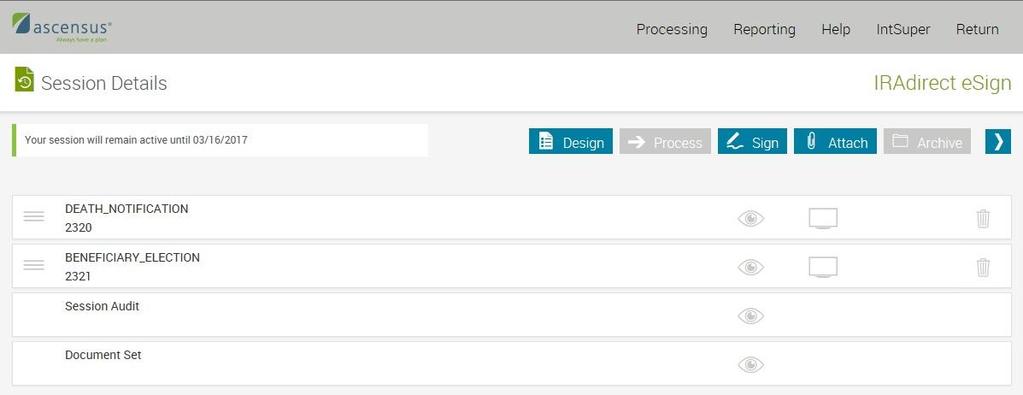
92 92
. 2.")
93 The following pop-up screen will appear. Take the following steps to upload the applicable attached documents. 1. Select the Attachment Type from the drop-down menu (the type of document you are attaching with the signed document). 2. Select the Index Source (the signed document for which you are sending attachments). 3. Select the External Document. Click Browse to upload the applicable attachment from your computer or click Scan to connect to your computer s scanner to upload the applicable attachment. (Additional setup may be required to use the Scan functionality.) The attachment information will display on the screen after it s selected. Only 10 attachments are allowed per signing session. Each attachment can be no larger than 5 MB. Only.pdf format is supported. (You cannot upload.tif,.jpeg, etc.) 93

94 4. Attach additional documents using the same method, if applicable. 5. Confirm that your selected attachments are correct, then click the Ok button. After clicking the Ok button, your signed document and applicable attachments will appear on the following screen, as shown below. If any attachments were uploaded in error, simply click the Delete icon (the trash can on the right side of the screen) to remove the applicable attachment. 94

95 Archiving Signed Documents Archiving a signed and completed document will either save a copy of the document in your organization s own imaging system (if enabled), or it will automatically send a copy of the document to Ascensus imaging system if your organization uses our record retention services. If your organization uses our record retention services, archiving a completed and electronically signed document means that you no longer have to mail copies of these documents to Ascensus for imaging. You also have the functionality to view all archived/imaged documents under the specific owner s account in IRAdirect. For more information about this functionality, see the Record Retention section. To archive a signed and completed document, click the Archive button. You will receive the following message after the document is successfully archived: Archived document(s) successfully. A check mark will also appear across from the document name. This completes the electronic signature process. To return to the IRAdirect homepage, click Return in the upper right corner. 95

96 Blank Forms Our Blank Forms library allows you to complete forms manually. You may also create an offline library of blank forms by saving the selected blank form to a directory and file name of your choice. NOTE: Always confirm that you are using the most current version of any blank form that has been saved offline. 96
97 Getting Started Click the Blank Forms link located in the Forms section of the homepage. A list of all available blank forms appears. Forms are grouped together by the type of account. Traditional IRA Coverdell ESA Roth IRA SEP IRA Multiple Account Types HSA SIMPLE IRA To access a form, click its title. The blank form displays as a PDF so it can be printed and then completed by hand. Any blank forms you complete must be keyed into IRAdirect at a later time using the applicable form wizard. The exceptions are the following forms, which cannot be posted to IRAdirect. (*See the special processing instructions that follow for forms marked with an asterisk.) Beneficiary Periodic Payment Change QRP Direct Rollover Request Contribution Eligibility Qualified HSA Funding Distribution Request* Contribution Recharacterization Roth IRA Transfer Request Direct Transfer Instructions SEP and SIMPLE IRA Forms Incoming Beneficiary Scheduled Payment Election Special Contributions* Investment Change Traditional & SIMPLE IRA Transfer Request IRA Certification For Late Rollover Contribution* Trust Certification for Death IRA Charitable Distribution Request Trust Certification for Periodic Payments IRA Direct Rollover Request Mistaken Distribution Repayment* 97
98 IRA Certification For Late Rollover Contribution This form is used to document an IRA owner s self-certification that a rollover contribution is late because of an error due to the financial organization, death, disability, hospitalization, incarceration, restrictions imposed by a foreign country, postal error, or other circumstance listed in Section 3.02(2) of Rev. Proc or other event beyond the reasonable control of the IRA owner. Ensure that a self-certified late rollover contribution is reported correctly on Form 5498, IRA Contribution Information, by having an Advanced User take the following steps to manually add the transaction to the IRA owner s tree. 1. Search for the IRA owner in IRAdirect. 2. Click the specific account that received the self-certified rollover contribution. 3. In the For this Account section, click the Create Contribution radio button and then click Continue. 4. Select Rollover from the Type drop-down menu. Check the Late Rollover certified by the owner box that appears. 5. Enter the remaining information in the applicable fields and click Save. Mistaken Distribution Repayment (Form 3315) This form is completed to document the return of an HSA distribution that was taken to pay for what was mistakenly believed to be a qualifying medical expense. Such a distribution can be returned as a mistaken distribution only if it s deposited no later than April 15 of the year following the year the distribution was determined to be a mistake. Ensure that the mistaken HSA distribution (withdrawal) and the subsequent return of the distribution to the HSA (contribution) are handled by your financial organization as non-reportable transactions. If you entered the original HSA distribution in IRAdirect as a reportable withdrawal, take the applicable steps below to correct the reporting, after searching for the HSA owner. When the account owner name and SSN appear in the tree, click the applicable HSA Acct link. Then click the + sign for the current tax year to expand the tree. If we have not yet produced an IRS Form 1099-SA for the current tax year, delete the mistaken distribution transaction from IRAdirect. If we have already produced a Form 1099-SA for the current tax year, take the one applicable step below. a. If the mistaken distribution is the only withdrawal reported on the tax form, click the 1099-SA Form link for the HSA owner, correct the Gross Distribution amount to 0.00, and click Save. b. If there were multiple withdrawals reported on the tax form, click the 1099-SA Form link for the HSA owner and correct the Gross Distribution amount so it does not include the mistaken distribution. Then, click Save. 98
99 If a Form 1099-SA was produced for the previous tax year, you must produce a manual corrected tax form for that tax year and send the corrected Form 1099-SA to the IRS and the HSA owner. Take the applicable step outlined below after obtaining a Form 1099-SA for the previous tax year from your local IRS office. a. If the mistaken distribution was the only withdrawal reported on the tax form for the previous year, create a Form 1099-SA with a Gross Distribution amount of 0.00, and check the CORRECTED box at the top of the form. b. If there were multiple withdrawals reported on the tax form for the previous year, enter a revised Gross Distribution amount on the Form 1099-SA that does not include the mistaken distribution, and check the CORRECTED box. Example: The original Form SA reported a Gross Distribution amount of $5,000, and the mistaken distribution was for $2,000, so you would correct the Gross Distribution amount to $3,000 on the manual tax form. Qualified HSA Funding Distribution Request (Form 3322) This form is used to request a one-time direct movement of assets from an IRA to an HSA in order to fund the HSA. A qualified HSA funding distribution is a way to move money directly from an account owner s IRA to an HSA and avoid taxation and penalties on the IRA distribution. In order to make a qualified funding distribution to an HSA, the individual must be eligible to contribute to a health savings account, which means being covered by a high deductible health plan (HDHP). To ensure that this transaction is added to IRAdirect and tax reporting occurs as required, you must complete both the Withdrawal form wizard (according to the account owner s age) to document the assets leaving the IRA, and the Contribution form wizard to document the assets going into the HSA as a regular contribution for the current tax year. Special Contributions (Form 106) This form is completed to document special contributions that can be made to IRAs and ESAs. Some examples are Qualified Reservist Distribution Repayments and Disaster Relief Repayments to Traditional and Roth IRAs, or contributions for Military Death Gratuity to Roth IRAs and Coverdell ESAs. The form lists the types of special contributions that can be made and the rules for those contributions, but because these rules are complex and change frequently, the account owner should always seek competent tax advice before making a special contribution. Fax each completed IRA/ESA Special Contributions (Form 106) to us at , so we can ensure tax reporting is handled correctly for the account owner. Saving Forms To apply a form to IRAdirect, you must complete the applicable wizard for that form (if there is an associated form wizard). NOTE: Completed transaction forms mailed to Ascensus by your financial organization will not be keyed into IRAdirect. If you use our optional record retention service, any completed forms you send to us will only be imaged and archived for future access. 99
100 CALCULATORS Financial Disclosure You have the opportunity to create a Financial Disclosure that describes the growth pattern of the investment the account owner selected for the IRA. The calculation of the future value of the IRA is based on these assumptions. The investment terms and fees remain the same throughout the projection period. The entire IRA is withdrawn at the end of the accumulation period. The Single Contribution column assumes that $1,000 was contributed at the beginning of this year (the first year). The Annual Contribution column assumes that $1,000 was contributed at the beginning of each year starting this year. 100
101 Instructions The following information describes what must be provided in each field to create and print the Financial Disclosure. Nominal Earnings Rate This is either the current rate of interest or the estimated dividend rate for an investment. It s called the "nominal" rate because it is the rate before considering the effects of compounding. Calculation Method Select the method that describes the way in which earnings are calculated. Simple Earnings are paid only on the original amount of the investment. Compound Earnings are paid on both the original investment and on earnings previously posted to the account. Frequency Select how often earnings are paid. Annually (once a year) Monthly (once a month) Semi-Annually ( twice a year) Daily (every day) Quarterly (four times a year) Term Select the option that matches the length of the investment being offered. For a share account, checking account, or other non-term investment, select Days and enter (365) in the Number of Days field. Days Months Years Number of Days/Months/Years Enter the length of the term of the investment you are offering. Early Withdrawal Penalty (Days) This is the penalty assessed on an IRA investment when the money is withdrawn before the investment matures. Specify the penalty as the number of days of earnings the account owner will lose. Note: According to IRS regulations, it s not necessary to provide this information for investments with terms of 1, 2, 3, 4, 6 or 12 months, or if the investment does not have an early withdrawal penalty. (Thus, this field will not be available for investments with these terms.) Yield The annual yield is calculated by IRAdirect based on the interest rate and the calculation method entered. Enrollment Fee The fee your financial organization assesses (if applicable) to establish an IRA. Withdrawal/Termination Fee The fee your financial organization assesses (if applicable) when a withdrawal is made from the IRA, or a termination fee for a withdrawal that closes the IRA. Annual Fee The fee your financial organization assesses (if applicable) for each year the IRA remains open. 101
102 Click To Add Fee Up to two additional fees not listed in the Fees box may be entered by clicking the Click To Add Fee link. When you click this link, the pop-up box below appears. Enter the fee name and the amount of the fee in the applicable fields. The fee cannot exceed $100. After clicking Save, the fee will appear in the Financial Disclosure table. Options Select the appropriate table. (We recommend the Single Table.) Single Table One projection table based on the nominal earnings rate you enter. Standard Set A set of nine projection tables calculated from the nominal earnings rate you enter +/- 1% at.25% intervals. Custom Set A set of projection tables that allows you to choose the starting (low) and ending (high) rates as well as the increment between steps by entering the following information. o o o Start Rate End Rate Rate Step To create the Financial Disclosure after completing your entries, click the Calculate button. To print the Financial Disclosure you have created, click the Print link. 102
103 Income Attributable The Income Attributable Calculator can be used to determine the earnings (net income attributable) for a withdrawn contribution or a recharacterized contribution. A withdrawn contribution is any part of an IRA contribution that is withdrawn before the withdrawal deadline, or that does not qualify as a regular, rollover, transfer, direct rollover, IRA conversion, or SEP plan contribution. 103
 occurred The date of the first contribution in the group, when a group of consecutive contributions is")
104 Instructions To calculate the net income attributable, enter the information requested in each field, as outlined below. Date of Contribution Being Removed The date on which the contribution (that is being removed) occurred The date of the first contribution in the group, when a group of consecutive contributions is being withdrawn or recharacterized Current Value of IRA Today s balance before removing the contribution Includes all investments of the IRA and earnings that have accrued, even if they have not yet been posted Any investment penalties should be subtracted from this value 104
105 Value of IRA Immediately Before the Contribution The balance of the IRA immediately before the contribution was deposited Includes all investments of the IRA, but excludes earnings that have not been posted Contributions during the Computation Period Includes all contributions (including transfers and the contribution being removed) deposited to the account other than posted earnings Computation Period begins immediately before the contribution was made, and ends immediately before the contribution is withdrawn Distributions during the Computation Period Includes all assets (including transfers) removed from the IRA before the removal of the contribution Computation Period begins immediately before the contribution was made, and ends immediately before the contribution is withdrawn Amount Being Withdrawn or Recharacterized The amount of the contribution being removed from the account Income Attributable Will populate with the net income attributable amount after the Calculate button is clicked When all fields are completed, take the following steps to calculate the net income attributable. 1. Click the Calculate button to calculate the Income Attributable and the Total Amount to Withdraw or Recharacterize figures. 2. Click the Print link to print the net income attributable calculation information. 105

106 Post 70½ The Post 70½ Payment Estimator illustrates the difference in annual payment amounts by calculating the projected required minimum distribution (RMD). The payment amounts assume that there is a constant yield, that the payment is distributed on the first day of the year, and that there are no additional withdrawals or contributions. 106
107 The Post 70½ Payment Estimator is used to calculate the estimated RMD for the account, and should not be used to distribute periodic payments to the IRA owner. NOTE: The Post 70½ Periodic Payment Estimator is designed to be used before the year in which the IRA owner reaches age 70½. Instructions To use the Post 70½ Payment Estimator, enter the information requested in each field, as outlined below. Owner s Birth Date In mm/dd/yyyy format Is the spouse the only primary beneficiary OR is a qualified trust the sole primary beneficiary and the spouse the sole beneficiary of that trust? Answer the question by clicking the applicable radio button. No Yes Spouse s Year of Birth If you clicked the Yes radio button, you will be prompted to enter the spouse s birth year in yyyy format. Estimated Balance in Owner s 70½ Year The balance in the IRA at the end of the year preceding the year in which the IRA owner will attain age 70½ Estimated Annual Yield in IRA Investment The annual percentage earned by the IRA Use the following buttons as applicable. Click the Estimate Payments button to calculate the estimated payments for the IRA owner. Click the Print Payments link to print the calculated payment information. Click the Exit button to leave the calculator. 107
108 REPORTS AND QUEUES Through the Reports page, a General User or an Advanced User can create, view, and print a variety of reports. The report categories are listed below. General and Ad Hoc Reports Tax Reporting Summaries Replacement RMD Notifications Sample IRA Owner Notifications Billing Report General and Ad Hoc Reports These reports can be customized by indicating your preferences on each report s parameters screen. Provide the information requested for the report you want to create by entering it in the applicable field on the screen or selecting an option from the drop-down menu. To create the report and print it in Portable Document Format (PDF), click the Generate Report button. NOTE: If the report can be created and printed as a spreadsheet, there will be an Output to Excel button available. Click the Reset button to clear the screen of your entries and selections. 108
109 Account Owner List This report can be used to list owner and beneficiary accounts by account type, and will include each account owner s Social Security number, date of birth, address, and account number information. Some of the customization options for this report include the following. Account Type Date of Death Owner Age Open or Closed Accounts 109
110 Fair Market Value With this report, a list of the fair market values (FMVs) of owners or beneficiaries accounts can be created according to the criteria selected. Some of the customization options for this report include the following. IRA Type Date of Death Owner or Beneficiary Date of Birth Open or Closed Accounts 110
111 Contributions Contribution information for owners accounts can be viewed according to the criteria selected. Some of the customization options for this report include the following. Account Type Contribution Type Contribution Date Range Tax Year 111
112 Withdrawals With this report a list of account owners or beneficiaries withdrawals can be created according to the criteria specified. The report can be customized according to these options. Account Type Withdrawal Reason Code Withdrawal Date Range Withdrawal Type 112

113 Death Claim Status Report This report provides you with a summary of all death claims being processed by Ascensus for your financial organization s deceased account owners. The report you generate will provide you with the information listed below. Deceased Owner Information Payment Election Received (date) Account Type & Account Status Disbursal Type Beneficiary Name & Tax ID Disbursal Authorization Sent (date) Payment Election Sent (date) Disbursal Authorization Received (date) 113
114 User Activity Report This report provides Advanced Users with a tool to monitor financial organization staff use of IRAdirect. The report documents when employees sign into IRAdirect and for how long, which helps strengthen the safeguarding of your financial organization s account owners data. An Advanced User can customize the User Activity Report generated by selecting the period for which information should be displayed. The date information is entered in the Run Date From and Run Date Through fields on the report s parameters screen. When the report is produced, it provides the following information for the date(s) selected. User ID Logout Time User Role Minutes Online Login Time 114
115 Periodic Payment List This report can list your account owners or beneficiaries taking periodic distributions from their IRAs, based on the criteria specified. The report always includes the payment amount and frequency for each listing. It can be customized by selecting the following options. Owner or Beneficiary Beginning/Ending Month(s) Periodic Payment Type Changes Only or All Payments To access detailed instructions for the Periodic Payment List, click the Report Instructions button on the parameters screen. 115

116 Periodic Payment Distribution Report (historical) With this report, regularly scheduled periodic payments can be viewed by selecting the applicable month and year. The report is considered historical, because information for previous years can be viewed. To access detailed instructions for the Periodic Payment Distribution Report (historical), click the Report Instructions button on the parameters screen. 116
117 Verification Reports 1099 Reporting If your organization s reporting option is Online for IRS Forms 1099-R, 1099-Q, or 1099-SA, you will see links to the reports listed below (as applicable) on the Reports page in January. Each optional verification report can be used as a visual tool as you complete the associated report wizard for that account type. The link to each report wizard is in the Reports and Queues section of the IRAdirect homepage. Pre-1099-R Verification Report (If this report link is available, you are expected to complete the IRA Withdrawal Report Wizard.) Pre-1099-Q Verification Report (If this report link is available, you are expected to complete the ESA Withdrawal Report Wizard.) Pre-1099-SA Verification Report (If this report link is available, you are expected to complete the HSA Withdrawal Report Wizard.) FMV Reporting If your organization s reporting option is Online for FMV/RMD reporting, you will see a link to the Year End FMV Report on the Reports page in January. This optional report can be used as a visual tool as you complete the associated Year End FMV Report Wizard for FMV reporting. The link to this associated report wizard is in the Reports and Queues section of the IRAdirect homepage Reporting If your organization s reporting option is Online for IRS Forms 5498, 5498-ESA, or 5498-SA, you will see links to the reports listed below (as applicable) on the Reports page after the tax return deadline (generally April 15). Each optional verification report can be used as a visual tool as you complete the associated report wizard for that account type. The link to each report wizard is in the Reports and Queues section of the IRAdirect homepage. Pre-5498 Verification Report (If this report link is available, you are expected to complete the IRA FMV and Contribution Report Wizard.) Pre-5498-ESA Verification Report (If this report link is available, you are expected to complete the ESA Contribution Report Wizard.) Pre-5498-SA Verification Report (If this report link is available, you are expected to complete the HSA FMV and Contribution Report Wizard.) 117

118 Account Owners Over 70.5/71.5 Scheduled Payment Status Report Each year beginning in February or March, Ascensus mails RMD notification letters to Traditional IRA owners who will attain age 70½ in the current year, and to those who are age 71½ or older and do not yet have an RMD election established in IRAdirect (unless your organization opts out of this service). The RMD notification letters are written as though sent by your organization. This report identifies Traditional IRA owners who have received the RMD notification, as well as those who are age 70½ or older and have not yet made an RMD election in IRAdirect. The report can be customized according to these options. Account Status RMD Notification Sent (or Not Sent) Scheduled Payment Election (or No Scheduled Payment Election) Year Notification Sent (YYYY) NOTE: Ascensus does not mail RMD notification letters for SIMPLE IRA owners. 118

119 Tax Reporting Summaries Information Reports During the tax reporting season, whenever we produce tax forms for your account owners, we make the applicable Information Report available in IRAdirect for that tax form type. For example, if we have produced IRS Forms 5498 for your organization s Traditional and Roth IRA owners, you would see the information that appeared on each account owner s tax form by clicking the Current Tax Year 5498 Information Report link and generating the report. Below are the parameters pages for some of the Information Reports. At the bottom of each report s parameters page you will see these buttons. Report Instructions Output to Excel Generate Report Reset 119
120 After opening a current tax year Information Report, take the following actions. 1. On the report s parameters screen, click the Report Instructions button. Print the instructions, which display as a PDF file. 2. Click the Generate Report button or Output to Excel button to open the report. Review the report carefully, as it reflects the information you provided to us, which now appears on the tax forms we produced and sent to your account owners. The information on those tax forms will be reported to the IRS. 3. If any corrections are necessary, refer to the report instructions, which provide a step-by-step guide to entering changes in IRAdirect. Every time we produce original or corrected tax forms for your organization they will be reflected in another Information Report available in IRAdirect. You will know each time we produce tax forms of that type, because the most recent Printed Date appears in the menu on the report s parameters screen. You can also review an Information Report for a previous year by tax form type. Example: If you want to see the information on the Forms 5498 we produced for your account owners for tax year 2016, you would click the Previous Tax Years 5498 Information Report link and select 2016 from the menu on the report s parameters screen R Totals Report The 1099-R Totals Report summarizes the data listed below on the date the report was generated, and reflects the original and corrected Forms 1099-R that were printed. When we have stopped producing Forms 1099-R and have closed the tax year, the information on the 1099-R Totals Report lists the final totals information submitted to the IRS for your organization. Year to Date Adjusted Distribution Amounts Year to Date Adjusted Federal Withholdings Year to Date Adjusted State Withholdings On the report s parameters screen, you can select the tax year for the report you want to review. Keep in mind that previous tax year Form 1099-R totals can be used in reconciling your IRS 945 Withholding Report for the applicable tax year. 120
121 Replacement RMD Notifications A personalized Replacement Age 70½ Notification or a Replacement Age 71½ Notification can be created for a Traditional IRA owner who received an original notification in the current year, but now needs another copy of it. To create a replacement notification, take these steps. 1. Click the Reports link in the Reports and Queues section of the IRAdirect homepage. 2. Click the applicable link in the Replacement RMD Notifications to Create, Print & View section of the Reports page. 3. Enter the IRA owner s Social Security number on the parameters page. 4. Click the Generate Notification button to create the replacement letter. If the replacement letter you generate is blank, it means an original notification letter has not yet been produced for that IRA owner, or it is past the year the original notification was produced. Sample IRA Owner Notifications This section of the Reports page contains links to the various letters and booklets we send to your organization s account owners or beneficiaries as applicable. You can view and print samples of the materials listed below by clicking the applicable link. Age 70½ RMD Notifications Age 30 Notification Age 71½ RMD Notifications Beneficiary Payment Options Booklet Pre 71.5 Instruction Booklet for IRA Owners Turning 70½ in Current Year Instruction Booklet for IRA Owners Over Age 70½ Beneficiary Payment Options Booklet Post 71.5 Roth IRA Beneficiary Payment Options Booklet Billing Report In the Billing Report section of the Reports page, you will be able to view and print your organization s Billing Detail Report. This report identifies all accounts added or closed that are reported on the selected billing invoice. On the parameters screen you can select current and previous semiannual billing invoices. To create the report, take the following steps. Click the Billing Detail Report link and select the billing invoice from the menu on the parameters page. Click the Generate Report button or the Output to Excel button. To access a guide to read and understand the information on your report, click the Report Instructions button. NOTE: If the report you generate is blank, it means that no data exists for that report. 121
122 Approve Forms From General Users Forms created by General Users are not applied to IRAdirect until reviewed and approved by an Advanced User. The Approve Forms From General Users queue is located in the Reports and Queues section on the homepage. This queue is where an Advanced User reviews forms created by General Users, and either approves or denies those forms. The Total indicator near the top of the screen displays the number of records awaiting action in the Approve Forms From General Users queue. If a form needs a correction, an Advanced User has the ability to edit the form, and then post the edited document. Advanced Users can also view approved or denied forms from the past 30, 60, 90, or 120 days. 122
123 Instructions The menus at the top of the Approve Forms From General Users screen allow you to perform a customized search. Sort By Search By Search Value Form Type Form Type Social Security Number Social Security Number Account Number Submitted By Signature Date History Period Form Date Submitted By What you select as the Search By criterion determines what is displayed in the Search Value field. If you search by Form Type, select the applicable form from the menu that s displayed. If you search by Social Security Number, enter the account owner s Social Security number. If you search by Submitted By, enter the User ID of the financial organization staff member whose forms you want to review. If you search by History Period, select the applicable time frame from the menu that is displayed. The status of the forms displayed according to your search selections will appear as New, Approved, or Denied. Disbursal Authorizations appear on the Approve Forms From General Users screen after Ascensus has authorized payment to a death beneficiary. Notification that the Disbursal Authorization is available is sent to your organization by fax. Disbursal Authorizations and new forms require the attention of an Advanced User, as they need to be reviewed and then approved or denied, by taking these steps. The Form Review Process (without esign) 1. Click the View/Print link. The PDF of the form displays in a new window. 2. Review the form. 3. If the form requires changes, take these actions. a. Click the Edit Transaction link. b. Make the necessary changes to the form. c. Click Save. 123
124 4. If the form does not require changes, take these steps. a. Change the form Status in the drop-down menu, from New to Approved (or Denied). b. Click Save to apply an approved form to IRAdirect or to deny an unapproved form. The Form Review Process (with esign) 1. Click the View/Print link if the document has not yet been electronically signed. Otherwise click the View Signed Document link if the document has already been electronically signed. The PDF of the form displays in a new window. 2. Review the form. 3. If the form requires changes, take these actions. (Warning: If the form has already been electronically signed, taking these actions will create a new document and require a new electronic signature from the account owner.) a. Click the Edit Transaction link. (If the document has already been electronically signed, a pop-up message will appear to confirm that you wish to proceed with creating a new document and obtaining a new signature.) b. Make the necessary changes to the form by continuing through the form wizard. c. Click Save to save the transaction to IRAdirect. d. Click Continue to begin the electronic signing process and complete the transaction. 4. If the form does not require changes, but still needs to be electronically signed, click the Sign Document link. 5. If the form does not require changes, take these steps. a. Change the form Status in the drop-down menu, from New to Approved (or Denied). b. Click Save to apply an approved form to IRAdirect or to deny an unapproved form. The Disbursal Authorization Review Process 1. Click the Edit Transaction link. For an RMD Disbursal Authorization, make any needed changes to the withholding election and click Next. For a Normal Disbursal Authorization, enter the gross dollar amount distributed to the beneficiary and any applicable withholding amount(s) in the fields provided, and click Next. 2. On the final authorization page, click Print to print a copy of the authorization for your records. 3. Then, click Save to apply the disbursal information to IRAdirect. 4. Lastly, distribute the payment to the beneficiary. 124
125 NOTE: Whenever you edit a record (transaction form), you must navigate through the entire record in the same session before you will be able to approve and process the form. To approve or deny a form without reviewing it, take these steps. On the Approve Forms From General Users screen, change the status of the form from New to Approved (or Denied). Click Save. NOTE: Forms that were mistakenly created should be denied. Forms with a New status that are changed to Approved and then saved, are applied to IRAdirect. You can also take action for multiple records at once by clicking the applicable button. Process Records Click this button to submit (apply to IRAdirect) all approved records displayed on the screen. Set Status to Approve All Click the Approve All button to enter a status of approved for all records displayed on the screen. NOTE: You must then click the Process Records button to apply those records (transaction forms) to IRAdirect. Set Status to Deny All Click the Deny All button to enter a status of denied for all records displayed on the screen. NOTE: If a record (transaction form) has been edited, but has not yet been processed (applied to IRAdirect), an Advanced User can still deny that record. Finish Electronically Signing a Document If electronic signatures are enabled for your organization and not all electronic signatures were obtained on a document that was completed by either a General or Advanced User, an Advanced User may elect to finish electronically signing the document through the Approve Forms From General Users queue if the document is not available under the View Pending Signatures link on the homepage. NOTE: If a General or Advanced User saves a form wizard, but exits before clicking the Continue button or exits the Signer Information page, the document will not appear under the View Pending Signatures link. Therefore, an Advanced User must take the following steps to complete the electronic signing process. 1. If a General User completed the transaction, an Advanced User should follow the steps listed under The Form Review Process (with esign) section, discussed on the previous pages, to complete the electronic signing process. 2. If an Advanced User completed the transaction, an Advanced User can retrieve the document and finish the signing process in the Approve Forms From General Users queue by following the steps below. Select History Period from the Search By drop-down menu. 125
126 Select the applicable Search Value and Form Type from the additional drop-down menus. Click Search. Find the saved document from the list of forms that appear and click the Sign Document link to complete the signing process. o o o If the user saved the form wizard but either exited the transaction before clicking Continue or exited on the Signer Information page, the electronic signing process will resume at the Signer Information page. If the user exited the electronic signing process after reaching the Session Details page, the signing process will resume at the Session Details page. If 90 days have passed since the form was completed, the electronic signing process will resume at the Signer Information page. Complete the electronic signing process by following the steps described in the Electronic Signatures section of this guide. 126
127 Approve Forms From Owners Approve Forms From Owners is an optional link in the Reports and Queues section of the homepage. This link is visible only if your organization is using Retirement Central with esign. If the Approve Forms From Owners link appears on your IRAdirect homepage, refer to your Retirement Central documentation for detailed instructions. View Pending Signatures If electronic signatures are enabled for your organization, Advanced and General Users have access to the View Pending Signatures link in the Reports and Queues section of the homepage. This link allows the user to access a form for which a signing session has already been created, but not yet completed. You may view pending signatures for any forms that were completed within the last 90 days. NOTE: Documents only appear under this link if the user exited the Session Details page. If a General or Advanced User saves a form wizard, but exits before clicking the Continue button or exits the Signer Information page, the document will not appear under the View Pending Signatures link. Instead, an Advanced User must finish the electronic signing process by accessing the form from the Approve Forms From General Users queue. 1. Click the View Pending Signatures link in the Reports and Queues section of the homepage. 2. Enter any applicable search criteria to search for the applicable form. Date Range (within the last 90 days) First Name Full Name SSN (Masked) SSN/TIN Account Number Department Account Suffix Document Type Account Type Image Status 3. Click Search. 127
128 Any forms meeting the specific search criteria will display as shown below. To view the specific documents before continuing to the signing process, click anywhere in the outlined section below and the following information will display. You can view the document and audit report by clicking the Eye icon under the Documents tab, and you can view the signatures that are still needed under the Signature Status tab. 128
129 To enter the signing session and finish signing the document, click the arrow icon on the right side of the form, outlined below. You will be directed to the Session Details page where the electronic signature process can be completed. 129
130 MAINTENANCE TOOLS Investment Maintenance With the Investment Maintenance table in IRAdirect, you can complete the following tasks. Add a new investment Make changes to current investments NOTE: The Investment Maintenance feature is also part of the Application and Contribution Wizards. If investments are selected when completing the Application Wizard or the Contribution Wizard, the investment information displays on the form at the end of the wizard. In the Application Wizard, the financial disclosure automatically calculates based on the investment selected. Instructions 1. Select Investment Maintenance from the Maintenance Tools section of the IRAdirect homepage to automatically display your list of current investments. Each investment has its own box containing its specific details. New investments are created in the New Investment section of the table. 2. After making changes to investment maintenance information, click the Save button at the bottom of the page to apply the changes made to a current investment or to save the information entered to create a new investment. New investments will be added to your organization s Investment Table in IRAdirect. 130
131 Adding an Investment Move to the New Investment section at the bottom of the table and complete these fields. Product Name Enter the name of the investment. Product Details Enter information that best describes the features of this investment to your financial organization s account owners. Min Balance Enter the minimum balance required. Use a decimal point if needed, but do not use dollar signs or commas. Term in Months Enter the investment term, calculated in months. If there is no term, leave this field blank. Rate Enter the rate. If a decimal point is necessary, it can be followed by up to three digits. Do not enter the percentage (%) symbol. # of APR Decimal Places Select the number of decimal places to use for displaying rates. We use two decimal places as the default, but you can choose up to four decimal places from the drop-down menu. Calc Method Select one of the following options from the drop-down menu. Simple Compound 131
132 Frequency If you selected Simple as the Calc Method, the Frequency field is not available. If you selected Compound as the Calc Method, choose one of the following options from the drop-down menu. Annually (once a year) Monthly (once a month) Semi-Annually ( twice a year) Daily (every day) Quarterly (four times a year) Yield (APY) The yield is automatically calculated, based on the term and rate information entered. Override Calculated Yield (APY) Check this box if you want to override the automatically calculated yield. Then, enter the desired yield. Early Withdrawal Penalty Enter the penalty (in number of days or percent) for early withdrawals. If you select Days from the drop-down menu, enter the penalty amount using the number of days of earnings the account owner will lose if money is withdrawn before the investment matures. If you select Percent from the drop-down menu, enter the percentage of earnings the account owner will lose if money is withdrawn before the investment matures. NOTE: The penalty for early withdrawals is used for calculating the Financial Disclosure only. Terms of less than 12 months do not display an early withdrawal penalty, because the disclosure assumes the investment is held for one year. These penalties and other fees can be displayed under Product Details and in your financial organization s Truth-in-Savings disclosure. Enrollment Fee Enter the fee (in dollars) that is required to participate in the investment. Use a decimal point, but do not use dollar signs or commas. Early Termination Fee Enter the fee (in dollars) charged for terminating the investment before the term has expired. Use a decimal point, but do not use dollar signs or commas. Annual Fee Enter the yearly fee (in dollars) charged for this investment. Use a decimal point, but do not use dollar signs or commas. Click To Add Fee Up to two additional fees not listed in the Fees box may be entered by clicking the Click To Add Fee link. When you click this link, a pop-up box appears. Enter the fee name and the amount of the fee in the applicable fields. The fee cannot exceed $100. After clicking Save, the fee will appear in the Financial Disclosure table. Sort Order You can control the order in which investments display. Enter the number that reflects the order in which the investment is to appear in the Retirement Central Investment Table. For example, if the investment should appear first in the table, enter 1 in this field. Note: The investment will not display in the table if the Sort Order is not entered. Effective Date Enter the date the investment terms are considered to be in effect, using mm/dd/yyyy format. 132
133 Changing the Investment Terms To change the terms and conditions and the effective date information in the table, take these steps. 1. Enter the new information in the Effective Date and Terms fields. Effective Date Enter the date the investment terms are considered to be in effect, using mm/dd/yyyy format. Terms In the open field provided, enter the terms and conditions governing all of the investments. Ensure that the information is clear and complete because it s what your financial organization s account owners will use when making investment selections. 2. When your entries are complete, click the Save button. Changing an Investment To change an investment, take these steps. 1. Move to the applicable investment and edit the fields needing changes. For details, see the field descriptions in the Adding an Investment section. Each data entry field can be changed. 2. After completing all the necessary changes for the investment, click the Save button. 133
134 Deleting an Investment To delete an investment, take the following steps. 1. Move to the applicable investment. 2. Beneath that investment, click the Remove this investment check box. 3. Click the Save button. Viewing the Investment Table To see how the Investment Table appears after changes and edits have been saved, take these steps. 1. Click the View button. 2. Review the updated table, which displays in a new window. NOTE: To see how the investment and terms will appear in the Investment Table, save all data before clicking the View button. 134
. Files transferred through this process are encrypted, scanned for viruses, and protected from unauthorized access during the entire process.")
135 Transfer Files The Transfer Files link on the IRAdirect homepage allows Advanced Users to either upload general files to Ascensus or download files delivered to you from Ascensus using Secure File Transfer Protocol (SFTP). Files transferred through this process are encrypted, scanned for viruses, and protected from unauthorized access during the entire process. The Transfer Files link will not appear if your organization is not registered to upload or download general, non-tax reporting files through IRAdirect. For more information, contact your Conversion Coordinator or the IRA Call Center. NOTE: This link is not used to upload tax reporting files. The Upload Tax Files link, discussed later, should be used to upload tax reporting files. General Upload To upload a general file, take the following steps. 1. Click the Transfer Files link in the Maintenance Tools section of the homepage. The General Upload tab appears, as shown below. 135
 Name and Address Changes New Applications Miscellaneous Files 3. Enter your email address in the Send Email Confirmation field under the Optional Settings section.")
136 2. Select the File Type you are uploading by selecting one of the applicable radio buttons listed below. (Only the file types available for your organization will appear on the screen.) Name and Address Changes New Applications Miscellaneous Files 3. Enter your address in the Send Confirmation field under the Optional Settings section. (The address will default to the Primary Contact.) 4. Click the Browse button to select the file to upload from your system. 5. Click the Upload button to transmit the selected file. (The Upload button will be grayed out until all required fields are completed.) If your file was successfully uploaded, the following message will appear on the screen: Your file has been uploaded successfully. 136
137 File Upload Errors If you upload a general file and do not receive a success message, check the screen for a red error message. If an error message appears, you must fix the error and re-submit the file. Below are examples of error messages you may receive. The selected file does not contain any data. Please select another file. This error occurs when a file with no data is uploaded. The selected file name is too long. Rename the file and try uploading again. This error occurs when a file is uploaded with a file name that is greater than 139 characters. Invalid File Type. The file you have selected to upload appears to be compressed or is a type of file we do not accept. This error occurs when an unacceptable file type is uploaded. The acceptable file types are.pdf,.doc,.docx,.xls,.xlsx,.txt,.dat,.zip, and.csv. address must contain and. This error occurs then an address is missing the referenced characters. Error occurred while uploading your file. This general error message appears when an error occurs, but no other error message is applicable. In this instance, contact the IRA Call Center at for further assistance. 137

138 General Download To download a general file delivered to you from Ascensus, or to review a file your organization uploaded for Ascensus, take the following steps. 1. Click the Transfer Files link in the Maintenance Tools section of the homepage. The General Upload tab appears. 2. Click the General Download tab. 3. Click the Download icon ( ) under the Uploaded by Ascensus section to download a file from Ascensus. 4. Click the Download icon ( ) under the Uploaded by Financial Organization section if you would like to download and review a general file your organization uploaded for Ascensus. The table columns for files Uploaded by Ascensus and Uploaded by Financial Organization will provide the name of the file, the file size, the type of file, and the date the file was uploaded to IRAdirect. The Delete icon ( ) should only be clicked if your organization no longer needs the applicable file. 138

139 My Services The My Services link can be used to view or edit your user profile in IRAdirect. After clicking the My Services link, the following page appears. From here, you can review and edit the following items. Demographics Security Question Password Service Role If you are a Security Administrator, review the User Guide for Security Administrators, found under the User Guide & Manuals link in the Welcome section of the IRAdirect homepage, for information about approving and deactivating users, resetting passwords, and much more. 139
140 TAX REPORTING Upload Tax Files The Upload Tax Files link on the IRAdirect homepage allows Advanced Users to upload tax reporting files to Ascensus using Secure File Transfer Protocol (SFTP). Files transferred through this process are encrypted, scanned for viruses, and protected from unauthorized access during the entire process. The Upload Tax Files link should only be accessed by financial organizations that use the Transmission reporting option to submit tax information. NOTE: Do not send tax information through the Upload Tax Files link if your Reporting Option is Online for that type of reporting. Sending tax information by an incorrect reporting method will delay processing and may result in fees or penalties being charged. 140
141 The File Upload page may contain up to three sections. 1. Past Due Includes any tax information that has not yet been submitted and is now past the Ascensus deadline. 2. Upcoming Due Includes any tax information that has not yet been submitted and the Ascensus deadline is approaching. 3. Received Includes any tax information that has already been submitted and received. (You must click the triangle next to the Received header to view the tax information that has already been submitted.) NOTE: If Financial Organization is listed under the Tax Reporting Completed By column for FMV, an information icon ( click the icon, the following information is provided. ) appears. If you Tips for Uploading Tax Files If your file is formatted incorrectly, or an error occurs that delays processing because manual intervention is required to apply the tax data, Ascensus may charge your organization a $100 Processing Issue Fee. Below are some tips for submitting files and avoiding potential processing errors. Your financial organization s reporting option selections are listed on the File Upload tab. Review the Reporting Option column before submitting a file. You should only upload a file if your reporting option is Transmission for the selected file type. Only one file can be uploaded at a time. Do not attempt to upload file directories. We do not accept zipped (compressed) files. If you attempt to upload a zipped file, you will receive an upload error alert message because you have transmitted an invalid file type. Because the file has been rejected, an unzipped replacement file must be uploaded. Do not encrypt or password-protect your data/files. The Secure File Transfer Protocol encrypts the data upon submission. Encryption done by the sender may cause unnecessary delays in accessing your file. Allow Ascensus 72 hours to process your file after you submit your file and receive a success message on the screen. If your file is not successfully processed after 72 hours, and you do not receive an from Ascensus regarding any processing errors, then please contact Ascensus for assistance. 141
142 File Upload To upload a file, take the following steps. 1. Click the Upload Tax Files link in the Tax Reporting section of the homepage. The File Upload tab appears, as shown below. 2. Click the applicable radio button to select the type of file to be uploaded. Review the information on the page to ensure your organization s reporting option is Transmission for the selected file type. 3. If you re submitting a contribution file for 5498 or 5498-ESA reporting, additional steps will appear. Read the instructions on the screen to ensure the correct contribution types are read from your transmission file. 4. Enter your address in the Send Confirmation field under the Optional Settings section. 5. Click the Browse button to select the file to upload from your system. 6. Click the Upload button to transmit the selected file. (The Upload button will be grayed out until all required fields are completed.) 142

143 The transmitted file is then analyzed for valid extensions and other formatting issues depending on the type of file that was uploaded. When the file analysis is complete, one of the following messages appears. Upload Successful The file uploaded successfully, so your task is complete. Upload Error An upload error occurred because an invalid file type was submitted. The acceptable file types are.pdf,.doc,.docx,.xls,.xlsx,.txt,.dat,.zip, and.csv. You must correct the file type and re-submit the file. File Rejected Your file cannot be processed because an error occurred. These errors can occur for a number of reasons. In each instance, you must correct the error and re-submit the file. (An example of a file rejected error message is below.) 143

144 Tax Reporting Error Queue If tax reporting information is submitted for your organization by transmitting a file (the Transmission reporting option), and there are problems that prevent us from processing all of the data in the file, those issues will be reflected in the Tax Reporting Error Queue. If errors appear in your Tax Reporting Error Queue, it is important to address them immediately so the applicable tax forms can be produced for those account owners. Take the following steps if you see a red alert message on the IRAdirect homepage that reads: Tax Reporting Errors are waiting for action by an Advanced User. 1. Click the Tax Reporting Error Queue link in the Tax Reporting section of the IRAdirect homepage. 2. Click the Export all errors to Excel link to create a report of the errors for your organization s records. This export step is optional, but is recommended because once an error is corrected, you are unable to access it through the queue again. 3. Click the Error Queue User Guide link and print the guide. It provides step-by-step instructions for each error message that may appear in the Tax Reporting Error Queue. 4. Correct each error listed in the Tax Reporting Error Queue by following the instructions in the Error Queue User Guide. 144

145 Tax Reporting Warnings If tax reporting information is submitted for your organization by transmitting a file (the Transmission reporting option), review the Tax Reporting Warnings link in the Tax Reporting section of the IRAdirect homepage. This queue displays certain transactions that have been applied to an account owner s account in IRAdirect, but should be reviewed by your organization for accuracy because a change was made before it was applied. Take the following steps. 1. Click the Tax Reporting Warnings link in the Tax Reporting section of the IRAdirect homepage. 2. Follow the instructions listed on the page (or view the last page of the Error Queue User Guide for specific instructions). 3. Click the Delete button to delete a warning once it s reviewed for accurate reporting on the account owner s tree. 145
146 etax Owner Settings The etax Owner Settings link allows Advanced Users to produce electronic tax forms for account owners that can be uploaded to your organization s online banking system, where they are easily accessible to your account owners. Three delivery method options are available for new and existing account owners: Paper/Mail, Electronic, or Paper/Mail and Electronic. There is a fee for each delivery method. Paper/mail delivery is invoiced at the current first-class postage fee per tax form. Electronic delivery is invoiced at $0.30 per tax form. It s important to note that etax forms for owners cannot be the only delivery method used to send tax forms without an account owner s consent. This is an IRS requirement. Before selecting the etax forms for owners option, your organization must meet additional IRS requirements. Refer to the etax Forms User Guide for complete details about these IRS requirements, your organization s responsibilities, and producing etax forms for owners. The etax Forms User Guide is found under the User Guide & Manuals link in the Welcome section of the IRAdirect homepage. etax State Settings The etax State Settings link allows Advanced Users to update the settings for etax forms for state reconciliation. Ascensus uploads electronic copies of Forms 1099-R for state reconciliation to IRAdirect, rather than mailing copies to your organization. These copies are uploaded as part of the annual tax reporting cycle, and include original or corrected Forms 1099-R (as applicable) that are created based on the selections you make under the State Settings tab. We provide state copies to your organization to comply with state withholding reconciliation requirements, if applicable. Every state has different reconciliation requirements, so you should review your state s requirements and the requirements of any other states for which your account owners request state withholding from their IRA distributions. If you are unaware of the requirements for a particular state, contact that state s department of revenue (DOR) for more information. If your organization is required to submit paper copies for state reconciliation, you ll select your settings under the State Settings tab. If you re required to submit a tax file for state reconciliation, review the Tax File Creation section. Refer to the etax Forms User Guide for complete details about selecting your settings for producing etax forms for state reconciliation. The etax Forms User Guide is found under the User Guide & Manuals link in the Welcome section of the IRAdirect homepage. Download etax Forms The Download etax Forms link allows Advanced Users to download etax forms for owners or etax forms for state reconciliation, as applicable, for their organizations. Once downloaded, etax forms for owners can be uploaded to your online banking system, and etax forms for state reconciliation should be filed with your state s DOR, if needed. Refer to the etax Forms User Guide for complete details about downloading available etax forms for owners or etax forms for state reconciliation. The etax Forms User Guide is found under the User Guide & Manuals link in the Welcome section of the IRAdirect homepage. 146
147 Tax File Creation If your organization is required to submit a tax file in IRS 750 Format for a particular state s reconciliation, use the Tax File Creation tab to submit a request to create this file. This tab is accessed by clicking one of the following links in the Tax Reporting section of the IRAdirect homepage, then clicking the Tax File Creation tab. etax Owner Settings etax State Settings Download etax Forms Check with your particular state s DOR to determine if a tax file is required to reconcile state withholding. If a tax file is not required, navigate to the State Settings tab to receive a PDF version of each 1099R record, if applicable. NOTE: This tax file should not be submitted to the IRS. It is only used for state reconciliation, if required. Refer to the etax Forms User Guide for complete details about selecting your settings for producing etax forms for state reconciliation. The etax Forms User Guide is found under the User Guide & Manuals link in the Welcome section of the IRAdirect homepage. Previous Year Forms The Previous Year Forms tab is accessed by clicking one of the following links in the Tax Reporting section of the IRAdirect homepage, then clicking the Previous Year Forms tab. etax Owner Settings etax State Settings Download etax Forms This tab is only used to purchase electronic copies of tax forms produced in prior tax years. Your organization may choose to do this for recordkeeping purposes (especially if you are aware that you ll be merging with another organization). Previously, our Conversion Coordinators would complete these requests and it would be a manual process. Now, your organization can produce these copies on your own as long as you are still an active client with Ascensus. Refer to the etax Forms User Guide for complete details about selecting and purchasing previous year tax forms. The etax Forms User Guide is found under the User Guide & Manuals link in the Welcome section of the IRAdirect homepage. 147
148 FINANCIAL ORGANIZATION INFORMATION Overview The tabs to your organization s information screens are accessed by clicking your organization s name in the upper right corner of the homepage. It s easy to navigate to the financial organization information screens by clicking the tab you want to review. Programs Address General Reporting Contacts Summary Programs The Programs tab contains the information about your services and programs. This data can be viewed by organization staff, but it cannot be changed. 148
149 Details Because your organization is on the Ascensus Fully-Administered Program, this is the information you will find on the Programs screen. Program Fully Admin Method Online Fiduciary Will display one of the following, as applicable. Custodian Trustee Status Will display one of the following, as applicable. Active Liquidating Establishing Terminating Inactive Check Boxes A check mark in the box indicates that Ascensus is the program administrator for those accounts. Traditional Coverdell ESA Roth SIMPLE IRA Additional Programs Health Savings Account A check mark in this box indicates you are enrolled in the Fully-Administered Program and Ascensus is the program administrator for these accounts. Record Retention A check mark in this box indicates that you will send your transaction forms to us so we can image them and make them available should you ever need them. NOTE: Keep in mind that we never process any forms you send us for record retention, because you use IRAdirect to enter activity for your accounts. Retirement Central No Forms A check mark indicates you are using our Retirement Central No Forms product. Retirement Central Forms A check mark indicates you are using our Retirement Central Forms product. Retirement Central Forms with esign A check mark indicates you are using our Retirement Central Forms product enhanced with esign. IRAdirect express A check mark indicates you use our IRAdirect express product. NOTE: For more information about product offerings, visit 149
150 General The General tab contains information about your financial organization which can be viewed, but cannot be changed by financial organization staff. Details Below is a field-by-field guide to the information contained on the General screen. Financial Organization Name The name by which your organization is listed in IRAdirect. Financial Organization Legal Name The name by which your organization is identified by the IRS, which may differ from the name that appears in IRAdirect. Organization Number This is the identification number assigned to your financial organization by Ascensus. ClD# This stands for Client Identification Number, and is a unique five-digit number assigned to each IRAdirect client by Ascensus. It appears with your organization name in the upper right corner of every screen in IRAdirect, and on your organization s IRAdirect reports. Federal Tax ID The identifying number assigned to your organization by the IRS. State Tax ID The identifying number assigned to your organization by the state in which you are located and conduct business. 150
151 Edit Branch States If your financial organization has branches in other states, click the Edit Branch States link to enter and save the state name(s) in the table that appears. (This link is visible only to an Advanced User.) Changes to state tax ID numbers can be entered only by Ascensus, and only after the current tax year is closed. Contract No This eight-digit number is for internal use by Ascensus staff. Data Processor Name The name of your financial organization s data processor, if that information has been provided to Ascensus. Charter Indicates your financial organization s charter status, which is either State or Federal. 151
152 Contacts The Contacts tab contains a table with the name, telephone number, fax number, and address information for the following program contacts and roles at your organization, as applicable. One IRA Representative is designated as the primary contact, and will always appear at the top of the table. An Advanced User can add, delete, or change the information on the Contacts screen, except for the Security Administrator role, which requires the completion of a registration process. A General User can only view the information. Advanced Users must click the Save button to apply any changes made to the fields on the Contacts screen. The Save button is not visible to General Users. It is the responsibility of the organization staff to keep the information on this screen current, and to call us about a need to add or remove a Security Administrator. 152
153 Details When an Advanced User selects a contact type from the drop-down menu, completes the information fields, and clicks Save, the new contact appears in the table at the top of the screen. Contacts listed in the table can be selected for editing by an Advanced User at any time. Click View to see and edit the contact type information. Below is a field-by-field guide to the Contacts screen. Contacts Table The Contacts Table at the top of the screen contains information about the contact types that have been entered and saved. The Primary Contact at your financial organization defaults to an IRA Representative, and the Primary Contact column displays Yes for the IRA Representative contact. If a contact has elected to receive notifications, Yes appears in the Receive s column. Click View to see all the details on the screen for the contact type selected in the table. Click Delete for the contact type selected in the table to remove the contact from the screen. o o The Benefit Claims and Security Administrator contacts in the table cannot be deleted because those contacts must register their roles with Ascensus. To delete a Primary Contact (the Primary Contact check box is checked), another Primary Contact must first be entered and saved. Click New to create a new contact. If you select an existing contact from the table and then click New, the selected contact will be removed and the fields cleared. Click Save to update the new information entered in the fields for the selected contact. If Save is clicked but no contact was selected, a new contact will be created. Contact Type The information displayed on the screen is dependent on the type of contact selected from the drop-down menu. IRA Representative Security Administrator (for IRAdirect) HSA Representative Data Processor IRAdirect express Financial Organization IT Retirement Central Third Party Vendor Benefit Claims Primary Contact Check Box This box is available when IRA Representative is selected for the Contact Type. First Name, Middle Initial, and Last Name The name of the contact selected from the table. Phone and Ext. The telephone number called to reach the selected contact. 153
154 Fax The fax number for the contact selected from the table. Address The address to which our notifications should be sent for the selected contact. If the contact type is IRA Representative, and you want more than one IRA staff member to receive our notifications, enter a group address in this field. (Contact your organization s IT department for assistance in setting up an group.) Send notifications to this contact If the selected contact wants to receive notifications such as tax reporting reminders, notices of report availability, or special updates, click this check box. If a representative is set up to receive our notifications but you notice that he or she is not receiving these communications, have your IT department whitelist our s. They ll need the following information to complete this task. Domain: ascensus-rps.com IP Address: Retirement Central esign notifications to this contact If the selected contact type is Retirement Central, and that individual wants to receive s when a form is submitted through Retirement Central, this box should be checked by clicking it. etax notifications to this contact If the selected contact wants to receive notifications about etax forms, click this check box. (This box will automatically be checked for the Primary Contact.) 154
155 Address The Address tab contains basic information about your financial organization, such as the PO Box and street mailing addresses, the hours of operation, telephone number, and webpage address. 155
156 Details All fields on the Address screen can be updated by a General User. Primary Address This is usually the PO Box for your financial organization. Overnight Address This is usually your financial organization s street address. Business Hours Your financial organization s hours of operation. Web Page Address The address used to access your financial organization on the Internet. Retirement Central T-I-S Web Address If applicable, enter the URL for the truth-in-savings disclosure that will appear in Retirement Central. Phone Number The main telephone number for your financial organization. States with a branch location If your financial organization has branches in other states, click the Edit Branch States link to enter and save the state name(s) in the table that appears. (This link is visible only to an Advanced User.) Changes to state tax ID numbers can be entered only by Ascensus, and only after the current tax year is closed. 156
157 Reporting The Reporting tab contains tax reporting information for your organization. It details how we expect to receive your tax information, documents when the information was received and processed, and specifies the order in which you want the records on your tax reports to be displayed. Advanced Users must click the Save button to apply any changes made to the Reporting screen. The Save button is not visible to General Users. 157
158 Details Below is a field-by-field guide to the Reporting screen. Type The type of tax reporting is displayed in this column by the name of the tax form. Tax Reporting Completed By By the tax reporting form type displayed in the Type column, this column documents whether Ascensus or your Financial Organization is producing tax forms for your account owners and reporting to the IRS. Ascensus We will produce and mail tax forms to your account owners (as applicable) and send all reportable information to the IRS by the required deadlines. Financial Organization You (or your data processor) will be responsible for producing and mailing tax forms to your account owners, and sending all reportable information to the IRS by the required deadlines. The only exception to the Financial Organization setting is for FMV reporting, where Financial Organization in this field means the following. You will submit FMV information to Ascensus in January for all of your financial organization s Traditional and Roth IRA owners, but we will produce and mail FMV/RMD statements and report the FMV to the IRS only for the following groups. Traditional IRA owners age 70½ or older in the year following the tax year, whose statements will contain the estimated required minimum distribution (RMD) for the current year as well as the December 31 ending balance (the FMV) IRA owners deceased during the tax year IRA beneficiaries determined during the tax year Your financial organization is expected to put the December 31 ending balances for all Traditional and Roth IRAs on account owners year-end statements, accompanied by language that tells the recipient the FMV will be reported to the IRS. Reporting Option This column indicates the method by which you send that type of tax reporting information to Ascensus, which will be one of the following. Online FMV, 1099, and 5498 information is submitted using the applicable report wizard available in IRAdirect in the Reports and Queues section of the homepage. For example, this setting for 1099-R, 1099-Q, or 1099-SA reporting means that you are entering withdrawals in IRAdirect as they occur throughout the year, using the form wizards. The information is then confirmed or changed in January by completing the applicable IRA, ESA, or HSA Withdrawal Report Wizard, as required. Transmission The information file is transmitted electronically using the Upload Tax Files link available in the Tax Reporting section on the homepage. Date Option Received This is the date the reporting option was requested by your financial organization. 158
159 Date Information Processed This is the date we successfully processed the information submitted for that type of reporting, which ensures the production of tax forms for your financial organization s account owners. If you report using the Online option, a date will appear in this field about an hour after you have completed the applicable report wizard and received a success message. Date Information Received This is the date we received your tax information for that type of reporting. Account Owner Order on Reports From the drop-down menu, you can determine the order in which records should appear on your reports by selecting one of the following options. Account Name SSN Account Owner SSN on Reports From the drop-down menu, you can determine how each account owner s Social Security number should appear on your reports by selecting one of the following options. Display Last 4 Digits of SSN Display Full SSN Account Owner SSN on Tax Forms From the drop-down menu, you can determine how each account owner s Social Security number should appear on each tax form produced by selecting one of the following options. Display Last 4 Digits of SSN Display Full SSN No Additional Tax Data to Report for Tax Year (Year) Checking a box in this section indicates that rather than submitting tax information by the selected method, Transmission or Online, Ascensus will complete tax reporting based solely on the information your organization enters and saves in IRAdirect for the selected account type. If no tax data is saved in IRAdirect, no reporting for the specific account type will occur for the tax year. To indicate as such, an Advanced User should take the following steps. 1. Check the box for the type of account for which you have no additional withdrawals (1099), FMVs, or FMVs/contributions (5498) to report. 2. Click the Save button. After clicking the Save button, a date will appear in the Date Information Received and Date Information Processed columns, and any associated red action messages on the IRAdirect homepage will no longer appear. 159
160 Contributions Applied from File to IRAdirect This section outlines the different types of contributions that are currently selected to be read and applied to IRAdirect from your transmission file, if applicable. If your organization submits tax reporting contribution information by using the Transmission reporting option, we recommend applying all contribution types from your transmission files. But if your organization s core system is not programmed to properly code all contribution types as outlined in IRS Publication 1220, you may want to consider applying only regular contributions from your files. All other contribution types would then need to be added to the specific account owner s tree in IRAdirect to ensure proper tax reporting is completed. Select a category, and then indicate the reporting option(s) to be changed. An Advanced User can change one or more of the Ascensus tax reporting options for the financial organization by changing from the Transmission option to the Online option, or from the Online option to the Transmission option. NOTE: Please read about each reporting option by clicking the Changing a Reporting Option link in the Instructions box to the right of the screen, before making any reporting option changes. To change a reporting option, take the following steps. 1. Click the radio button for the reporting type for which you are changing the option FMV reporting, Withdrawal reporting (1099-R, 1099-Q, 1099-SA), or Contribution reporting (5498, 5498-ESA, 5498-SA). 2. Click the applicable check boxes that appear beneath the selected radio button. 3. If you elect the Transmission reporting option for 5498 reporting, you must also click the applicable radio button to indicate whether you want all contribution types in your file read. If you click the Only apply Regular and SEP contributions radio button instead of the Apply ALL contributions radio button, only the information listed below will be read in your file (as applicable). Regular Contributions SEP Contributions Fair Market Values (FMVs) 4. When your selections are complete, click the Save button. After saving, you will see this success message: Your changes have been saved. You will see the changes you made reflected on the Reporting screen. 160

161 Summary The Summary tab contains information about the number and type of accounts at your financial organization, as well as information regarding the number of tax forms produced. Details The following is a field-by-field guide to the Summary screen. Current Open Accounts The number of open accounts information reflects your financial organization figures at the time the screen is being viewed. The figures include owner and beneficiary accounts with data displayed in the following columns. Account Type Open account information is provided for all account types Traditional, Roth, Coverdell ESA, HSA, and SIMPLE. The Total row at the bottom provides the total number of all account types at the financial organization (including beneficiary accounts), as well as the total number of deceased account owners. Total The total number of open accounts for that account type. Over 70½ The number of account owners age 70½ or older appears only for Traditional IRAs, because only that account type has an IRS required minimum distribution beginning at age 70½. Deceased The number of deceased owners with that account type. SEP The number of dedicated SEP IRAs at your organization. SIMPLE The number of SIMPLE IRAs at your organization. 161
162 (Year) Tax Forms Produced The number of tax forms produced information displays data for the current tax year in the following columns. Form Type You can view the number of forms produced by form type. o o o o o o o o FMV Fair market value information 5498 Contribution and FMV information for Traditional and Roth IRAs 5498 (IRS Only) FMV information only for Traditional and Roth IRAs (no IRA contributions were made, so only the IRS receives these tax forms) 5498-ESA Contribution information for Coverdell ESAs 5498-SA Contribution and FMV information for health saving accounts (HSAs) 1099-R Withdrawal information for Traditional and Roth IRAs 1099-Q Withdrawal and FMV information for Coverdell ESAs 1099-SA Withdrawal information for health savings accounts (HSAs) Paper This column displays the total number of paper tax forms that were mailed to account owners for the applicable form type. Electronic This column displays the total number of electronic tax forms (etax forms) that were produced for account owners for the applicable form type. Merger in Process If the screen contains a Merger in Process message, only the tax forms produced under your financial organization s federal tax ID number will be reflected. 162
163 OWNER INFORMATION Owner information is divided into two sections Account Owner General Information and Account Information. Account Owner General Information This section explains how to view and edit the account owner s personal information, and how to read and record comments regarding the owner or the owner s account(s). Account Information This section details all the accounts and the account activity you may encounter in IRAdirect. NOTE: The account owner list is commonly referred to as the owner tree or simply tree. Owner list, owner tree, and tree as used throughout the Owner Information section are synonymous. To display an account owner in the tree, you must first search for the owner using the Search tool on the homepage. You can use this tool to search by the following criteria. SSN Full Name (last, first) Last 4 of SSN Acct Number Last Name IRAdirect employs masking to help ensure the privacy of an account owner s SSN. If you search by SSN, bullets appear in the Search field as the information is entered. If you search by Last 4 of SSN, the four numbers entered in the input field are not masked. When the account owner appears in the tree, only the last four digits of the SSN are displayed, with the first five digits masked as XXX-XX. To see the SSN for the account owner, place your cursor in the Social Security Number field on the General screen and click to display the full nine-digit number. To mask the information, click outside the Social Security Number field. Your organization s account owners are displayed on the tree in a hierarchy. First, the account owner s name and SSN are shown, followed by the owner s account(s). Under each account is a year folder, and within the folder are links to any recorded account activity. 163
164 Additionally, four tools are included below the Search field to assist you in displaying the data on the tree. Clear Account Owner List removes all owner and account information from the tree Clear Other Account Owners removes all owner and account information on the tree with the exception of the account you are currently viewing Expand All displays all accounts and activity for all account owners on the tree Collapse All hides all account activity from view NOTE: Click the + button to the left of any listing to expand the information. Click the - button to the left of any listing to collapse the information. When an account owner is displayed in the tree in the left frame of the screen, and you click that person s name, the General screen appears. 164
165 Account Owner General Information The General screen is where the personal information about each account owner is maintained. Advanced Users can update the information on this screen, but keep in mind that any changes entered should also be documented by completing and posting the applicable Change Notice Wizard. Advanced Users can also create a new IRA for the owner displayed, or delete the displayed owner, but these features should be used with caution and only as outlined in this chapter. Advanced Users must click the Save button to apply any changes made to the fields on the account owner s General screen. The Save button is not visible to General Users. Details The information on the General screen is comprised of the following updatable fields for the account owner. First Name: Middle Initial: Last Name: Social Security Number: (nine digits) Account owner is a non-resident alien (not typical): (Only check this box if the owner is not a U.S. citizen or resident alien. Resident aliens are citizens of another country that meet either the green card test or the substantial presence test. If this box is checked, your organization is responsible for reporting any IRA distributions on Form 1042-S, Foreign Person s U.S. Source Income Subject to Withholding. Form 1099-R cannot be used to report distributions to nonresident aliens. For more information about nonresident aliens, click the Question Mark icon or refer to IRS Publication 519, U.S. Tax Guide for Aliens.) Date of Birth: (mm/dd/yyyy format) Date of Death: (mm/dd/yyyy format) Address Line 1: (Enter the account owner s mailing address here.) Address Line 2: (Note: The purpose of this address line is to hold information from Address Line 1 that exceeds the field and wraps to Address Line 2. Unless it contains information that wrapped from Address Line 1, leave this field blank or there could be problems with tax form production for the account owner.) City: Foreign: (Click this check box if the address being entered is a foreign address.) State: (Select from the menu if the address is not foreign.) Country: (Select from the menu if the address is foreign.) Zip Code: (Five digits) 165
166 Phone: (Nine digits) Address: Tax Form Delivery Method: (Shows the tax form delivery method for the account owner. Changes in an account owner s tax form delivery method can be made by an Advanced User on this screen by checking the applicable Paper/Mail and/or Electronic check boxes.) Creating Accounts and Deleting Owners Advanced Users can create additional accounts for the displayed account owner or delete the displayed account owner using the radio buttons that appear. But these features should be used only as directed. Create Account To create a new account for the displayed owner, click the Create Account radio button, and click Continue. NOTE: If you create a new account for the displayed owner using this shortcut, you also need to complete the applicable Application Wizard and have the owner sign the printed form. Delete Account Owner To delete an account owner, click the Delete Account Owner radio button, and click Continue. NOTE: Use the delete feature with caution! You should delete an account owner in this way only if you have just mistakenly created the account. In all other cases, you must complete the applicable Change Notice Wizard and close the account. 166
167 Comments When an account owner is displayed in the tree in the left frame of the screen and you click the owner s name, the Comments tab is visible. The Comments screen allows you to document information about the account owner or the owner s accounts. The information can be categorized by making the appropriate selections from the drop-down menus beneath the Primary Category and the Secondary Category sections. 167
168 Reading Comments Any information entered and saved on the owner s Comments screen appears in the top section of the display, where you will see the date, the identity of the financial organization staff member making the entry, and the Primary and Secondary categories. To read a comment, click View. Entering and Saving Comments 1. Select the Primary and Secondary categories. 2. Click in the Comment field and enter your comment. 3. Click the Save button. Primary Categories You may select from the following Primary comment categories in the drop-down menu. Action Periodic Payments Call Center Reporting General Special Handling Secondary Categories You may select from the following Secondary comment categories in the drop-down menu Q FMV 1099-R 1099-SA 5498 General HSA IRA Center 5498-ESA IRAdirect express 5498-SA MIC Benefit Claims Periodic Payments Billing Retirement Central Change SEP Copy of Form Special Handling Excess/Recharacterization 168

169 Record Retention If your organization uses Ascensus record retention services and has electronic signatures enabled, a Record Retention tab will also be visible when you click the account owner s name on the owner tree. This tab is visible to both General and Advanced Users and will display all documents that have been completed, electronically signed, and archived using IRAdirect esign functionality. NOTE: If the document is not archived after it s electronically signed, it will not appear under the Record Retention tab. The documents will appear with the most recent transaction at the top of the list. To change the date order, the user can click the Archived Date link. To change the document name order, the user can click the Document Type link. To view the signed, archived document, click the Document link. A PDF will open in a new window. The PDF cannot be edited, but the user can save it to a local drive if needed. To view an audit report that details who electronically signed the document and when, click the Audit link. 169
170 ACCOUNT INFORMATION Account The Account screen displays the information about the owner s account type Traditional IRA, Roth IRA, SIMPLE IRA, Coverdell education savings account (ESA), or health savings account (HSA) as selected in the owner tree. Advanced Users can enter and save changes to the account information listed below by clicking the Save button. The Save button is not visible to General Users. Account Number Closed Date Open Date Account Status Traditional Type (including dedicated SEP IRAs) Reporting Options Instructions Change or update the information by entering it in the accessible fields on the screen or selecting an option from the drop-down menu. When your entries and selections are complete, click Save. Account Info Open Date Must be in the mm/dd/yyyy format Account Number Can consist of numeric and alpha characters Account Status Select Open or Closed from the drop-down menu Closed Date Must be in the mm/dd/yyyy format 170
171 Traditional IRA Info Traditional Type Select the IRA type (Regular, Conduit, or SEP) from the drop-down menu. Reporting Options An Advanced User may indicate that the account contains hard-to-value assets (assets with no readily available fair market value) by checking the applicable check box. If this box is checked, the Hard-To-Value Asset FMV Amount field and applicable Investment Type Code drop-down menu will be enabled on the owner s FMV screen. For this Account An Advanced User may do the following by clicking the applicable radio button. Create Contribution Create Withdrawal Delete Account Create Contribution To create a contribution from the owner s Account screen, take these steps. 1. Click the Create Contribution radio button. 2. Click Continue. The Contribution screen appears. 3. Provide the information requested by entering it in the applicable fields on the screen, selecting the correct option from the drop-down menu, or clicking the appropriate check box or radio button. 4. When all information has been entered, click Save. NOTE: We recommend that you complete the Contribution Wizard to create a contribution, because it prevents most form completion mistakes. But, an Advanced User may enter a contribution to the tree using this shortcut if the account owner has already completed a contribution form. 171
172 Create Withdrawal To create a withdrawal from the owner s Account screen, take these steps. 1. Click the Create Withdrawal radio button. 2. Click Continue. The Withdrawal screen appears. 3. Provide the information requested by entering it in the applicable fields on the screen, selecting an option from the drop-down menu, or clicking the appropriate check box or radio button. 4. When all information has been entered, click Save. NOTE: We recommend that you complete the Withdrawal Wizard to create a withdrawal, because it prevents most form completion mistakes. But, an Advanced User may enter a withdrawal to the tree using this shortcut if the account owner has already completed a withdrawal form. Delete Account To delete the account from the owner s Account screen, take these steps. 1. Click the Delete Account radio button. 2. Click Continue. A message box appears asking: Are you sure you want to delete this IRA? Click OK to delete the account. Click Cancel to stop the deletion of the account. NOTE: Use this feature with caution! An Advanced User should use the Delete Account feature only to delete an account that was just mistakenly created in IRAdirect. In all other situations, the Change Notice Wizard should be completed to close the account. 172
173 Beneficiaries The tabs for the Primary, Secondary, and Tertiary Beneficiaries screens are displayed when the Account screen is opened for an account owner. NOTE: The Ascensus forms have been updated to list only Primary and Contingent categories for designating beneficiaries. The two former categories Secondary and Tertiary remain in IRAdirect so that all previous beneficiary information is accurately documented. This information is View Only and cannot be changed. Each beneficiary screen consists of these sections. Beneficiary Type Personal Info Address NOTE: To change a beneficiary, the account owner must complete the Beneficiary Designation. If the account owner is at your financial organization, a staff member can complete the Beneficiary Designation/Change Wizard to document the information provided, and have the account owner sign the printed form. 173
174 Periodic Payment Election The information on the Periodic Payment Election (PP Election) screen is View Only and provides all users with the details of a Traditional IRA owner s periodic payment election. If an IRA owner wants to make allowable changes to the periodic payment election, a Traditional IRA Periodic Payment Change Wizard must be completed and posted for that owner s account. Details The information on the Periodic Payment Election screen is divided into the following sections. Type State Withholding Status Disbursals Payment Years Federal Withholding Dates Refer to this screen when responding to your account owners questions about their periodic payment election details. Information about the actual payment amount and frequency for the calendar year can be found on the PP Calculation screen. 174
175 Periodic Payment Calculation The information on the PP Calculation screen is View Only and provides all users with the amount and frequency of an IRA owner s periodic payment distributions for the calendar year. If an IRA owner wants to make allowable changes to the periodic payment calculation, a Traditional IRA Periodic Payment Change Wizard must be completed and posted for that owner. 175
176 FMV The FMV screen is where you can view the current tax year December 31 ending balance for an account owner, as well as that for the previous tax year. Advanced Users can enter or update information in the FMV fields on this screen, and save their entries by clicking the Save button. The Save button is not visible to General Users. Below is a field-by-field guide to the information that can be viewed and updated on the FMV screen. Dates Processed Date The date the account owner s FMV information we received was applied to IRAdirect. FMV Generated Date The date an FMV/RMD statement was produced for the account owner for the current tax year Generated Date The date an IRS Form 5498 was produced for the current tax year if the account owner made a contribution for the tax year. 176
177 Prior Balances 12/31/yyyy FMV The FMV for the prior tax year. Date of Death Balance If the account owner died in the prior tax year and the death was reported to Ascensus, the balance in the account on the date of death is displayed and is reported to the IRS in lieu of the December 31 balance. Current Balances 12/31/yyyy FMV The FMV for the current tax year. Self Directed FMV Amount The portion of the IRA that is maintained at a brokerage firm with which the financial organization has a relationship, and for which the financial organization does the reporting. Total Amount If there was a Self Directed FMV Amount, this is the combined total of that figure and the FMV for the current tax year. Fees and Penalties (For SIMPLE IRAs only) The fees and penalties assessed on a SIMPLE IRA for the applicable year. Earnings (For SIMPLE IRAs only) The amount of earnings accrued for the SIMPLE IRA during the applicable year. Current Hard-To-Value Assets This section only appears if the hard-to-value assets indicator is checked in the Reporting Options section the owner s Account screen. If the hard-to-value assets indicator is checked, the FMV screen will appear as indicated on the following page. 12/31/yyyy Hard-To-Value Asset FMV Amount The FMV of any hard-to-value assets for the current tax year. Investment Type Code(s) The code that identifies the types of hard-to-value investments held in the IRA (a drop-down menu listing the applicable codes appears after an amount is entered in the 12/31/yyyy Hard-To-Value Asset FMV Amount field). For more information about the applicable codes, click the A through G link on the FMV screen or read below. A Stock or other ownership interest in a corporation that is not readily tradable on an established securities market B Short or long-term debt obligation that is not traded on an established securities market C Ownership interest in a limited liability company or similar entity (unless the interest is traded on an established securities market) D Real estate E Ownership interest in a partnership, trust, or similar entity (unless the interest is traded on an established securities market) F Option contract or similar product that is not offered for trade on an established option exchange G Other asset that does not have a readily available FMV H More than two types of assets (listed in A through G) are held in this IRA 177
178 178
179 Making Corrections Before Statement Production If we have not yet produced FMV/RMD statements for your financial organization, there will not be a date in the FMV Generated Date field on the account owner s FMV screen. If corrections are needed for a current tax reporting year FMV, an Advanced User should take these steps. 1. Go to the Current Balances section of the FMV screen, and enter the correct FMV figure in the 12/31/yyyy field. For SIMPLE IRAs, correct the figures in the Fees and Penalties field or Earnings field, as applicable. 2. Click Save to apply the correction. Entering the correction will result in the production of an original FMV/RMD statement for the account owner when we begin producing those statements. After Statement Production If we have produced current tax year FMV/RMD statements for your financial organization, there will be a date in the FMV Generated Date field on the account owner s FMV screen, and the FMV/RMD Information Report will be available in IRAdirect. This report is accessed by clicking the Reports link in the Reports and Queues section of the homepage. Take the following steps. 1. Print the Current Tax Year FMV/RMD Information Report and the report instructions. (Click the Report Instructions button.) 2. Review the FMV/RMD Information Report. It contains the information printed on the FMV/RMD statements mailed to the listed account owners. 3. If any corrections are necessary, enter them in IRAdirect, as outlined in the report instructions (accessed on the report s parameters screen). Entering corrections for an account will result in the production of a corrected FMV/RMD statement for the account owner. 179
180 Withdrawal Withdrawal information for an account owner can be retrieved by clicking the applicable withdrawal link in the account owner tree. All users can view the information on the withdrawal screens, but only Advanced Users can create, delete, and correct withdrawals. NOTE: Because IRAdirect employs masking to help ensure the privacy of an account owner s Social Security number, when you search by SSN, the numbers will display as bullets when entered in the Search field. After the account owner appears in the tree, the first five digits of the SSN will be masked as XXX-XX. 180
181 Creating a Withdrawal Click the applicable owner s account in the tree. The owner s Account screen appears. Locate the For this Account box in the lower left corner of the Account screen. Click the Create Withdrawal radio button, and then click Continue. 181
182 The Withdrawal screen appears. Provide the information requested by entering it in the applicable fields, selecting an option from the drop-down menu, or clicking the appropriate radio button. After all information has been entered, click Save to post the transaction to the owner tree. You will see the Withdrawal screen with a Success message at the top. 182
183 Reminders Dates must be entered in mm/dd/yyyy format. The withdrawal amount entered must be the gross amount, which includes the taxes withheld. The IRS Code field will populate after the withdrawal has been saved and posted to IRAdirect. The Reported Date field will be populated after the applicable IRS Form 1099 has been produced for the account owner. State income tax can be withheld only if your financial organization has an office in that state, and there is a specific state rule for withholding state income taxes on IRAs. Deleting a Withdrawal Click the applicable withdrawal in the tree for the account owner. The Withdrawal screen appears. Locate the For this Withdrawal section near the bottom of the screen. Click the Delete Withdrawal check box. Click Continue. 183
184 A question box appears, asking: Are you sure you want to delete this Withdrawal? Click OK to delete the withdrawal. Click Cancel to stop the deletion of the withdrawal. NOTE: Withdrawals for which IRS Forms 1099-R, 1099-Q, or 1099-SA have been produced cannot be deleted, nor can you delete rolled-up (RU) withdrawals. The delete function is to be used by an Advanced User for the sole purpose of removing a withdrawal that was just mistakenly created. 184
185 Correcting a Withdrawal To correct a withdrawal before the annual withdrawal roll up has occurred, take these steps. 1. Click the applicable withdrawal in the tree for the account owner. The Withdrawal screen appears. 2. Change the information by entering it in the applicable fields on the screen, selecting an option from the drop-down menu, or clicking the appropriate radio button. 3. Click Save. 185
186 Annual Withdrawal Roll Up Withdrawals (including scheduled periodic payments) added to IRAdirect throughout the year are rolled up (summed) into one total by IRS reason code and state withholding state. This annual roll up occurs on the last business day of the year. When the roll up is completed, individual transactions are archived and the summed withdrawals appear on the account owner s tree with an RU- 12/31/yyyy Withdrawal indicator. NOTE: An RU-01/01/yyyy Withdrawal indicator may appear if a deceased account owner made a withdrawal before death in the current tax year, or if an IRA owner turned age 59½ in the current tax year and made a withdrawal before attaining age 59½. After the roll up takes place, the applicable Pre-1099 Verification Report (Pre-1099-R, Pre-1099-Q, and Pre-1099-SA) is available in IRAdirect for financial organizations that selected the Online reporting option for withdrawals. The Pre-1099 Verification Report for the account type (IRA, ESA, or HSA) is an optional tool that can be used to track your progress in completing the associated withdrawal report wizard. NOTE: If your financial organization reports withdrawal information by the Online reporting option, completing the applicable withdrawal report wizard in January is mandatory. If you report withdrawal information by using the Online reporting option, the IRA, ESA, or HSA Withdrawal Report Wizard must be completed to confirm or correct each listed account owner s withdrawal information. Refer to the step-by-step report wizard instructions that are accessed on the report wizard s parameters screen after clicking the applicable report wizard link in the Reports and Queues section of the homepage. Completing the withdrawal report wizard enters a Received Date and Processed Date for that tax form type (1099-R, 1099-Q, or 1099-SA) onto your financial organization s Reporting screen. If there is no Processed Date for that form type on the Reporting screen, IRS tax forms will not be produced for that account type (IRA, ESA, or HSA.). If you send withdrawal information to us once a year for 1099-R and 1099-SA reporting by transmitting a file (the Transmission reporting option), account owner tax forms will be produced using only the information provided in the transmission. Any existing current tax year withdrawals in IRAdirect will be overridden when your file is applied. NOTE: The Transmission reporting option is not available for Coverdell ESAs because there is no field in the IRS 750 Format to provide the fair market value (FMV) or the withdrawal reason code information. 186

187 Contribution Contribution information for an account owner can be retrieved by clicking the applicable contribution link in the owner tree. All users can view the information on the contribution screens, but only Advanced Users are able to create, delete, and correct contributions. NOTE: Because IRAdirect employs masking to help ensure the privacy of Social Security numbers, when the account owner appears in the tree, the first five digits of the SSN display as XXX-XX. We recommend that you complete the Contribution Wizard to create a contribution, because it prevents most form completion mistakes. But, an Advanced User may enter a contribution directly to the tree if the account owner has already completed a Contribution form. 187
188 Creating a Contribution Click the applicable owner s account in the tree for which you are adding the contribution. The owner s Account screen appears. Locate the For this Account box in the lower left corner of the Account screen. Click the Create Contribution radio button, and then click Continue. 188
189 The Contribution screen appears. Provide the information requested by entering it in the applicable fields on the screen, selecting an option from the drop-down menu, or clicking the appropriate radio button. NOTE: A self-certified late rollover contribution can only be documented in IRAdirect by following these instructions to add the rollover contribution to the tree and checking the Late Rollover certified by the owner box. After all information has been entered, click Save to post the transaction to the owner tree. You will see the Contribution screen with a Success message at the top. NOTE: Dates must be entered in the mm/dd/yyyy format. NOTE: The Tax Reported Date field will be populated after the applicable IRS Form 5498, 5498-ESA, or 5498-SA has been produced for the account owner. 189
190 Deleting a Contribution Click the applicable contribution for the account owner. The Contribution screen appears. Locate the For this Contribution section on the screen. Click the Delete Contribution check box. Click the Continue button. 190
 contributions.")
191 A question box appears, asking: Are you sure you want to delete this Contribution? Click OK to delete the contribution or click Cancel to stop the deletion of the contribution. Contributions for which IRS Forms 5498, 5498-ESA, or 5498-SA have been produced cannot be deleted, nor can you delete rolled-up (RU) contributions. The delete function is to be used by an Advanced User for the sole purpose of removing a contribution that was just mistakenly created. 191
192 Correcting a Contribution Click the applicable contribution for the account owner. The Contribution screen appears. NOTE: Contributions must be corrected before the annual contribution roll up has occurred. Change the information by entering it in the applicable fields on the screen, selecting an option from the drop-down menu, or clicking the appropriate radio button. Click Save. 192
193 Annual Contribution Roll Up Any current tax year contributions added to IRAdirect by completing the Contribution Wizard or by applying the information in the owner tree are rolled up (summed) into one total by contribution type. This annual roll up occurs on the business day following the IRS filing deadline for the tax year. When the roll up is completed, individual account owner transactions are archived, and the summed contributions appear on the owner s tree with an RU-12/31/yyyy Contribution indicator. NOTE: An RU-01/01/yyyy Contribution indicator may appear if a deceased account owner made a contribution before death for the current tax year, or if an HSA owner made a contribution in the current year, but before the tax return deadline, and allocated it as a prior-year contribution. After your financial organization has submitted IRS Form 5498 information to us and the information has successfully applied to IRAdirect, the RU- 12/31/yyyy Contribution indicator in the owner tree will reflect those amounts. 193
194 Death Claim The General screen recaps the information submitted on the Death Notice, and displays the type of claim as determined by our Benefit Claims Staff. 194
 This section includes a table of all the additional letters or faxes sent to request information needed to process the claim.")
195 The Claim Status screen documents the actions that have been taken with the claim. Additional Information Letters (Click view to see the most recent letter) This section includes a table of all the additional letters or faxes sent to request information needed to process the claim. These communications are sent to the financial organization or claim contacts. Beneficiary Payment Elections (Click view to see the most recent letter for each beneficiary) When a Beneficiary Payment Election (Form 2321) is sent to a beneficiary, the information is documented here. Disbursal Authorizations (Click view to see the most recent letter for each beneficiary) When your financial organization is authorized to disburse account assets to a beneficiary, the information is documented here. 195

196 Beneficiaries The Beneficiaries screen lists the beneficiaries who are to receive benefits from the deceased owner s IRA. If only the column headings are displayed, the beneficiaries have not yet been determined. When the beneficiary returns the Beneficiary Payment Election (Form 2321) to Ascensus, we create a beneficiary account in IRAdirect. This means that the beneficiary will appear as a beneficiary account owner in the owner tree. Beneficiaries are treated similarly to account owners except that the beneficiary s account number is the deceased owner s account number (which can be changed), and contributions cannot be added to a beneficiary account. These accounts appear as Beneficiary Accounts in the owner tree. If the beneficiary already has an IRA at your financial organization, the beneficiary account will be added as another account for that owner. Click View All Bene Accounts to view the beneficiary s separate account on the owner tree, if applicable. If the beneficiary account has not been created, the beneficiary will not appear. NOTE: Do not disburse assets to the beneficiary until you have received our faxed notification that there is a Disbursal Authorization in the Approve Forms From General Users queue. 196
IRAdirect User Guide Tax Reporting Service
 IRAdirect User Guide Tax Reporting Service It is understood that the publisher is not engaged in rendering legal or accounting services. Every effort has been made to ensure the accuracy of the material
5498 Tax Reporting Frequently Asked Questions (FAQs) for Fully-Administered Program Clients
 for Fully-Administered Program Clients") 5498 Tax Reporting Frequently Asked Questions (FAQs) for Fully-Administered Program Clients Below are common questions and answers regarding 2017 tax reporting for the IRS Form 5498 series. Q. When is
5498 Tax Reporting Frequently Asked Questions (FAQs) for Fully-Administered Program Clients Below are common questions and answers regarding 2017 tax reporting for the IRS Form 5498 series. Q. When is
5498 Tax Reporting Frequently Asked Questions (FAQs) for Tax Reporting Service Clients
 for Tax Reporting Service Clients") 5498 Tax Reporting Frequently Asked Questions (FAQs) for Tax Reporting Service Clients Below are common questions and answers regarding 2016 tax reporting for the IRS Form 5498 series. Q. When is the tax
5498 Tax Reporting Frequently Asked Questions (FAQs) for Tax Reporting Service Clients Below are common questions and answers regarding 2016 tax reporting for the IRS Form 5498 series. Q. When is the tax
IRA FMV and Contribution Report Wizard Instructions for Tax Reporting Service Clients
 IRA FMV and Contribution Report Wizard Instructions for Tax Reporting Service Clients Wizard Purpose The IRA FMV and Contribution Report Wizard must be completed by financial organizations with a 5498
Confirm Your Reporting Options Page 2. Communicating with Your Data Processor Page 2. Transmission Receipt Deadlines Page 2. Deadlines Alert Page 3
 Tax Year 2017 Transmission Requirements for Fully-Administered Clients April and May 5498 Reporting This communication provides your financial organization with information about the transmission requirements
IRAdirect Death Claim Process Training Aid
 IRAdirect Death Claim Process Training Aid The death claim process begins when the financial organization is notified that the account holder is deceased. Legally, the notification can only be completed
IRAdirect User Guide. Table of Contents. Tutorials. Overview 3. Access to IRAdirect 4. Forms 7. Resources & HELP 8. Contact Information 9.
 SF Fire Credit union university Est 2009 Table of Contents Tutorials Overview 3 Access to IRAdirect 4 Forms 7 Resources & HELP 8 Contact Information 9 Training 10 2 Overview IRADirect is SF FIre Credit
UCAA Expansion Application Insurer User Guide December 2017
 UCAA Expansion Application Insurer User Guide December 2017 2017 National Association of Insurance Commissioners All rights reserved. Revised Edition National Association of Insurance Commissioners NAIC
Guide to online withdrawals
 Streamlined withdrawal processing The online withdrawal process on the secure My TIAA-CREF website has the same easy-to-use navigation and functionality as other websites that you visit regularly to shop,
OregonSaves Employer Handbook
 OregonSaves Employer Handbook A Guide to Your Role and Responsibilities October 2017 OregonSaves is overseen by the Oregon Retirement Savings Board. Ascensus College Savings Recordkeeping Services, LLC
Plan Sponsor Administrative Manual
 Plan Sponsor Administrative Manual V 3.1 Sponsor Access Website January 2017 Table of Contents Welcome Overview... p 5 How to Use this Manual... p 5 Enrollment Overview... p 7 Online Enrollment Description...
Your guide to Fidelity NetBenefits
 Your guide to Fidelity NetBenefits Includes simple steps to: Access and log into Fidelity NetBenefits... Navigate the Home Page... Review Investment Options and Performance... Change Your Savings Plan
Welcome to the BenefitWallet HSA!
 2016 2017 Conduent Xerox HR Solutions, Business Services, LLC. All rights LLC. All reserved. rights reserved. BenefitWallet Conduent, is a Conduent trademark Agile of Xerox Star Corporation and BenefitWallet
VITA/TCE Training. Preparing a Return in Practice Lab
 The National Tax Training Committee has modified this manual to more accurately reflect Tax-Aide policies and scope and to clarify instructions that relate to Practice Lab versus the desktop version of
Then, complete a salary reduction agreement form by either going on-line or by contacting PlanConnect at the phone number indicated below.
 Welcome! We re PlanConnect Your Employer s 403(b) Plan Administrator PlanConnect is the third-party administrator for employees of Huron City Schools for its 403(b) plan. We have been working with Huron
HomePath Online Offers Guide for Selling Agents
 HomePath Online Offers Guide for Selling Agents 2012 Fannie Mae. Trademarks of Fannie Mae FM 0912 1 Table of Contents Introduction...3 Online Offers User Support...3 Your Account...4 Registering on HomePath.com...4
MEMBER BENEFITS ONLINE SYSTEM
 MEMBER BENEFITS ONLINE SYSTEM MBOS USER'S INFORMATION GUIDE FOR ACTIVE EMPLOYEES Welcome to the Member Benefits Online System (MBOS) MBOS is your most useful resource for getting accurate, up-to-date information
smart South Carolina Deferred Compensation Program Plan Service Center Guide
 South Carolina Deferred Compensation Program Retire from work, not life. smart Plan Service Center Guide Your Resource for Plan Administration Details on how to process your payroll with the South Carolina
TRAVEL PORTAL INSTRUCTIONS
 TRAVEL PORTAL INSTRUCTIONS Date: June 22, 2018 Version: Version 3.1 Prepared By: Berkley Canada Table of Contents 1 ACCESSING THE PORTAL... 3 1.1 LOGIN & LOGOUT... 3 1.2 RESET YOUR PASSWORD... 3 2 THE
HomePath Online Offers Guide for Public Entity and Non-Profit Buyers
 HomePath Online Offers Guide for Public Entity and Non-Profit Buyers 2017 Fannie Mae. Trademarks of Fannie Mae. July 2017 1 Table of Contents Introduction... 3 HomePath Online Offers User Support... 3
ELECTRONIC BILL PAYMENT OVERVIEW
 ELECTRONIC BILL PAYMENT Our online electronic bill payment system allows you to pay bills through our secure Internet server. You may schedule a payment; schedule recurring payments to be issued automatically;
EMPLOYEE USER GUIDE 10/03/ /27/2017
 EMPLOYEE USER GUIDE Open Enrollment 2018 10/03/2017 10/27/2017 browardschools.com/benefits TABLE OF CONTENTS PAGE # EMPLOYEE CHECKLIST 1 OPT-OUT PROCESS... 2 LIFE INSURANCE.. 3 DOMESTIC PARTNER ENROLLMENT
Do not include a Social Security Number in your .
 Member Guide Table of Contents Introduction... 3 System Requirements... 3 Accessing CoreLink II... 4 Menu Components... 5 Log-in Screen... 5 Log-in Instructions... 5 Forgot Your Password... 6 Main Menu...
Welcome! to the Year End Processing Guide Review for Online Credit Unions Our Presentation will begin at 11:00 EST.
 Welcome! to the Year End Processing Guide Review for Online Credit Unions Our Presentation will begin at 11:00 EST. Presented by the Client Service / Education Team Host: Penni Starren- Education Coordinator
PNC HSA Funding & Contribution Guide for Employers
 PNC HSA Funding & Contribution Guide for Employers How to set up and send employer-directed HSA Contributions with PNC Bank 20180924AHNJ Document Updates The table below details updates made to the document
Exploring Your IRA Options
 Exploring Your IRA Options Traditional IRA Q & A.................. Page 2 Roth IRA Q & A...................... Page 5 Traditional vs. Roth IRAs............... Page 8 How does a Traditional IRA differ from
Roth Conversion Tax Idea
 Roth Conversion Tax Idea The Concept: Most people do not want to convert to a Roth IRA because of the conversion tax. This program shows the advantages of a surviving spouse using the proceeds of a life
Getting started. UltraBranch Business Edition. alaskausa.org
 Getting started UltraBranch Business Edition alaskausa.org Contents 2 4 6 8 9 11 13 14 15 21 22 23 24 Key features Getting started Company permissions Setting & exceeding limits Configuring ACH & tax payments
Electing Your Benefits During Open Enrollment
 Electing Your Benefits During Open Enrollment Workday is our web-based application for viewing and editing your personal and career-related information. You will be making your benefit elections during
401(k) PLAN FOR YOUR FUTURE. The Investment Advantage
 PLAN FOR YOUR FUTURE. The Investment Advantage") Payroll HR Admin & Compliance 401(k) & Employee Benefits Tax Filing & Credits Time & Labor Solutions 401(k) PLAN FOR YOUR FUTURE The Investment Advantage Congratulations! You are eligible to participate
Payroll HR Admin & Compliance 401(k) & Employee Benefits Tax Filing & Credits Time & Labor Solutions 401(k) PLAN FOR YOUR FUTURE The Investment Advantage Congratulations! You are eligible to participate
RISD 2018 Voluntary Insurance Open Enrollment Dec-01 Dec-15, Benefit Enrollment Instructions
 2018 Benefit Enrollment Instructions Contents Quick Reference... 3 Access and log in to the Online Enrollment Portal (OEP)... 6 Password Reset and Login Instructions... 7 Enrolling in 2018 Supplemental
THE BORROWER EXPERIENCE
 PRESENTS THE BORROWER EXPERIENCE Page 1 The Borrower Experience Table of Contents ipromise..3-44 mycampusloan.com.45-100 E-Exit 101-116 Page 2 Campus Partners ipromise is a web-based product, which helps
2016 Forms & Documents Catalog
 2016 Forms & Documents Catalog Table of Contents Account Establishment Conversion and Amendment Service...3 Opening Documents...4 Account Maintenance Forms Forms Handbook...5 IRA Contributions...6 IRA
Beneficiary Payment Options for Traditional IRAs (Death Before Required Beginning Date)
") Beneficiary Payment Options Beneficiary Payment Options for Traditional IRAs (Death Before Required Beginning Date) Frequently Asked Questions Payment Options Payment Flexibility Withholding Elections
Beneficiary Payment Options Beneficiary Payment Options for Traditional IRAs (Death Before Required Beginning Date) Frequently Asked Questions Payment Options Payment Flexibility Withholding Elections
Guide to online withdrawals
 Less time, paper and phone calls Many types of withdrawal requests can be completed online through your account on TIAA.org, 1 which saves time and reduces the need for paper forms. This guide includes
USER GUIDE. Loans. (Partner iseries Only)
") USER GUIDE Loans (Partner iseries Only) 2007. Transamerica Life Insurance Company. All rights reserved. Information in this document is subject to change without notice. No part of this document may be
USER GUIDE Loans (Partner iseries Only) 2007. Transamerica Life Insurance Company. All rights reserved. Information in this document is subject to change without notice. No part of this document may be
July Why Is April 1 the Required Beginning Date? What s Inside. Your inside source for IRAs and tax-favored savings plans
 I RA Your inside source for IRAs and tax-favored savings plans Your Inside Source for IRAs and Tax-Favored Savings Plans Volume 40, Number 7 July 2016 What s Inside Letter from the Editor Francis X. Krawiec,
2014 EMPLOYEE SELF SERVICE GUIDE
 2014 EMPLOYEE SELF SERVICE GUIDE CONTENTS Click any topic below to go directly to that page. HOW TO USE SELF SERVICE 1.1 How to Access, Log In and Navigate Employee Self Service BENEFITS 2.1 Enrollment
14. Roster Processing
 14. Roster Processing Plan processing Roster processing Roster processing roster list You can create rosters by entering data manually or by using the file import capability. If you want to create the
2014 IRA Supertrain. Cruise the IRA Seas. August 4 7 Denver, CO. June New Orleans, LA. September 8 11 Las Vegas, NV
 2014 IRA Supertrain Cruise the IRA Seas June 16 19 New Orleans, LA August 4 7 Denver, CO September 8 11 Las Vegas, NV Come Aboard! We re Expecting You at IRA Supertrain in 2014 The IRA department in your
Understanding your. What it is, when to take it, and what to do with it.
 Understanding your Required Minimum Distribution What it is, when to take it, and what to do with it. MAKE YOUR RMDs STRESS-FREE Once you reach age 70½, the IRS requires you to take money out of your retirement
How to Get Your Phillips 66 Retirement Benefits For Active Employees Planning to Retire
 > Start Your Retirement Process > Your Overall Retirement Process Timeline > Your Retirement Resources > Initiate Your Retirement Process > Receiving Your Pension Payments > Your Retirement Process Checklist
General Questions 1) Who is GoldStar? 2) What do I need to get started? 3) Can I fax or the documents?
 Who is GoldStar? 2) What do I need to get started? 3) Can I fax or the documents?") General Questions: 1) Who is GoldStar? a) GoldStar Trust Company is one of the nation's leading Self-Directed IRA custodians with over twenty years of experience. GoldStar offers unique retirement solutions
General Questions: 1) Who is GoldStar? a) GoldStar Trust Company is one of the nation's leading Self-Directed IRA custodians with over twenty years of experience. GoldStar offers unique retirement solutions
Third Party Administrator (TPA) Guide to CONNECT
 Guide to CONNECT") Third Party Administrator (TPA) Guide to CONNECT TABLE OF CONTENTS Table of Contents... 2 1. Introduction... 3 1.1 Guide Instructions... 3 1.2 CONNECT System Overview... 3 2. Navigate CONNECT as a TPA...
Third Party Administrator (TPA) Guide to CONNECT TABLE OF CONTENTS Table of Contents... 2 1. Introduction... 3 1.1 Guide Instructions... 3 1.2 CONNECT System Overview... 3 2. Navigate CONNECT as a TPA...
OPEN ENROLLMENT... 2 LINKS TO NEW BENEFITS OPTIONS & DESCRIPTIONS... 2 SYSTEM REQUIREMENTS...
 Title: Oracle Advanced Benefits: Open Enrollment Date Modified: 4/5/2018 Purpose: The purpose of this document is to assist OHIO employees with Open Enrollment, the annual (mid-april early-may) opportunity
smart Distribution Options Massachusetts Deferred Compensation SMART Plan PARTICIPATE Office of the State Treasurer and Receiver General
 smart S A V E M O N E Y A N D R E T I R E T O M O R R O W PARTICIPATE Distribution Options Massachusetts Deferred Compensation SMART Plan Office of the State Treasurer and Receiver General Live Your Dreams
PriceMyLoan.com Lender AE Guide. Revision 0707
 PriceMyLoan.com Revision 0707 PriceMyLoan INTRODUCTION... 3 CUSTOMER SUPPORT... 3 VIEWING LOAN SUBMISSIONS... 4 AUTOMATIC EMAIL NOTIFICATIONS... 5 PRICING ENGINE COMMON SCENARIOS... 6 Running the LPE on
DTE Energy retirees: Welcome to PayFlex
 DTE Energy retirees: Welcome to PayFlex You are enrolled in a Retiree Reimbursement Account (RRA). Your new RRA comes with some great tools to help you manage your account. Through the PayFlex member website,
Refund Application Checklist
 Refund Application Checklist Before completing your application: Have you read the CalSTRS publication, Refund: Consider the Consequences, available at CalSTRS.com/publications? Have you watched the CalSTRS
U.S. Global Investors Mutual Funds-Forms 1099R and 1099Q Guide for Tax Year 2009
 U.S. Global Investors Funds U.S. Global Investors Mutual Funds-Forms 1099R and 1099Q Guide for Tax Year 2009 U.S. Global Investors is committed to providing accuracy in reporting tax information related
PriceMyLoan.com Broker s Guide. Revision 0705
 PriceMyLoan.com Revision 0705 PriceMyLoan Introduction... 3 Create a New File... 4 Upload a Fannie Mae File... 5 Upload a Calyx Point File... 5 Loan Request Interface... 6 Loan Officer Info... 6 Credit
Prudential Employee Savings Plan (PESP)
") Prudential Employee Savings Plan (PESP) This document constitutes part of a prospectus covering securities that have been registered under the Securities Act of 1933. Important Notice This Summary Plan
Prudential Employee Savings Plan (PESP) This document constitutes part of a prospectus covering securities that have been registered under the Securities Act of 1933. Important Notice This Summary Plan
IRA Contribution Limits for 2018 Unchanged at $5,500 and $6,500; 401(k) Limits Do Change
 Limits Do Change") Published Since 1984 ALSO IN THIS ISSUE IRA Contribution Limits for 2018 Page 1 IRA Contribution Deductibility Charts 2017 and 2018, Page 2 Roth IRA Contribution Charts for 2017 and 2018, Page 3 SEP and
Published Since 1984 ALSO IN THIS ISSUE IRA Contribution Limits for 2018 Page 1 IRA Contribution Deductibility Charts 2017 and 2018, Page 2 Roth IRA Contribution Charts for 2017 and 2018, Page 3 SEP and
How to Get Your ConocoPhillips Pension Benefits For Former Employees
 How to Get Your ConocoPhillips Pension Benefits For Former Employees 1 2 3 Initiate your retirement process Elect your form of pension payment Sign and return your pension paperwork START HERE H000078982
FOR INVESTMENTS IN STRATEGIC STORAGE TRUST, INC. SECOND OFFERING
 COMBINED TRADITIONAL/ROTH PACKAGE STATE STREET BANK AND TRUST COMPANY, CUSTODIAN FOR INVESTMENTS IN STRATEGIC STORAGE TRUST, INC. SECOND OFFERING INVESTMENT PRODUCTS STATE STREET BANK AND TRUST COMPANY
OnlinEnroll Employee Self Service for CSS Dynamac, Inc.
 OnlinEnroll Employee Self Service for CSS Dynamac, Inc. New Hire and Open Enrollment pages 2-6 Year-round Access and Qualifying Events page 7 OnlinEnroll is a tool which allows you to directly access and
Agency Distribution Financial Professionals
 BENEFITS FLEXIBILITY CHOICES COMPETITIVE COVERAGE PROTECTION HEALTH CARE RETIREMENT WORK/LIFE BENEFITS FLEXIBILITY CHOICES COMPETITIVE COVERAGE PROTECTION HEALTH CARE RETIREMENT WORK/LIFE BENEFITS FLEXIBILITY
This booklet contains information and an application for your use.
 State of California Savings Plus Program Part-time, Seasonal, and Temporary Employees Retirement Program BENEFIT PAYMENT BOOKLET All information contained in this booklet was current as of the printing
BBPadmin s WebCOBRA On Demand Employer User s Guide. BBPadmin s Employer User s Guide to
 BBPadmin s Employer User s Guide to 1 Table of Contents Introduction to Employers... 5 Chapter 1: Getting Started... 6 Purpose of WebCOBRA... 6 For Employers... 6 For Participants... 6 Getting Started
IMPORTANT INFORMATION REGARDING DISTRIBUTIONS FROM YOUR 401(K) ACCOUNT
 ACCOUNT") IMPORTANT INFORMATION REGARDING DISTRIBUTIONS FROM YOUR 401(K) ACCOUNT All distributions are issued in the form of a check, mailed to your address on file. Please make sure to have proper payee information
IMPORTANT INFORMATION REGARDING DISTRIBUTIONS FROM YOUR 401(K) ACCOUNT All distributions are issued in the form of a check, mailed to your address on file. Please make sure to have proper payee information
Then, complete a salary reduction agreement form by either going on-line or by contacting PlanConnect at the phone number indicated below.
 Welcome! We re PlanConnect Your Employer s New 403(b) and 457(b) Plan Administrator Recently your plan sponsor, Pickerington Local School District, selected PlanConnect as the third-party administrator
Honeywell Savings and Ownership Plan. Distribution Options Guide
 Honeywell Savings and Ownership Plan Distribution Options Guide June 2016 For more information on the Plan, visit the HR Direct Website through the Honeywell Intranet or www.honeywell.com, click on 'Employee
Then, complete a salary reduction agreement form by either going on-line or by contacting PlanConnect at the phone number indicated below.
 Welcome! We re PlanConnect Your Employer s New 403(b) Plan Administrator Your plan sponsor, Huron City Schools, selected PlanConnect as the third-party administrator for its 403(b) plan. We are excited
Beneficiary Benefit Payment Booklet
 1. Purpose Beneficiary Benefit Payment Booklet Phone: (855) 616-4776 savingsplusnow.com This booklet contains information and a payment application to help you select a payment method. Your decisions regarding
Inheritance Life Plus
 APPLICATION PROCESS Guide Inheritance Life Plus Fixed, single-premium universal life insurance Increase the inheritance your clients leave their loved ones Policies issued by: American General Life Insurance
FEDERAL TAX REPORTING INFORMATION
 2017 FEDERAL TAX REPORTING INFORMATION for OP&F benefit recipients Securing the future for Ohio s police and firefighters FEDERAL TAX REPORTING INFORMATION The Ohio Police & Fire Pension Fund (OP&F), which
Global Transaction Banking Products & Services. Business Tax Payment Service
 Global Transaction Banking Products & Services Business Tax Payment Service November 2016 Table of Contents Introduction to Scotiabank s Business Tax Payment Service... 3 Service Overview... 3 Registration
Required Minimum Distributions
 Required Minimum Distributions What You Need To Know When It Is Time To Start Distributions From Your Retirement Accounts What Are Required Minimum Distributions? Required minimum distributions (RMDs)
How to Take a Withdrawal
 How to Take a Withdrawal Table of Contents Important Information Read This First! 2 Can I Withdraw Funds from My Account? What Should I Consider Before Taking a Withdrawal? Taking a Withdrawal 3 Step 1:
Introduction to Client Online
 Introduction to Client Online Trade Finance Guide TradeFinanceNewClientsV2Sept15 Contents Introduction 3 Welcome to your introduction to Client Online 3 If you have any questions 3 Logging In 4 Welcome
PLANNED MAINTENANCE Dealer Administrator Manual
 PLANNED MAINTENANCE Dealer Administrator Manual 2009 H-D. Harley-Davidson and the Bar & Shield logo are among the trademarks of H-D Michigan, Inc. HDPM-DAM Rev 11/09 The Planned Maintenance Portal www.hdplan.com
User Guide for Your Retirement Plan Website.
 User Guide for Your Retirement Plan Website www.trustpointinc.com Home Page Type in the web address: www.trustpointinc.com To access your account, go to Select Account Type in the top right corner of the
Traditional IRA SEP IRA Roth IRA. Disclosure Statement & Custodial Account Agreement
 Traditional IRA SEP IRA Roth IRA Disclosure Statement & Custodial Account Agreement Table of Contents Page in Document PART I COMBINED DISCLOSURE STATEMENT AND CUSTODIAL ACCOUNT AGREEMENT... 1 TRADITIONAL
Employee Online Enrollment User Guide
 Employee Online Enrollment User Guide Welcome to Online Enrollment! In this guide, you will find information and step-by-step instructions on how to enroll in your benefits. Table of Contents Before you
HomePath Online Offers Guide for Listing Agents
 HomePath Online Offers Guide for Listing Agents 2016 Fannie Mae. Trademarks of Fannie Mae. June 2016 1 Table of Contents Introduction... 3 HomePath Online Offers User Support... 3 Registration and Login...
Tier I Tier II. Retire. Getting Ready to. KP&F Pre-Retirement Planning Guide KPERS
 Tier I Tier II Retire Getting Ready to KP&F Pre-Retirement Planning Guide KPERS Countdown to Retirement Checklist Attend a pre-retirement seminar. Our pre-retirement seminars are designed to help you navigate
Credit Variance Administration System (CVAS ) User Guide
 User Guide") Credit Variance Administration System (CVAS ) User Guide 2016 Fannie Mae. Trademarks of Fannie Mae. December 2016 1 of 24 Table of Contents Chapter 1. Introduction to CVAS... 3 Chapter 2. Requesting a
Credit Variance Administration System (CVAS ) User Guide 2016 Fannie Mae. Trademarks of Fannie Mae. December 2016 1 of 24 Table of Contents Chapter 1. Introduction to CVAS... 3 Chapter 2. Requesting a
Individual Taxpayer Electronic Filing Instructions
 Individual Taxpayer Electronic Filing Instructions Table of Contents INDIVIDUAL TAXPAYER ELECTRONIC FILING OVERVIEW... 3 SUPPORTED BROWSERS... 3 PAGE AND NAVIGATION OVERVIEW... 4 BUTTONS AND ICONS... 5
Reference guide for small businesses
 Small Business Superannuation Clearing House Reference guide for small businesses Contents Employer registration initial registration 2 Employer registration finalising registration 13 Employer default
Supplement to the Traditional and Roth Individual Retirement Account (IRA) Disclosure Statement
 Disclosure Statement") BNY MELLON INVESTMENT SERVICING TRUST COMPANY Supplement to the Traditional and Roth Individual Retirement Account (IRA) Disclosure Statement Deadline Extension for 2016 Contributions to a Traditional
BNY MELLON INVESTMENT SERVICING TRUST COMPANY Supplement to the Traditional and Roth Individual Retirement Account (IRA) Disclosure Statement Deadline Extension for 2016 Contributions to a Traditional
Guide to Credit Card Processing
 CBS ACCOUNTS RECEIVABLE Guide to Credit Card Processing version 2007.x.x TL 25476 (07/27/12) Copyright Information Text copyright 1998-2012 by Thomson Reuters. All rights reserved. Video display images
INVESTOR PORTFOLIO SERVICE (IPS) ONLINE USER GUIDE
 ONLINE USER GUIDE") INVESTOR PORTFOLIO SERVICE (IPS) ONLINE USER GUIDE HELPING HAND. It s important to keep a close eye on your investments, so we do all we can to lend a helping hand. That s why we ve put together this step-by-step
INVESTOR PORTFOLIO SERVICE (IPS) ONLINE USER GUIDE HELPING HAND. It s important to keep a close eye on your investments, so we do all we can to lend a helping hand. That s why we ve put together this step-by-step
What You Need To Know When It Is Time To Start Distributions From Your Retirement Accounts
 Retirement Planning Required Minimum Distributions What You Need To Know When It Is Time To Start Distributions From Your Retirement Accounts WHAT ARE REQUIRED MINIMUM DISTRIBUTIONS? Required minimum distributions
Supplement to IRA, 403(b) and 457(b) Custodial Agreements
 and 457(b) Custodial Agreements") Supplement to IRA, 403(b) and 457(b) Custodial Agreements The updates below apply to the American Century Investments custodial agreements for the following retirement accounts: SEP IRA, SARSEP IRA, SIMPLE
Supplement to IRA, 403(b) and 457(b) Custodial Agreements The updates below apply to the American Century Investments custodial agreements for the following retirement accounts: SEP IRA, SARSEP IRA, SIMPLE
FEDERAL TAX REPORTING INFORMATION
 2018 FEDERAL TAX REPORTING INFORMATION for OP&F benefit recipients Securing the future for Ohio s police and firefighters FEDERAL TAX REPORTING INFORMATION The Ohio Police & Fire Pension Fund (OP&F), which
Setting up TaxSlayer Pro Online
 Setting up TaxSlayer Pro Online To set up TaxSlayer ProOnline as a Favorite in your web browser, use the following steps: 1. Open Internet Explorer, Mozilla Firefox, or Google Chrome. 2. Type https://vita.taxslayerpro.com
2016 Tax Guide FORM 5498
 2016 Tax Guide FORM 5498 Table of contents IRS RESOURCES:... 3 FORM 5498: IRA INFORMATION... 4 Understanding Form 5498... 5 Frequently Asked Questions...7 IMPORTANT INFORMATION REGARDING THE 5498 FORM
Welcome to Citizens Bank Online New & Improved
 Welcome to Citizens Bank Online New & Improved You ll enjoy enhanced Citizens Bank online banking services this fall. This User s Guide explains the features and the use of Citizens Bank s Online Banking
Greenshades Garnishments User Guide
 Greenshades Garnishments User Guide 1. 1. General Overview... 4 1.1. About this Guide... 4 1.2. How Greenshades Garnishments Works... 4 1.3. Default Deduction Setup within GP... 5 1.4. Employee Deduction
Employee Enrollment User Guide
 Employee Enrollment User Guide Welcome to Online Enrollment! In this guide, you will find information and step-by-step instructions on how to enroll in your benefits. Table of Contents Before you get started:
A Step-By-Step Guide To Enrolling In Your Benefits On The Your Benefits Resources TM (YBR) Web Site It s Easy!
 Web Site It s Easy!") A Step-By-Step Guide To Enrolling In Your Benefits On The Your Benefits Resources TM (YBR) Web Site It s Easy! The Your Benefits Resources TM (YBR) Web site is home to all of the tools and resources you
A Step-By-Step Guide To Enrolling In Your Benefits On The Your Benefits Resources TM (YBR) Web Site It s Easy! The Your Benefits Resources TM (YBR) Web site is home to all of the tools and resources you
Employee Online SunGard BusinessPLUS
 Employee Online SunGard BusinessPLUS Employee Online (EO) is a web-based system designed to provide employees with improved access to their records. The interactive nature of Employee Online enables end
Special Pay Plan Required Minimum Distribution (RMD) Form
 Form") For assistance completing this form, please refer to the checklist on page 2. Your Information Employer: Special Pay Plan Required Minimum Distribution (RMD) Form Return this completed form to: Mail: MidAmerica
For assistance completing this form, please refer to the checklist on page 2. Your Information Employer: Special Pay Plan Required Minimum Distribution (RMD) Form Return this completed form to: Mail: MidAmerica
Merrill Lynch E-Contribs for Small Business Retirement Accounts
 Merrill Lynch E-Contribs for Small Business Retirement Accounts A Guide for Plan Sponsors Merrill Lynch E-Contribs for Small Business Retirement Accounts enables you to make electronic contributions to
emerchantview Service July 23, 2010
 emerchantview Service July 23, 2010 2010 FIRST DATA CORPORATION All Rights Reserved. Printed in U.S.A. This document contains confidential and proprietary information of First Data Corporation. You may
How to Get Your Phillips 66 Pension Benefits For Former Employees
 How to Get Your Phillips 66 Pension Benefits For Former Employees 1 2 3 Initiate your retirement process Elect your form of pension payment Sign and return your pension paperwork Start Here Get started
BNY MELLON INVESTMENT SERVICING TRUST COMPANY. Supplement to the Traditional and Roth Individual Retirement Account (IRA) Disclosure Statement
 Disclosure Statement") BNY MELLON INVESTMENT SERVICING TRUST COMPANY Supplement to the Traditional and Roth Individual Retirement Account (IRA) Disclosure Statement DEADLINE EXTENSION FOR 2016 CONTRIBUTIONS TO A TRADITIONAL
BNY MELLON INVESTMENT SERVICING TRUST COMPANY Supplement to the Traditional and Roth Individual Retirement Account (IRA) Disclosure Statement DEADLINE EXTENSION FOR 2016 CONTRIBUTIONS TO A TRADITIONAL
Sage Quickpay Payroll Year End 2013 User Guide
 Sage Quickpay Payroll Year End 2013 User Guide This guide covers the Payroll Year End 2013 process. You can read it onscreen or print it out. For additional PYE information, select the Tax Year End - FAQs
BNY MELLON INVESTMENT SERVICING TRUST COMPANY. Supplement to the Traditional and Roth Individual Retirement Account (IRA) Disclosure Statement
 Disclosure Statement") BNY MELLON INVESTMENT SERVICING TRUST COMPANY Supplement to the Traditional and Roth Individual Retirement Account (IRA) Disclosure Statement DEADLINE EXTENSION FOR 2016 CONTRIBUTIONS TO A TRADITIONAL
BNY MELLON INVESTMENT SERVICING TRUST COMPANY Supplement to the Traditional and Roth Individual Retirement Account (IRA) Disclosure Statement DEADLINE EXTENSION FOR 2016 CONTRIBUTIONS TO A TRADITIONAL
Introduction to Client Online
 Introduction to Client Online Bibby Factors International Guide 1 InternationalFactoringNewClientBibbyUKopsSept15 Introduction 3 Logging In 5 Welcome Screen 6 Navigation 7 Viewing Your Account 9 Invoice