IMS Membership Maintenance User Guide
|
|
|
- Godwin Jacobs
- 6 years ago
- Views:
Transcription

1 IMS Membership Maintenance User Guide Financial & Membership Services Membership Management Services Version Last Updated: 3/30/2012 Page 1 of 80
2 TABLE OF CONTENTS IMS Membership Maintenance User Guide Introduction... 4 Security Access... 4 N a v i g a t i o n... 4 View Membership... 5 Membership Status... 7 Enrollment... 9 Search Search Results Personal Info Membership Roles Demographics Enroll Student Individual EFT Additional Enrollments Copy Membership Data Add a Membership to an exisiting Individual Edit Membership Critical Changes Local Change Chapter Change Membership Type Change Updates to Other Membership Data Employment Information Adding Additional Employment Data Deleting Additional Employment Data Renew Membership Employment Information Adding Additional Employment Data
3 Deleting Additional Employment Data Cancel Membership Reactivate Delete Obligation Prorate Prorate directly in Obligation grid Prorate link Prorate & Critical Changes (Local, Chapter, Membership Type Changes) Local Change Prorating Funds Chapter Change Prorating Funds Membership Type Change Prorating Funds Cancels & Prorating Obligation Individual Reduction Remove Individual Reduction Change Payment Method Refund /Opt Out Add / Delete Additional Funds Payment Method Detail Obligation Matrix Obligation Log Additonal Membership Tasks View Membership History Recent tab Processing Guidelines on Special Memberships NEA Active- Life NEA Retired Lifetime and Pre Retired Subscription
4 INTRODUCTION The Membership/Obligation/Employment (MOE) subsystem allows you to add, update, renew, cancel, and reactivate memberships. In addition you can review and maintain all employment and obligation information pertinent to an individual s membership. An individual may have one or more membership sets. A membership set contains information about a person's membership. This information is displayed on two IMS screens: State, Local and UniServ data as well as NEA, SEA and LEA types, employer, work location, position and subject information is on the Membership screen. Dues and other fees with payment method information is on the Obligation screen. The Membership subsystem provides the ability to maintain up to 3 years of membership information (prior, current, future) and view on-line membership history older than prior year. It allows for an individual to have only one effective (active/current) membership set associated with a local (or chapter if applicable) at a time. One exception is the Pre-Retired subscription, which is a valid dual, or second, membership record within a Local. An individual may have both an Active membership and a Pre-Retired subscription. S E C U R I T Y A C C E S S There are three levels of membership security in IMS -- Membership Maintenance, Advanced Obligation Adjustment and Membership Advanced Maintenance. Membership adds (Enrollments) and edits (Membership Changes, Renewals, Cancels, Reactivates) are available for authorized IMS users who have been granted the Membership Maintenance level of security. Obligation adjustment to a member s Dues & Fees is available for authorized IMS users who have been granted the Advanced Obligation Adjustment level of security. Deleting a membership from the database is available to authorized IMS users who have been granted the Membership Advanced Maintenance level of security. We recommend this security access be given to only a few users and only used when a membership has been added in error. A user must have Membership Maintenance in order to have Advanced Obligation Adjustment and Membership Advanced Maintenance. N a v i g a t i o n Many functions are presented as links on a page. Click the link to initiate the function. Some functions appear on pop up pages. To close a pop up, click the close icon in the upper right corner. On most screens (or pages) we display a message if you make changes but forget to click the SAVE button. The message is: You have made changes. Are you sure you want to discard your changes?. When you make a change and click the SAVE button, a message will be displayed that is similar to Your changes have been saved successfully. 4

5 VIEW MEMBERSHIP In order to update membership information, the individual must be retrieved first. For instructions on how to search for an individual, refer to the Individual Maintenance User Guide. The Individual Profile page displays a comprehensive view of individual and membership information for the retrieved individual. From this page you will navigate to other pages/screens where all modifications and updates can be performed. Membership data is displayed by membership year in tab format with the current membership year in focus. The membership tab in focus is highlighted in yellow. Membership ID and Membership Status (Effective, Cancelled) are displayed at the top of the membership section for easy viewing. Current Year, Prior Year and Future Year Membership tabs are available. If multiple memberships exist for a membership year, a set of VCR buttons between them. will be displayed on the right to easily navigate To navigate between membership years, click on the Membership Year tab. To navigate between multiple memberships within a membership year, click on the VCR buttons. All basic membership information is displayed for the membership in focus. The information is divided into sections. The left section provides membership details, such as the state and local affiliate, employer and work location. Below that information is the display of membership types. The middle section provides information on the original enroll/renew date, Continuous membership indicator and a link to the Membership Status. The right section displays obligation information. Links above the Member Types are provided to Add a new membership to an existing individual, to Edit an existing membership and to Renew an existing membership. Additional links are provided to review Membership Status and to view/edit Obligation, Pay Method Detail and Indiv Payment Summary information for the membership in focus. All the links are discussed in more detail later in this guide. 5
6 Description Membership Year Memb ID Effective Current Membership Year is the default view for the page. Prior Year and Future Year memberships can be viewed under the other year tabs. The Membership Year is 9/1 through 8/31. The Membership Identifier for the Membership set. This is system generated when a membership record is added to the database for an individual. The status of the membership in focus -- Effective or Cancelled. Indication there is more than one membership for the year in view. Use the arrows to go back and forth to view the other memberships. State Uniserv Local Chapter Employer Work Location Position Subject The state affiliate of the membership in focus. The UniServ unit associated to the local affiliate. The local affiliate for the membership. If it exists, the chapter for the membership. The Chapter is a subset of the Local. The employer for the membership. If there is more than one employer, the Primary is shown. The work location for the membership. If there is more than one work location, the most recent one is shown. The member s employment position. If there is more than one position, the most recent one is shown. The subject taught by the member. If there is more than one subject, the most recent one is shown. Links to process membership updates. When clicked a new screen for the selected process will pop up. Member Type Start Date End Date Cancel indicator Enroll/Renew The membership types for the member -- NEA, SEA or LEA types. The date the associated membership type was assigned to the membership. The date the associated membership type was ended. If the membership is noncontinuous, the End Date will be 8/31 meaning it will not automatically renew during the annual FYMP process. If the membership is cancelled, the membership types are displayed in red and the End Date will reflect the cancel effective date. If checked the associated membership type has been cancelled. If the membership is continuous it is the original date the member enrolled. The system reflects dates back to If the membership is not continuous, the date the membership in focus was renewed. # of Ded Optional, to identify the number of payroll deductions for dues/fees for the membership in focus. Verify Info Indicates whether the membership in the database has been verified for accuracy. Verified: Membership added by the user. Automatic Renew: Continuous membership that was automatically renewed by the system (FYMP). Unverified: The "automatic renewal" code is changed by the system to "unverified" 6

7 whenever a second membership is added/renewed in the same year for an individual alerting the user that the membership set that was automatically renewed may no longer be valid. Continuous Early Enrollee NEA Card/Label SEA Card/Label If checked, the membership continues from year to year and is automatically renewed each year. If not checked it is an annual membership and requires a Renewal transaction by the user. Typically, memberships paid through payroll deduction and EFT are continuous while memberships paid via Cash are not. If checked the membership was added as part of the Early Enrollment Program. If checked, an NEA membership card and/or label will be produced for the member. If checked, a state membership card and/or label will be produced for the member. When clicked, a pop up displays the continuity status of the membership within the Association within the Membership Class/Subclass at each level. Fund Name Method Amount The name of an obligation fund for NEA, State, Local, and UniServ. The payment method used by the member to pay the obligation. This is the annual amount the member is obligated to pay. When clicked, the Obligation page is displayed for view or edit. When clicked the Pay Method Detail screen is displayed. It shows the obligation by payment method for each fund. Changes to an obligation split between two payment methods for a fund are made on this screen. When clicked the Individual Payment Summary screen is displayed. It is used to record individual check or cash payments received from a member. 1. Select a different Membership year tab to view Prior or Future Year memberships. 2. Click the right and left arrows to view other membership sets for the selected year. MEMBERSHIP STATUS The link in the Membership section of the Individual Profile screen opens a popup displaying information about the membership set in focus. This is a view only screen. 7
8 Description Membership ID Status Association Status The identifier of the membership in Focus. The status of the membership in Focus: Effective or Cancelled Per level New: The individual holds a membership for the year in focus (any class) and has never held a membership (any class) before in the association. Continuing: the individual holds a membership for the year in focus (any class) and also held a membership (any class) including a potential membership in the prior year in the association. Returning: the individual holds a membership for the year in focus (any class) and has held a past membership (any class) in the association but was not a member (any class) in the prior year. The Returning status means a lapse in membership of one or more years. Class/Sub Class Status Per level New: the individual holds a membership in the specific class/subclass (i.e. AC-1) for the year in focus and has never held a membership in that class/subclass before. Continuing: the individual holds a membership in a specific class/subclass (i.e. AC-1) for the year in focus and also held the membership in the same class/subclass in the prior year. Returning: the individual holds a membership in a specific class/subclass (i.e. AC-1) for the year in focus and has held a membership in that same class/subclass in the past but was not a member in that class/subclass in the prior year. The Returning status means a lapse in membership of one or more years. Click the to close the pop up. 8
9 ENROLLMENT Membership Enrollment processing is available for authorized IMS users who have been granted the IMS Membership Maintenance level of security. Advanced Obligation Adjustment security privileges are required to adjust the obligation in a new membership. Refer to the Obligation section for more information. You can navigate to the Enrollment page in one of two ways: 1. From the Search Results list after performing a New search or Expanded search and not finding the individual in the result list, click on the membership. button to add a new individual and 2. From the Individual Profile page after viewing or updating an existing individual, click the link in left panel to add a new individual and membership. 3. Use these same links to add a new individual and role. Refer to the Roles User Guide for more information. Note: Do not add an individual record if the person is already in the database. An individual record only needs to be added when the individual does not already exist within the database. It is possible to add a membership to an existing individual who has a membership in another state or another local within the same state. Click on the link from the Individual Profile page to add a new membership to an existing individual. See the Add a Membership section for more information. As you work with your enrollments/applications, you will find you need to go back and forth between the Enrollment page (used for new individuals) and the Individual Profile page (used to add a membership to existing individuals). The Add Indiv/Memb/Role page (often called the Enrollment page) allows the entry of a new individual and membership and/or role after first performing a database wide search to make sure the individual does not already exist. The page is organized into a series of accordion sections. To open an accordion, click on the accordion title bar. Open the accordions to add specific data for the new individual as needed. Drop down lists are utilized wherever possible. They include values from the membership database. Add data by typing data in the field or by selecting an entry from the drop down box. After adding the data, click the Save button within each accordion to commit the information to the database. 9
 or Full SSN (name not required but recommended) or SSN4 (first and last name required) or Alternate ID (name not")

10 Accordion sections S E A R C H From the Individual Profile page when you click the link, the Individual Search accordion is automatically open. Enter the search criteria and click the Search button. One of these five combinations is required: Individual ID (name not required) or Full SSN (name not required but recommended) or SSN4 (first and last name required) or Alternate ID (name not required) or First Name, Middle Name (optional) and Last Name (you may include the City and/or State of Residence if you know the member exists) 1. When searching by Individual ID, enter the 10-digit ID used as a unique identification number for an individual in the I&A database. You do not have to type the leading zeroes. If an individual is found, click on the Individual in the Result list and you will be returned to the Individual Profile page to review or edit the information for the existing record. 2. When searching by the full Social Security Number (SSN), enter the ID as 9 consecutive digits. Note: It is recommended that First Name and Last Name be entered with SSN. If the individual exists but does not currently have their SSN recorded on the database, the individual would not be found by SSN only. If SSN and Name are entered as search criteria and the SSN is not found, a subsequent search is initiated automatically by Name only. 3. When searching by the SSN4 or the last four digits of the Social Security Number, First Name and Last Name are also required. 10


11 4. When searching by the Alternate ID, First Name and Last Name are also required. Enter the alternate ID used by affiliates to identify and find individuals. This field is often populated by the state affiliates with Employee ID or some other internal or system ID. 5. When searching by Name, First Name and Last Name are required. Middle Name is optional. 6. When searching on City, First Name and Last Name are required. You must key the full city name. 7. When searching on State of Residence, First Name and Last Name are required. Select the state from the dropdown list. S E A R C H R E S U L T S Search results will be displayed based on search criteria entered. You will receive this message if no records match the criteria. Click to proceed. If there are matches, you will receive this message: Click and a result list will be displayed. If the individual is found in the result list, double-click on the name and you will be returned to the Individual Profile page to review and edit the information. Refer to the Add a Membership section of the User Guide if you need to add a membership to an existing individual. After determining that the individual does not already exist, click on the New button in the result list. 11

12 P E R S O N A L I NFO The Personal Information accordion will automatically open and the criteria entered for the search (i.e. Name, ID) is copied to this section. If you navigate to the Enrollment page from the initial Search by Individual screen after performing a New Search or Expanded Search, the Personal information accordion will open automatically instead of the Individual Search accordion. The criteria entered for the search (i.e. Name, ID) is copied to the Personal info section. You can proceed with entering the Personal Information. Enter the necessary personal data for the new individual. Description Title First Middle Last Suffix SSN SSN4 Alt ID Title (e.g. Mr., Ms, Mrs., Dr.) for the individual. Select from the dropdown list. Optional field. First name (given name) of the individual. It will be pre-populated from the search criteria. Required field. Middle name of the individual. Optional field. Last name (surname) of the individual. It will be pre-populated from the search criteria. Required field. Suffix (e.g. Jr., Sr., III) for the individual. Select choice from the dropdown list. Optional field. The SSN will be pre-populated from the search criteria if entered. The Social Security Number (SSN) must be unique in the entire database. If SSN already exists for another individual, the entered SSN is moved to the Alternate ID field for the individual in focus. Optional field. The SSN4 represents the last 4-digits of the Social Security Number. It will be pre-populated if it or the full SSN was entered in the search criteria. Optional field. The Alternate ID is an alternate identifier for the individual. Alternate ID is often used when SSN is not available. The Alternate ID will be pre-populated from the search criteria if entered. Optional field. Alternate ID is not required to be unique across the database. So if using this identifier in searching or matching, be sure to compose the ID so that it will be unique by including state and/or local identifiers. If a user attempts to give the same SSN to two individuals, the entered SSN for the second individual is moved to the Alternate ID field. 12
13 Nickname Address Type Primary Legal Foreign Delivery Address Apt Attn City/State/Zip Country USPS Override Phone 1, 2 & 3 Phone Number Primary 1 & 2 address Primary Ethnicity DOB Marital Status Gender Nickname for the individual. Optional field. The Address Type defaults to Home. It defines the type of address (Home, Work Other). Only one address per type is allowed. Required field. The Primary checkbox is automatically set. The first address added for the individual is automatically set to Primary. Only one address per individual may have the primary indicator. Required field for one address. If the address type is Home and the address is a non-po Box address, the Legal checkbox is automatically set. It is the legal address where the individual votes. Optional field. Indicator of a non-usa or foreign address. Optional field. The main part of the address such as the house number and street name, or PO Box. Required field. Secondary information such as apartment, Unit Number or Floor. Leave blank if not needed. Information line which includes in care of or Attention. Leave blank if not needed. The city, state abbreviation and zip code plus 4. For quicker data entry you can enter just the city and state or just the zip code and all three fields will be automatically populated if it s a valid address. Required fields. Blank if domestic (United States). Otherwise select from the list. The USPS (US Postal Service) field indicates whether the address passes validation (Deliverable), or fails due to an invalid house number, invalid street name, etc. Non editable. Indicates whether the address is good for mailing. Choices are Deliverable or Non Deliverable. Defines the type for the associated phone number field. One phone number per type is allowed. Up to three phones can be added on this page. Optional field. The ten digit numeric telephone number. Optional field. Indicates the main phone number. Only one phone number per individual may have the primary indicator. Phone 1 is marked as the primary. Defines the type of for the associated address. One address per type is allowed. Up to two can added on this page. Optional field. The address. Format: name@domain.suffix. Optional field. sign and. (dot) are required. name and domain can be any number of valid characters. Acceptable characters are a-z, 0-9, dot or period (.), apostrophe ( ), hyphen (-), or underscore ( _). Invalid characters (such as! # $ %? space etc.) are accepted by IMS but will be removed upon updating the database. The suffix (the part that follows the last dot) must have two characters (such as those denoting a country: us, ca, uk, au, etc.), or must match one of these values: com, edu, gov, org, biz, int, mil, net, pro, aero, arpa, coop, info, name, nato, museum. Otherwise you will receive an error message. Indicates the main address. Only one address per individual may have the primary indicator. 1 is marked as the primary. It displays on the Individual Profile page. Ethnicity indicates the race of the individual. Ethnicity can be changed but cannot be deleted once entered. Select from the dropdown list. Optional field. Date of Birth for the individual. Optional field. Marital Status indicates the marital status for the individual. Select from the dropdown list. Optional field. Gender indicates the gender of the individual (Male, Female). Gender can be changed but 13


14 Political Party Reg Voter cannot be deleted. Select from the dropdown list. Optional field. Political Party indicates the political party affiliation of the individual. Select from the dropdown list. Optional field. Check the box if the individual is a registered voter. Optional field. 1. Click the button to add the Individual. Click the Reset button to clear your entries from the screen. 2. After clicking the Save button the address validation popup is displayed. All addresses entered into the system are validated against the USPS database. If the address is correct, click. When a new address fails USPS validation, an error message will appear, such as the one below: The default is with Deliverable status. o If you have made an error and need to re-enter the address, click. o o Select Accept with Deliverable status if you believe the input address is good and should be selected for mailings. The Override field will change to Deliverable. Select Accept with Undeliverable status if you believe the address you have is not good and should not be selected for mailings. The address will be stored in the database and the Override field will change to Undeliverable. Once the Personal Info has been saved, the individual s name and Individual ID will be displayed at the top of the screen. At any time you can click on the Individual ID link at the top of the page to navigate to the Individual Profile page for additional editing of Information for the newly added individual. This is usually done after you add the membership and/or role information. In the Personal Info accordion only, you can edit the information after you click the Save button. 14

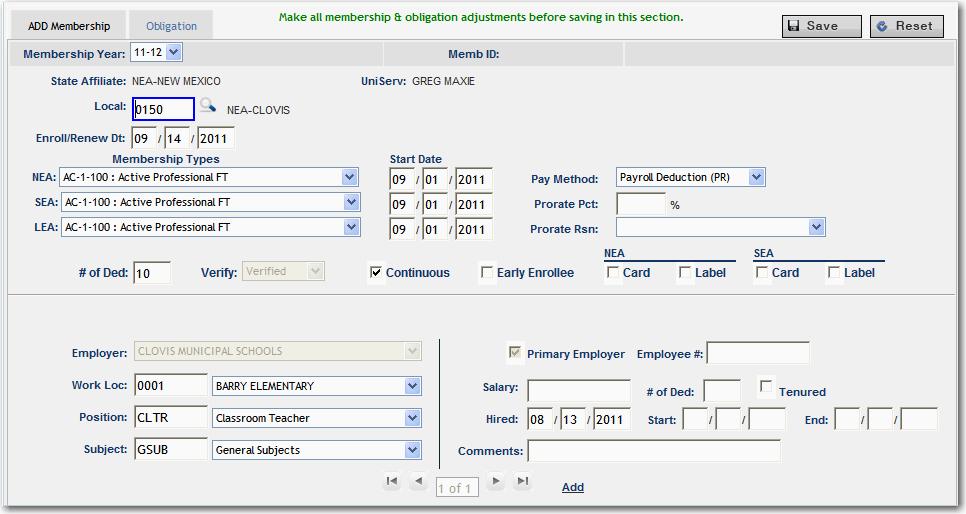
15 M E M B E R S H I P After saving the Personal Information, click on the Membership accordion to add a membership set to the new Individual record. The Membership accordion has two tabs ADD Membership and Obligation. The ADD Membership tab is the default tab. On this tab you will enter the necessary Membership, Employment and Work Detail information. The Obligation tab displays the system generated dues/fees after you select the local and membership types. Note: You can click the Save button from either the Membership or Obligation tab. However, make all membership and obligation adjustments before saving in this section. A message will appear at the top of the Enrollment page indicating the membership information was saved. At the top of the Enrollment page is a button. This time saving feature allows you to replicate or copy information from one membership enrollment to another. Refer to the Copy Membership Data section of this User Guide for complete instructions. 15
16 16 IMS Membership Maintenance User Guide


17 ADD Membership tab IMS Membership Maintenance User Guide 1. Select Membership Year from the drop down list. The default is for current year. Click on the drop down list to select a prior or future year. Required field. Prior Membership Year - On rare occasions you may need to enter an enrollment for last year. The system allows you to enter prior year enrollments until 12/31 of the current year. Future Membership Year - You will have the opportunity to enter next year s enrollments into the system during the spring and summer months of the current membership year when your state affiliate is future year ready. If enrolling into the future membership year and your state affiliate is not ready to accept enrollments in the future year, the following message will be displayed after selecting the future membership year. Contact your state affiliate to determine when enrollments into future year will be allowed. 2. State Affiliate will be pre-populated based on your login. 3. For the Local, enter the Local User ID or double click the Local box or click the icon to search for the local association. A list of local associations appears. Depending on your level of login, the system may prepopulate the Local Association. Required field. 17

18 4. To find the local enter the User ID in the Code box or enter a portion of the name in the Description box or scroll through the list. 5. Double click on the row for the local or click on the radio button to select it. The Local User ID and Name will be displayed. The UniServ Name will be automatically displayed after the Local is selected. 6. Select the Chapter from drop down list if displayed on the page. It is displayed only if the local is setup with chapters in the system. Required field if local has chapters. 7. Enter the Enroll/Renewal Date (date the member signed the enrollment form). It will default to the date you enter the enrollment if no Enroll Date is keyed. The format is mm/dd/yyyy with automatic tabbing between month, day and year. You do not need to key the slashes. Required field. 8. Select the NEA, SEA and LEA Membership Types. Included are the codes and text descriptions of the membership types in the database. In some cases, LEA Types are not recorded in IMS. If this is the case, you will not see any values in the LEA Type drop down list. Required field (at least one level). 9. Select the Pay Method chosen by the member to pay the annual dues and fees. The drop down list includes text description and code of the payment methods valid for your state association. Required field. 10. If applicable, enter the Prorate percentage and select the reason from the drop down list for the proration. The percent is calculated against the dues/fees that are setup in the Obligation table in the Utilities subsystem. Optional field 18
19 19 IMS Membership Maintenance User Guide 11. Enter the Number of Deductions (Nbr Ded) if the member is paying their dues through payroll deduction and it is information you want to keep in the database. Optional field. 12. Check the Continuous box if the member provided continuous membership authorization. Do not check the Continuous box if the member is not continuous and will renew each year. When enrolling a member, the Continuous field defaults to non-continuous. Optional field. Typically members who pay through payroll deduction or EFT are continuous, while members who pay by cash are non-continuous. Non-continuous records will have an 8/31 end date. The will not automatically renewed during the annual FYMP process. 13. The Verify field is automatically set to Verified and is disabled during an Add. You can change the field value during an Edit if necessary. Optional field. 14. Check the Early Enrollee box if the state association is participating in the NEA Early Enrollment Program for first time Active members and/or new Student members and the individual is a new member who is enrolling between April and August for the new membership year. Optional field. When processing early enrollments in the spring and summer, do not add the members to the current membership year. Instead, add the Early Enrollments to the next membership year. 15. Check the NEA or SEA Card and/or NEA or SEA Label box if a card or label should be produced during the weekly (periodic) process of printing Cards and Labels. Optional field. Your state can request that the system automatically mark the Card and/or Label fields for all Adds and/or Renewals. Talk to your NEA MMS contact about this feature. It is called the Weekly Auto Generate feature. That way, the Card & Label fields need only be marked when a member requests a replacement card. EMPLOYMENT INFORMATION 1. Select the Employer. The primary (or default) employer for the local is automatically displayed. You can select a different employer if the local is associated to more than one employer. Required field. 2. Select the Work Location. Enter the Work Location User ID or choose the work location/building from the drop down list. The work locations for the employer are displayed in the list. Optional field. 3. Select the Position held by the member. Enter the Position User ID or choose the Position from the drop down list. Optional field. 4. Select the Subject taught by the member. Enter the Subject User ID or choose the Subject from the drop down list. Optional field. 5. The following Employment fields are display only. The Primary Employer checkbox is automatically marked for the first employer added to the membership. The Employer s # of Deductions is from the External Org - Employer/Work Location subsystem. The Start Date automatically defaults to the membership start date. 6. Enter the other Employment fields (all optional). The Employee Number is a 15 alpha-numeric identifier assigned by the employer (i.e. School District, State Board of Ed, etc.) Enter the Salary if known (i.e ). Do not key a comma when entering the number.
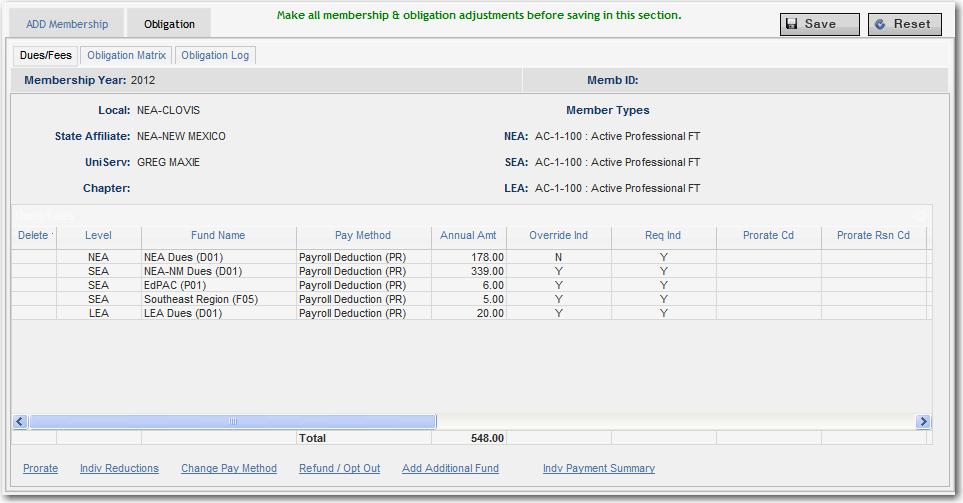
20 Mark the Tenured checkbox if the member has reached tenured status. IMS Membership Maintenance User Guide Enter the member s Hired Date (mm/dd/yyyy) with the employer, if known. Automatic tabbing between month, day and year is provided. You do not need to key the slashes. If no date is entered, the Hire Date will be left blank in the database. The End Date is updated only when adding a second employer to the membership. This is infrequently done during an enrollment. Enter Employment notes in the Comments field. It is a free form text box. 7. Additional Employment data (second employer, work location, position and/or subject) can be entered if applicable. Click the link to add the second set of employment data. The VCR buttons reflect the number of employment records added to the new membership.. 8. Click the Obligation tab to view the obligation for the membership. The Obligation tab has three sub-tabs. The Dues/Fees sub-tab is the default. The Membership Year and critical membership information is displayed at the top. The annual obligation amount and payment method for each fund is displayed in a grid for review and editing. The obligation is automatically generated based on the local and membership types as set up in the Utilities Obligation table. Refer to the Obligation section for complete instructions on modifying or adding obligation. Make note of the following message in center of Membership section of the Enrollment page: Do not click the Save button until you have reviewed the obligation information. Once clicked, you can no longer make changes to the Membership or Obligation information on the Enrollment page. If changes are necessary after clicking the Save button, you will need to click the Individual ID at top of Enrollment page. All the information for that person will be displayed on the Individual Profile page for further editing. 20


21 9. Click to save the enrollment to the database. The following message is displayed at the top of the screen when the membership has been saved The following warning message is displayed if you change the pay method from or to EFT. Depending on the action you may need to review/update EFT information. R O L E S Click on the Roles accordion to add roles for the new individual. Enter necessary roles data for the new individual and click Save. A message will appear at the top of the page indicating the Role Assignment was saved. Consult the Roles User Guide for further information. D E M O G R A P H I C S Click on the Demographics accordion to add demographic data for the new individual if necessary. Demographics are custom data created specifically by each State Affiliate. The data shown on this page will vary based on the options utilized by the State Affiliate. Please contact your State Affiliate membership office for processing instructions. The more commonly used Demographic codes for your state and NEA are automatically displayed in this section. Click the button to select additional Demographic codes. The First year of membership (NEA code NEAIND01) is automatically populated when the member is added to the database with an NEA membership type. 21


22 Enter demographic data for the new individual and click Save. A message will appear at the top of the page indicating the Demographic information was saved. E N R O L L S T U D E N T Click on the Enroll Student accordion to add student membership information for the new individual if necessary. Enter student data for the new individual and click Save. A message will appear at the top of the page indicating the Student information was saved. Description State Affiliate Higher Education Institute Campus Level of Study Subject of Study Graduation Date Student Teacher Comments The State Affiliate associated to the User s ID. It will be pre populated. Required field. The Higher Education institution the student is attending. Required field. For Higher Education Institutions with more than one campus, select the specific one the student is attending. Optional field. Select Freshman, Sophomore, Junior, Senior, Graduate. Optional field. The subject area the student is studying. Select the choice from the list. Optional field. The anticipated graduation date. Optional field. If checked, the individual is doing student teaching. Optional field. Comments about the student information. Optional field. 22

23 I N D I V I D U A L E F T Click on the Individual EFT accordion to add EFT information for the new individual if necessary. There are links to the EFT Bank Transit # and the Deduction Profile. Enter EFT data for the new individual and click Save. A message will appear at the top of the page indicating the EFT information was saved. Consult the Electronic Funds Transfer (EFT) User Guide for further information. Description Bank Transit# Account # Enter the 9-digit number Bank Transit number of member s bank. You can click on the Bank Transit# link to open the EFT Bank Profile page. There you can search for a Bank by name. Enter the member s Bank Account Number to be used for Electronic Funds Transfer. Links to the EFT Deduction Profile page where you can review or edit the profile. A deduction profile is automatically created for memberships with payment method of EFT. A D D I T I O N A L E N R O L L M E N T S After all the new information has been entered and saved for an individual, you have the following options: Click to setup data to be copied from one enrollment to the next. Click the button at the top of the page to search for the next new individual. Note: After processing the first enrollment, you do not have to navigate to the Search by Individual screen to add the next new individual and membership/role. Instead, a search can be performed on this screen. First, click the New button at the top of the page. The Individual Search accordion will open. Enter the search criteria and click the Search button. The Search Results will be displayed. Refer to the Search Results information at the beginning of the Individual/Membership/Role section of this document for more information. Click on the Individual ID at the top of the page for the person you just entered. The Enrollment page will close and the Individual Profile page will display all the information for that person. Click on the Search breadcrumb at the top of the page to return to the Search by Individual page to search for other existing individuals. This is an alternative way to search for an individual. 23

24 COPY MEMBERSHIP DATA The copy function allows you to replicate or copy information from one membership enrollment (add) to another. This will save you processing time when entering enrollments for a local. Sort your enrollment forms to take advantage of this feature. Suggested sort -- by Local, Employer, Work Location, Membership Types and Payment Method. If you have a substantial number of enrollments, we recommend you use MEX. This function copies the data from the previous enrollment forward to the next enrollment. You can click the Copy link at any time to setup the fields to be copied. The data copied from the last enrollment will be displayed in the next enrollment. 1. Click the button at the top of enrollment screen. All the fields in the membership section of the enrollment can be copied. Fields in other sections (Personal, Roles, Demographics, Student and EFT) are not currently available for copying. 2. Select all the data fields you wish to copy from one enrollment to the next. If you want all the data fields copied, select the first checkbox Select All. 24

25 3. Click the button on the Copy pop-up to save the field values so they will be copied from one enrollment to the next. The following message is displayed. Continue processing your enrollments. You will notice on the next enrollment that the membership fields are automatically populated from the previous enrollment. If you change the value in any field, it will be saved and the new value will be copied forward from that point on. The enrollment Copy function is active for a user s entire session so you can navigate to other subsystems and when you return to key enrollments, your copy settings are still intact. At any time you can turn off the copy of a field. Click the Copy button, remove the checkmark from the field and click the button. To turn-off the Copy function entirely, click the button from the Copy pop-up. It is important to review the copied data for each member. There are some fields that most likely will change from enrollment to enrollment (Enroll Date, Position, Subject, Hire Date). Be sure to enter or make a new selection if the data is different. Sometimes the copied values do not apply to an enrollment. Clear the field to remove a value. If it s a drop down field (e.g. Subject), choose the blank at the top of the list. But remember, from that point on the field will be blank until a value is entered/selected in the field. The Copy feature remains in effect when adding a membership to an existing individual record. Refer to the Add a Membership section of the User Guide for more information. 25


26 ADD A MEMBERSHIP TO AN EXISITING INDIVIDUAL IMS Membership Maintenance User Guide There are times when you search for a new member and find the individual already exists in the database as mentioned in the Enrollment section. Or you may need to add a second membership for one of your current members. Adding a membership is available to authorized IMS users who have been granted the Membership Maintenance level of security. Advanced Obligation Adjustment security privileges are required to adjust the obligation when adding a membership. To add a membership for an existing individual, first search for the individual. Personal data is displayed but as you can see the membership area is blank. On the Individual Profile page, click the link to open the membership page. There are two tabs ADD Membership and Obligation. The ADD Membership tab is displayed. 26

27 This is the same membership screen as the Enrollment. Refer to the Enrollment section of this User Guide for complete instructions. You can utilize the Copy feature when adding membership information to an existing individual. Refer to the Copy Membership Data section of the User Guide for more information. If the Copy feature is in effect when adding a membership to an existing individual record, you will see the on the Add Membership screen. o o To populate the screen with the copied fields, click the Paste link. To enter completely different data, do not click the link. Key the new data and click Save. There is no impact to the Copy Setup if you skip the Paste feature. o Click on the Obligation tab before saving the add to view the obligation for the membership. The annual obligation amount and payment method for each fund is displayed in a grid for review and editing. The obligation is automatically generated based on the local and membership types as setup in the Utilities Obligation table. Refer to the Obligation section of this guide for complete instructions on modifying or adding obligation. o After clicking the Save button you will get the message:. Notice the intent changes from an ADD to EDIT on the Membership tab. You can make further changes if necessary. o o If the Paste link is not displayed on the ADD Membership screen, the Copy Setup has not been established. NOTE: If you change the value in any field when adding a membership to an existing individual, the new value will NOT be saved from that point on. This is the difference between the Copy feature in enrollments vs. the Copy feature when adding a membership to an existing individual. We hope to resolve this issue in a future IMS release so the Copy feature in both screens work the same. 27
 as well as changes to non-critical fields such as Continuous indicator and Work Location.")
28 EDIT MEMBERSHIP Membership Update processing is available for authorized IMS users who have been granted the IMS Membership Maintenance level of security. This includes critical changes (Local, Chapter and Membership Types changes) as well as changes to non-critical fields such as Continuous indicator and Work Location. In addition to edits, this screen is used to process cancellations and to delete memberships processed in error. Click the link in the membership section of the Individual Profile page. There are two tabs EDIT Membership and Obligation. The EDIT Membership tab is displayed with the membership information. Updates can be made directly to the membership, employment and work details information. Click on the obligation tab to make adjustments to obligation as needed. You must have the Advanced Obligation Adjustment level of security to make obligation changes. Refer to the Obligation section of the user guide for more information. The Membership Year, Memb ID, Memb Status (Effective or Cancelled) and a Cancel link are displayed at the top of the screen. These fields as well as the State Affiliate and UniServ are pre-populated and are not available for update. Add or modify data by typing data in the field or by selecting an entry from the drop down box. To delete information from a data entry field, simply remove the content. To delete information from a field with a dropdown list, choose the blank at the top of the dropdown list. It is the equivalent of no value. To assist with navigation, the field in focus is highlighted with a blue border. 28
29 CRITICAL CHANGES L O C A L C H A N G E Local Association for the selected membership will be displayed. If a member has changed locals and you have security access to move the person to the new local, the change can be processed in one of two ways. Option 1: Add a membership in the new local and cancel the membership in the old local two transactions which may be completed at different intervals and by different users. Option 2: Process a local change by selecting a new local from the Local selection list. If a new local is selected, the update is considered a membership critical change and the system will cancel the old membership and add a new membership in the new local all in one step. Both memberships are retained for historical reference. Additional fields will be displayed to capture further required information. In the Local field, enter the Local User ID or double click the Local box or click the association. A list of local associations appears. icon to search for the local To find the local enter the User ID in the Code box or enter a portion of the name in the description box or scroll through the list. Double click on the row for the local or click on the radio button to select it. The Local User ID and Name will be displayed. 29
30 Make any additional changes. IMS Membership Maintenance User Guide A local change clears the Work Location if it is not valid under the new local/employer. Select the new Work Location if known. The Position and Subject are carried forward from the old local to the new local if no change to Employer type (PK-12, Higher Ed, Other). If no further changes, click the Save button and a new popup will be displayed showing the obligation for the old and new membership side by side. For both the old and new membership sets, the obligation is initially displayed showing the full amounts. Advanced Obligation Adjustment security privileges are required to adjust the obligation in a local change. If you do not have Advanced Obligation Adjustment security privileges, the percent fields will default to 0% (old) and 100% (new) and will be protected. Refer to Local Change-Prorating Dues for more information on prorating the dues when processing a local change. 1. Enter the Effective Date of the critical change (defaults to current date). 2. Enter the Percent of obligation to remain in the old membership. If left blank it will default to 0%. 3. Enter the Percent of Obligation to be generated for the new membership. If left blank it will default to 100% (full obligation). 4. The Reason field displays Local Change. Edits are not allowed. 5. The obligation based on the percentages entered will be shown in the Annual Amt columns. 6. Click after making all modifications. If no percentages were entered, the following warning message is displayed. Click if correct or to return to the critical change screen. 30
 membership will be displayed on the Edit Membership popup. Click the in the upper-right hand corner of the Edit Membership popup to return to the Main screen.")
31 To abandon the change, click the Membership screen. in the upper-right hand corner to return to the Edit 7. The popup will close and the database will be updated immediately. 8. The new (effective) membership will be displayed on the Edit Membership popup. Click the in the upper-right hand corner of the Edit Membership popup to return to the Main screen. The new membership is in focus on the Individual Profile screen. Notice the VCR buttons. You can go back and forth between the two memberships. C H A P T E R C H A N G E A Chapter will be displayed if existing for the membership. It is displayed only if the local is setup with chapters in the database. Select a new chapter from the selection list if required. If a new chapter is selected, the update is considered a critical change to the membership and the system will cancel the old membership and add a new membership with the new chapter. Additional fields will be displayed to capture further required information. After making the Chapter change (and other field changes), click the Save button and a new popup will be displayed showing the obligation for the old and new membership. For both the old and new membership sets, the obligation is initially displayed showing the full amounts. Advanced Obligation Adjustment security privileges are required to adjust the obligation in a chapter change. If you do not have Advanced Obligation Adjustment security privileges, the percent fields will default to 0% (old) and 100% (new) and will be protected. Refer to Chapter Change-Prorating Dues for more information on prorating the dues when processing a Chapter change. 1. Enter the Effective Date of the critical change (defaults to current date). 31
32 2. Enter the Percent of obligation to remain in the old membership. If left blank it will default to 0%. 3. Enter the Percent of Obligation to be generated for the new membership. If left blank it will default to 100% (full obligation). 4. The Reason field displays Chapter Change. Edits are not allowed. 5. Obligation adjustments based on the percentages entered will be shown in the Annual Amt columns. 6. Click after making all modifications. If no percentages were entered, a warning message is displayed. Click if correct or to return to the critical change screen. To abandon the change, click the Membership screen. in the upper-right hand corner to return to the Edit 7. The popup will close and the database will be updated immediately. 8. The new (effective) membership will be displayed on the Edit Membership popup. Click the in the upper-right hand corner of the Edit Membership popup to return to the Main screen. 9. The new membership is in focus on the Individual Profile screen. Notice the VCR buttons. You can go back and forth between the two memberships. M E M B E R S H I P T Y P E C H A N G E Select a new NEA, SEA and LEA Membership Type to make a change. Included in the drop down are the codes and text descriptions of the membership types in IMS. Membership type changes at one or more levels are allowed. When making a membership type change, the update is considered a critical change to the membership and the system will cancel the old membership and add a new membership with the new membership types. Additional fields will be displayed to capture further required information. In some cases, LEA Types are not recorded in IMS. If this is the case, you will not see any values in the LEA Type drop down list. One or two levels of Membership can be removed at the same time a membership type change is being processed. To remove a type, choose the blank at the top of the Membership Type dropdown list. It is the equivalent of no value. For example, to change a membership set from Active Professional Full-time (AC-1-100) at the NEA, SEA and LEA levels to Reserve (RS) at the NEA and SEA levels only, key the update in the following way: 32


33 Current: New: IMS Membership Maintenance User Guide There are times when all you need to do is insert a membership type into a level that does not have a type (level is blank) and no membership type change is warranted. When only inserting a type, the update is not considered a critical change. Thus the additional critical change fields will not be displayed. And the membership is not cancelled. The Pay Method field becomes available when you change a membership type or insert a type into a level that does not have a type. If you select a different payment method, all funds in the new membership will be changed to the new method. If you do not select a payment method, the payment method for SEA Dues is automatically assigned to the funds for the new or inserted types. You may change other fields when making Membership Type changes. After making your changes, click the Save button and a new popup will be displayed showing the obligation for the old and new membership. For both the old and new membership sets, the obligation is initially displayed showing the full amounts. Advanced Obligation Adjustment security privileges are required to adjust the obligation in a type change. If you do not have Advanced Obligation Adjustment security privileges, the percent fields will default to 0% (old) and 100% (new) and will be protected. Refer to Membership Type Change-Prorating Dues for more information on prorating the dues when processing a membership type change. 1. Enter the Effective Date of the critical change (defaults to current date). 2. Enter the Percent of obligation to remain in the old membership. If left blank it will default to 0%. 3. Enter the Percent of Obligation to be generated for the new membership. If left blank it will default to 100% (full obligation). 4. The Reason field displays Type Change. Edits are not allowed. 5. Obligation adjustments based on the percentages entered will be shown in the Annual Amt columns. 6. Click after making all modifications. 33
34 If no percentages were entered, a warning message is displayed. Click if correct or to return to the critical change screen. To abandon the change, click the to the Edit Membership screen. in the upper-right hand corner to close the pop-up and return 7. The popup will close and the database will be updated immediately. 8. The new (effective) membership will be displayed on the Edit Membership popup. Click the in the upper-right hand corner of the Edit Membership popup to return to the Main screen. 9. The new membership is in focus on the Individual Profile screen. Notice the VCR buttons. You can go back and forth between the two memberships. UPDATES TO OTHER MEMBERSHIP DATA 1. Enroll Date Update the Enroll Date as needed. The date must be greater than 1950 and less than or equal to 8/31 of the membership year. 2. Membership Type Start Dates Updates to the Start Dates can be made but they must fall within the membership year (09/01-08/31). 3. Membership Type End Dates These dates are disabled and not available for updates. If a membership is non-continuous, the End Dates will reflect 8/31. If a membership is cancelled, the End Dates will reflect the cancel process date and the Memb Status is changed to Cancelled. 4. Number of Deductions (Nbr Ded) Update as needed. It is an optional alpha-numeric three character field. 5. Continuous Mark the Continuous checkbox if the member provided continuous membership authorization and is not currently marked. Do not check the Continuous box if the member is not continuous and will renew each year. To change a continuous membership to non-continuous, uncheck the Continuous box. Typically members who pay through payroll deduction or EFT are continuous, while members who pay by cash are annual and non-continuous. 6. Early Enrollee - Check the Early Enrollee box in the future year membership if your state association is participating in the NEA Early Enrollment Program for first time Active members and/or new Student members, and the person enrolled during the open Early Enrollment campaign (April August) and the box is not currently marked. To remove the early enrollee indicator from the membership, uncheck the Early Enroll box. 34
35 7. NEA & SEA Card/Label - Check the Card and/or Label boxes if a card or label should be produced during the periodic (i.e. weekly) process of printing Cards and Labels. Your state can request that the system automatically mark the Card and/or Label fields for all Adds and/or Renewals. Talk to your NEA MMS contact about this feature. It is called the Weekly Auto Generate feature. That way, the Card & Label fields need only be marked when a member requests a replacement card. E M P L O Y M E N T I N F O R M A T I O N 1. Employer This field is disabled and not available for updates. It displays the default employer for the local. See the Adding Additional Employment Data section for more information about changing employer. 2. Work Location Add or Update as needed. The Work Locations for the member s employer are in the drop down list. 3. Position Add or Update as needed the position held by the member. The Positions are listed in the drop down list. 4. Subject Add or Update as needed the subject taught by the member. There is a No Subject Taught value. The Subjects are listed in the drop down list. To remove a work location, position or subject (all optional), choose the blank at the top of the dropdown list. It is equivalent to no value. 5. Primary Employer The first employer added to the membership is automatically marked as the Primary employer. See the Adding Additional Employment Data section for more information about setting the Primary Employer when the membership has more than one employer. 6. Employee # - Add or Update the employee number as needed. It is a 15 alpha-numeric identifier assigned by the employer (i.e. School District, State Board of Ed, etc.) 7. Salary Add or update the Salary if known (i.e ). Do not key a comma when entering the number. 8. Number of Deductions (# of Ded) - This is display only. It is the Employer s # of Deductions from the External Org - Employer/Work Location subsystem. 9. Tenured - Mark this checkbox if the member has reached tenured status. 10. Hired Date Add or update the member s hire date (mm/dd/yyyy) with the employer, if known. Automatic tabbing between month, day and year is provided. You do not need to key the slashes. 11. Start Date It is display only. It automatically defaults to the membership start date. 12. End Date - Update only when ending the employment for a member who has another employment. See the Adding Additional Employment Data section for more information. 13. Comments Add or update employment notes in the Comments field. It is a free form text box. A D D I N G A D D I T I O N A L E M P L O Y M E N T D A T A 35
36 The VCR buttons at the bottom of the screen keep track of the number of employments/work details recorded for the membership. To add additional employments/work details, click the link. After saving the additional employment information, use the VCR buttons to move from one employment to the next. If there is more than one employer, work location, position and/or subject for the membership, it can be entered here. The employer is displayed if only one employer is associated to the local. If more than one employer is associated to the local, the employer field is available for you to select the employer. When adding another employer, the position and subject are automatically copied from the first employer to the second employer. If there are no changes to the position or subject, the user need only select the work location. Although rare if the member has two employers, one of them must be marked as the Primary employer for the membership. Mark the Primary Employer checkbox for the Employer you want printed on the rosters and reports. An employer is required for most memberships (Active, ESP, Agency Fee, Substitute). If the local for the membership is associated to more than one employer, you may change the employer. To change employer: o o The first step is to add the second employment with the new employer, work location, position and subject. The second step is to end the first employment. To end the first employment, enter a date in the End Date field. D E L E T I N G A D D I T I O N A L E M P L O Y M E N T D A T A If a member has more than one employment/work detail record and you want to remove one of them, follow these steps. 36

37 1. Select the employment record to be removed. Use the VCR buttons to move from one employment to the next. 2. To remove a work location, position and/or subject, choose the blank at the top of its dropdown list. It is equivalent to no value. Select the blank at the top of all populated work detail dropdown lists if you want to remove the entire work detail record. The work detail fields are work location, position and subject. 3. Click the button to save the change. 4. The VCR buttons will then display. To abandon membership updates made on the EDIT Membership screen, click the displayed values will revert to the original database values. button. The After making all your changes, click the membership information was saved. button. A message will be displayed indicating the Click on the Obligation tab to review the Dues/Fees. See the Obligation section for more information on updating the Dues/Fees. 37

38 RENEW MEMBERSHIP Membership renewal processing is available for authorized IMS users who have been granted the IMS Membership Maintenance level of security. Advanced Obligation Maintenance security privileges are required to adjust the obligation when renewing a membership. To renew a membership, make sure the membership you want to renew is in focus on the Individual Profile page (i.e. select the prior year membership for renewal into the current year). Click the link in the membership section. Notice there are two tabs RENEW Membership and Obligation. The RENEW Membership tab is automatically displayed with the membership information. Notice the Membership Year advanced by 1. In this example the membership was selected from the Individual Profile page. The Renew link was clicked and the RENEW Membership screen was displayed with the year reflecting There may be times when you select the current year membership and renew it for the future year. This is typically at the end of the current year in the summer months. If renewing into the future membership year (current membership year plus 1) and your state affiliate is not ready to accept renewals in the future year, the link will not be available for selection. Contact your state affiliate to determine when renewals into future year will be allowed. On the RENEW Membership screen, add or modify data by typing data in the field or by selecting an entry from the dropdown list. Any changes you make will be applied to the new ( Renewed To ) membership. The prior year ( Renewed From ) membership will not change. If no changes are needed simply click the button to renew the membership. 38

39 To delete information from a data entry field, simply remove the data. To delete information from a field with a dropdown list, choose the first item in the list, a blank. It is equivalent of no value. To assist with navigation, the field in focus is highlighted with a blue border. 1. Membership Year for the new membership will be pre-populated. The year displayed is the year the membership will be renewed into. 2. State Association will be pre-populated. 3. UniServ will be pre-populated. 4. Local Association for the selected membership will be displayed. Select a new local if required. The new local will be applied to the renewed membership. Depending on your level of login, the system may prepopulate the Local Association. In the Local field, enter the Local User ID or double click the Local box or click the the local association. A list of local associations appears icon to search for To find the local enter the User ID in the Code box or enter a portion of the name in the Description box or scroll through the list. Double click on the row for the local or click on the radio button to select it. The Local User ID and Name will be displayed on the Renew Membership page. 39
.")

40 5. Chapter will be displayed if existing for the membership. It is displayed only if the local is setup with chapters in the IMS system. Select a new chapter from the selection list if required. The new chapter will be applied to the renewed membership. 6. Enter the Enroll/Renewal Date (date the member signed the renewal form). Unless an Enroll Date is entered, the original Enroll Date on the Renewed from membership will be copied. If an Enroll date is entered, the Renewed to membership will reflect that date. The format is mm/dd/yyyy with automatic tabbing between month, day and year. You do not need to key the slashes. 7. Select a new NEA, SEA and LEA Membership Type, if required. The new membership types will be applied to the renewed membership. Included are the codes and text descriptions of the membership types in the database. In some cases, LEA Types are not recorded in IMS. If this is the case, you will not see any values in the LEA Type drop down list. 8. One or two levels of Membership may be removed during a renewal. To remove a type, choose the blank at the top of the Membership Type dropdown list. It is equivalent to no value. For example: To change a membership set from Active Professional Full-time (AC-1-100) at the NEA, SEA and LEA levels to Retired Life Initial Yr (RT-7-7) at the NEA and SEA levels only, key the update in the following way: 9. There are times when all you need to do is insert a membership type into a level that was missing a type (level is blank) during a renewal. The payment method for the dues/fees of the new membership type will be the same as the SEA Dues (or NEA dues if there is no SEA type). 10. Update the Number of Deductions (# of Ded), if needed. 11. Update the Continuous box if the member provided continuous membership authorization and is not currently marked. Do not check the Continuous box if the member is not continuous and will renew each year. To change a continuous membership to non-continuous, uncheck the Continuous box. Typically members who pay through payroll deduction or EFT are continuous, while members who pay by cash are annual and non-continuous. 12. Check the Early Enrollee box in the future year membership if the state association is participating in the NEA Early Enrollment Program and it is not currently marked. To remove the early enrollee indicator from the membership, uncheck the Early Enroll box. Most likely this box would not be checked during a renewal since the NEA Early Enrollment program applies to first time Active members and/or new Student members. 13. Check the Card and/or Label box for the appropriate level (NEA, SEA) if a card or label should be produced during the periodic (weekly) process of printing Cards and Labels. Your state can request that the system automatically mark the Card and/or Label fields for all Adds and/or Renewals. Talk to your NEA MMS contact about this feature. It is called the Weekly Auto Generate feature. That way, the Card & Label fields need only be marked when a member requests a replacement card.` 40
41 E M P L O Y M E N T I N F O R M A T I O N 1. Employer This field is disabled and not available for updates. It will display the default employer for the local. See the Adding Additional Employment Data section for more information about changing employer. 2. Work Location - Update as needed. The Work Locations for the employer are in the drop down list. 3. Position - Update as needed the position held by the member. The Positions are listed in the drop down list. 4. Subject Update as needed the subject taught by the member. There is a No Subject Taught value. The Subjects are listed in the drop down list. To remove a work location, position or subject (all optional), choose the blank at the top of the dropdown list. It is the equivalent of no value. 5. Primary Employer The first employer added to the membership is automatically marked as the Primary employer. See the Adding Additional Employment Data section for more information about setting the Primary Employer when the membership has more than one employer. 6. Employee # - Add or Update the employee number as needed. It is a 15 alpha-numeric identifier assigned by the employer (i.e. School District, State Board of Ed, etc.) 7. Salary Add or update the Salary if known (i.e ). Do not key a comma when entering the number. 8. Number of Deductions (# of Ded) - This is display only. It is the Employer s # of Deductions from the External Org - Employer/Work Location subsystem. 9. Tenured - Mark this checkbox if the member has reached tenured status. 10. Hired Date Add or update the member s hire date (mm/dd/yyyy) with the employer, if known. Automatic tabbing between month, day and year is provided. You do not need to key the slashes. 11. Start Date It is display only. It automatically defaults to the membership start date. 12. End Date - Update only when ending the employment for a member who has another employment. See Adding Additional Employment Data section for more information. 13. Comments Add or update employment notes in the Comments field. It is a free form text box. A D D I N G A D D I T I O N A L E M P L O Y M E N T D A T A The VCR buttons at the bottom of the screen keep track of the number of employments/work details recorded for the membership. To add additional employments/work details, click the link. After saving the additional employment information, use the VCR buttons to move from one employment to the next. If there is more than one employer, work location, position and/or subject for the membership, it can be entered here. The employer is displayed if only one employer is associated to the local. If more than one employer is associated to the local, the employer field is available for you to select the employer. 41

42 When adding another employer, the position and subject are automatically copied from the first employer to the second employer. If there are no changes to the position or subject, the user need only select the work location. Although rare if the member has two employers, one of them must be marked as the Primary employer for the membership. Mark the Primary Employer checkbox for the Employer you want to print in the rosters and reports. An employer is required for most memberships (Active, ESP, Agency Fee, Substitute). If the local for the membership is associated to more than one employer, you may change the employer. To change employer: o o The first step is to add the second employment with the new employer, work location, position and subject. The second step is to end the first employment. To end the first employment, enter a date in the End Date field. D E L E T I N G A D D I T I O N A L E M P L O Y M E N T D A T A If a member has more than one employment/work detail record and you want to remove one of them when processing the renewal, follow these steps. 1. Select the employment record to be removed. Use the VCR buttons to move from one employment to the next. 2. To remove a work location, position and/or subject, choose the blank at the top of its dropdown list. It is equivalent to no value. Select the blank at the top of all populated work detail dropdown lists if you want to remove the entire work detail record. The work detail fields are work location, position and subject. 42

43 3. Click the button to save the change. 4. The VCR buttons will then display. To abandon membership updates made on the EDIT Membership screen, click the displayed values will revert to the original database values. button. The After making all your changes, click the membership information was saved. button. A message will be displayed indicating the Click on the Obligation tab to review the Funds and Dues/Fees. See the Obligation section for more information about updating the Dues/Fees. 43

44 CANCEL MEMBERSHIP Membership Cancellation processing is available for authorized IMS users who have been granted the IMS Membership Maintenance level of security. All levels or a single level within a membership set can be cancelled. If all levels are cancelled, the set is marked as cancelled and the following occurs: The Membership Status (Cancelled), Cancel Reason and Membership types and dates are highlighted in red on the Individual Profile screen. The Cancel checkboxes are marked on the Individual Profile screen. The Membership Status Code is changed from Effective (E) to Cancelled (C) in the Membership History screen during the nightly batch process. If you do not process a full membership cancel (i.e. at least one level is still effective), the membership set remains effective and the Membership Status Code remains as E in the Membership History screen. Cancelled membership sets are retained on the database for historical purposes. A cancelled membership can be reactivated (returned to effective status) within the same membership year. When processing a cancellation, the system will: Cancel the membership and update the end date with the cancel effective date. Prorate the obligation if needed. End the employment. 44

45 Any membership cancelled as of 8/31 (the last day of the official membership year) is considered to be effective (current) in the IMS database. The Membership Status Code remains as E. Any Membership with a cancel date of 9/1 through 8/30 is considered to be cancelled. The Membership Status Code is set to C. You can cancel a membership with a future end date. This is useful if you learn a member is leaving the school district at the end of the year. Let s say you hear in May that a member is retiring at the end of the school year. In May, you can cancel the membership as of 8/31. Although it is cancelled, it is actually treated as effective for the entire year. It will not rollover to the next membership year during FYMP. To cancel a membership, make sure the membership to be cancelled is in focus on the Individual Profile screen. 1. Click the link from the Individual Profile screen. 2. On the EDIT Membership screen, click the link located in the top right corner of the page. 3. The Cancel Membership popup is displayed. Description Level Cancel Reason Cancel Effective Date Percent $ Remaining Dues/Fees Level Dues/Fees Fund Name Dues/Fees Annual Amount Dues/Fees Original Amount Select ALL to cancel all levels in the membership set. Select one or two of the specific levels if the complete set is not being cancelled. Select the appropriate reason from the dropdown list. The current date is the default value for the effective date of the cancellation. If required, enter a different date. The percentage of obligation to remain in the cancelled membership set. This would be the amount the member paid before the membership is cancelled. The level of membership for the fund. The Name and Fund ID of the Dues/Fees. The amount based on the percentage entered will be shown. It is the amount to be left in the cancelled membership. Amounts can be modified. The amount of obligation before the cancellation. Cannot be modified. 45
46 4. Select the Level(s) to be cancelled. 5. Select the Cancellation Reason from the list. 6. Enter the Cancel date or accept the current date. 7. Percent $ Remaining reflects 100% or is blank. It depends on your security privileges and the state s Affiliate/Process Control/Membership setting. If you have Advanced Obligation Adjustment security you are able to modify the percentage. If you do not have that security permission, the percentage of obligation to be left in the membership displays 100% and no adjustment to dues is allowed. Refer to Cancels & Prorating Obligation for more information on prorating the dues when cancelling a membership. 8. To process the cancellation, click. To abandon the cancellation, click to close the Cancel Membership popup. The data will be available for update and the membership processing intent will return to Edit mode. 9. The cancellation popup is closed and the cancelled membership is displayed. The Membership Status now shows Cancelled in red. The End Dates reflect the cancel processing date and there is a Cancel Status link. The membership and employment data are grayed out and not available for update for all cancelled memberships regardless of the cancel effective date (past or future). The only exception is some noncritical membership fields that can be updated after the membership is cancelled. They include # of Ded, Verify, Continuous, Early Enrollee, NEA Card/Label and SEA Card/Label. Immediately after the membership is cancelled, it will be reflected as such in the Membership Summary screen (Mshp Status = Cancelled and the row is highlighted in red). 46

47 In the database the membership will not be marked as cancelled until a nightly process is run to set the status; it will reflect cancelled status the day after the cancellation is processed. o o When doing searches on the day of the cancellation, the membership will still reflect Effective status. When running membership reports on the day of the cancellation, the membership will still reflect Effective status. However, the IMS Online and Server reports will display a (C) next to the membership types to signify the membership was cancelled that day. Reports run the next day for Effective memberships will not include the cancelled record. 10. You can review the cancellation reason by clicking the link on the Edit Membership page. The pop up displays the effective date of the cancellation and the reason. Updates to the Cancel Reason are permitted. Select the new Cancel Reason from the dropdown list and click the Ok button and the popup will close. Then click the button on the Edit Membership screen to apply the change to the database. Click the screen. in the upper-right corner of the Edit Membership screen to return to the Individual Profile 47

48 REACTIVATE Membership Reactivate processing is available for authorized IMS users who have been granted the IMS Membership Maintenance level of security. Advanced Obligation Adjustment security privileges are required to adjust the obligation after the membership has been reactivated. A membership must be cancelled for the reactivate function to be available. A reactivated membership will be restored to the way it was before the cancellation. You can reactivate a cancelled membership set or a single cancelled membership level. When reactivating a membership set, the system will: Remove the cancel effective date (and membership type end dates if membership is continuous). Reactivate the membership, employment and work detail information. Return the obligation to the amounts prior to the cancellation. The required dues and other fees are pulled from the IMS obligation log. To reactivate a cancelled membership set, make sure the cancelled membership is in focus on the Individual Profile screen and click the link to open the Edit Membership screen. 1. Review the membership information to make sure you are reactivating the correct cancelled membership. 2. Click on the Reactivate link located to the right. 3. The Reactivate Membership popup will be displayed. 48


49 4. Select the level(s) to reactivate. 5. Click the Save button to process the reactivation. To abandon the reactivation, click to close the pop up. 6. The popup will close and the reactivated membership will be displayed as Effective. 7. You may make membership or obligation changes at this time. 8. Click in the upper-right hand corner to close the Edit Membership screen. 49


50 DELETE IMS Membership Maintenance User Guide On rare occasions a membership is processed in error; the membership never should have been added in the first place. Authorized users can delete the membership provided it has first been cancelled. Deleted memberships are removed from the database. There is no membership history retained and the membership will not appear on membership rosters or FRS Billing statement listings. This function is available to IMS users who have been granted the Membership Advance Maintenance security privilege. To delete a cancelled membership, make sure the cancelled membership is in focus on the Individual Profile screen. 1. Click the link to open the Edit Membership screen. 2. Review the membership information to make sure you are deleting the correct cancelled membership. 3. The membership must be cancelled with the Cancel Reason of Error in Processing and the Obligation amounts must be zero. 4. Click on the Delete link located in the upper right corner. 50
51 5. A warning message will appear. Click OK to proceed with the membership delete. Click Cancel to abandon the delete. IMS Membership Maintenance User Guide The membership is removed and you are returned to the Individual Profile screen. 51

52 OBLIGATION To view complete obligation information and/or update obligation information for an existing membership, click on the link from the main Individual Profile screen for the membership in focus. The ability to adjust a member s annual dues and fees is available to authorized users with IMS Advanced Obligation Adjustment security privileges. The Obligation link from the main Individual Profile screen is available only to authorized users. The Obligation tab displays the funds and obligation for the membership. The top section of the page displays membership information. The Membership Year, Local, State Affiliate, UniServ, Chapter and Membership Types are displayed along with the Membership ID and Status. The middle section displays the obligation information in a grid. It includes Fund Name, Payment Method and Annual Amount for the membership set. Scroll to the right to see the other columns in the grid. At the bottom of the page are links for the various Obligation processing functions. Grid Description Delete Level Fund name Pay method Annual Amount Override Ind Selection box for removing a non-required fund. Identifies the level of the fund in the row. The name of the fund. Identifies the payment method for the fund. The annual amount the member is obligated to pay. Indicates if the annual amount can be adjusted by editing directly in the grid s cell. Yes or No. 52
53 Req Ind Indicates if the fund is Required (Yes) or voluntary (No). Required (Y) = A fund (Dues, PAC, UniServ or Other Fund) that is associated with NEA, a state or local affiliate and that must be paid by anyone joining the affiliate under a specific membership type. Required obligation is automatically generated when the membership is added. Non-required (N) = A voluntary fund that is associated with NEA, a state or local affiliate (e.g., PAC or Scholarship fund). It is not automatically generated when the membership is added; the user must add it to the membership. Prorate Cd If present, the fund was prorated. The codes are A, M or S. Obligation can be prorated in one of three ways: Automatic, Manual or System. Users can automatically prorate (A) the obligation amounts when adding a new membership based on a percentage entered by the user. Users can manually prorate (M) the obligation amounts for an existing membership, again, based on a percentage. The system will automatically set the prorate code (S) as the result of a local, chapter or membership type change if the obligation amounts are less than the standard amounts. Prorate Rsn cd Prorate Rsn Desc If present, the code for the proration reason. For example, NEWMBR (New Member). If present, the proration reason description. For example, New Member. Reduction Type Cd If present, the type of dues reduction. The codes are AFFRED or INDRED. AFFRED = Affiliate Reduction (impacts the entire affiliate local or state for the specific membership type). INDRED = Individual Reduction (impacts specific members). NEA and each state and local affiliate defines its own reduction reasons. The NEA Executive Committee approves affiliate and individual reductions of NEA obligation. Reduction Rsn Cd Reduction Rsn Desc Billable Party ID Billable Party Name NEA Billable Party ID NEA Billable Party ID If present, the reduction reason code. For example, MILRS (Military Reservist). If present, the reduction reason description. For example, Military Reservist. The SEA Billable Party System ID for the membership. The SEA Billable party name. The NEA Billable Party System ID for the membership. The NEA Billable Party name. 53
, the other does not (direct update to grid).")
54 PRORATE You may prorate (adjust) the annual dues and fees by using the Prorate function (link) or by updating the Dues/Fees directly in the cell of the Obligation grid. The difference between the two is that one requires you to record the reason for the adjustment (Prorate function), the other does not (direct update to grid). The Dues/Fees Annual Amt field is open in the grid for editing if the fund has been setup in the IMS Utilities Obligation table as overrideable (Override Ind = Y). The NEA Dues amount field is not open because NEA wants to know the reason for the adjustment. The SEA and LEA Dues/Fees may be open for direct update. A Fund with a Y (yes) in the Override Indicator field can be modified directly in the Obligation grid. P R O R A T E D I R E C T L Y I N O B L I G A T I O N G R I D To adjust an amount: 1. Click in the Fund Annual Amount cell. 2. Enter new amount. 3. Click. to process the update. The payment method for a fund can be changed at the same time in the Obligation grid. 1. Click in the Fund Payment Method cell. 2. Select the new payment method from the list. 3. The Change Pay Method pop-up screen is displayed. Enter the percentage for the amount of obligation to remain with the former payment method. For example, a member is switching from Payroll Deduction to EFT and has paid 30% of the annual obligation by Payroll Deduction. Enter 30 in the Percent Remaining field. NOTE: Percent Remaining is only displayed if your state reports by Payment Category in the Funds Receivables (FRS) subsystem. 54


55 Click to close the pop-up screen. Click to process the update. Click to abandon the change. The following warning message is displayed if you change the pay method from or to EFT. Depending on the action you may need to review/update EFT information. P R O R A T E L I N K The Prorate link initiates the obligation proration function. Typically, proration is done when a member joins late in the year and pays less than full annual dues. If necessary users can prorate the obligation under other circumstances such as when renewing or reactivating a member s record. Prorated obligation is in the member s record for one year. When the member is renewed the full obligation is inserted in his/her obligation record. You must use the Prorate function instead of direct adjustment in the grid if the fund has the Override code = No. If you are to prorate all the funds for a membership, the Prorate link is the quickest way to adjust the obligation. To adjust the dues and fees, click the appears. link on the obligation page. The Prorate Dues pop-up screen 55
56 Description Level Reason Percent Level Fund Name Pay Method Annual Amount Original Amount Select ALL to prorate funds at all levels in the membership set. Select one or two of the specific levels if not all funds are to be prorated. The Prorate Reason that is recorded in the member s obligation record. The percentage of full obligation the member is paying. Identifies NEA, state or local level. The specific name of the fund with fund code in parenthesis. The method of payment for the fund with the payment method code in parenthesis. The amount to be left in the membership set due to the proration. It is highlighted (yellow) indicating updates can be made to the obligation amounts. The amount of obligation before the proration. Cannot be modified. To prorate the dues and fees for a member: 1. Select the All level, or one or more NEA/SEA/LEA level. 2. Select the Prorate Reason from the drop down list. 3. Enter the percentage of dues the member is paying in format, for example, 30 or For all the funds the Annual Amount (adjusted amount) and the Original Amount are displayed side by side. As you enter the percentage the Annual Amount changes. 4. Review the adjusted amounts for accuracy. Modifications can be made in one of two ways. Modify the amounts again using the Percent field to enter a different percent. The new percentage is calculated based on the original obligation. The Annual Amount is updated with the obligation to remain in the membership. Modify the amounts manually by keying a figure into the Annual Amount cells to represent what obligation should remain in the membership. 56


57 5. Click to close the Prorate popup and return to the Obligation page or click to clear the values you entered. 6. Click to process the update. 7. The prorated fund is marked with the prorate reason in the member s obligation record for tracking purposes. 57

58 P r o r a t e & C r i t i c a l C h a n g e s ( L o c a l, C h a p t e r, M e m b e r s h i p T y p e C h a n g e s ) When processing critical changes on the membership page, the ability to prorate a member s annual dues and fees is available to authorized users with IMS Advanced Obligation Adjustment security privileges. Critical changes are Local Changes, Chapter Changes or Membership Type Changes. L O C A L C H A N G E P R O R A T I N G F U N D S After initiating a Local Change by selecting a new local from the selection list on the Membership page, additional fields will be displayed to capture further required information. If a new local is selected, the update is considered a critical change to the membership and will cancel the old membership and add a new membership with the new local. The obligation for the old membership and new membership are displayed side-by-side. For a Local Change, 1. Enter the Effective Date (defaults to current date). 2. Enter the Percent $ Remaining (old) in the old membership set (if no obligation should remain, enter 0). As you enter the percent figure the amounts change in the cells of the old set in left grid. 3. Enter the Percent $ Prorated (new) to be generated for the new membership (if full obligation, enter 100). As you enter the percent figure the amounts change in the cells of the new set in right grid. Percentages must fall between Do not include the % sign. Format for the Percent is The system will automatically default the Percent fields to 0% (old) and 100% (new) if you leave the Percent fields blank. And a warning message is displayed indicating as such. 4. Review the adjusted amounts for accuracy. Modifications can be made in one of two ways. Modify the amounts again by entering different percentages in the Percent fields. Modify the amounts manually in either the Old or New Set by keying a figure into the Annual Amount cell to accurately represent the obligation to remain in the membership. 58


59 5. Click to process the update. Click to clear the values you entered. 6. If you do not want to save the critical change, click to close the pop up and return to the membership page. C H A P T E R C H A N G E P R O R A T I N G F U N D S After initiating a Chapter Change by selecting a new chapter from the selection list on the Membership page, additional fields will be displayed to capture further required information. If a new chapter is selected, the update is considered a critical change to the membership and will cancel the old membership and add a new membership with the new chapter. For a Chapter Change: 1. Enter the Effective Date (defaults to current date) 2. Enter the Percent $ (obligation) Remaining in the old membership set (if no obligation should remain, enter 0. As you enter the percent figure the amounts change in the cells in the old set in left grid. 3. Enter the Percent $ (obligation) Prorated to be generated for the new membership (if full obligation, enter 100). As you enter the percent figure the amounts change in the cells in new set in right grid. Percentages must fall between Do not include the % sign. Format for the Percent is


60 The system will automatically default the Percent fields to 0% (old) and 100% (new) if you leave the Percent fields blank. And a warning message is displayed indicating as such. 4. Review the adjusted amounts for accuracy. Modifications can be made in one of two ways. Modify the amounts again by entering different percentages in the Percent fields. Modify the amounts manually in either the Old or New Set by keying a figure into the Annual Amount cell to accurately represent the obligation to remain in the membership. 5. Click to process the update. Click to clear the values you entered. 6. If you do not want to save the critical change, click to close the pop up and return to the membership page. M E M B E R S H I P T Y P E C H A N G E P R O R A T I N G F U N D S After initiating a Membership Type Change by selecting new membership types from the selection list on the Membership page, additional fields will be displayed to capture further required information. If new membership types are selected, the update is considered a critical change to the membership and will cancel the old membership and add a new membership with the new membership types. 60
61 For a Membership Type Change: IMS Membership Maintenance User Guide 1. Enter the Effective Date (defaults to current date). 2. Enter the Percent $ (obligation) Remaining in the old membership set (if no obligation should remain, enter 0. As you enter the percent figure the amounts change in the cells in the old set in left grid. 3. Enter the Percent $ (obligation) Prorated to be generated for the new membership (if full obligation, enter 100). As you enter the percent figure the amounts change in the cells in the new set in right grid. Percentages must fall between Do not include the % sign. Format for the Percent is The system will automatically default the Percent fields to 0% (old) and 100% (new) if you leave the Percent fields blank. And a warning message is displayed indicating as such. 4. Review the adjusted amounts for accuracy. Modifications can be made in one of two ways. Modify the amounts again by entering different percentages in the Percent fields. Modify the amounts manually in either the Old or New Set by keying a figure into the Annual Amount cell to accurately represent the obligation to remain in the membership. 5. Click to process the update. Click to clear the values you entered. 6. If you do not want to save the critical change, click to close the pop up and return to the membership page. 7. NOTE: For a membership type change at one level (e.g NEA only), the obligation for the levels that are not changing reflect $0 in the old set and the full amount in the new set as you can see in this next example. 61
 and 90% for Percent of Obligation (new membership).")
62 The percent you enter for the old and new sets are applied to the funds for only the level that is changing. In this next example only the NEA membership type is changing; 10% is entered for Percent of Obligation Remaining (Old membership) and 90% for Percent of Obligation (new membership). The percentages are applied to only the NEA obligation. The obligation amounts for the other levels (e.g. SEA and LEA) are copied to the new membership set. The old membership set is cancelled with only the NEA obligation (10% of original amount). The new membership set is created with 90% NEA obligation and 100% SEA and LEA obligation. 62

63 C A N C E L S & P R O R A T I N G O B L I G A T I O N When processing cancels, the ability to prorate a member s annual dues and fees is available to authorized users with IMS Advanced Obligation Adjustment security privileges. After initiating a Cancel by clicking on the link on the Edit Membership page additional fields will be displayed to capture further required information. Advanced Obligation Adjustment security privileges allow you to adjust the remaining obligation in a cancelled membership. Click on the button in upper right corner for helpful Cancellation instructions. For a Cancellation: 1. Select the Level(s) to be cancelled - ALL or single NEA, SEA, LEA level. 2. Select the Cancel Reason from the selection list. 3. Enter the Cancel Effective Date (defaults to current date). The date may be in the past or future. If a future date is entered, the membership will not be marked as cancelled until the nightly batch process of the entered date. 4. Enter Percent $ Remaining to determine the obligation that remains in the cancelled membership. Enter a percent 0 100%. If no obligation should remain, enter 0 ; if full obligation should remain enter 100. Do not include the % sign. Format for the Percent is In the grid, the Annual Amt (highlighted in yellow) is adjusted based on the percentage entered. The figures in this column will change as you enter the percentage. The member is obligated to pay this amount in the cancelled membership. The Original Amt is the amount of obligation before the cancellation; it is not editable. 63

64 6. You can further edit the amount by clicking in the Annual Amount cell and typing the desired amount. 7. Click to process the cancellation. The popup is closed and the cancelled membership is displayed. 8. Click to clear your entries or to close the cancellation pop-up. If you are recording individual payments in IMS, the paid amount will be displayed when cancelling the membership. It reflects the individual payments (i.e. EFT, check, recurring credit cards) recorded in the Individual Payment screen. Use as a reference when adjusting the Annual Amt. If there are no individual payments the Paid Amt column will not be shown. In this example the individual payments of $100 were recorded in the Individual Payment screen. The paid amount is shown by fund on the Cancel Membership pop-up. 64

65 Refer to the paid amount as you adjust the Annual Amt. 65

66 INDIVIDUAL REDUCTION A reduction is a special dues waiver that is in effect for a specific period of time. Some examples of dues reductions are: Military Reservist, Legal Services, Organizing Local. The NEA Executive Committee approves affiliate and individual reductions of NEA obligation. It is generally a lower obligation amount than the standard obligation defined by the NEA, state or local bylaws. The term implies a lesser amount, but the amount may be greater than the standard obligation. The Individual Reductions are applied on a member by member basis, and do not apply to all the members in a local. A reduction must be in the Utilities Obligation table before it can be applied to a member s obligation record. Reductions are carried in the member s obligation record from one year to the next or as long as the agreement is in effect. To apply a reduction, click the link on the Obligation page. The pop up appears. 1. Click the checkbox for the level receiving the reduction. 2. Select the reduction type from the drop down list. 3. Click to submit the reduction or to clear the choices on the pop-up. 4. Click to close the pop up and return to the Obligation page. 5. If you clicked OK, then click to save the transaction. 6. The reduced fund is marked with the reduction reason in the member s obligation record for tracking purposes. 66

67 REMOVE INDIVIDUAL REDUCTION There will be cases when you want to remove an Individual Reduction (e.g. Military Reservist, Legal Services) from a fund (i.e. NEA Dues, SEA Dues) in the member s obligation record. This is true when the member no longer qualifies for the dues reduction. For example, a member may only be eligible for a reduction in a single year. The individual reduction is applied to the membership in one year and when the membership is rolled over from one year to the next, the reduction is automatically carried forward to the new membership. If the reduction no longer applies, as is the case in this example, you will want to remove the dues reduction. If a member has an Individual Reduction, the page. link will be visible on the Obligation To remove a reduction: 1. On the obligation page click in the row for the fund with the reduction. 2. Click the link. 3. A confirmation message will appear. 4. Click to return to the Obligation screen. Click or to abandon the action and close the pop-up. 5. Click to process the update. The dues amount will be returned to the original amount and the fund is no longer marked with a reduction. 67


68 CHANGE PAYMENT METHOD Click the link to change the member s payment method for all funds. In this example, the payment method will change from Payroll Deduction to EFT. If your state reports by Payment Category in the Funds Receivable subsystem (FRS), this pop up will appear. 1. Select the new payment method from the selection list. 2. Enter the percentage for the amount of obligation to remain with the former payment method. For example, a member is switching from Payroll Deduction to EFT and has paid 30% of the obligation by Payroll Deduction. Enter 30 in the Percent Remaining field. 3. Click to return to the obligation screen. Click or to abandon the action. 4. Click to process the update. 5. The following warning message is displayed if you changed the pay method from or to EFT. Depending on the action you may need to review/update EFT information. 68

 payment method is displayed first for each fund. The ended payment method row for a fund is highlighted in red.")

69 6. The new payment method is displayed on the Obligation screen. Refer to the Pay Method Detail section to see the change to the obligation amount for the old and new payment methods. 7. On the Individual Profile screen, the obligation section will reflect the funds with amounts for both payment methods. The current (effective) payment method is displayed first for each fund. The ended payment method row for a fund is highlighted in red. As mentioned in the Prorate section, you can change the payment method for a single fund. 1. Double click the row in the Obligation grid that will have the change. It will open the Pay Method field. 2. Select the new payment method from the list. Click to process the update. Note: If your state does not report by Payment Category in the Funds Receivables subsystem (FRS), or does not use that subsystem, this pop up will appear. 69


70 1. Select the new payment method from the list. 2. Click to return to the obligation screen. Click or to abandon the action. 3. Click to process the update. REFUND /OPT OUT This allows users to track the members and fee payers who have requested a refund or opted out of a fund. For example, a member requests a refund of a required fund, such as PAC or an Other Fund, or elects to opt out of PAC or Other Fund and is requesting the money be diverted to another organization such as a charity. Typically this is used for reverse dues check-off where PAC is automatically included with Dues. It is also sometimes referred to as Negative PAC. Click on the link at the bottom of the Obligation screen to access the Refund/Opt Out pop-up screen. You can track refunds and opt outs by membership level and fund. Entering Refund/Opt Out data has no impact on the member s total obligation; it is informational data only. Description Level Fund name Refund/Opt Out Identifies the level of the fund. The name of the fund. Select the Refund option if the money will be refunded to the member. Select the Opt Out option if the money will be diverted to another organization such as a charity or general fund. 70
. 5.")
71 Date Comment The date of the action. The date will default to the system date if left blank. Refund/Opt Out comments. 1. Click in the Refund/Opt Out cell next to the applicable fund. 2. Select Refund or Opt Out from the drop down list. 3. Enter the applicable date or leave blank for system date. 4. Enter a comment (optional). 5. To remove Refund/Opt out data, select the Clear(*) option in the drop down list. The Refund/Opt Out type, Date & Comments will be removed when you save the update. 6. Click to close the pop up. 7. Click the in the Refund/Opt Out section to close the pop-up without making any changes. 8. Click on the Obligation screen to process the update. ADD / DELETE ADDITIONAL FUNDS The Add function allows users to add voluntary (non-required) annual obligations such as PAC, Scholarship Fund, Division Dues, etc to a member s record. Required funds (i.e. Dues) are automatically generated by the system when a new membership is created but voluntary funds (non-required) must be added by the user. To add an additional fund, click the Additional Fund pop-up appears. link at the bottom of the Obligation screen. The Add 71

72 1. Select the level of the new fund. IMS Membership Maintenance User Guide 2. Select the specific fund. 3. Select the payment method. 4. Accept the suggested amount or key a different amount. The suggested amount is from the Utilities Obligation table. 5. Click to close the pop-up. Or click to clear the entries from the pop-up or to close the pop-up without adding a fund. 6. Click on the Obligation screen to add the new fund to the database. The Delete function allows users to delete voluntary (non-required) annual obligations such as PAC, Scholarship Fund, Division Dues, etc from a member s record. 1. To remove a voluntary fund, click in the Delete checkbox to select it. 1. Click to process the update. The fund will be removed from the member s record. 72


73 PAYMENT METHOD DETAIL The Payment Method Detail screen is designed for users whose state affiliate reports by Payment Category in the Funds Receivable subsystem (FRS). The page displays each fund with the annual obligation and the obligation for the current and former payment methods. link at the bottom of the Obligation screen to access the Pay Method Details pop- Click on the up screen. You will not have that link on the Obligation screen if you are an All Inclusive state in FRS, that is, you do not break out your FRS data by payment category. This screen is an example of the obligation for a member having one payment method. There is one row per fund. This next screen is an example of the obligation for a member who changed his/her payment method during the membership year. In this case the member went from Payroll Deduction to EFT. For each fund the annual amount is displayed along with the amounts per payment method. The Payroll Deduction rows reflect 30% of the annual dues; the EFT rows reflect 70% of the annual dues. There can be multiple rows per fund. For each fund, the sum of the amounts in the PM Detail Amt column must total the amount in the Annual Amt column. 73

74 Description Level Fund Name Annual Amount Pay Method PM Detail Amount Identifies the membership level of the fund; NEA, SEA, or LEA. The name of the fund. It is the annual amount the member is obligated to pay. It is same amount as on the Obligation screen. Current or former payment method for the fund. The current (or effective) payment method is listed first for a fund and will not have an end date. The current payment method is displayed on the Obligation screen. It is the amount the member is obligated to pay for a fund by payment method. The payment method detail amounts are affected when making payment method changes. The percent the user entered when doing a payment method change is how the obligation split is calculated on this screen. The sum of the amounts for each payment method must equal the annual amount for a fund. The PM Detail Amount is reflected in the FRS Billable Party obligation for the applicable fund and payment method. Start Date End Date The date the payment method was assigned to the fund. The date the payment method was ended for the fund. The amount in the Annual Amount field cannot be modified on this page but you can modify the amounts in the Payment Method Detail cells. 1. Click in a PM Detail amount cell. 2. Enter the desired amount. Notice as you update the amount, the amount for the fund s other payment method automatically changes so both will total the Annual Amount figure. If there are more than 2 pay method rows for a fund, the system will not do the automatic adjustment. 74

75 3. Click to process the update. Click to clear the data entry values. 4. After you click the following warning message is displayed if you changed the pay method from or to EFT. Depending on the action you may need to review/update EFT information. Click OK to close the warning message. The following message is displayed. When you return to the main Individual Profile screen notice the obligation section of the screen now displays the Pay Method Details amounts. The current (effective) payment method is displayed first for each fund. The ended payment method row for a fund is highlighted in red. 75


76 OBLIGATION MATRIX The Obligation Matrix displays the member s obligation in a grid with totals under each column (total for a fund type) and at the end of each row (total for each membership level). There is a payment method summary which shows the sum of the obligation by payment method. The Payroll Deduction amount at the bottom is the total Payroll Deduction amount divided by the Number of Deductions in the member s record. In this example the deduction is $18.81 per pay period. This is a quick reference when answering member s questions about their obligation, especially regarding payroll deduction. OBLIGATION LOG The Obligation Log provides a history of all the changes made to the member s obligation information. This includes obligation and paymethod changes. All the previous obligation rows are stored in this log for reference purposes. The rows are listed in most recent (top) to oldest (bottom) sequence. Obligation from this log is used in the Membership Reactivation function. The column heading in the grid are the same as the Dues/Fees columns on the Obligation screen. To export the data from the Obligation log, click on the Export icon. 76
77 ADDITONAL MEMBERSHIP TASKS The Membership Task panel will allow users to add a new individual and membership without having to return to the initial Search page, set-up Electronic Funds Transfer data for the member and view the membership history for the member in focus. Clicking the more information. will open the Enrollment page. Please refer to the Enrollment section for Clicking will open EFT in another browser window. In EFT you can record Deduction and Account data. Please refer to the IMS Electronic Funds Transfer User Guide for more information. To return to the Individual subsystem, minimize or close the EFT browser. 77


78 VIEW MEMBERSHIP HISTORY IMS Membership Maintenance User Guide The Membership History page displays all memberships for the individual. Current year, prior year and future year memberships for the individual will be displayed at the top. Memberships as far back as will be displayed. Memberships in other state affiliates not associated with the user s logon ID are also displayed for review. Effective and cancelled memberships are displayed for each year. Memberships are displayed by descending year. Effective memberships are displayed before cancelled memberships. Cancelled memberships are displayed in red. The Membership Summary rows (top section) are organized by State Affiliate and then Membership Year. The Membership History rows (bottom section) are organized by Membership Year, then State Affiliate. In additional to State Affiliate and Membership Year, all membership rows include NEA, SEA and LEA Membership Types, Local Affiliate, Chapter, SEA Start Date, Continuous Indicator, Membership Status (Effective or Cancelled), SEA Cancel Reason and SEA Cancel Date to facilitate review of the membership. To see more information about a membership, click on the link. The Profile Summary screen is displayed with comprehensive details about all data types for the individual. Please refer to the IMS Individuals Maintenance User Guide for more information. You can print the Membership History screen by clicking on the button in upper right corner of screen. You can download the Membership History data to Excel by clicking on the of screen. button also in the upper right corner 78

79 RECENT TAB In the lower left panel of the Individual Profile screen is a Recent tab. It includes a list of the last 20 individuals you retrieved. Each time you login to IMS you will see the last 20 individuals in the lower left panel of the screen. They are the last 20 individuals retrieved, not necessarily the last 20 records updated. There may be times when you need to retrieve the person again. Simply click on the name in the Recent list and the individual will be retrieved with the latest information. If you hover over a name in the Recent list, the Individual ID is displayed. 79
User guide for employers not using our system for assessment
 For scheme administrators User guide for employers not using our system for assessment Workplace pensions CONTENTS Welcome... 6 Getting started... 8 The dashboard... 9 Import data... 10 How to import a
Employer Self Service (ESS) Contribution Reporting User Guide
 Contribution Reporting User Guide") Employer Self Service (ESS) Contribution Reporting User Guide 1 TABLE OF CONTENTS I. Launch Internet Explorer 3 II. Log In 4 III. Employer Reporting Module: Submitting Employer and Employee Contributions
Employer Self Service (ESS) Contribution Reporting User Guide 1 TABLE OF CONTENTS I. Launch Internet Explorer 3 II. Log In 4 III. Employer Reporting Module: Submitting Employer and Employee Contributions
BBPadmin s WebCOBRA On Demand Employer User s Guide. BBPadmin s Employer User s Guide to
 BBPadmin s Employer User s Guide to 1 Table of Contents Introduction to Employers... 5 Chapter 1: Getting Started... 6 Purpose of WebCOBRA... 6 For Employers... 6 For Participants... 6 Getting Started
ENTER REPORT EMPLOYER SELF-SERVICE USER GUIDE
 ENTER REPORT EMPLOYER SELF-SERVICE USER GUIDE Feb 2017 State of North Carolina Department of State Treasurer Retirement Systems Division Table of Contents 1--INTRODUCTION... 5 1.1 PREFERRED SYSTEM REQUIREMENTS
Washington State Requirements
 Washington State Requirements Release 7.0 SP3/FP5 Training/User Guide Revised: 06/23/11 2011 New World Systems Corporation. All Rights Reserved. All rights reserved. Information within this document is
CalPERS 457 Plan Employer Guide Easy-to-follow steps for 457 plan payroll submissions
 CalPERS 457 Plan Employer Guide Easy-to-follow steps for 457 plan payroll submissions Your choice, simplified. CalPERS 457 Plan Employer Guide Easy-to-follow steps for 457 plan payroll submissions Your
TAA Scheduling. User s Guide
 TAA Scheduling User s Guide While every attempt is made to ensure both accuracy and completeness of information included in this document, errors can occur, and updates or improvements may be implemented
New Employees How to Enroll in Health Coverage
 New Employees How to Enroll in Health Coverage through DC Health Link Who is this guide for? This guide will walk employees without a DC Health Link account through setting up their employee account, selecting
Open Enrollment User Guide
 Open Enrollment User Guide Open Enrollment is your once per year chance to make changes to your benefits, unless you experience a HIPAA Qualifying Life Event. Open Enrollment will run from Monday, October
Setting Up Direct Deposit for the First Time
 Setting Up Direct Deposit for the First Time Overview Setting up direct deposit for student refunds is a 2-step process: 1) Adding the checking or savings account to the student s bank account profile
MASTER SCHEDULING GUIDE TO CREATING CREDIT RECOVERY SECTIONS IN PERIODS 50-75
 MASTER SCHEDULING GUIDE TO CREATING CREDIT RECOVERY SECTIONS IN PERIODS 50-75 USER GUIDE ON CREATING CREDIT RECOVERY SECTIONS IN MISIS Per LAUSD MEM-6733.1 Credit Recovery Program Opportunities, all schools
Plan Sponsor User Guide
 Plan Sponsor User Guide Getting Started with PensionEdge Plus This guide is designed to provide you with a quick understanding of the many features of the PensionEdge Plus portal. The portal allows you
A16 Documenting CECAS PRC 29 Request & Baseline SIF Data Training Script ( ) 1
 1") A16 Documenting CECAS PRC 29 Request & Baseline SIF Data Training Script (04.17.14) 1 Welcome 9:00 9:05 1:00 1:05 Hello and welcome to the Documenting CECAS PRC 29 Request and Baseline SIF Data training
A16 Documenting CECAS PRC 29 Request & Baseline SIF Data Training Script (04.17.14) 1 Welcome 9:00 9:05 1:00 1:05 Hello and welcome to the Documenting CECAS PRC 29 Request and Baseline SIF Data training
Individual Taxpayer Electronic Filing Instructions
 Individual Taxpayer Electronic Filing Instructions Table of Contents INDIVIDUAL TAXPAYER ELECTRONIC FILING OVERVIEW... 3 SUPPORTED BROWSERS... 3 PAGE AND NAVIGATION OVERVIEW... 4 BUTTONS AND ICONS... 5
14. Roster Processing
 14. Roster Processing Plan processing Roster processing Roster processing roster list You can create rosters by entering data manually or by using the file import capability. If you want to create the
FLORIDA SURPLUS LINES SERVICE OFFICE. IPC Procedures Manual
 FLORIDA SURPLUS LINES SERVICE OFFICE IPC Procedures Manual December 2016 TABLE OF CONTENTS 1. INTRODUCTION... 4 1.1. Purpose of this Document...4 1.2. Intended Audience...4 1.3. FSLSO Contact Information...4
Section 2b: Compliance Procedures
 Section 2b: Compliance Procedures These procedures apply to Tax Credit property types and should be followed for EVERYONE who applies for residence at the property. In This Section Qualifying an Applicant
How to Use the New NeighborWorks New Homebuyer Down Payment Assistance Only Module in CounselorMax
 How to Use the New NeighborWorks New Homebuyer Down Payment Assistance Only Module in CounselorMax Introduction... 2 Client Intake... 2 Using the GPS Form and Carrying out the Service Steps... 4 Collect
OVERVIEW GUIDE TO HOME COUNSELOR ONLINE NATIONAL FORECLOSURE MITIGATION COUNSELING (NFMC) FEATURES
 FEATURES") OVERVIEW GUIDE TO HOME COUNSELOR ONLINE NATIONAL FORECLOSURE MITIGATION COUNSELING (NFMC) FEATURES WHO SHOULD USE THIS OVERVIEW GUIDE? WHAT IS NFMC? This overview guide contains information for Home Counselor
OVERVIEW GUIDE TO HOME COUNSELOR ONLINE NATIONAL FORECLOSURE MITIGATION COUNSELING (NFMC) FEATURES WHO SHOULD USE THIS OVERVIEW GUIDE? WHAT IS NFMC? This overview guide contains information for Home Counselor
Policy. Chapter 6. Accessing the Policy. Nexsure Training Manual - CRM. In This Chapter
 Nexsure Training Manual - CRM Policy In This Chapter Accessing the Policy Adding a Thank You Letter Editing the Policy Adding, Editing and Removing Assignments Admitted Carrier Identification Summary of
Region IV RMIC. SMART HR Retiree and COBRA Insurance Setup & Processing
 Region IV RMIC SMART HR Retiree and COBRA Insurance Setup & Processing Revised May 2009 Contents COBRA Checklist... 3 Retiree and COBRA Insurance Processing in SMART HR... 4 Coverage Continuation Notices
Mass Mutual: Allocated Link
 Mass Mutual: Allocated Link Overview The Relius Administration system provides three functions for Mass Mutual clients. Each of these three functions are described in this guide. The four functions are:
DUS DocWay TM Loan Documents User Guide. January 2019
 DUS DocWay TM Loan Documents User Guide January 2019 Table of Contents Getting Started with DUS DocWay... 1 Welcome Page Navigation... 3 Loan Documents Navigation... 6 Update Document Category and Type...
How to Use the New NeighborWorks New Homebuyer Full Information Service Module in CounselorMax
 How to Use the New NeighborWorks New Homebuyer Full Information Service Module in CounselorMax Introduction... 2 Client Intake... 2 Using the GPS Form and Carrying out the Service Steps... 5 Collect NW
Certifying Mortgages for Freddie Mac. User Guide
 Certifying Mortgages for Freddie Mac User Guide December 2017 The Freddie Mac Single-Family Seller/Servicer (Guide) requires a Seller/Servicer selling Mortgages to Freddie Mac to forward the Notes, assignments
Using FastCensus for Plan Sponsors
 Using FastCensus for Plan Sponsors FastCensus is a secure, online tool for Plan Sponsors to access, edit, validate and submit census data to their Third Party Administrator for the purposes of year-end
Log in at LMS Xpress 2
 Log in at www.westernbanc.com LMS Xpress 2 From your home page, select Loan Search. LMS Xpress 3 You will now see the updated information in your pipeline LMS Xpress 4 To register a loan for a loan officer,
Total Retirement Center Guide
 Total Retirement Center Guide The Event Log FOR PLAN SPONSOR USE ONLY The Event Log Purpose: This guide provides you with the following information about the Event Log: Types of events you may see on the
Oracle Banking Digital Experience
 Oracle Banking Digital Experience US Originations Auto Loans User Manual Release 18.2.0.0.0 Part No. E97823-01 June 2018 US Originations Auto Loans User Manual June 2018 Oracle Financial Services Software
People First User Guide for the Benefits Enrollment Process
 People First User Guide for the Benefits Enrollment Process Table of Contents Change My Benefits Overview... 2 Introduction... 2 Getting Started... 2 Change My Benefits... 4 Introduction... 4 Getting Started...
Associated Connect. Reference Guide: Quick Payments
 Associated Connect Reference Guide: Quick Payments Page 2 of 14 Quick Payments Use the Quick Payments service to send, save and manage your ACH payments. Depending on your configuration, you can use Quick
Dashboard. Dashboard Page
 Website User Guide This guide is intended to assist you with the basic functionality of the Journey Retirement Plan Services website. If you require additional assistance, please contact our office at
FLEXIBLE RETIREMENT OPTIMISER USER GUIDE
 FLEXIBLE RETIREMENT OPTIMISER USER GUIDE CONTENTS 1. SELECT NEW OR EXISTING CLIENT... 2 NEW CLIENT... 3-4 EXISTING CLIENT... 5 SELECTING AN EXISTING CASE... 6 CREATE NEW ANALYSIS... 6 2. ENTERING CONTRIBUTION
CABS New Employee Benefits Enrollment Guide. Coventry Corporate Benefits
 CABS New Employee Benefits Enrollment Guide Coventry Corporate Benefits Table of Contents Overview Initial Login Screen Welcome Screen Personal Information screen (Adding Dependents and Beneficiaries)
Session 2 Front Desk Tasks
 Session 2 Front Desk Tasks Agenda Front Desk Activities: Patient Search Manage Appointments Patient Registration Manage Recalls Patient Charts Manage Schedules Eligibility Checking Front Desk Screen Overview
SLAS CLEARINGHOUSE REPORTING ENTITY MANUAL SEPTEMBER 2017
 SLAS CLEARINGHOUSE REPORTING ENTITY MANUAL SEPTEMBER 2017 T A B LE OF CONTENTS 1. INTRODUCTION... 4 1.1. Purpose of this Document... 4 1.2. Intended Audience... 4 1.3. SLAS Clearinghouse Staff Contact
Eligibility Manual.
 Eligibility Manual www.claimsecure.com Updated August 22, 2003 Table of Contents Table of Contents INTRODUCTION... 3 WHO TO CONTACT... 3 GETTING STARTED... 4 ABOUT THE CLAIMSECURE SYSTEM... 4 PASSWORDS...
Maryland State Requirements. Release 6.1
 Maryland State Requirements Release 6.1 2009 New World Systems Corporation. All Rights Reserved. All rights reserved. Information within this document is the sole property of New World Systems Corp. and
Employee Self Service
 Employee Self Service Table of Contents AMS Advantage Employee Self Service (ESS)... 2 Employee Self-Service (ESS ) Open Enrollment Instructions... 2 AMS Advantage Employee Self Service Home Page... 3
Web Benefits Admin User Guide
 Web Benefits Admin User Guide. Table of Contents Navigate to Web Benefits... 3 Accessing Employee User Accounts... 4 Employee profile... 4 Active coverage... 5 Event history... 6 Family... 6 Adding a New
USER GUIDE. Loans. (Partner iseries Only)
") USER GUIDE Loans (Partner iseries Only) 2007. Transamerica Life Insurance Company. All rights reserved. Information in this document is subject to change without notice. No part of this document may be
USER GUIDE Loans (Partner iseries Only) 2007. Transamerica Life Insurance Company. All rights reserved. Information in this document is subject to change without notice. No part of this document may be
Clearing Admin. Broker Permissioning User Guide
 Clearing Admin Broker Permissioning User Guide This material may not be reproduced or redistributed in whole or in part without the express, prior written consent of IntercontinentalExchange, Inc. Copyright
Oracle Banking Digital Experience
 Oracle Banking Digital Experience US Originations Auto Loans User Manual Release 18.1.0.0.0 Part No. E92727-01 January 2018 US Originations Auto Loans User Manual January 2018 Oracle Financial Services
SSHE Open Enrollment through ESS
 Employee Self-Service (ESS) Screens - Benefits - Benefits Enrollment - SSHE Page 1 of 15 SSHE Open Enrollment through ESS Trigger: An employee wants to enroll or make changes to their SSHE health plan(s)
Chapter 9 Computer File Formats
 IN THIS CHAPTER: Testing Process Contribution (SDR) File Layout»» Contribution File Header»» Plan Summary Record»» Detail Transactions»» Reporting an Adjustment Contribution Edits Demographic File Layout
Product Eligibility and Pricing Services. Loan Originator User Guide
 Product Eligibility and Pricing Services Loan Originator User Guide Table of Contents Table of Contents Log In... 1 Enter New Loan Data... 1 Evaluate Products... 6 Analyze Search Results... 6 Update Search
THE BORROWER EXPERIENCE
 PRESENTS THE BORROWER EXPERIENCE Page 1 The Borrower Experience Table of Contents ipromise..3-44 mycampusloan.com.45-100 E-Exit 101-116 Page 2 Campus Partners ipromise is a web-based product, which helps
ShelbyNext Financials: Credit Card Tracking
 ShelbyNext Financials: Credit Card Tracking (Course #F211) Presented by: Dave Heston Shelby Consultant 2018 Shelby Systems, Inc. Other brand and product names are trademarks or registered trademarks of
How to Enter Foreclosure Mitigation Data in Counselor Max using the Guidance and Planning System (GPS) and the Work Plan Generator
 and the Work Plan Generator") How to Enter Foreclosure Mitigation Data in Counselor Max using the Guidance and Planning System (GPS) and the Work Plan Generator Table Of Contents Creating a New Foreclosure Mitigation Client (FMC)...
How to Enter Foreclosure Mitigation Data in Counselor Max using the Guidance and Planning System (GPS) and the Work Plan Generator Table Of Contents Creating a New Foreclosure Mitigation Client (FMC)...
Recurring Payments CitiDirect BE SM
 Recurring Payments CitiDirect BE SM A Simple, Easy Way to Schedule Recurring Payments User Guide Treasury and Trade Solutions Recurring Payments CitiDirect BE Table of Contents Table of Contents 1. Overview
LLC Quick Reference Guide
 LLC Quick Reference Guide The Conveyancer (Do Process Software LP) Once you obtain your User ID and Password from FCT by email and you are ready to setup your LLC Account, log into The Conveyancer application.
Maintaining Budget Change Requests
 Maintaining Budget Change Requests This document describes the functions used in TEAMS to enter and approve requests to move funds from one General Ledger account to another. In this document: Request
Using the Clients & Portfolios Module in Advisor Workstation
 Using the Clients & Portfolios Module in Advisor Workstation Disclaimer - - - - - - - - - - - - - - - - - - - - - - - - - - - - - - - - - - - - - 1 Overview - - - - - - - - - - - - - - - - - - - - - -
ShelbyNext Financials: Credit Card Tracking (Course #N211)
") ShelbyNext Financials: Credit Card Tracking (Course #N211) Presented by: Dave Heston Shelby Consultant 2017 Shelby Systems, Inc. Other brand and product names are trademarks or registered trademarks of
ShelbyNext Financials: Credit Card Tracking (Course #N211) Presented by: Dave Heston Shelby Consultant 2017 Shelby Systems, Inc. Other brand and product names are trademarks or registered trademarks of
Master User Manual. Last Updated: August, Released concurrently with CDM v.1.0
 Master User Manual Last Updated: August, 2010 Released concurrently with CDM v.1.0 All information in this manual referring to individuals or organizations (names, addresses, company names, telephone numbers,
For Lenders. Accessing LOS: LOS is a web based program that can be accessed at the following URL address: https://los.chfa.org/los
 Accessing LOS: LOS is a web based program that can be accessed at the following URL address: https://los.chfa.org/los A User ID and Password will be assigned to all users by the designated account administrator
FREQUENTLY ASKED QUESTIONS
 General Questions: Questions 1. How should store sites be named? 2. How do I get help? 3. How to request consultant/vendor access? 4. How to request FBO Vendor access? 5. How do I delete a project? Responses
TeletrackOnline. User Guide. June 2014
 TeletrackOnline User Guide June 2014 Confidential The recipient of this document agrees that at all times and notwithstanding any other agreement or understanding, it will hold in strict confidence and
Money Management (MX) Frequently Asked Question s
 Frequently Asked Question s") Money Management (MX) Frequently Asked Question s Account Maintenance How do I get rid of duplicate accounts? How do I permanently delete an account? How do I hide/exclude an account? How do I rename my
Money Management (MX) Frequently Asked Question s Account Maintenance How do I get rid of duplicate accounts? How do I permanently delete an account? How do I hide/exclude an account? How do I rename my
Bank Reconciliation Processing SYSTEM ADMINISTRATION AND PROCESSING GUIDE. Last revised: 8/19/10 12:22 PM
 Bank Reconciliation Processing SYSTEM ADMINISTRATION AND PROCESSING GUIDE Last revised: 8/19/10 12:22 PM New World Systems 1 CONTENTS Contents... 1 Introduction... 3 System Administrator Guide... 4 Company
VHFA Loan Origination Center
 User Guide 1 How to Access 3 Where to access (1) www.vhfa.org Home Page > (2) Business Partners > (3) Loan Origination Center 1 2 3 4 Access & Log In 5 First time access (1) Enter Lender ID, Username and
FMS View Expense Budget Information
 FMS View Expense Budget Information Budget Information Queries To view your operating expense budget (Fund 110) in the Financial Management System (FMS), you create a budget query with specific criteria;
ELECTRONIC BILL PAYMENT OVERVIEW
 ELECTRONIC BILL PAYMENT Our online electronic bill payment system allows you to pay bills through our secure Internet server. You may schedule a payment; schedule recurring payments to be issued automatically;
DEFINED BENEFIT TRANSFER ANALYSIS USER GUIDE
 DEFINED BENEFIT TRANSFER ANALYSIS USER GUIDE CONTENTS 1. SELECT NEW OR EXISTING CLIENT... 2 NEW CLIENT... 3 EXISTING CLIENT... 5 SELECTING AN EXISTING CASE... 6 CREATE NEW ANALYSIS... 7 2. DEFINED BENEFIT...
Using the Merger/Exchange Wizard in Morningstar Office
 in Morningstar Office Overview - - - - - - - - - - - - - - - - - - - - - - - - - - - - - - - - - - - - - - 1 Can I use the Merger Wizard for all security types? - - - - - - - - - - - - - - - - - - 1 Can
An overview of the financial profile fact finder
 An overview of the financial profile fact finder Functions addressed in this document: A step-by-step walk through of the financial profile fact finder. How data entry is presented to the client within
Network Health Claims Editing Portal
 Network Health Claims Editing Portal CPT codes, descriptions and other CPT material only are copyright 2010 American Medical Association (AMA). All Rights Reserved. No fee schedules, basic units, relative
EDUCATION TECHNOLOGY SERVICES. PowerSchool Fees
 EDUCATION TECHNOLOGY SERVICES PowerSchool Fees POWERSSCHOOL FEES... 3 PAYMENT TYPES... 3 Default Payment Types:... 3 To change... 3 FEE CATEGORIES... 3 School... 3 Create a School Enrollment Fee... 3 Course...
2014 EMPLOYEE SELF SERVICE GUIDE
 2014 EMPLOYEE SELF SERVICE GUIDE CONTENTS Click any topic below to go directly to that page. HOW TO USE SELF SERVICE 1.1 How to Access, Log In and Navigate Employee Self Service BENEFITS 2.1 Enrollment
Guide to Credit Card Processing
 CBS ACCOUNTS RECEIVABLE Guide to Credit Card Processing version 2007.x.x TL 25476 (07/27/12) Copyright Information Text copyright 1998-2012 by Thomson Reuters. All rights reserved. Video display images
Chapter 18. Indebtedness
 Chapter 18 Indebtedness This Page Left Blank Intentionally CTAS User Manual 18-1 Indebtedness: Introduction The Indebtedness Module is designed to track an entity s indebtedness. By entering the principal
Step 1: Log in to your student information system (SIS) account at go.sfu.ca
 account at go.sfu.ca") How to setup up direct deposit to your bank account using SIS (go.sfu.ca) Direct deposit allows scholarship payments and refunds from SFU to be made to a student s bank account (in Canada), as opposed
How to setup up direct deposit to your bank account using SIS (go.sfu.ca) Direct deposit allows scholarship payments and refunds from SFU to be made to a student s bank account (in Canada), as opposed
IRA FMV and Contribution Report Wizard Instructions for Tax Reporting Service Clients
 IRA FMV and Contribution Report Wizard Instructions for Tax Reporting Service Clients Wizard Purpose The IRA FMV and Contribution Report Wizard must be completed by financial organizations with a 5498
Using ERAs with Helper
 Using ERAs with Helper Table of Contents Introduction to ERAs in Helper... 1 Getting Started with ERAs... 1 Set up Multi-User settings for ERAs... 1 Enter the ERA Payer ID in the Insurance Company Library...
Employer Portal epayment User Guide
 Employer Portal epayment User Guide Table of Contents Introduction to epayment... 3 Access the epayment Site... 3 Navigate the epayment Site... 4 Account Summary... 5 Outstanding Invoices... 5 Scheduled
How To Enter or Change My Direct Deposit Banking Information
 Step 1: Go the the Lakeland Home Page found here: http://info.lakelandregional.org/pages/home.aspx Click on myworkplace Step 2: In the left hand margin, scroll down to mybenefits/ Payroll and click on
WINASAP5010 User Manual (Version 1.00)
") ACS EDI Gateway, Inc. WINASAP5010 User Manual (Version 1.00) December 7, 2011 ACS EDI Gateway, Inc. Prerequisite for using WINASAP5010 BEFORE USING THIS APPLICATION, THE USERS SHOULD HAVE KNOWLEDGE ON
ACS EDI Gateway, Inc. WINASAP5010 User Manual (Version 1.00) December 7, 2011 ACS EDI Gateway, Inc. Prerequisite for using WINASAP5010 BEFORE USING THIS APPLICATION, THE USERS SHOULD HAVE KNOWLEDGE ON
Banner Finance Self Service Budget Development Training Guide
 Banner Finance Self Service Budget Development Training Guide Table of Contents Introduction and Assistance...3 FOAPAL....4 Accessing Finance Self Service...5 Create a Budget Development Query... 6 Query
Financial Arrangements/Fee Schedules
 it just makes sense Summary This Feature Summary will be divided into four sections, Financial Arrangements Fee Schedules Financial Arrangement Document Template Financial Arrangement Questionnaires Each
Verification of Eligibility Form Out-of-District Transfer Evaluation Information. Washington IEPPLUS
 Verification of Eligibility Form Out-of-District Transfer Evaluation Information Washington IEPPLUS 1990-2014 SunGard Public Sector Inc. All rights reserved. No part of this publication may be reproduced
QUICKSUPER. A how-to guide
 QUICKSUPER A how-to guide April 2017 1 Contents Page How to register for QuickSuper 4 How to set up your account 6 How to make a payment 10 CSV file specifications 12 How to view new default fund member
Plan Access ABA-RF Guide
 Plan Access ABA-RF Guide September 1, 2014 Copyright Copyright 2009, 2014 Voya Institutional Plan Services, LLC All rights reserved. No part of this work may be produced or used i4 any form or by any means
Welcome to Dearborn National s. Benefits Manager. Instruction Guide for. Web Billing. Contents Next > BM.WB
 Welcome to Dearborn National s Benefits Manager Instruction Guide for Web Billing Contents Next > BM.WB.021517 This instruction guide demonstrates how to navigate through Dearborn National s Benefits Manager.
Manual Input. Earnings & Deductions Trinity Health. All Rights Reserved. 1
 Manual Input Earnings & Deductions 2014 Trinity Health. All Rights Reserved. 1 1 Housekeeping Do not place us on hold Close other programs Ask questions by raising your hand or by using Chat You may be
Dear Client, We appreciate your business!
 FTJ FundChoice Website Guide Page 1 Dear Client, Thank you for choosing FTJ FundChoice. This guide will assist you in managing your online account at: www.portfoliologin.com. In keeping with our mission
OregonSaves Employer Handbook
 OregonSaves Employer Handbook A Guide to Your Role and Responsibilities October 2017 OregonSaves is overseen by the Oregon Retirement Savings Board. Ascensus College Savings Recordkeeping Services, LLC
Retirement Services Participant Online Navigation Guide
 Retirement Services Participant Online Navigation Guide Table of Contents Accessing the Website... 3 My Plan Dashboard... 5 View Investments... 8 Manage My Account... 9 Plan Statements & Forms... 12 Tools
Plan Member a) Updating the Plan Member s Personal Information... 15
 Updating the Plan Member s Personal Information... 15") Table of Contents Web Administration INTRODUCTION... 4 WELCOME TO EQUITABLE LIFE OF CANADA... 4 WEB ADMINISTRATION COVERAGE UPDATES... 5 Certificate Summary... 7 a) Terminating the Certificate... 7 b)
Table of Contents Web Administration INTRODUCTION... 4 WELCOME TO EQUITABLE LIFE OF CANADA... 4 WEB ADMINISTRATION COVERAGE UPDATES... 5 Certificate Summary... 7 a) Terminating the Certificate... 7 b)
Position Management Console
 Position Management Console Last Update: 7/13/2009 1 Table of Contents Position Management Console... 3 Viewing the Position Search Results... 4 Viewing the Position Information... 5 Editing the Position
2018 IRS ACA Reporting Completing Your Confirmation Page
 Revised Oct. 23, 2018 2018 IRS ACA Reporting Completing Your Confirmation Page SB-25770-XXXX Need Help? You are welcome to call your consultant with any questions at 800-654-8489 and their extension: Kim
Fund Details: Multi Fund Panel & COP Header
 Fund Details: Multi Fund Panel & COP Header Summary of Multi Fund Panel The purpose of the multi fund panel is to allow the user to quickly reference recently used and viewed closeout packets. The multi
CENTRAL SUSQUEHANNA INTERMEDIATE UNIT Application: HR/Payroll
 CENTRAL SUSQUEHANNA INTERMEDIATE UNIT Application: HR/Payroll Personnel Clean-up Programs Learning Guide Updated: 11/20/17 2017 Central Susquehanna Intermediate Unit, USA Page 1 Table of Contents Introduction...
State of Maryland Department of Labor, Licensing and Regulation Division of Unemployment Insurance Contributions Unit
 Larry Hogan Governor Boyd K. Rutherford Lt. Governor State of Maryland Department of Labor, Licensing and Regulation Division of Unemployment Insurance Contributions Unit Quarterly Contribution & Employment
Support Unit Budget Requests
 Support Unit Budget Requests In Hyperion University Budget Office Office of the Vice President and Chief Financial Officer October 2016 1 Table of Contents HYPERION OVERVIEW... 2 Overview... 2 Support
Accounts Receivable Instructor Guide
 Instructor Guide Rutherford and Associates August 2012 All rights reserved. All rights reserved. The reproduction or use of this document in any form or by any electronic, mechanical, or other means, now
FMS Account Summary Inquiry View Budget Information
 FMS Account Summary Inquiry View Budget Information Account Summary Inquiry The Account Summary Inquiry (ASI) in our Financial Management System (FMS) displays budget, expenditure, encumbrance, and available
RESOLV WAREHOUSE MANAGEMENT
 RESOLV WAREHOUSE MANAGEMENT USER MANUAL Version 9.3 for HANA PRESENTED BY ACHIEVE IT SOLUTIONS Copyright 2010-2018 by Achieve IT Solutions These materials are subject to change without notice. These materials
Enrollment Guide for New Hires
 Prepared by the Human Resource Department. PEOPLESOFT E-BENEFITS Enrollment Guide for New Hires WELCOME TO SAINT PAUL PUBLIC SCHOOLS. Enrollment Process Enrolling in benefits is quick and easy. Using Employee
Global Transaction Banking Products & Services. Business Tax Payment Service
 Global Transaction Banking Products & Services Business Tax Payment Service November 2016 Table of Contents Introduction to Scotiabank s Business Tax Payment Service... 3 Service Overview... 3 Registration
Introduction to Client Online
 Introduction to Client Online Trade Finance Guide TradeFinanceNewClientsV2Sept15 Contents Introduction 3 Welcome to your introduction to Client Online 3 If you have any questions 3 Logging In 4 Welcome