Tax Collect Software Manual
|
|
|
- Hillary Spencer
- 6 years ago
- Views:
Transcription


1 Tax Collect Software Manual 1
2 2
3 Contents Contents 3 Important Concepts 9 Parcel Identifier, PID, or Map/Lot/Sub Lot 9 Invoice 10 Current Owner vs. Billed Owner 11 Receipt 11 Refunds 11 Fiscal Year 11 Current Year Database vs. Prior Year Database 12 Group of Record Sets 12 Outstanding Balance Tool Tip 12 System Functions Available To You 13 Required Knowledge of Tax Collect Concepts 13 Avitar Tax Collect Internet Kiosk 13 Using the Avitar Tax Collect System 14 Starting Avitar Tax Collect 14 Tax Collect Main Window 14 Data Display Tabs 15 Data Access Tabs - Receivables 16 Tree View 16 Current/Billed Owner Data Access Tabs 17 PID Data Access Tab 18 Address Data Access Tab 18 Query Data Access Tab 18 User Query 18 Data Access Tabs - Receipts 20 Payer/Creditors Data Access Tabs 20 Recent Receipts Data Access Tab 20 Recent Credits Data Access Tab 20 Displayed Receivables 21 Displayed Receipts 22 Data Access Tabs Set Tab Default 23 Toolbar 23 Common Toolbar Buttons 24 Log In/Log Out Button 24 Prior Years/Current Year Toolbar Button 24 Previous/Next Button Toolbar Buttons 24 Exit Toolbar Button 24 Toolbar Buttons - Receivables
4 Pay Toolbar Button 25 Total Toolbar Button 25 History Toolbar Button 26 Toolbar Buttons - Receipts 26 Deposit Toolbar Button 27 Assign Toolbar Button 27 Int/Pen Toolbar Button 27 Payables Toolbar Button 27 Printing 27 Previewing and Printing Reports 28 Exporting Reports 29 Print Setup 29 Paying Invoice(s) 30 Pay an Invoice 30 Pay Multiple Invoices 32 Only List Unpaid 34 Changing Interest Date 35 Edit Payer/Check Number 35 Process Pre-Payments 35 Print Receipts as Paid 36 Reprint Current Receipt 36 Creating a Deposit 38 Deleting Receipt 42 Delete Receipt 42 Assign Receipt to Deposit 43 Delete Transaction from Receipt 43 Assigning Credits 45 Associate Credit with PID 45 Assign Credit to Payables 45 Assign Credit to Receivables 46 Assign Credit to Int/Pen 46 Post-It Notes 47 Add Parcel Post-It 47 Add Receipt Post-It 48 Viewing Post-Its 48 Post-It Reminders 48 4
5 Abatements 49 Abatement - Beginning Balance 49 Abatement - Ending Balance 50 Delete Abatement 51 Refund Abatement 51 Abatements Report 51 The Warrant Process 53 Import Warrant 53 Assign Credits to Warrant Function 54 Print Tax Bills 57 Real Estate Services 64 Export Invoices 64 Process Payments 66 Supplemental Warrant 69 Delete Supplement 71 Supplements Report 71 Change Due Date 72 Refresh Lists 73 Add Additional Owners/Mail To 73 Get Appraisal Owners 75 Customize Notices 77 Header Options 77 Digital Signatures 77 Fold Hash Marks 77 Custom Messages 78 Reminder Notice 79 Bankruptcy Flag 81 Delinquent Notices 82 Delinquent Tax Notice 82 Delinquent Utility Notice 83 Tax Lien Process 86 Lien Notice 86 Lien Execute 88 Title Search Import/Export 90 Mortgagee Search Report 92 5
6 Mortgagee Lien Notice 92 Edit Book & Page 94 Lien Redemption Report 94 Mortgagees 96 Maintain Mortgagees 96 Assign Mortgagee 97 Mortgagees by Parcel Report 97 Tax Deeding Process 98 Tax Deed Notice 98 Re-Notice Previous 100 Tax Deeding 101 Tax Collectors Deed 102 Deeded Property Report 102 Monthly Balancing 103 Monthly Balance Report 104 Understanding the Monthly Balance Report 104 Year End Process 108 Collections YTD Report 109 MS-61 Report 109 Generating and Submitting the MS Balancing the MS-61 Report 115 Close Period 122 Archived Reports 123 Purge of Prior Years History 124 Reports Menu 126 Credits Report 126 Deposit Reports 127 Deposit Report 127 Deposit Slip Report 128 Deposit Summary Report 128 Activity Report 129 Receivables Reports 132 Individual Invoice 132 Group of Invoices 132 Current History by Owner 133 6
7 Paid Warrant 133 Ledger 134 Uncollected Interest Report 135 Deleted Receipts Report 135 Inventory Penalties Report 135 NSF Checks Report 135 Penalties Reports 135 Labels 137 Post-It Notes Report 137 Penalties Menu 139 Add Penalty 139 Delete Penalty 139 Change Penalty 140 Interest 141 Forgive Interest 141 Change Interest Rate 141 Interest Calculator 141 Maintain Users 143 Add User 143 Modify User 143 Delete User 143 Change Password 144 Town Settings 145 Tax Collector Tab 145 Fiscal Year Tab 145 Purge Paid Invoices 146 Rates, Fees, Deposit Tab 148 Discounts Tab 150 Town Accounts Tab 151 Miscellaneous Tab 152 Display Inventory Penalties 153 Combine Water & Sewer Warrants on Importation 153 Credits Assignment Search Order 153 Districts/Precincts Tab 154 System Settings 154 Tax Bill Setup 154 ADS ProFund Settings 156 7
8 Notice Format 156 Backup Database 157 Server Application 158 Workstation Settings 160 Import Database Script 163 FTP Data to Avitar 164 Avitar Tax Collect Internet Kiosk 164 Features and Benefits 166 Limited Tax Collect Internet Kiosk 167 Expanded Tax Collect Internet Kiosk 168 Comprehensive Tax Collect Internet Kiosk 169 Using Your Tax Collect Internet Kiosk 171 Updating Current Tax Information Online 171 Modifying Who and What Appears Online 172 Creating PDF Invoices for Paperless Notification 174 Upload PDFs Tab 176 Paperless Notification Settings 177 Default Invoice Cloud Wording 182 Downloading, Importing, and Applying Payments 183 Best Practices for Managing Online Payments 188 Supporting Reports for Reconciling Online Payments 189 Utilizing Your Invoice Cloud Biller Portal 191 Update Instructions 192 8
9 Important Concepts Before examining the details of how to use the Avitar Tax Collect program, it is necessary to explore several important definitions and concepts used throughout this manual. Parcel Identifier, PID, or Map/Lot/Sub Lot Both Avitar Assessing and Avitar Tax Collect maintain assessment and other parcel data based on a unique parcel identifier assigned to each parcel. This identifier, often referred to as the PID, is generated from the map, lot, and sub lot assigned to each parcel on your tax maps. The PID is an eighteen character code, consisting of six characters each for the map, lot, and sub lot. For example, the PID of the first parcel shown on tax map number seven would appear as follows: If this parcel was later subdivided in to three lots, the resulting PIDs might appear as follows, depending on the nomenclature used in your community: A B In this example, PID would typically remain with the original mother lot, and the new sub lots carved out of the original parcel would be numbered A and B. Throughout this document, the terms record, parcel identifier, PID, and map/lot/sub lot will be used interchangeably. It is important to note that PIDs are created and modified in the Avitar Assessing program, not the Avitar Tax Collect program. Tax Collect has many functions whereby changes to PIDs in Assessing are imported to Tax Collect, but there is no PID naming or assignment done in Tax Collect to ensure that PIDs maintained in Tax Collect correlate with those maintained in Assessing. Custom PID Format It is possibile to configure your system to display PIDs in a manner different from the standard six character map, six character lot, and six character sublot. This is in response to the growing number of communities (predominantly towns that have had a remapping/renumbering project by Cartographic Associates) that have PIDs that do not conform to this standard. Previously, this could be accommodated within the existing 18 character PID framework but it was not always clean. The Custom PID function allows you to configure a PID mask that divides the 18 available characters up into as many as six distinct sections of any length (e.g. six sections of three characters or one section of ten characters and another of eight characters). Additionally, you can choose to indicate a character that will separate each section and/or you can choose to suppress leading zeros from each section. 9
10 Note that this function should only be enabled in consultation with Avitar Software Support and in conjunction with your Assessing department. However, review the description below and please contact us if you and your assessors are interested in implementing a Custom PID format. By using the Custom PID Format option, you can choose to change the system format to an eighteen character PID in a manner different from the standard six character map, six character lot, and six character sublot format. For example, you could elect to choose six characters for the map, three for the lot, three for the sublot, three for a building number, and three for a unit number. Invoice Custom PID Mask -- You must use the # symbol to indicate the placement of the individual PID characters within the mask. Then use another character (for example a space or a dash or a slash) to indicate the character you wish to use to separate the component sections of the PID. However, you can only use one character as the separator character. Custom PID Description -- Enter a brief description of the entire PID (e.g. "Map/Lot/Sub/Bld/Unit"). This is the label that will appear on reports. It is best to use a capital letter for the first letter of each component and then lower-case letters for the rest. This will match the format of the rest of the program and the report heading will look consistent. Custom PID Section Names -- You can choose to enter a description for each component of the PID (e.g. "Map", "Lot", etc.). The Custom PID Section names are only visible when you hover over the individual boxes throughout the program used to enter PID values on which to search. Suppress Leading Zeros -- Check this box to suppress the leading zeros in each section of the customized PID (e.g. "1/2/3" instead of "000001/000002/000003"). Pad Separators with Spaces -- Check this option to add a space before and after each separator, making it easier to read in some instances (e.g. "1 / 2 / 3" instead of "1/2/3"). An Invoice in Avitar Tax Collect is a specific bill. Each invoice is assigned a unique invoice number. For example, Invoice number 2009P is a st issue property tax bill ( 2009P01 ). The first four numbers indicate the levy year of the tax, and the letter following the levy year designates the type of tax. For property tax invoices imported from Avitar Assessing, the right six characters of the invoice number (in this case ) indicate the page of the property tax warrant on which the invoice appeared (in this case it is the seventh invoice on page twelve of the warrant). Other invoices may be supplemented directly into Avitar Tax Collect (as opposed to imported from Assessing). For example the invoice number 2009T01 S00001, indicates the bill is a 2009 Tim- 10
11 ber Tax bill that was supplemented into Tax Collect (the S in the bill number S00001 designates the invoice was supplemented). Note that the terms invoice and receivable are often used interchangeably throughout this documentation. Current Owner vs. Billed Owner In Avitar Tax Collect we refer to a Current Owner as the person who owns the property at the time the last owner import from Assessing was completed. A Billed Owner is the person who owned the property at the time the warrant was generated. For example, John Smith owned a parcel at the time the warrant was created. He would be the Billed Owner. However, if the property sold a month later to Jane Doe, Jane Doe would be the Current Owner and John Smith would be the Billed Owner. Note that the Billed Owner never changes, while the Current Owner may change numerous times over the life of the invoice. Receipt A Receipt refers to the total amount of money paid by a single payer at one time. A receipt might include just a single payment applied to one invoice or it might, for example in the case of a bank payment, contain dozens of transactions that affect dozens of different, unrelated invoices. For most purposes, you should create an individual receipt for each check you receive, whether the check only reflects a partial payment on a single invoice or the check completely pays off multiple invoices. Refunds Payables is a term used in Tax Collect in reference to a refund. When you assign a credit to Payables, you are refunding the customer. Fiscal Year Each municipality has a Fiscal Year, which may, or may not, follow the calendar year (i.e. January 1st to December 31st). Some municipalities have alternate Fiscal Years, such as July 1st to June 30th. When Avitar Tax Collect is installed, your Fiscal Year is configured for your municipality. Your Fiscal Year is a discreet accounting period that determines how your information on financial reports are gathered. For example, if your Fiscal Year ends December 31st, your MS61 will be accumulating data starting with January 1st until you close the fiscal period. Avitar Tax Collect has a hard fiscal year end close, which means that before you can proceed into the next fiscal year, you must close the current fiscal year (see Close Period). Closing the fiscal year captures the balances needed for your financial reports. For example, your ending balances from one year must equal your beginning balance for the next year. As these figures must match, the system will not allow you to go back into the closed year(s) to perform any work (e.g. process a returned check, delete receipts, post payments). 11
12 Current Year Database vs. Prior Year Database The Current Year Database contains all the information that you have updated or modified in your current fiscal year (see Fiscal Year). The Prior Year database contains information that has been purged from your Current Year Database (see Purge Paid Invoices). In order to keep the tree view in the Data Access Tabs to display current unpaid data, at the close of the fiscal year Avitar Tax Collect will ask if you wish to purge your paid invoices. If you answer Yes, any paid invoice will be moved from the Current Year database to the Prior Year database. To view the Prior Year Database, click on the Prior Years toolbar button. Subsequently, to return to the current year, click on the Current Year toolbar button. Group of Record Sets Throughout Avitar Tax Collect you will be creating and accessing groups of invoices or receipts referred to as record sets. A record set simply indicates a group of invoices or receipts that match your search criteria and were therefore selected from the database. The number of possible records in your record set ranges from zero to all of the records in your database. For example, if you select a single invoice, your record set will consist of one record. If you select a single owner, your record set may consist of several records if the selected owner owns many parcels in town. Alternatively, if you use the Query tab to search for all invoices owned by Avitar Associates, your record set will likely consist of zero records (see User Query). When you create a record set by selecting particular records for access, Avitar Tax Collect will display the first record (generally based on the first PID). If there are several records in your record set, you can navigate among them using the Previous and Next buttons on the Toolbar. At all times, the record counter on the Data Display Banner will indicate which record of your current record set is now displayed. Most of the time, the record counter will say Invoice 1 of 1" or Receipt 1 of 1, indicating you only have one record in your record set and it is currently displayed. As you press the Next button on the toolbar, you will notice the record counter changes with the record to indicate your current position in the record set (e.g. Invoice 2 of 5", Invoice 3 of 5", or Receipt 3 of 4, etc.). Once you have viewed or edited the data in one particular record set, just create a new record set by selecting different search criteria from any of the Data Access Tabs. Avitar Tax Collect will continuously create new record sets based on the criteria you select, so do not get too preoccupied with the concept of record sets. But you can use the record counter to determine how many invoices or receipts match your current selection criteria. Outstanding Balance Tool Tip A Tool Tip is used to assist you in finding information without having to leave the current screen. The Outstanding Balance Tool Tip will assist you in finding what is owed on a first issue billing when you have the second issue invoice displayed. To see the Tool Tip, first find a taxpayer and select their second issue invoice. While on the Details tab, on the bottom right side of the screen you will see a heading called Tax Rates. (If your municipality has Taxable Districts the default display for this portion of the screen is Taxable Districts -- you will need to click on the Show Tax Rates icon next to the heading to display the Tax Rates.) At the bottom of the Tax Rates column, you will see First Bill. This is the amount that was billed for the first issue. If you hover over the First Bill, the tool tip will show what is still owed for that billing. This will eliminate having to click on the 2009P01 invoice as well as the 2009P02 invoice. 12
13 System Functions Available To You This document describes every function of the Avitar Tax Collect system. You may not be able to access a particular function if you are not a member of the required user group. Required Knowledge of Tax Collect Concepts It is assumed that you are familiar with the many complicated concepts associated with the taxation and collection of taxes in the State of New Hampshire. This document is not intended to serve as a substitute for or a short cut to the process of accumulating this knowledge. Rather, it is intended to apply what you already know to the proper use of the Avitar Tax Collect system. Avitar Tax Collect Internet Kiosk The Avitar Tax Collect Internet Kiosk provides a method by which you can easily make invoice and transactional information maintained in the Avitar Tax Collect system available on the Internet. Taxpayers, mortgagees, banks, and title companies can view invoice summaries and balances, pay taxes (if enabled), download original invoices (if enabled), and receive paperless invoice notifications (if enabled) at any time of day without having to contact you for information. There are three options for deploying the Internet Kiosk: Limited: Invoice summary and balance only. Expanded: Invoice summary and balance, online payment capability. Comprehensive: Invoice summary and balance, online payment capability, downloadable invoices, and paperless notification. Your interaction with your Tax Kiosk will generally fall into the following categories: Updating Current Tax Information Online Modifying Who and What Appears Online Adding or Updating Tax Kiosk Messages Generation, Upload, and Maintenance of Downloadable PDF Invoices and Paperless Notification Settings. Downloading, Importing, and Applying Payments (If configured with Invoice Cloud s Cloud Pay) See Features and Benefits for more details on the features and benefits of each option. 13
14 Using the Avitar Tax Collect System The Avitar Tax Collect System is setup to help you navigate logically through the screens and menu choices. Starting Avitar Tax Collect Click on the Avitar Tax Collect desktop icon or select Tax Collect from the Avitar program group on your Windows Start Menu. You will see what is referred to as the splash screen, visible while the program initially connects to the database. You are then greeted with the main Avitar Tax Collect window. The program opens in public access mode in which you will be able to view, but not edit, data. Tax Collect Main Window Avitar Tax Collect's main program window is designed to provide quick and easy access to your data. The main window appears below and consists of five basic areas. The areas are labeled below. It s a good idea to remember these terms as they will be referred to throughout this document. 14

15 1. Menus 2. Toolbar 3. Data Access Tabs 4. Data Display Tabs 5. Status Bar Note: The syntax used throughout this document to refer to items available on the menus is Menu Name Menu Item Sub Menu Item. For example, the Deposit Summary report would appear as Reports Deposits Deposit Summary. To generate the report, click on the Reports menu located at the top of the main program window, then select the Deposits menu item which reveals the Deposits sub menu. Lastly, select Deposit Summary. Data Display Tabs There are two Data Display Tabs: Receivables and Receipts. Each Data Display Tab displays its own Toolbar items and Data Access Tabs, which will be described in detail under the Data Access Tab section. 15
16 The Receivables Data Display Tab displays information regarding individual invoices, both owed and paid along with the billing information at the time the bill was generated. The Receipts Data Display Tab displays information regarding receipts, such as whether they have been deposited or deleted. Data Access Tabs - Receivables The Receivables Data Access tabs provide you with several different ways in which you can search, identify, and access records in your database. You can visually search and select records from the various tree view lists if you know the parcel s PID, Owner, or Address. You can also perform user defined queries in which you define the characteristics of the records you want to review. Tree View A Tree View is how data is accessed and displayed on several of the Data Access Tabs. As an item is selected, if there is additional information, it will be displayed below it. For example, John Smith owns two parcels and each parcel has two invoices. By selecting the Current Owner Data Access Tab, the tree view displays an alphabetical list which you can use to select the letter S. This will expand the tree view to show a list of all current owners that have a last name beginning with the letter S. You can scroll down until you find Smith, John and click on the tree view item. You could also type Smith in the search box below the tree view and as you start typing the tree view will advance to the first name with the letters you are typing. Click on the name in the tree view to select. This will display the two PIDs for this owner. Select one of the PIDs to expand the tree view to display the invoices. Click on the invoice to display the information. 16

17 After you have looked up information and your tree view is expanded, it is helpful to collapse the view back to its original state in order to make looking up the next invoice easier. A simple way to collapse the tree view is to put your mouse onto any white area in the tree view and right click on the mouse. This will bring you back to the original view. For example, if you are on the Current Owner tab and you right click on a white space, your tree view will collapse so you can only see the alphabet. If there are invoices in the tree view that are for the same parcel yet listed under two different names, it could be due to different spellings on the warrant, which may cause owners to exist in multiple places. For example, assessing may have created a warrant with the name Smith, John and then realized it should have been Smith Jr, John and they make the correction. When the next warrant is generated, the Billed Owner Data Access tab will show two entries, one for Smith, John and one for Smith Jr, John. If you look under the Current Owner Data Access Tab, you will find only Smith Jr, John with all the invoices. The reason the Billed Owner Data Access tab displays two people is because that is exactly how the bills were created, so it will never change. Current/Billed Owner Data Access Tabs The Current and Billed Owner data access tabs enable you to select parcels by owner name. To do so, click on the first letter of the last name. The letter level of the tree view will expand to reveal all owners starting with that letter. Select the desired owner name by clicking on it in the tree view. Multiple parcel record sets will be returned for owners with multiple parcels. Alternatively, you can 17
18 type the first few letters of the owner s name in the Find text box to jump automatically to the appropriate section of the list. Select the parcel ID to display a list of invoices for that parcel. PID Data Access Tab The PID data access tab enables you to select parcels by Map and Lot. To do so, select the Map number from the first level of the tree view. The Map number will expand to display the parcels on that map. Choose the desired parcel by selecting its Lot and Sub Lot number. Alternatively, enter the Map, Lot, and/or Sub Lot numbers in the search text boxes at the bottom of the tab and press Go. If any match is found, the parcel will be displayed. You may press Clr (i.e. Clear) to clear the search text boxes. Address Data Access Tab The Address data access tab enables you to select records by property location. To do so, select the street name. The street name level of the tree view will expand to show the street numbers on that particular street. Select the desired parcel by clicking on the appropriate street number in the tree view. Alternatively, you can type the first few letters of the street name in the Find box beneath the tree view to jump automatically to the appropriate section of the tree view. N/A beneath a street name allows you to select parcels on the selected street for which no street number was entered. Query Data Access Tab The Query data access tab allows you to execute a User Query in order to create a record set of parcels meeting specific user-defined criteria. For example, you could select all invoices on which the bill amount was greater than $5,000. User Query The User Query Data Access Tab allows you to search for invoices that share common attributes. To execute a User Query, you need to select a field, indicate the proper query operator, and finally enter the appropriate query criteria. Each step within the process is outlined below. User Query Choose an Operator Within the Oper column of your query field s row, select an operator from the dropdown list of available operators. The types of available operators depend on the type of data maintained in the field you selected. The specific types of operators are outlined below. Numeric Field Operators Numeric fields (e.g. Billed Amount or Principal Paid) use the following operators to compare the data in the field with your query criteria to determine whether a record should be included in your record set: < Less Than <= Less Than or Equal To 18
19 = Equal To >= Greater Than or Equal To Alphanumeric Field Operators Alphanumeric fields (e.g. owner name or address) use the following operators to compare the data in the field with your query criteria to determine whether a record should be included in your record set: Like The Like operator enables you to compare data in an alphanumeric field by entering the exact value or a pattern you wish to match. For example, selecting Owner LIKE RANDALL would return only parcels where the owner value is RANDALL. Or alternatively, you could use a wildcard character (the percent symbol) to search for values that match a certain pattern. For example, Owner LIKE RAN% would match all values beginning with the pattern RAN. Therefore, Owner LIKE RAN% would match RANDALL and RANFORD but not RASMUSSEN. Note: Owner names are typically entered in the format Last Name, First Name, so it s a good idea to always include the percent symbol at the end of any owner name query to allow for different first names and/or suffixes such as Jr. or Sr. Not Like The Not Like operator is the opposite of LIKE and can also be used with complete values or just patterns with wildcards. Using the earlier example, Owner NOT LIKE RAN% would match RASMUSSEN but not RANDALL or RANFORD. User Query Enter the Query Criteria After selecting the field s appropriate query operator in the Oper column, enter your query parameter in the column labeled Criteria. Remember to use the percent symbol for wildcard pattern matching. User Query Execute the Query After selecting all of your field operators and adding all of your criteria, press the Query button to execute the query. Any matching parcels will be returned as your current record set. If no matches were found, you will be told so in the message portion of the status bar. If your query could not be executed for some reason you will get an error message. You can add as many additional conditions to your query as you have fields in the grid. Note, though, that all of the conditions will be joined using the AND operator (as opposed to OR). Therefore, a parcel must match all of your criteria to be included in your record set, so beyond several fields of criteria, you may find your queries don t return any records. With the use of these operators and the selection of one or more fields you can create almost any conditions in which to create a subset of records on which to review. With enough planning and thought any record set can be created based on the parameters you enter. 19

20 Data Access Tabs - Receipts The Receipts Data Access tabs provide you with a variety of ways in which you can search, identify, and access receipts. You can visually search and select records from the various tree view lists, or you can perform user defined queries in which you define the characteristics of the records you want to review. Payer/Creditors Data Access Tabs The Payer and Creditors Data Access tabs display owners alphabetically by last name. Click on the desired name in the tree view to display a list of receipts or credits. Select the receipt and the information will display on the right side of the programs main screen. Recent Receipts Data Access Tab The Recent Receipts Data Access tab displays the most recent receipts you have entered. The tab allows you to search by receipt or deposit number. Searching for a receipt number will go directly to that receipt. A deposit number search will display the first receipt included in the selected deposit. You will need to use the Previous & Next buttons on the toolbar to move forward and back through the subset of receipts displayed. Recent Credits Data Access Tab The Recent Credits Data Access tab displays a list of recent over payments. The radio buttons below the grid allow you to define what type of credits displays. For example, if you want to only view deleted credits, click on the Show Deleted radio button. 20

21 Displayed Receivables Once you have used the different methods available on the Receivables Data Access Tabs to select invoices, the receivables invoices themselves are displayed on the right side of the Receivables Data Display Tab. When you are on the Receivable Data Display Tab, there are two tabs on the right side of the screen, Details and Transactions, which will give you additional information. Receivables Details Tab The Receivables Details tab will display the information of the bill at the time it was generated, such as the assessment, tax rate, due date, and per diem. Once a property tax invoice is displayed, the system will show the individual component tax rates (e.g. County, School, Local, and State Ed), as well as the total tax rate. If your town has taxable districts, the taxable district information will be displayed by default for each invoice. To see the tax rate information you will need to press the Show Tax Rates icon to the right of the Taxable Districts label. Notes regarding the Tax Rate display: Rates are only displayed for property tax bills. Rates are not displayed for supplemented tax bills. Parcels that fall within a taxable district will display the full rate for that district, even though only a percentage of the parcel may fall within that district. Parcels that fall within three or more taxable districts will not display each individual rate as there is not enough space for each individual component. Consequently, you will see the standard four components followed by a total district rate. Receivables Transactions Tab 21

22 The Transactions tab will display information regarding payments, abatements, and/or penalties that have been posted to the selected invoice. Transactions are displayed sequentially, from top to bottom, based on when the transactions were processed. Displayed Receipts Once you have used the different methods available on the Receipts Data Access Tabs to select receipts, the receipts themselves are displayed on the right side of the Receipts Data Display Tab. The transactions grid shows the details of each individual payment that was processed as part of the receipt, in the order in which it was processed. 22

23 Data Access Tabs Set Tab Default The Set Tab Default menu item allows you to set the Data Access tabs to specify which Data Display tab displays when the program opens. The system defaults to the Current Owner on the Receivables Data Display Tab and Payer on Receipts Data Display Tab. If you prefer to look information up by the PID Data Display tab, you can change the system to always open with the PID tab displayed. To change the setting, click on the Data Access Tab you want to set as the default setting (e.g. PID Data Access Tab). Then, from the main menu, go to File Set Tab Default. A message box will display asking if you want to set the default to this setting. Click Yes to apply the change or No to retain the default. Toolbar The Toolbar located at the top of the program s main window provides a number of buttons corresponding to frequently performed tasks. Some of the Toolbar button options change from the Receivables Data Display tab to the Receipts Data Display tab. Also, which toolbar buttons are 23
24 enabled at any one time will depend on whether or not you have logged in to the database, and the level of user access you were assigned. Common Toolbar Buttons The Receivables and the Receipts Data Display tabs each utilize a unique toolbar. However, there are items on each toolbar that will display no matter which Data Display tab is currently active. Log In/Log Out Button The Avitar Tax Collect system does not require you to log in to the database when you start the program. In this public access mode you are able to view most data, but the majority of the system s functions are not accessible. To print reports or pay an invoice you will need to log in. To log in press the Log In button on the program s main toolbar. On the Login dialog box, enter your user name and password in the appropriate text boxes. Keep in mind that passwords are case sensitive. Your user level determines what functions you are able to access. User levels are explained in detail under the Maintain Users section. You can press the Log Off button to end your user session without closing the Avitar Tax Collect system. Logging off is recommended when you are away from your computer. Alternatively, you can simply exit the program. Prior Years/Current Year Toolbar Button The Prior Years/Current Year button on the program's main toolbar allows you to toggle back and forth between the prior fiscal years data and the current fiscal year. When you first log on, the system defaults to your Current Year database, so the toolbar button will display as Prior Years. When you press Prior Years, the programs main screen displays in a different color scheme and the toolbar button now displays as Current Year. Data is moved from the Current Year to the Prior Years database when you purge paid items (see Purge of Prior Years' History). Previous/Next Button Toolbar Buttons The Previous and Next buttons on the program s main toolbar allow you to move back and forth between records (either invoices or receipts) in the current record set. Exit Toolbar Button The Exit button on the program s main toolbar allows you to close the program. You do not need to log off prior to exiting the program. 24
25 Toolbar Buttons - Receivables The Receivables Toolbar is located at the top of the program s main window and displays when you are on the Receivables Data Display Tab. The Log In, Prior Years, Previous, Next, and Exit toolbar buttons are discussed in the section Common Toolbar Buttons. Pay Toolbar Button The Pay button on the Receivables toolbar opens the payment entry dialog box allowing you to pay the invoice you have selected (see Pay an Invoice or Pay Multiple Invoices). Total Toolbar Button The Total button on the Receivables toolbar provides details of the total principal, interest, penalties, and the daily per diem rate for the total outstanding taxes of the owner or PID currently displayed. The Interest As Of date allows you to get information for a date in the future. This is frequently used when a mortgage company is looking for pay off figures for a closing. The Total button also gives you the ability to select multiple invoices for an owner at once in order to pay the total amount due. You can select outstanding invoices for a single parcel or for a single owner. Note, this process cannot be used to make partial payments on multiple invoices. 25

26 To pay all outstanding invoices for an owner, select the owner from the treeview. Once you have selected the owner, click the Total button located on the toolbar, or right click on the owner name within the treeview and select Total Due. Each outstanding invoice for this owner will display and is automatically selected and included in the Total Due amount. If you do not want to include a specific invoice, simply uncheck the box next to the invoice. Once you have selected the invoices to pay, click Pay Selected. A Receipt dialog box displays. Enter the Payer into the text box, select the payment type radio button, and fill in the Check Number if payment is made by a check. Click Pay to complete the process. To pay all outstanding invoices for a specific Map/Lot, find the owner in the treeview, select the Map/Lot, and click the Total button located on the toolbar, or right click on the Map/Lot within the treeview and select Total Due. Follow the same instructions above to complete the process. History Toolbar Button The History button on the Receivables toolbar displays the billing history for the PID you have selected (e.g. 2007L01, 2008P01, 2008P02), including the billed owner for each invoice. If you do not want to see the detail of each billing, select the Show Invoices Grouped by Levy Year button. This will display only the totals for each year (e.g. 2007, 2008). Toolbar Buttons - Receipts The Receipts toolbar buttons are located at the top of the program s main window and displays when you are on the Receipts Data Display Tab. Which toolbar buttons are enabled at any time will depend on whether or not you have logged in to the database and the level of user access you were assigned. The Log In, Prior Years, Previous, Next, and Exit toolbar buttons are discussed in the section Common Toolbar Buttons. 26
27 Deposit Toolbar Button The Deposit button on the Receipts toolbar displays payments you have posted to invoices but have not deposited. It allows you to preview and complete the deposit process (see Creating a Deposit). Assign Toolbar Button The Assign button on the Receipts toolbar displays when you have selected a receipt with an unassigned credit. Clicking the Assign toolbar button will allow you to assign the credit to an outstanding invoice (see Assigning Credits). Int/Pen Toolbar Button The Int/Pen button on the Receipts toolbar displays when you have selected a receipt with an unassigned credit. It allows you to assign a credit to interest and penalties (see Assign Credit to Int/Pen). This will only be allowed if the amount is equal to or less than the amount of interest you are authorized to forgive (see Forgive Interest). Payables Toolbar Button The Payables button on the Receipts toolbar displays when you have selected a receipt with an unassigned credit. It allows you to assign a displayed credit to Payables creating a refund in the system (see Assign Credit to Payables). Printing Virtually every report in Avitar Tax Collect will preview to the screen in the report viewer. At the top of the report viewer window you will find the report preview toolbar. The Print Setup option is available at the top of the report preview screen. If you want to select a different printer, select Print Setup. Under Print Setup you have two choices, Printer Options and Printer Preferred: Printer Options allows you the flexibility to direct a single report to a different printer at the time of printing. For example, if there is a lengthy report running on the default printer you could select a different printer to print the report. The temporary printer is for that specific print job only, however, and will not change the default printer; if you printed another report the printer to which that report was initially directed would again revert to the Windows system default printer. Printer Preferred allows you to select a printer as the default printer for Avitar Tax Collect on each specific workstation. When selected, this option sends all printing from the Avitar Tax Collect program on that specific workstation to the Preferred Printer. However, it does not change the Windows default printer. For example, a workstation used for posting payments and issuing receipts may use one printer and the same workstation uses another printer for Microsoft Word document printing. 27
28 The forward and back arrow icons allow you to sequentially move through the pages of the report in preview mode. The first and last arrow icons enable you to immediately jump to the first or last page of the current report in preview mode. The counter will indicate the number of the currently displayed report page. If you decide you wish to print the report, click the Print Report icon. You will be able to see which printer the report will be sent to and you can indicate the pages you wish to print. Previewing and Printing Reports The report preview toolbar enables you to view and print the current report. The forward and back arrow icons allow you to sequentially move through the pages of the report in preview mode. The first and last arrow icons enable you to immediately jump to the first or last page of the current report in preview mode. The counter will indicate the number of the currently displayed report page. If you decide you wish to print the report, click the Print Report icon. You will be able to see which printer the report will be sent to and you can indicate the pages you wish to print. If you want to select a different printer, select Print Setup. Under Print Setup you have two choices, Printer Options and Printer Preferred: Printer Options allows you the flexibility to direct a single report to a different printer at the time of printing. For example, if there is a lengthy report running on the default printer you could select a different printer to print the report. The temporary printer is for that specific print job only, however, and will not change the default printer; if you printed another report the printer to which that report was initially directed would again revert to the Windows system default printer. Printer Preferred allows you to select a printer as the default printer for Avitar Tax Collect on each specific workstation. When selected, this option sends all printing from the Avitar Tax Collect program on that specific workstation to the Preferred Printer. However, it does not change the Windows default printer. For example, a workstation used for posting payments and issuing receipts may use one printer and the same workstation uses another printer for Microsoft Word document printing. Depending upon your screen s resolution, the report may or may not be legible when it is first displayed in the preview mode. You can zoom in or out on the current report by selecting a new zoom factor from the dropdown list of percentages. The report will always appear at 100% initially, however, it may be necessary to set the zoom factor to 150% or higher to actually read the report in preview mode. Note that the zoom factor has no effect on the final print of the report, only on the way in which it is displayed in preview mode. Also note that depending upon your 28
29 resolution and system fonts, some labels or values may appear truncated in preview mode at higher zoom factors. However, the report should be fine when printed this is only a display issue with some screen resolutions. If you need to locate a specific record within the report, on the preview toolbar, click on the Search Text icon (pictured with the binoculars). Type the name or value for which you are searching in the search text box and click on the Find Next button. Avitar Tax Collect will search the report for the string entered in the text box. Any matches will be highlighted with a red rectangle in the preview window. To keep searching, just continue pressing the Find Next button. If the text is not found, you will receive a message indicating no results were found. Once you have previewed or printed a report, you can close the report preview window by clicking on the standard close button (pictured with an X ) in the control box in the upper right corner of the report form. Exporting Reports In addition to printing reports, you have the ability of exporting most all of the reports in Avitar Tax Collect to a number of standard file formats. Your options range from distributable report formats like Adobe PDF files and HTML files, to formats like Microsoft Excel or delimited text files that allow you to share data with other applications. To export a report select the envelope icon on the toolbar and you will see all of the aforementioned options. Please note that some reports may produce unexpected results when exported to certain formats and it may take a bit of trial and error with different export types to get just the type of format that is most useful to you. Print Setup The File Print Setup menu item allows you to select the printer and printer settings to be used by the program. 29

30 Paying Invoice(s) In Avitar Tax Collect you can pay an individual invoice or pay multiple invoices with one check. It is advisable when paying multiple invoices with one check to enter all of the payments as one receipt. By entering the payment as one receipt, if the check is returned, all the payments can be easily reversed. If you entered each payment as its own receipt, and the check was returned, you would have to reverse each payment separately. Pay an Invoice To Pay an invoice, you must be on the Receivables Data Display Tab. Using one of the Data Access Tabs search and select the invoice you wish to pay. Change the Interest Date to reflect the postmark date, if applicable (see Change Interest Rate). On the Toolbar, click the Pay button. The Pay Invoice dialog box displays. If you do not accept Electronic tender types, you will not see the Electronic radio button. To enable the Electronic tender type, see Rates, Fees, Deposit Tab. The Receipt section of the Pay Invoice dialog box is used to enter the information regarding the payment received. This tells the system who paid the bill, on what date, with what tender type, and the total amount received. The Payer text box defaults to the property owner, however, if a mortgage company is submitting the payment, you should change this to reflect who actually is paying this invoice. The Payment Date text box is populated with the date you selected, or if you did not change the interest date on 30
31 the program's main screen, the system will default to the current date. If you need to change this date click on the dropdown arrow to display the month date picker and select the date. With the EFT payment option enabled, you will have to select a tender type radio button (Electronic, Cash, Check) when you pay an invoice. When you select Electronic as the tender type, a dropdown text box displays allowing you to select the type of Electronic payment you received. By selecting the type of electronic payment used, the system captures the information and adds a total at the end of the deposit report summarizing the amounts by each electronic tender type. This is useful when balancing with credit card companies. If the EFT payment option is not enabled, you will only see the Cash and Check payment options. The Invoice section of the Pay Invoice dialog box is used to enter the information regarding the bill you are paying. This information is automatically populated based on the invoice selected and the information you entered in the Receipt section. The date you selected as the Payment Date is used to calculate, and populate, the interest text box. You can change the interest amount by typing the amount you wish to charge in the text box, however, any interest you change is audited and recorded on the Uncollected Interest report. The Payment On This Invoice text box allows you to pay a portion of the payment received to this invoice and the rest to another invoice (seepay Multiple Invoices). After all information is correct, click the Pay button to apply the payment. The system will prompt you to print a receipt. The default methodology for printing receipts at the time of payment is intended to be a quick method of providing the customer the basic details of their payment. As such, the emphasis, at the time of payment, is on speed and efficiency. However, we recognize some users mail receipts more frequently and would like the opportunity to select or enter the address the first time when the receipt prints. For these users, there's an option with which you have the additional flexibility to select or enter the appropriate mailing address for a receipt at the time it is originally printed. To enable the address prompt on the receipt upon payment, navigate to Utilities Town Settings Miscellaneous check the box "Receipts: Print Address Input After Payment" and save your changes. If this is not enabled, the above address behavior will remain unchanged there are no extra message boxes or options, just a simple click and print and the receipt is in the customer s hand. If you do not want to print a receipt, click the Cancel button on the Print dialog box. Otherwise, click OK to send the information to the printer. Video - Paying Individual Invoice 31
32 Pay Multiple Invoices There are two options when paying multiple invoices. The first option is used to pay in full all selected outstanding invoices for a single parcel or for a single owner. The second process is used to make partial payments on multiple invoices. To pay all outstanding invoices for an owner (the first option), select the owner from the treeview. Once you have selected the owner, click the Total button located on the toolbar, or right click on the owner name within the treeview and select Total Due. Each outstanding invoice for this owner will display and is automatically selected and included in the Total Due amount. If you do not want to include a specific invoice, simply uncheck the box next to the invoice. Once you have selected the invoices to pay, click Pay Selected. A Receipt dialog box displays. Enter the Payer into the text box, select the payment type radio button, and fill in the Check Number if payment is made by a check. Click Pay to complete the process. To pay all outstanding invoices for a specific Map/Lot, find the owner in the treeview, select the Map/Lot, and click the Total button located on the toolbar, or right click on the Map/Lot within the treeview and select Total Due. Follow the same instructions above to complete the process. To Pay to make partial payments on multiple invoices (the second option), you must be on the Receivables Data Display Tab. Using one of the Data Access Tabs search and select the first 32

33 invoice you wish to pay. Change the Interest Date to reflect the postmark date, if applicable (see Changing Interest Date). On the Toolbar, click the Pay button to display the dialog box. The Receipt section of the Pay Invoice dialog box is used to enter the information regarding the payment received. The Payer text box defaults to the property owner, however, if a mortgage company is submitting the payment, you should change this to reflect who is paying. The Payment Date text box is populated with the date you selected above, or if you did not change the interest date on the programs main screen, the system will default to the current date. If you need to change this date, click on the down arrow to display the month date picker and select the date. With the EFT payment option enabled, you will have to select a tender type radio button (Electronic, Cash, Check) when you pay an invoice. When you select Electronic as the tender type, a dropdown text box displays allowing you to select the type of Electronic payment you received. By selecting the type of electronic payment used, the system captures the information and adds a total at the end of the deposit report summarizing the amounts by each electronic tender type. This is useful when balancing with credit card companies. If the EFT payment option is not enabled, you will only see the Cash and Check payment options. The Total Receipt Amount is the total amount received (usually the check amount). For example, a bank sends you a check for $5, to pay off two invoices, each owing $2, The Total Receipt Amount would be $5, The Invoice section of the Pay Invoice dialog box is used to enter the information regarding the current bill you are paying and is automatically populated based on the invoice and the information you entered in the Receipt section. For example, the date you selected as the Payment Date is used 33

34 to calculate, and populate, the interest text box. You can change the interest amount by typing the amount you wish to charge into the text box, however, any interest you change is audited and recorded on the Uncollected Interest report. The Payment On This Invoice text box allows you to pay a portion of the payment received to this invoice and the rest to another invoice(s). After all information is correct for this payment, click the Pay button to pay this invoice. As you are paying multiple invoices, a dialog box will display in the upper-right hand corner of your program's main screen showing the balance remaining for this receipt. For example, assume a customer pays you $5, to pay for his three properties. The total receipt amount is for $5, and the first invoice paid was for $2, The remaining receipt balance to be used to pay for the other two properties is $2, There are two options at this point: Assign or Credit. Selecting Credit means you have no more invoices to pay and the customer has overpaid you. Selecting Assign allows you to keep posting the remaining receipt balance to other outstanding invoices. To pay another invoice, leave the green box in the upper corner of the screen while you search and select the next invoice. With the next invoice selected, click the Assign button. This will display the Pay Invoice box. Note, the payment dialog box does not allow you to edit the top section, as this is a continuation of a previously created receipt. Update the Payment On This Invoice amount and/or the Interest text boxes if necessary. Then select Pay. If you have applied all the money received, a Print box displays allowing you the option of printing a receipt. If you have an amount still not applied, the Remaining Receipt Balance box will display. Continue this process until the balance of the receipt has either been assigned to invoices or assigned to a credit. Video - Paying Multiple Invoices Only List Unpaid Only List Unpaid is a function to assist you in viewing only unpaid invoices in the Data Access Tab tree views. This feature will assist you in searching and paying multiple tax bills quickly. When you log into Avitar Tax Collect, you are viewing all invoices, whether paid or unpaid. To activate this function double click on the ONLY LIST UNPAID cell on the Status Bar. This will turn the letters in the cell black indicating the function is active. To inactivate this function, double click the cell again and the letters in the cell will now be gray. 34

35 Changing Interest Date New Hampshire Revised Statutes Annotated (RSA) states the payment is considered received by the post marked date shown on the envelope. Therefore, in order to calculate the interest due, you need to change the interest date to reflect the correct postmark date. On the right side of the Receivables Data Display tab you will see a Date field, which defaults to today's date. To change this field, click in the date field. This will display a calendar. Choose the posting date by clicking on a date and then selecting Update. Your program's main screen will now display the new date and the field is now red to remind you that you are not on the current date. After you are done with this transaction, remember to change the date back to the current date. Refer to RSA 80:55 Timely Mailing Edit Payer/Check Number Prior to deposit, you can change the Payer and/or Payment Type on a receipt up until the time that the receipt has been deposited. This can be helpful when you notice at the end of the day, that the name on one of the checks does not match the name that appears on the Deposit preview report. To edit either the Payer or the Payment Type, search and select the receipt using the Receipts data display tabs. From the Receipts main menu, select Receipt Edit Payer/Check Number and make any necessary changes. Process Pre-Payments The Process Pre-Payment menu item allows you to post a pre-payment for a specific parcel. A prepayment is maintained as a credit for posting to a future invoice. To process a pre-payment, you must be on the Receipts tab of the application's main window. From the main menu select Receipts Process Pre-Payment. The Process Pre-Payments box will display. 35

36 Enter the Payer name in the text box or click on the ellipsis button to search by Current or Billed Owner. Next enter the Map/Lot/Sub into the appropriate text boxes or click on the ellipsis button to search by PID. It is possible to process a pre-payment without a Map/Lot/Sub associated with it, however, if a PID is not entered, the system will not be able to automatically search for an invoice at the time of assignment. The Date field defaults to your system date. To change the date, you can type in the text box field or click on the down arrow to access the month date picker. Next select one of the tender type radio buttons. With the EFT payment option enabled, you will have to select a tender type radio button (Electronic, Cash, Check) when you pay an invoice. When you select Electronic as the tender type, a dropdown text box displays allowing you to select the type of Electronic payment you received. If the EFT payment option is not enabled, you will only see the Cash and Check payment options. Enter the amount of the prepayment. Once all the information is complete, click the Pre-Pay button. Print Receipts as Paid In Avitar Tax Collect, the system defaults to prompt you to print a receipt after each receipt has been posted. To turn this function off, and subsequently back on, from the Receipts main menu select Receipts Print Receipts as Paid. This will turn the function off. To turn it back on, follow the same procedure. If a check mark is visible next to Print Receipts as Paid on the drop down menu, the receipts will automatically be printed. Reprint Current Receipt The Reprint Current Receipt menu item allows you to reprint a displayed receipt. In order to reprint a receipt, you must search and select the receipt you wish to reprint from the Receipts Data Access Tabs. Once the receipt is selected, from the main menu select Receipt Reprint Current Receipt. When reprinting receipts you have the ability to select or enter the appropriate mailing address for a receipt. 36
37 Whether or not the receipt contains zero, one, or many distinct current owner addresses, with a reprint you will be prompted with the Select Mailing Address dialog box. In it, you will be able to choose from every distinct current owner address included on any and all invoices included on the receipt. Additionally, you will have the option to enter a new mailing address. The name for the new mailing address will default to the receipt payer name which you can choose to use or type over to enter a different recipient. So, for example, if a bank paid five different invoices for five different parcels, each with its own distinct current owner address, during a reprint you could choose to include any of those five addresses on the receipt or you could choose to manually enter the mailing address for the bank. If the address is unknown or you do not wish to include any of the possible options on the reprinted receipt, select No Address. Note that whether you are opting to include an address on a receipt from one of the available distinct current owner addresses or you are choosing to manually enter a different address the address for the receipt will not be saved. 37
.")
38 Creating a Deposit The Deposit function in Avitar Tax Collect is used to balance and finalize the receipts posted in the system. The system can be configured to prepare one deposit for each individual user or one deposit for multiple users (see Rates, Fees, Deposit Tab). The Deposit dialog box will display depending on this setting. For example, if the system is preparing a single deposit for multiple users, the Deposit dialog box will show every payment posted by each user. Alternatively, if the system is preparing a single deposit for a single user, only the payments posted by that user will be displayed. To create a deposit, you must be on the Receipts Data Display tab of the applications main menu. On the toolbar select the Deposit icon, which will display the Prepare Deposit window. In the single deposit for multiple users scenario, every payment entered in the system is displayed, including the receipt number, type of payment, the payment date, and the amount of each receipt. If the list is longer then will fit in the box, use the scroll bar to the right to view the items not displayed. The lower section of the deposit dialog box will display differently depending on the options you have chosen (see Rates, Fees, Deposit Tab). The above deposit screen shot is if you do not accept Electronic payments, so the totals displayed are what you have collected in cash and checks, as well as the total number of checks, which is displayed in parentheses. If your totals in the deposit dialog box do not match what you actually collected, select the Print Preview button. This will produce an exact report of the deposit that you can print to compare each receipt to assist in finding the error. To correct an error or to exit the Deposit dialog box, click the Close button. 38

39 If you have chosen to accept Electronic Payments (EFT), you have the option to Include EFT Payments in Deposit Total (see Rates, Fees, Deposit Tab). By selecting to include the EFT Payments in Deposit Total, the amounts you have collected will be added to your checks and cash. For example, if you collect $ in Checks, $ in Cash, and $ in EFT, your deposit total for the day will show as $ Select this option if you want your total deposit to reflect all the transaction you processed during the day, not just what you are actually taking to the bank. If you do not check the box Include EFT Payments in Deposit Total, the EFT payments will still be itemized on the deposit report, but will not be included in the overall deposit total. 39
40 Using the example above, the deposit total would equal $11,725.69, which is the total of the Cash and Checks only. You will want to select this option if you want the deposit total to match what is actually being taken to the bank. Once you are ready to finalize the deposit, make sure the Date text box has the date you are making the deposit. The Date field defaults to your system date. To change the date, type in the text box field or click on the down arrow to access the month date picker. To finalize the Deposit, select the Deposit button. Each finalized deposit will be assigned a unique deposit number based on the fiscal year and a sequential number. For example, if you are making your tenth deposit for the fiscal year 2009, the system will name the deposit Once you select Deposit, the deposit report displays, or if you are utilizing the Avitar Tax Collect Deposit Slip feature (see Deposit Slip Report), the deposit slip will display first and then the deposit report. At this point, you can print or export the document (see Printing). The first page of the deposit report gives the total received by invoice year and type, broken down by Principal, Interest, and Penalties collected. If you are using EFT, you will also see a totals summarizing the amounts by each electronic tender type. This is useful when balancing with credit card companies. The second page gives the detail on each receipt. At the bottom of the first page on each deposit report are signature and date lines for the person submitting the deposit (usually the Tax Collector) and a line for the person receiving the report (usually the Treasurer). If the Treasurer is not the person receiving the report, you have the option of entering text to specify what you want the signature line to read. (See Rates, Fees, Deposit Tab) 40
41 Video - Create Deposit 41

42 Deleting Receipt In the Avitar Tax Collect system there are two functions available that you can use to correct errors or delete a receipt: Delete Receipt and Delete Transaction from Receipt. Depending on the reason you need to delete the receipt will determine which item you need to choose. The delete receipt functions are used to reverse a bad check, to fix an amount entered incorrectly, as well as to correct a misapplied payment. The Delete Transaction from Receipt will remove the payment from an invoice and leave it as a credit. Delete Receipt The Delete Receipt function is commonly used for the following situations: To reverse a returned payment To fix an amount entered incorrectly To correct a misapplied payment A receipt can be deleted before or after you have finalized the deposit. However, if you delete the transaction after you have finalized the deposit, Avitar Collect will audit this transaction by adding the transaction to the Deleted Receipts Report. Also, once it is deleted, the deposit will be updated showing the reversed amount with a strike through mark on the transaction. To delete a receipt, use the Receipts Data Access Tabs, look up and select the receipt you want to delete. Once you have selected the receipt, from the main menu, select Receipt Delete Receipt. The Delete Receipt dialog box displays. There are two radio buttons to choose from, Data Entry Error and Returned Check. Both selections require you to enter an explanation into the text box on why you are deleting the receipt (e.g. Insufficient Funds, Account Closed). This explanation will print on the Deleted Receipt report. 42
43 The Returned Check option will reverse a payment and allow you to assign a returned check fee to the owner's account. If the receipt was deposited, you will be prompted to reprint the deposit affected by this transaction. The deposit will show the original receipt with a strike mark through the amount and a note stating VOIDED-RC. This indicates the check was voided due to a returned check. To complete the process, click Delete Receipt and reprint the deposit when prompted. The Data Entry Error option is typically used when you make the deposit at the bank and the bank then states the written amount on a check was incorrect and they are going to adjust your deposit amount for that transaction. For example, a customer pays their bill for $2,500.00, which you deposit. The bank subsequently sends you a statement saying the written amount was for $2, and they will adjust your deposit by $ In order to correct the actual amount of the receipt, you have to delete the receipt with the wrong amount, reenter the payment correctly, and then assigning that receipt to the original deposit. Note, we suggest you reprint the original receipt before deleting it, so you will have all the information you will need in order to reenter the transaction. After you have deleted the receipt, you will need to reenter the payment correctly using the original transaction date and the new/correct payment amount. Once you have entered the payment, you need to assign the new receipt back to the original deposit. Assign Receipt to Deposit The Assign Receipt to Deposit function allows you to assign a newly created receipt to a previously made deposit. This is usually used when you need to delete a receipt that was posted for the wrong amount and the error wasn't found until after the deposit was made. For example, perhaps you posted a payment in the amount of $ but the bank only gave you credit for $ The Avitar Tax Collect system will not allow you to adjust a receipt amount. You must reprint the current receipt (see Reprint Current Receipt) and then delete the receipt (see Delete Receipt). The next step is to post the payment with the correct amount using the original payment date (if you do not use the same payment date, you may not be allowed to assign the receipt back to the original deposit.), check number, and payer. Once the payment has been entered correctly, you can assign the receipt to the original deposit by selecting Receipts from the main menu and clicking on Assign Receipt to Deposit from the drop down menu. The Assign Deposit for Receipt box displays showing you all the deposits available for you to assign this receipt to. Select the deposit in the grid and select Assign. The last step is to reprint the deposit (see Deposit Report). Delete Transaction from Receipt The Delete Transaction from Receipt menu item allows you to delete a single payment transaction from a multiple payment receipt without having to delete the entire receipt. It is also used if a payment was posted to a wrong invoice. By deleting a transaction from a receipt, you create a credit 43

44 that can be assigned, either to another receivable (see Assign Credit to Receivables) or it can be assigned to payables (see Assign Credit to Payables). To delete a transaction from a receipt, use the Receipts Data Access Tabs, look up and select the receipt. From the main menu, select Receipt Delete Transaction from Receipt. The Delete Transaction From Receipt dialog box displays listing all the invoices paid on this receipt. Select the payment to be deleted by highlighting the transaction in the grid and click the Delete Transaction button. A dialog box will display asking you to confirm the deletion of the transaction. Select Yes if you wish to continue or No to end this process. If you had previously deposited this receipt, deleting it will affect the deposit, therefore, the program will prompt you to reprint the deposit. You will need to give a copy of the deposit to your treasurer/bookkeeper to show the adjustment.the credit you create will need to have a PID associated with it in order for it to be reflected on the owner s account. 44
45 Assigning Credits In Avitar Tax Collect, a credit is created when an invoice is over paid or an owner makes prepayments. A credit will not be automatically assigned to an invoice, as the system needs you to verify where the credit belongs. Associate Credit with PID The Associate Credit with PID function will link credits with specific map/lots. Note, this function does not automatically apply a credit to a specific invoice, it is only a reference to where/who the credit belongs to. This function is commonly used when a bank sends in multiple mortgage payments and one of the payments is for an invoice that is already paid. The system does not know which customer overpaid, so it will leave the credit without an association to anyone. Having the credit associated with a PID will assist you in finding an invoice that matches the PID when you are ready to assign the credit to a receivable. It is also used in conjunction to the Delete Transaction from Receipt process where a credit is created and needs to be associated with a specific PID (Associate Credit with PID). To Associate a Credit with a PID, use the Receipts Data Access Tabs to search and select the credit. From the main menu select Receipt Associate Credit with PID. The Associate Credit with PID dialog box displays. If you know the PID, you can type it into the Map, Lot, and Sub text boxes and click OK. Otherwise, you can use the tree view to browse for the PID or by Current Owner Name. Once you have made your selection, select OK. Assign Credit to Payables The Assign Credit to Payables function is used to create a refund in the system. If you are refunding a property owner, it is recommended that you print an activity report before assigning the credit. This can be used to as backup paperwork for your finance office. To Assign Credit to Payables, use the Receipts Data Access Tabs to search for and select the credit you wish to refund. Then click on the Payables toolbar button. The Payables Check Number dialog box displays. This box allows you to type in the refund check number your town used to refund the credit. If you do not know the check at this time, you can enter any pertinent information in the text box provided and then return at a later time after you have this information. Once you have entered the information click OK to process the refund. If you did not enter the check number at the time of the assignment and now wish to update the information, search and select the original receipt from the Receipts Data Access Tabs. Then click on the Payables toolbar button. An Edit Payables Check Number dialog box displays asking if you want to edit the check number. Select Yes. Enter the refund check number in the text box, and click OK. 45
46 Assign Credit to Receivables The Assign Credit to Receivables function allows you to assign a credit to an outstanding invoice. If you want to assign all or most of the credits to the warrant you just imported, you should follow the procedures for Assigning Credits to Warrant. To Assign a Credit to a Receivables, search and select the credit using the Receipts Data Access Tabs. Press the Assign toolbar button. The system will search for any unpaid invoice if the credit was associated with a PID (see Associate Credit with PID). If an unpaid invoice is found matching that PID, it will take you directly to that invoice. An Assign Credit dialog box displays in the upper right hand corner of the program. If the unpaid invoice on the screen is where you want the credit to be applied, click Assign. Otherwise, choose another invoice by searching and select an invoice from the Receivables Data Access Tabs. Once you click the Assign button, the Assign Credit to Invoice dialog box displays. The system will default to the original payment information, but you can change the Interest As Of Date, Payment On This Invoice, and Interest text box. Once all the information is correct, press Pay. Assign Credit to Int/Pen RSA 80:57 states that an overpayment of $5.00 or less does not have to be refunded to the taxpayer. Therefore, when a payment is being posted and it overpays the invoice by $5.00 or less, the Avitar Tax Collect system will ask if you want to assign the overpayment to interest and penalties. You would select Yes to assign it or No to leave it as a credit. The Assign Credit to Int/Pen toolbar button is used after you have created the credit and now decided to assign it to interest and penalties. To Assign Credit to Int/Pen, search and select the credit using the Receipts Data Access Tabs. Select the Int/Pen toolbar button to display the Assign to Interest/Penalties dialog box. Click Yes to assign the credit or click No to cancel the procedure. 46

47 Post-It Notes The Avitar Tax Collect system provides Post-It functionality whereby you can add notes or reminders to specific types of records within the database. You can use Post-Its to simply maintain additional details about a record, or you can create them such that the system will remind you when specific reminder dates pass. Post-Its can be added to a parcel or a receipt. Add Parcel Post-It The Add a Parcel Post-It function allows you to add a note or reminder to a specific parcel. To add a Parcel Post-It, search and select the parcel using the Receivables Data Access Tabs. With the parcel selected, choose Edit Invoice Add Parcel Post-It. You will see the Edit Post-Its dialog box, where you have several options. For each Post-It you can select whether you want to be reminded on a certain date. For example, if a customer has made monthly payment arrangements to avoid being deeded, you can set the reminder for the payment date, which will assist you in making sure the payment plan is being followed. To be reminded, check the Set Reminder check box and then select the Reminder Date. Additionally, if you wish to be explicitly reminded of the Post-It whenever the record is displayed on the screen check the Flash This Message check box. You might use the Flash option to add a Parcel Post-It to remind you that the customer has an outstanding returned check that must be paid. In the future, any time this parcel is selected by any user, the Post-It will automatically be displayed. You can add multiple Post-Its to a single record by pressing the New button. To move among multiple Post-Its on a single parcel, use the left and right arrow buttons within the Post-It dialog box. To delete a Post-It, display the note to be deleted (using the left and right arrow buttons if multiple Post-Its exist on a parcel) and then press the Delete button. 47
48 Add Receipt Post-It The Add Receipt Post-It function allows you to add a note or reminder to a specific receipt. To add a Receipt Post-It, search and select the receipt using the Receipts Data Access Tabs. With the receipt selected, choose Edit Invoice Add Receipt Post-It. (For additional Post-It features, see Add Parcel Post-It.) Viewing Post-Its Once you have added a Post-It to a particular parcel or receipt, the Post-It icon appears on the record as a little yellow piece of paper. To view the Post-It, simply click on the Post-It icon. The system will automatically display Post-Its that were created with the Flash This Message option. When a Flash Post-It is displayed you can press the Don't Remind Me button once you have acknowledged the Post-It. It will continue to flash in subsequent sessions until you either delete the Post-It or remove the Flash Option. Post-It Reminders Each time you or any other user logs into the system, the system will check the database for any Post-Its with Reminder dates equal or prior to the current system date. If the system identifies one or more parcels with applicable Reminder dates, you will be notified immediately after logging in that you have reminders and you will be prompted whether or not you wish to view them. If you answer No you can proceed as usual. If you answer Yes, the system will query the database for all parcels with applicable Reminder dates and display them in your current record set. Keep in mind when searching a parcel's Post-Its for the Reminder in question that the Reminder Post-It might not be the first Post-It displayed in the Post-It dialog box. You may have to scroll through multiple Post-Its to find the one in question. You will continually be notified of Post-Its with applicable Reminder Dates with each subsequent log in until such time as you either uncheck the Set Reminder checkbox on all of the applicable Post-Its, change the Reminder Dates to sometime in the future on all of the applicable Post-Its, or simply delete the applicable Post-Its. 48
49 Abatements Abatements are generated in the Assessing office and are a reduction in a taxpayer's amount owed. In Avitar Tax Collect you have two options for posting an abatement and it's important to understand the fundamental difference between the two types of abatements. An Ending Balance Abatement will automatically abate the entire remaining principal amount of the bill. A Beginning Balance abatement is used to enter a partial abatement. Refer to RSA 76:16 Abatements Abatement - Beginning Balance Beginning balance abatement is used to enter a partial abatement to an invoice. When you enter a Beginning Balance abatement, you are telling the system that the billed amount should be reduced and any previously posted late payments should be charged interest based on the lowered principal amount. With this in mind, if any late payments, posted within this fiscal year, had been made prior to the posting of the Beginning Balance abatement, they were charged too much interest. As such, when you post a Beginning Balance abatement, Avitar Tax Collect will look to see if late payments were made within this fiscal year. If there were, the payments are recalculated and adjusted to reflect interest charged on the adjusted principal amount. This will show the payment with more principal and less interest paid. However, if there were no late payments, the system will lower the principal amount owed and calculate interest on this amount going forward. Posting a Beginning Balance abatement could also create a credit. If the property owner paid his bill and was granted an abatement, the property owner is due a refund for the amount of the abatement. Some tax collectors will not post a refund abatement in the system, however, as long as the payment was made within the current fiscal year, Avitar Tax Collect will allow you to post the abatement and then process the overpayment as a refund (see Assign Credit to Payables). To process a Beginning Balance abatement, search and select the invoice using the Receivables Data Access Tabs. Once the Invoice is selected choose Abate Beginning Balance. The Abate Beginning Balance dialog box displays. 49

50 Select the transaction date and enter the amount of the abatement in the text box provided. The Reference Number text box is optional and is used to enter a unique number for each abatement. Once the information is complete, click the Abate button. If the abatement affected a previous deposit(s), after posting the abatement, the system will display an Affected Deposit dialog box prompting you to reprint the deposit(s). A copy of this updated deposit should also be given to the Treasurer/Bookkeeper. Abatement - Ending Balance The Ending Balance abatement is used to eliminate the total principal amount owed on an invoice. To process an Ending Balance abatement, search and select the invoice using the Receivables Data Access Tabs. Once the Invoice is selected, choose Abate Ending Balance. The Abate Ending Balance dialog box is displayed. As you selected to process and Ending Balance Abatement, the system defaults the abatement amount to the principal amount owed on this invoice. The only information you can enter in this dialog box is the Reference Number. This is an optional field and is used to enter a unique number for each abatement. Once the information is complete, select Abate. If a penalty had been posted to the invoice, a dialog box will display asking whether you wish to wipe out the penalty with the 50
51 abatement. If you select Yes, the system will show an abatement for the principal and penalty amount. However, if you select No, the system will leave the penalty to be paid but the principal amount will be gone. If you do not want to leave the penalty as owed and do not want to abate it, you can delete the penalty prior to posting the abatement (see Delete Penalty). Note, with Ending Balance Abatements it is not necessary (and in fact it's impossible) to abate interest when you abate the entire outstanding bill amount the interest will disappear as well. Delete Abatement The Delete Abatement function allows you to delete an abatement that was posted in the current fiscal year. This means that if you posted an abatement in the prior fiscal year, you will not be allowed to delete it in your current fiscal year. To Delete an Abatement, search and select the invoice using the Receivables Data Access Tabs. Once you have selected the invoice choose Abate Delete Abatement. The Delete Abatement dialog box displays. Click the Delete button to finish the process. Refund Abatement Abatement Refunds are used in some towns to process an abatement on an invoice paid in a prior fiscal year. Note, if you are processing an Abatement Refund to an invoice that was paid in the current fiscal year, you will not follow this process -- you will post a beginning balance abatement and assign the subsequent credit to payables. If you are unsure on whether you should use this process, call Avitar. To post an Abatement Refund, go to your Prior Years database and select the invoice for the property you want to abate (i.e. 2007P02). From the Main Menu, select Abate Refund Abatement. Enter the abatement amount, reference number (if applicable), and the refund check number. Once the information is complete, click Create. This will now create an abatement and a refund on the current Monthly Balance, Collection Year to Date, and MS-61. To print an abatement report showing this transaction, you must go to your Current Year database. If you have posted an Abatement Refund and need to delete it, you need to go to the Prior Years database and select the invoice to which you posted the Abatement Refund. From the Main Menu, select Abate Delete Abatement. When the Delete Abatement dialog box displays, click Delete. Abatements Report The Abatements Report is a compilation of the abatements posted during this fiscal year. The report can be viewed and printed for a specific date range or for the complete year. You have the option of including the deleted abatements in this report. To include the deleted abatements, on the Abatements Report dialog box, click the Include Deleted Abatements check box. The original abatement will show on the report as it was posted and a subsequent posting will show the reversal. Both entries will have a line through them indicating they have been deleted. Also, if you use the Abatement Refund process (see Refund Abatement), they will display on the bottom of the 51

52 Abatement report as a separate entry and total. This report should be used for your monthly and yearly balancing. To view and print the Abatements Report, from the main menu select Reports Abatements. The Abatements Report dialog box displays. Select the date range for the report. If you want the report to display the deleted abatements, select the Include Deleted Abatements check box. To see the report, click View. (For information on Printing and /or Exporting see Printing or Exporting Reports.) 52

53 The Warrant Process The Avitar Tax Collect system offers a full range of Warrant capabilities. Its full integration with the Avitar Assessing system simplifies the process of owner updates and tax warrant importation. The warrant process begins with the import of a warrant, assigning credit to the warrant, printing bills, and ends with an export file for the Real Estate Services. There is also the Supplemental warrants process, which includes, but is not limited to, Timber Tax, Current Use Change Tax, and Gravel Tax. Import Warrant The Import Warrant function is used to import warrants from the Avitar Assessing and Utility Billing systems. The options for Utility Billing will only be available if the Avitar Utility Billing program is installed or if other arrangements have been made to import a third party product. A warrant cannot be imported until it has been formalized in the Assessing system or exported in the Utility Billing system. Before importing any warrant, it is a good idea to create a backup of the Tax Collect database in the event a problem with the warrant is subsequently identified (see Backup Database). To Import a Warrant from the main menu choose Utilities Import Warrant. Select the appropriate warrant and select Next. If the selected warrant type is found a totals dialog box will display showing pertinent data to be verified to the printed warrant from the Selectmen. The totals on this page and the totals from the warrant must match exactly. If all your totals match, enter the Bill Due Date for your bills and select Import. A dialog box will display verifying the bill due date. If it is correct, select Yes to continue, otherwise select No to change the date. 53

54 If your municipality has Districts defined in Assessing, a Defined Taxable Districts dialog box displays. This box is designed to verify that the Districts configured in Assessing are the same as those configured in the Avitar Tax Collect System. If they match, select Continue. (Note that the most important factor is the Districts are in the identical sequence and named similarly they do not have to be named identically in order to proceed.) If they do not match, you need to close the process and update the Districts before proceeding (see Districts/Precincts Tab). Video - Import Warrant Assign Credits to Warrant Function The Assign Credits to Warrant function enables you to review and assign all of your outstanding credits in a single dialog box, without the need to flip back and forth between the Receipts and the Receivables tabs as you would do when assigning a single credit. To Assign Credits to Warrant choose Utilities Assign Credits To Warrant. As the dialog box loads, it will display all of the outstanding credits down the left side of the window. When Assigning Credits to Warrant, you can change the sort order by which the credits are displayed. They can be sorted by Payer Name, PID, or by Receipt Number. The system defaults to displaying them alphabetically by Payer Name. To change the sort order, click on the heading 54
55 Credits By Payer. This will display the Credit Sort Order dialog box. Click on the radio button next to the option you want and select OK. The credits will now display in the order you requested. Use the scroll bar on the right to see the entire list. Initially, the credits are not matched or assigned to any invoices. To begin the process, select the warrant to which you want to assign the credits using the Warrant To Which Credits Will Be Applied drop down box. Generally this will be the warrant that you just imported and for which you are preparing to print tax bills. However, it could be any warrant in the database. Once you have selected the warrant, the system will review each outstanding credit and attempt to locate the most likely invoice on that warrant to which the credit should be applied. This decision will be made based on the way in which your database has been configured, but typically it will first try to match the PID that may have been associated with the credit to the PID of an invoice on the warrant. If no possible match is made for a credit based on PID, it will then attempt to match invoices by comparing the payer name from the credit with the owner name on the invoice. Regardless of the method used, if the system makes a potential match for a credit it will display the corresponding invoice information to the right of the credit information. If no possible match can be identified, it will indicate "No Unpaid Invoice Found." Once the system has suggested possible invoice matches for your outstanding credits, it is up to you to scroll through the list of possible matches to finalize or revise any credit assignments. Note that the system will make suggestions and make it easier for you to assign the credits, but the final decision is still up to you. Use the scroll bar to review the list of credits and possible assignments. If the system has suggested a possible credit/invoice match with which you agree, use the check box to the left of the credit payer's name to indicate that you wish to assign the credit to the displayed invoice. 55

56 If the system has suggested a possible credit/invoice match with which you disagree, you can simply leave the corresponding check box unchecked and the credit will not be assigned to any credit. Alternatively, you can use the Locate Bill button to the far right of each credit to select the correct invoice for the credit. Once you have manually located an invoice for the credit, make sure to check the corresponding check box to indicate you wish to assign the credit to the bill you just found. Finally, if the system has not suggested a possible credit/invoice match you can also use the Locate Bill button to the far right of each credit to select the correct invoice for a credit. When you check the credit assignment check box, the system will calculate the payment that will be made to the invoice. Typically, you will be using this function to assign credits prior to printing bills so there will not be any interest due on the invoices. However, if you are using this function after the due date of the selected warrant has passed, the system will calculate any interest due based on the effective date of the credit. Thus, if the credit was received last year and you are just assigning it today, three weeks after the due date of the invoice, the system will not charge any interest during the assignment of the credit since you have had the tax payer's money since long before the bill due date. To see the interest date used by the system, hold your cursor over the Interest/Penalties amount for the invoice. Once you have reviewed the credit/invoice assignments and indicated the credits you wish to assign using the corresponding checkbox you must next print a report of the matches using the 56
57 Print Assignments button. After you have printed the assignment report, press the Assign Credits button to assign the selected credits to the corresponding invoices. There are a few additional items worth noting for the Assign Credits To Warrant function: The system will prevent you from assigning more than one credit to a single invoice at one time. For example, imagine a tax payer who makes weekly prepayments of $50.00 for 12 weeks prior to the issuance of the property tax warrant. By the time the tax bill is imported, the tax payer will have 12 outstanding credits, each in the amount of $ If these credits are all to be assigned to a single property tax invoice, you will need to either do it manually (see Assign Credit to Receivables) or you will need to use the Assign Credits To Warrant function recursively to assign the subsequent credits. In any event, the system will warn you when you are assigning more than one credit to a single invoice and prevent you from doing so. You can only assign outstanding credits to a single warrant at a time, but you can recursively use the Assign Credits To Warrant function. For example, if you import a water and a sewer warrant at the same time, you will have to select one of the warrants first. Then indicate the credits you wish to assign, print the assignments, and assign the credits. Once you are done with the first warrant, the system will refresh the list of outstanding credits and if there are any remaining you can immediately select the second warrant and proceed with assigning the remaining credits. You cannot save the credit assignment selections you have made without actually assigning them. That is, if you start the process, select a warrant, carefully review the credit assignments, and then somebody comes to the window to pay their taxes and you close out of the Assign Credits To Warrant function, you will need to restart the process again. The system will warn you when you are about to discard any assignment information. The function is not available in towns in which discounts are given for early payment. In this situation, credits must be assigned manually as there are a number of other factors involved when discounts are provided (see Assign Credit to Receivables). Print Tax Bills The Print Tax Bill function will assist you in printing tax bills. There are many options in printing bills, as well as the format of the bill itself. You can choose from the traditional 3 part bill form, where the bottom third is removed and retained at the town office before mailing the other two thirds to the taxpayer. The taxpayer would then keep the middle portion for his or her records and return the top portion with the payment. The alternate tax bill format was designed to be sent to the taxpayer and they return the bottom third with the payment (see Tax Bill Setup). If you elect to use the alternate tax bill format, you must make certain to either print a duplicate set of bills (the entire page) to retain for your records, or you should export a copy of the bills to PDF format for reference. To Print Tax bills, choose Utilities Print Tax Bills. A warning dialog box may display if you have unassigned credits. If you are not sure if the credits need to be assigned, select No to review 57

58 the credits and if need be, assign the credits (see Assign Credits to Warrant Function). If you are satisfied the credits should not be assigned select Yes to continue. The Tax Bill Setup dialog box displays with many options. The first step is to select the Warrant to Print by using the dropdown box. Once the Warrant is selected, the program provides you with the flexibility to print all invoices or to only print supplemental invoices. When selecting to print only supplemental invoices you may choose between printing the bills by Invoice Numbers or by the invoice date by selecting the appropriate radio button. There are two additional check boxes at the bottom of the window. The first, Include Invoices With Zero Due Amounts, is used to send or exclude bills with a zero due amount. For example, if you choose not to send these bills, anyone one who had a credit assigned that paid off their entire bill, will not receive a bill. The next check box, Include Exempt Invoices, allows you to print bills for properties that are exempt (e.g. municipal buildings, schools, churches). A check mark in the box means you have selected this option, if you do not want these options click in the box to delete the check. Once your selections are complete, select Next and a dialog box displays telling you the number of tax bills to be printed. Click Yes to display the Tax Bill Setup dialog box. 58

59 Depending on the tax bill format you selected, the Tax Bill Setup screen will display slightly different. The traditional bill format offers two message text boxes that can be used for important information you want your tax payers to know, or they can be left blank. The alternate bill format has more room for messages, so the message text boxes are removed and an Include Custom Message link has been added, which gives you additional formatting option. 59

60 The Return Address and Tax Collector & Office Hours fields are populated from the Town Settings table (see Town Settings). However, if you need to change or update any of the information you can type the changes into the text boxes without having to exit the process. The Warrant Number text boxes will default to the number of this billing for the warrant you select. For example, if you selected to print your 2009P02 warrant, the text boxes would default to 2 of 2. If this information is incorrect, type in the correct information in the text boxes. Select Next to continue. The Tax Bill Setup dialog box will display. 60

61 This screen will allow you to designate which unpaid amounts, if any, from other warrants you wish to include as Other Due amounts on the tax bill. Some of our towns bill for Water and Sewer in the Collect system, however, they do not want to include them in the Other Due amount section on their property bills. In order to accommodate all our clients, we offer the following options: Indicate which unpaid warrant to include in the Other Due Amounts: Do not include any Other Due Amounts -- This option will eliminate other due amounts from printing on the bills. Include Other Due Amounts for all currently unpaid balance on invoices due prior to the due date for the 2011P01 (or the bills you have selected to print) -- Selecting this option will include Other Due Amounts which will be overdue as of the due date of the bills you are printing. For example, you have a timber tax bill with a due date of June 15th and the 2011P01, which you are about to print, have a due date of July 1st. Using this selection, the timber tax bill would be included as an Other Due Amount. If the timber tax had a due date of July 15th, it would not have been included. Include Other Due Amounts for all currently unpaid balance on invoices due prior to the specified date -- This option offers more flexibility, as it will allow you to specify the cut off date for which you do not want to include invoices as Other Due Amounts. Using the timber tax example 61
62 with a due date of June 15th, if you want to include other unpaid invoices, but not the timber tax, you could select this option and set the date to June 14th. Then all outstanding invoices due on or before June 14th will be included, but not the timber tax. Filter Warrants -- This check box is used in conjunction to the last two due date options and allows you the option of selecting the warrants you want included. For instance, you might want to include every warrant except the Water/Sewer bills. Select Filter Warrant and check each warrant you want included. Interest on Other Due Amounts: Do not include Interest on Other Due Amounts-- If you decide to include Other Due Amounts, you can now select to not include interest to the due date of the billing. In the past, the Other Due Amounts included interest to the due date of the bills you were printing. For example, you are printing your 2011P01 with a due date of July 1, 2011 and several taxpayers have outstanding 2010L01 invoices. Typically, the Other Due Amounts for 2010L01 invoices would include interest calculated to July 1, Selecting this option would only print the principal amount owed for the lien. Include Interest on Other Due Amounts calculated as of the due date for 2011P01 (or the bills you have selected to print) -- This option is how the system has worked in the past, which means any Other Due Amounts will be shown with interest through the due date of the bill you are printing. The drawback to this is that taxpayers who pay prior to the due date of the current bill will actually overpay if they include the exact Other Due Amount indicated on the bill, as this amount includes interest up to the due date. There's no perfect solution, which is why the Other Due Amounts message indicates the taxpayer should call for proper payment amount. Once you have made your Other Due Amount preferences, they will be saved. So, as long as your selections are still valid, you will be able to skip past this section the next time you create bills. However, if you selected an option with a date, you will need to change the date each time you process bills. Click Next to advance to the second Tax Bill Setup screen. 62
63 There are three print options: The Print All Bills radio button allows you the ability to print all the bills for the selected warrant. The Print By Billed Name radio button allows you to print bills for an individual or group of owners. This selection is commonly used when you have a printer error and you need to reprint a group of bills. Select an owner from the grid by clicking on the owner name. If you only need to print this bill, that is all you have to do. If you need to print a group of bills, highlight the first record to be printed and while holding down the shift key, scroll to the last record you wish to print and select it. The Print By Bill Count radio button allows you to print a range of bills by entering the appropriate page range, keeping in mind that each bill is a page. The Generate PDF Invoices for Tax Kiosk radio button (only visible as part of the Comprehensive Tax Kiosk configuration) allows you to create PDFs of your tax bills that will be uploaded to the Tax Kiosk. This process should be completed at the time you are printing tax bills. (See Creating PDF Invoices for Paperless Notification ) The next option is the Sort By, which will tell the system in what order you want the bills to print (Name, PID, Zip). Finally, use the month date picker to update the Print Date text box. The date you select is the date that will print on the tax bills. 63
64 If you are using an outside agency to print your tax bills, select Export. The Browse for Folder dialog box displays. Use this dialog box to tell the system where you want the file to be saved. We recommend your desktop, as it is easy to find the files. The export will create a file on your desktop that is named TAXxxxxP0x.TXT (e.g. TAX2009P02.TXT for the nd issue billing). This file will need to be sent to the outside printing agency. If you print your bills in house, select Print. After confirming the Print Date, the first Bill image will display. Note, when printing tax bills within the Tax Collect system, traditional paper invoices will not be generated for parcels on which the taxpayer has opted-in for Paperless Notification. You can click on the right arrow to advance through the bill file to display each individual bill and the left arrow to go back. Make sure all the information is correct and then click on the printer icon to print the bills. Display of "Current Use Credit" on Tax Bills To eliminate confusion among tax payers regarding the "Current Use Credit" displayed on tax bills we have removed it as a separate line item displayed in the assessment information. Instead of displaying "Land Value", "Current Use Credit", and "Building Value" on the tax bill, the bill will just display "Taxable Land Value" and "Building Value." The single "Taxable Land Value" is equal to the "Land Value" minus any "Current Use Credit" -- shown as a single number rather than two. If a parcel has current use, the bill will display a message indicating "**Taxable Land Value Includes Current Use**" so that tax payers will know their assessments still reflect their current use assessments. Note: If you want to print the tax bills with the separate "Current Use Credit" line item (however confusing it may be to your taxpayers) you can configure your system to do so. To configure it to print the old way, select Utilities Town Settings. Click on the Miscellaneous Tab and then check the "Display Current Use Credit as separate assessment on Property Tax Bill" box on the Tax Bill Setup tab. Video - Creating a PDF File of Tax Bills Real Estate Services The Real Estate Services function allows you to export your tax warrant information and subsequently import payments back into the system from various Real Estate Service companies. Export Invoices The Export Invoice function allows you to export your billing information to a file that can be sent to the Real Estate Tax Services. This function can be used to export information on a specific warrant, usually created at time of billing, or to export your unpaid invoice amounts for all warrants. 64


65 To Export Invoices, choose Utilities Real Estate Services Export Invoices. The Export Real Estate Services Data dialog box displays. The Warrant drop-down box allows you to select the warrant you wish to export. If you select ALL, you will only be able to import payment back from the file if the warrants all have the same due date. The ALL selection is commonly used by Real Estate Services to gather information on all your unpaid Invoices. The Filter Warrants check box will enable the Set Warrant Filter link allowing you the option of selecting individual warrants that you want to include in the file. The system defaults to Only Export Unpaid Invoices by automatically putting a check in the check box. If you want to export all Invoices, click in the check box to deselect. The Export Location tells the system where you want the file to be saved. Select Browse to locate the destination. The system defaults to the a drive, as many of the services in the past have sent a floppy disk. However, more of the Tax Services now want the file through , so you will need to save the file to a convenient location for attachment in an . We recommend saving the file to your desktop. Once you have completed your selections, click Export. The following message box displays: 65

66 The export creates two files. The tretts.txt file contains the billing information and the treadme.txt contains documentation on reading the file for the Real Estate Tax Services. Note: You must , or send, both files. Process Payments The Import Payments function is used to import payments from a file that you received from the Real Estate Tax Services. When the payments are applied through the Real Estate Service process, an individual receipt will be created for each payment. For example, if TD Bank pays five invoices with one check, you will have five individual receipts, each with any corresponding overpayment amount maintained individually. Also, it is recommended that you do not have an open deposit, as the import will post payments to that deposit. Also, before importing payments, create a backup (see Backup Database). The first step to Processing Payments is to save the file the Real Estate Service has sent you to your desktop (if the file already exists on your desktop, you should delete it before beginning this process). To import the payments choose Utilities Real Estate Services Process Payments. The Real Estate Services Process Payments function has three tabs that reflect the sequence of tasks associated with the process: Import Payments, Edit Imported Payments, and then Apply Payments. Import Payments: The Import Payments tab is used to locate and import the payments from the Tax Services. Select Browse to change the default import location, which is the A:\ drive to a different location. If you saved the file to your desktop, you will need to select Desktop from the Browse for Folder dialog box. Once you have located the file select Import Payments. The system will begin the import process. When the import is complete, an Import Complete dialog box will display stating how many payments were imported. This should match what the Tax Service sent you. 66
67 Edit Imported Payments: The Edit Imported Payments tab is used to print the bank report to reconcile with the report from the Tax Service and to make corrections if necessary. Once you have imported the payments, select the Edit Imported Payments tab, where you will see an alphabetical tree view, which you can browse through looking at individual payments. To make sure the payments imported correctly, click Print Bank Report. Compare this to the Tax Services information, making sure the total amounts match. If you need to a payment, find the owner in the treeview and select the payment you wish to edit. This will display the payment information. 67

68 There are three options available when editing a payment, each is associated with one of the icons. You can hover your pointer over each icon for a tooltip until you are familiar with each icon's function. The three functions are: delete payer from the batch; assign payment to a different invoice; or assign payment to a credit. Delete Payer from the Batch -- This deletes the entire payment from the current batch process. For example, if there are problems with a check from one bank you may wish to return the check to the bank and remove all of those payments from the payment batch. We recommend you print the payment report before proceeding with this selection so you will know how the bank meant to apply the payment. Assign Payment to a Different Invoice -- This allows you to browse through a treeview and select a different invoice for payment. For instance, the bank may incorrectly associate the payment with the wrong owner or parcel and you want to assign the payment to the correct person. Select the payment, click the icon, find the correct invoice to which the payment should be applied, and press Select. Assign the Payment to a Credit -- This selection allows you to remove the application of the selected payment from the specified invoice and instead maintain the amount as a credit. Once you have made the changes, you should print the bank report, which will show the updated information. Apply Payments: 68

69 The Apply Payments tab is used to finalize the import process and post the payments to the appropriate invoices. The Effective Date For Payments is the date on which you want the payments to be posted. For example, if the due date is July 1st and you received the disk on July 2nd with a post mark of July 1st, you would select July 1st as the Effective Date. If you selected July 2nd the system would calculate and apply interest for each payment received. The effective date is very important as you can not apply a payment to an invoice that has already been paid with a date after your effective date. To verify, select Print Warnings. If there are warnings, verify the dates you are using before continuing. If there are no warnings, select Apply Payments. The system will apply the payments to the selected invoices. After the payments are posted you should make a deposit to complete the process (See Creating a Deposit). Supplemental Warrant The Supplemental Warrant function is used to manually enter a warrant, such as Timber, Gravel, Current Use Change Tax, and an individual Property bill. To add a Supplemental Warrant, choose Utilities Supplemental Warrant. The Add Supplemental Bill dialog box displays. 69
 and designate the year of the tax.")
70 The Warrant dropdown box displays a list of warrants available in the system. You can select a warrant from this list or select New Warrant to add a warrant. When adding a New Warrant, select the warrant type, (e.g. Gravel Yield Tax, Timber Yield Tax, etc.) and designate the year of the tax. Select Add Warrant, which will bring you back to the Add Supplemental Bill dialog box with the new warrant. Type in the Map, Lot, and Sublot, tabbing after each field. If the Map/Lot/Sub exists in the database, all the pertinent information on the parcel will display. If the Map/Lot/Sub is not accurate, the owner information will be blank. Most of the time you should have an owner display, but if you do not and the information is correct, you can manually enter all the missing owner information in the appropriate text boxes. However, manually adding the information is not recommended. The Interest Percent text box will default to the interest rate for the warrant you selected. For example, if you selected a Timber Tax warrant type, the interest will default to eighteen. If the interest rate is incorrect, type the correct rate into the text box. The Bill Due Date text box is used to tell the system when the bill is due before interest starts accruing. Next, enter the amount of the bill into the Amount text box. The Acres text box is populated based on the owner information for that Map/Parcel/Sub and the Ref No is used to enter a unique number for each supplemental bill. Review the information entered for accuracy and select Add. 70

71 A message box will display stating the Supplement was successfully added and it will ask if you wish to maintain owner information for entering another invoice. Select Yes if you have another supplement to add for this owner, or No to enter the next supplement. If you are done, select Close. Note, if you had the Owner or PID selected before entering the Supplemental Warrant process, in order to see the invoice in the tree views on the program's main screen you will need to Refresh List. To refresh the list, choose File Refresh List. Delete Supplement The Delete Supplement function is used to delete a supplemental warrant that was entered incorrectly. To delete a supplement, search and select the supplement to delete using the Receivables Data Access Tabs. With the supplement selected, choose Edit Invoice Delete Supplement. You will be asked to verify that you want to delete the supplement. The system will not allow you to delete the supplement if any transactions have been posted to this invoice or if the invoice was supplemented in a previous month. Also, if you are using the ADS Profund integration you will need to notify your bookkeeper or treasurer of the deleted supplement as they will need to make a manual journal entry correction on the ADS side. Supplements Report The Supplements Report will produce a list of supplemental warrants entered into the system for this fiscal year. There are several options when creating the report. For example, you can create a report for a single warrant 71

72 type, such as 2009 Timber Tax and restrict it to only those supplemented for a certain date range. This assists in comparing what was entered into the Avitar Tax Collect system versus the warrant from the assessors. To produce a Supplements Report choose Reports Supplements. The Supplements Report dialog box displays. Select an individual warrant or use the default All Warrants to see every supplement for the current fiscal year. There are three radio buttons to narrow the search criteria: Included Supplements Supplemented: This option allows you to choose a specific date range for the report. Include Supplement Numbers: This option allows you to choose specific supplements based on the unique supplement number created by the system at the time the supplement was created. Include All Supplements for Warrant(s): This option allows you to choose all supplements for the specified warrant you selected. Once you have selected one of the above options, click View. The report displays on the screen. Change Due Date The Change Due Date function allows for the adjustment of the due date of a supplemental warrant, which was entered incorrectly. Note: The due date cannot be changed after a payment has been posted. To Change Due Date, search and select the supplement using the Receivables Data Access Tabs. With the supplement selected choose Edit Invoice Change Due Date. The Change Due Date dialog box displays. Change the due date and select Update. A message box displays asking you to confirm the date change. 72
73 Refresh Lists Refresh Lists is used to update values previously displayed in the Data Access Tab tree view after a change has been made to the database. For example, in order to display a supplemental warrant you just added to the system, you will need to Refresh Lists before looking up the invoice. This will repopulate the data displayed in the tree view based on the most recent changes. To Refresh List, choose File Refresh Lists. Add Additional Owners/Mail To The Additional Owners/Mail To feature allows you to send copies of notices and tax bills to multiple parties. You have the ability to distinguish between an Additional Owner (i.e. someone with a distinct ownership interest) and an Additional Mailto (e.g. someone wishing to receive a duplicate copy of a bill or notice). This is commonly used when there are several owners on a parcel and each has a separate mailing address. Once you have designated who is an additional owner in the system, all owners (both the first owner of record and any additional) will receive copies of each notice (e.g. tax bill, lien notice, deed notice, etc.), as well as be included on all reports recorded at the Registry of Deeds. The software will automatically print duplicate copies of the following mailings in the event that an Additional Mail To is attached: Reminder Notice Delinquent Tax Notice Delinquent Utility Notice Lien Notice Tax Deed Notice Tax Bills The duplicate copies of the bills and notices listed above will be addressed to the additional party and clearly marked with a water marked Duplicate. Note: The duplicate copies will not divide the bill into equal parts to be paid by the taxpayer and any Additional Mail To recipients. It will only send a duplicate of the original bill to each Additional Mail To recipient. To add an Additional Owner, or designate an existing Mailto as an Additional Owner, from the main menu select Edit Invoice Add Additional Owner/Mailto. If the parcel has an existing Additional Mailto that needs to be changed to an Additional Owner, select their name and click Modify. Select This recipient has an Ownership Interest in this parcel checkbox and click Save. To add a new owner to the parcel, from the main menu select Edit Invoice Add Additional Owner/Mailto. Select Create New. Check to see if the owner already exists in the system by clicking on the Existing Owners/Mailtos icon located at the top of the screen. In the Find box start typing the owner s last name to advance through the list. If the owner is in the list, click on their name and click Select. If the owner is not in the list, select Cancel to enter the owner s information in the text boxes. Once you have added/selected the owner, select This recipient has an Ownership Interest in this parcel checkbox and click Save. 73
74 Note, that a parcel can have Additional Owners and Additional Mailtos. You will add all of them to the system the same way, e.g Edit Invoice Add Additional Owner/Mailto, except when you want to designate them as an Additional Owner, you will select This recipient has an Ownership Interest in this parcel checkbox. If this parcel has an existing Additional Mail To recipient, it will be displayed. To delete or edit an existing Additional Mail To select Modify. Make the change in the text boxes and click Save. If you do not want this recipient select Delete. To add an Additional Mail To select Create New, enter the information in the text boxes, and click Save. The recipient will be displayed. To assist you with finding Additional Owners/Mailto, you can select Edit Invoice Find Additional Owner/Mailto. If you want to find a specific invoice for an owner, type the owner s last name into the Find text box and select the Find button to execute the query. Any matching invoices will be returned as your current record set. Use the Next or Previous buttons on the toolbar to maneuver through the invoices until you have found the one you are looking for. You can also select View to display a report of all additional owners and which parcels they are attached to. 74

75 Get Appraisal Owners The Get Appraisal Owners function is used in conjunction with the Avitar Assessing software and allows you to update the Avitar Tax Collect system with the changes made in assessing. This function is usually run monthly after any deed changes are made in Assessing. There are two times a year you do not want to Get Appraisal Owners, after you have sent your lien and deed notices. Once you send these notices, owner changes cannot be made because the owner you sent the notice to must be the owner you lien and/or deed. To Get Appraisal Owners choose Utilities Get Appraisal Owners. The Import Owners dialog box displays with two options, Only For Owners That Have Been Edited by Assessing and For All Owners Maintained In Assessing. The first option tells the system to look for only the owners that have had changes made in Assessing (e.g. ownership and/or name changes; updated addresses). The second option tells the system to check every owner in assessing and compare it with the owners in collect and update the information that has changed. The Verify Billing History For All Owners check box under the second option tells the system that you want to compare every owner and billing file in Tax Collect with every owner in Assessing. (Note: The Verify Billing History process can take a while to run.) Select one of the options and select Import. Once the import is complete a message will display stating the import was successful. When you click OK, another message will display asking if you want to generate a report of the changes. If you do not print the report at this time, you will not be able to reproduce it later. Note that the Get Appraisal Owners function only updates the Current Owner on each invoice the Billed Owner on an invoice remains unchanged for the entire life of the invoice. Also, depending on the information you maintain in collect such as Additional Mail To s, Mortgagees, Bankruptcies, Paperless Invoices, the import process will identify parcels which changes were made to and provide a report showing the changes. However, the following reports will only display if changes were made in assessing to an owner and/or parcel. Note if you do not generate any of the following reports at the time of the import, you will not be able to reproduce them later. We recommend printing or exporting each report. 75
76 Paperless: When you start the import process, the system will prompt you to connect to the Tax Kiosk in order to verify if any of the parcels that had changes made in assessing also are utilizing Paperless Notification. Note a message will only display if you offer Paperless Notification to your tax payers. If the system finds a parcel designated as a Paperless Notification and changes were made to owners and/or address information, you will be prompted to print the Paperless Invoice Parcels report. You must review and change, if necessary, any parcel listed on the report to prevent them from continuing to be notified when they are no longer associated with the parcel s current owner. (see Suppress/Display Parcels) Additional Mail To: The import process will determine if changes were made to owners and/or address information for parcels that have Additional Mail To recipients. If changes were made, the Additional Mail To recipients must be reviewed and changed, if necessary, to prevent them from continuing to be notified when they are no longer associated with the parcel s current owner. Mortgagees: The import process will determine if changes were made to owners and/or address information for parcels that have Mortgagees. The Mortgagees must be reviewed and changed if necessary to prevent them from continuing to be notified when they are no longer associated with the parcel s current owner. Report of Changes: The system will create a report of imported owner/address changes. 76
77 Customize Notices You may customize the notices that you typically send to taxpayers to allow you more flexibility. There are four formatting options: Header Options; Digital Signatures; Fold Hash Marks; Custom Messages. When you implement the formatting options available in the system it will apply to the following notices: Reminder of Unpaid Taxes Delinquent Tax Notice Delinquent Utility Notice Lien Notice Mortgagee Lien Notice Deed Notice Activity Report Header Options You may select any one of three various configurations for the header portion of notices. Left Return Address Labels, Right Office Information Labels, Center All Labels, and Use Custom Image. To change the settings choose Utilities Town Settings Miscellaneous Notice Format Header. You have the following three options: Left Return Address Labels, Right Office Information Labels -- You can choose this option so that your return address information will appear in the upper left corner of each notice, suitable for use with a #10 double window envelope. The office information (i.e. location, phone number, hours) will appear in the upper right corner of the notice. Center All Labels -- You can choose this option to center all information (i.e. office information and address) in the notice header. Use Custom Image -- You can choose this option if you wish to add a custom image or letterhead to the header of each notice. You should use a JPG image that is approximately four times as wide as it is high (e.g X pixels) to avoid it being stretched. For more information on using a Custom Image contact Avitar. Digital Signatures You can add an image of your scanned signature that will appear on the signature line of every notice. This will save you from having to autograph an entire stack of notices prior to mailing. For information on how to add a digital signature contact Avitar. Fold Hash Marks You have the option to add fold hash marks to notices. The fold hash marks appear as two small dotted lines on either side of the top third of the notice. By folding along the hash marks you can more easily fold notices so that they fit correctly in the envelope. To enable or change the hash marks settings choose Utilities Town Settings Miscellaneous Notice Format Fold Hash Marks. To enable, check the Print Fold Hash Marks on Notices check box. The default value is the distance (measured in some obscure printer units) from the top of the page where the hash marks will appear. Invariably, you will have to print a sample notice and adjust the default value up or down to accommodate your specific printer. 77
78 Custom Messages When printing the notices, you have the option of adding a custom message to the text that already appears on each notice. To do so, click on the Include Custom Message link on the setup dialog box for any notice. Using the custom message dialog box, enter any message, as well as the font size and the alignment for the message. Select Save and print the notice. You will notice the custom message appears following the standard text of each notice. Note: Each notice has its own unique custom message that will remain in effect until you edit or remove it. Once a notice has a custom message, the Include Custom Message link will instead appear as Update Custom Message. To edit the message, simply click on the link and edit. To remove an existing custom message, click on the Update Custom Message link, highlight and delete the existing message, and press Save. 78

79 Reminder Notice The Reminder notice may be used to remind taxpayers of unpaid taxes prior to sending the Delinquent Notice with all of its threatening language of the liening and deeding processes. Some Collectors will use this function between the first and second billings to remind delinquent taxpayers that interest is accumulating on the unpaid first bill. To send Reminder Notices choose Utilities Reminder Notice. The Reminder of Unpaid Taxes dialog box displays. The Include Records Due On Or Before tells the system what records should be included in the notice. This date should reflect any due dates of supplements you want included. For example, if you created a Timber Tax supplement that was due on 01/15/2010, you would need to Include Records Due On Or Before 01/15/2010. The Interest Date will display the total interest owed based on the date you enter. To include a custom message to the notice, select the Include Custom Message link (See Customize Notices). Note, you can send the reminder notice to everyone for any unpaid warrant, or you can select specific warrants by selecting the Filter Warrants checkbox. The Filter Warrants option allows you more flexibility when running the notices. Some tax collectors like to print a Reminder Notice for only the current year taxes. For instance, this process could be used in September to send a Reminder notice for only the 2010P01 delinquent bills. To filter the warrants, select the Filter Warrants check box on the dialog box. Click on the Set Warrant Filter link to choose the warrants you want to include. You can select the individual check boxes of the specific warrants, or you can use the links at the bottom of the Warrant Filter dialog 79
80 box to select entire categories of warrants. Once you set a Warrant Filter, it will remain available until you close the application. Once you have made your selections, click Print List to view and/or print a recipient report. Then select Print Notices to view and/or print the notices. 80
81 Bankruptcy Flag Due to court rulings, an owner who has filed for bankruptcy must have additional information sent with the delinquent and lien notices. Avitar decided not to add wording to our letters, as some of our clients want to include the additional wording on every letter, others only want the wording on the notices affected by bankruptcy, and some want to use customized wording their own town attorneys have recommended. In order to comply with the court decision, you have several options. The first option is to add the new wording as a custom message to every notice. Note, depending on how much information you are adding, this may make the notices print on two pages. The second option is to add a custom message stating If in Bankruptcy, see back of notice for important information. Then photocopy the wording onto the back of each notice. The final option would be to enclose a separate notice with the bankruptcy wording in with the Avitar notice. This would allow you to send it to everyone or just the owners in bankruptcy. Although we decided not to change the wording, we wanted to assist you in knowing who had filed for bankruptcy, so we added the ability to place a flag on parcels for which the owner is presently involved in bankruptcy proceedings. To flag an owner as bankrupt, locate the parcel in question and select an invoice. Then go to Edit Invoice Parcel Bankruptcy. The Parcel Bankruptcy dialog box displays. To place a bankruptcy flag on this owner, click the Owner Has Filed For Bankruptcy check box. If you know the bankruptcy filing date, uncheck the Not Known check box to enable the month date picker. Select the date and click OK. Once a parcel has been flagged when you select an invoice on which the Bankruptcy Indicator has been set you will notice a red gavel icon next to the PID, also shown in red. Hover your mouse pointer over the icon to display the filing date. Prior to sending out notices or executing deeds, you should consult the report of parcels on which the Bankruptcy Indicator has been set so you can be aware of parcels that may need to be treated differently. To print the report, go to Reports Parcels Bankruptcies. 81

82 Delinquent Notices The Delinquent Notice is used to notify any property owner of delinquent tax and/or utility bills. You can print Delinquent Tax Notices, which can include outstanding utility bills, or you can print Delinquent Utility Notices as a separate notice. Delinquent Tax Notice The Delinquent Tax Notice, formally called the Barrington Notice, must be mailed within 90 days of the final bill due date per RSA 76:11-b. It is a notice to every delinquent taxpayer, listing all outstanding invoices, including interest and/or penalties. To produce the Delinquent Tax Notice choose Utilities Delinquent Tax Notice. The Delinquent Tax Notice dialog box displays. Fill in the following information: Include Records Due On Or Before: This date tells the system what records should be included in this notice. The date should reflect the due date of the final bill of the year. For example, if your fall bills were due January 5th, you would want the date 01/05/xxxx. Be sure to include any supplemental warrants that may have been issued with a due date after your fall billing. Omit Records Due On Or Before: This date is not used often. Therefore, it is grayed out making the field inactive. However, there are reasons when it is necessary to enable this function. For example, if you sent your delinquent notices already, but they did not include some supplemental warrants and now you need to send them a delinquent notice. If you follow the same procedure and change only the Include Records Due On or Before date, you will get all the notices that you already sent. To limit the criteria, you need to click in the Omit Records Due On Or Before check box to enable the date field. Then enter the due date from the last time you ran this process. 82
83 Mailing Date: This date will print on the notice and should reflect the date you are planning on mailing them. Lien Notice Date: This is the date you plan on mailing your certified lien notices to the taxpayer. By informing the taxpayer of this date, they can avoid the additional lien notice charges. Deeding Date: This is the date you are planning on executing your deeds. The Deeding Warrant text box is used to enter the levy year of the warrant you will be deeding this year. For example, in fiscal year 2009, you will be deeding you 2006 liens, so the Deeding Warrant will be 2006L. Once you have filled in all the fields, you can customize your notice by selecting the Include Customize Message link (see Custom Messages) or use the default notice provided. Note, you can send the delinquent notice to everyone for any unpaid warrant, or you can select specific warrants by selecting the Filter Warrants checkbox. The Filter Warrants option allows you more flexibility when running the notices. Some tax collectors like to print a delinquent notice for their unpaid utility warrants separate from all other the unpaid tax warrants. To filter the warrants, select the Filter Warrants check box on the dialog box. Click on the Set Warrant Filter link to choose the warrants you want to include. You can select the individual check boxes of the specific warrants, or you can use the links at the bottom of the Warrant Filter dialog box to select entire categories of warrants. Once you set a Warrant Filter, it will remain available until you close the application. Once you have made your selections, click Print List to review a report of everyone who will be receiving the notice, as well as what is owed as of the lien notice date. As long as everything looks correct, select Print Notices. You will be prompted to verify the deeding date and questioned if you would like to indicate the time of day by which payments must be paid. If you answer Yes, you will be asked to enter the time of day in the text box. This will tell the taxpayer they need to be at your office before this time or the extra charges, due to the lien process will be added to their account. After entering the time, the first notice will display. Look very carefully at all the dates and times on the notice to verify you have the correct information and print the notices (see Printing). Delinquent Utility Notice The Delinquent Utility Notice will provide a Delinquent Water/Sewer Notice, designed like the Delinquent Tax Notice, to every property owner who owes water/sewer bills. This option should only be used if you are not already including the outstanding utility bills with the delinquent tax notices. To process the Delinquent Utility Notices choose Utilities Delinquent Utility Notice. The Delinquent Utility Notice dialog box will display. 83

84 Fill in the following information: Include Records Due On Or Before: This date tells the system what records should be included in this notice. The date should reflect the due date of the final bill of the year. For example, if your fall bills were due January 5th, you would want the date 01/05/xxxx. Be sure to include any supplemental warrants that may have been issued with a due date after your quarterly billing. Mailing Date: This date will print on the notice and should reflect the date you are planning on mailing them. The Include Calculated Interest in Due Amounts check box is used if you charge interest on delinquent utility bills. If you do, check this box and select the date you want the interest calculated to. This will display on the notice. The Assign Late Penalties check box is used to post a penalty to every invoice meeting the criteria selected. For example, when you select Assign Late Penalties, the Assign Penalties to Warrant and Late Penalty Amount text boxes are enabled. Using the drop down menu, select the warrant that should receive a penalty. Then enter the amount of the penalty. Under the section Include Notice Message there are two options. Each option will add a message to the notice. To select the message, click in the check box....quarterly bills DO NOT reflect previous balances questions regarding usage should be directed to the Water & Sewer Department at.... When you select this message, the Phone Number text box is enabled allowing you to type in the phone number the customer should call if they have questions regarding the usage. Once you have filled in all the fields, you can customize your notice by selecting the Include Customize Message link (see Custom Messages) or use the default notice provided. Select Print List to review a report of everyone who will be receiving the notice, as well as what is owed as of the lien notice date. As long as everything 84
85 looks correct, select Print Notices. The first notice will be displayed. Look very carefully at all the dates and times on the notice to verify you have the correct information and print the notices (see Printing). 85
86 Tax Lien Process The Tax Lien Process is used to notify delinquent taxpayers that if their taxes are not paid by a certain date, a Tax Lien will be recorded at the Registry of Deeds. Taxes subject to the Lien process are: Betterment/Special Assessments Current Use Change Taxes Excavation Taxes (excavated materials) Property Taxes Resident Taxes Sewer Rents Water Rents Yield Taxes Lien Notice RSA 80:60 states, The collector shall give notice of the impending lien at least 30 days prior to the execution of said lien. Notice shall be sent by certified or registered mail return receipt requested, to the last known post office address of the current owner, if known, or of the person against whom the tax was assessed. The notice shall state the name of the current owner, if known, or the person against whom the tax was assessed, the description of the property as committed to the tax collector, the date and time on which the last payment shall be accepted, and the amount of the tax, interest, and costs to the date of executing the tax lien. The returned receipt or the returned unclaimed notice shall be prima facie evidence that the collector has complied with the notice requirements of this section. Before you begin the Tax Lien Notice process, there are a few things you should do. The first is to import any change of ownership or address changes from Assessing (see Get Appraisal Owners). After you send the lien notices, do not import changes from Assessing until after the lien execution, as the person you send the notice to must be the person you lien. The next step is to create a backup (see Backup Database). If a problem arises during the lien process, we can restore your data from this backup. To create the lien notices choose Utilities Lien Notice. The Lien Notice dialog box displays. Note: The dates displayed are the dates you entered the last time you created a new group. 86

87 Fill in the information as follows: Include Records Due On Or Before: This date tells the system what records should be included in this notice. The date should reflect the due date of the final bill of the year. For example, if your fall bills were due January 5th, you would want the date 01/05/xxxx. Be sure to include any supplemental warrants that may have been issued with a due date after your fall billing. Omit Records Due On Or Before: This date is not used often, therefore, it is grayed out making the field inactive. If you have any questions regarding this option, call Avitar. Warrant Year of Invoices: This should be the levy year you want to lien. The system defaults to All, but if do not want to include past years invoice that have not been liened, you should select only the year in which you wish to lien. For example, if you wish to lien all 2008 warrants, you would select 2008 from the drop down menu. Lien Execution Date: This is the date on which you intend to execute the lien, which must be at least 30 days from the lien notice being mailed. Fees: Put in appropriate fees from the latest Fee Schedule issued by the NHTCA. If you do not have the fee schedule and wish to obtain the most up to date amounts, go to the NH Tax Collector s website at nhtaxcollectors.com. Once the information is complete, select Create New Group. Note, if you created a group previously and posted expenses, you can select Edit Existing Group to reprint notices. After answering several questions, the Lien Notice dialog box displays. Select the mail date and then Print Lien List. Review the list to verify all the information is correct. 87
. This would create two records for this individual, showing cost of $18.00 for each parcel. You would need to make the second parcel a fee of $2.00. To change the fee, click on the fee to be changed in the grid and type the new fee.")
88 Adjust fees if necessary. Adjusting fees may be necessary for several reasons, but the most common is when the same ownership in property was entered, but the names were input slightly different (e.g. middle initial, period, etc.). This would create two records for this individual, showing cost of $18.00 for each parcel. You would need to make the second parcel a fee of $2.00. To change the fee, click on the fee to be changed in the grid and type the new fee. Reprint the list when changes are complete and keep with your copy of the Lien Notices. Should you choose to exit the Lien Notice procedure, your dates will be saved automatically. When you decide to go back into the process, simply choose Edit Existing Group. After printing the list and updating any cost, select Post Expenses to place the appropriate costs on each account notified. The Expenses must be posted before you are allowed to print the notice. You can create a message to be included on the lien notice by selecting the Include Custom Message (see Custom Messages). Once you are sure everything is correct, select Print Lien Notices. After the letters display on the screen, verify all the dates are correct and print the notices (see Printing). Make a copy of each letter to keep for your records. If you wish to use the system to print your Certified Forms, select Print Certified Forms and fill in the appropriate fees. Otherwise, you can select Print Labels. Lien Execute RSA 80:61 states, An affidavit of the execution of the tax lien to the municipality, county or state shall be delivered to the municipality by the tax collector on the day following the last date for payment of taxes as stated in the notice given in RSA 80:60. The collector shall execute to the municipality, county or state only a 100 percent common and undivided interest in the property and no portion thereof shall be executed in severalty by metes and bounds; provided, however, that where distinct interests in the property have been separately assessed pursuant to RSA 75:2, the tax lien executed to the municipality, county, or state shall be for 100 percent of the separate distinct interest upon which the taxes have not been fully paid. The Lien Execute procedure is used to lien all unpaid receivables that were noticed through the Lien Notice process. As such, the Lien Notice process must be completed before attempting to execute the lien (see Lien Notice) or this process will not find any records eligible for the Lien Execution. 88
89 Before you begin the Lien Execute process, make sure you have posted all payments and created the deposit in the system. Next, create a backup (see Backup Database). If a problem arises during the lien execute process, we can restore your data from this backup. To execute the lien choose Utilities Lien Execute. The Lien Execute dialog box displays. Note: The dates displayed are the dates you entered the last time you created a new group. Fill in the information as follows: New Lien Warrant Year: Enter the year you want displayed for this lien. The New Hampshire Tax Collectors Association recommends this be the levy year you are liening. For example, if you are liening unpaid 2008 taxes, you would enter 2008 in the text box. Once the lien is executed, the invoices will display as 2008L. Interest As Of: The date entered in this field should be the execution date. Interest owed will be computed to this date. Fees: Put in appropriate fees from the latest Fee Schedule issued by the NHTCA. If you do not have the fee schedule and wish to obtain the most up to date amounts, go to the NH Tax Collector s website at nhtaxcollectors.com. Once the information is complete, select Create New Group. Note, if you created a group previously and posted expenses, you can select Edit Existing Group to reprint notices. After answering several questions, the Lien Execute dialog box displays. 89

90 By default, all of the records are selected to be included in the execution. If you do not want to include a record in the execution process, click in the Y/N check box. This will remove the check next to their name. Select Print Lien List for review. Adjust fees if necessary. Adjusting fees may be necessary for several reasons, but the most common is when the same ownership in property was entered, but the names were input slightly different (e.g. middle initial, period, etc.). This would create two records for this individual, showing cost of $18.50 for each parcel. You would need to make the second parcel a fee of $8.00. To change the fee click on the fee to be changed in the grid and type the new fee. Reprint the list when changes are complete. Should you choose to exit the Lien Execute procedure, your dates will be saved automatically. When you decide to go back into the process, simply choose Edit Existing Group. After printing the list and updating any cost, select Execute Liens. Once the lien is executed, select Print Registry Report. Use the month date picker to select the Date Notice of Impending Lien Sent. In the Lien Execution Time text box, enter the time you are executing the lien. There are two reports available and both should be printed. Summary: The Summary report is sent to the Registry of Deeds to record the lien. Details: The Details report is kept by the Collector and will list the details of what is being liened, such as Property, Timber, Current Use, etc. Once you have printed the reports, click Close. This will bring you back to the main screen. The final step in the Lien Execute process is to create a deposit (see Creating a Deposit). There will be an open deposit in the amount of your Lien Execution, as every unpaid invoice will be paid in order to create the lien. Title Search Import/Export The Title Search Import/Export function allows you to export lien execution information to simplify the process by which you have an outside title search company perform your mortgagee searches. This function enables you to export a file (similar to the Real Estate Services file) for a selected warrant that can then be sent to a title 90

91 search company. The file includes all relevant information about the selected invoices, including deed book and page where available. The title search company can simply use this file to gather the information needed to perform the search. Alternatively, the search company can edit the file, filling in the appropriate search and notice fees and return the modified file to you. Upon receiving the file, you can import the fee information back into your system. Prior to the assignment of penalties, you will be able to review and modify the fee amounts reported back by the title search company. Note, if your researcher only wants a printed report, the Print option will generate a printed report. (See Mortgagee Search Report.) To export a file choose Utilities Title Search Import/Export. While on the Export tab, use the drop down box to select the warrant to be exported. Select the radio button next to the Lien Mortgagee Search or the Deed Mortgagee Search. If you select the Deed Mortgagee Search the date text box is enabled. This is the deed date. Next, select a location to which the export file will be saved by clicking on the ellipsis and selecting the destination. If your researcher would like the file through , save the file to a convenient location, such as your desktop. Once you have selected the destination, click OK. Finish the process by selecting Export. The export creates two files. The LienMortgageeSearch file contains the property information and the readme- LienMortgageeSearch file contains documentation on reading the file for your Researcher. Note: You must , or send, both files. Once the Researcher has returned the file with the updated costs, you can import and post fees by clicking on the Import tab. You will need to specify the location of the file by selecting Import File. After locating the file, the Title Search Import screen displays the data. Select Print to display the report. Compare this report to the Researchers information, if everything is correct, select Import Penalties to complete the process. 91

92 Mortgagee Search Report The Mortgagee Search report will give your researcher the information they will need to research the registry of deeds. The report can be run for both the liening and deeding process. To print the report, go to Utilities Title Search Import/Export. While on the Export tab, select the warrant using the dropdown box. Then click on the radio button designating whether you are generating the report for the lien or deed mortgagee search. If you are producing the deed mortgagee search report, once you select the corresponding radio button, a date field will display. Use the date picker to enter your deed date. Once you have made your selections click Print to display the report. Mortgagee Lien Notice RSA 80:65 states, The municipality, county or state as lienholder, within 45 days from the date of execution of the lien, shall identify and notify all persons holding mortgages upon such property as recorded in the office of the register of deeds... The Mortgagee Lien Notices process involves a search of the registry of deeds, which includes a fee and notification of all mortgagees recorded at the registry. Also, it includes a fee for the accounts with mortgagees attached to them. Some Collector's use the program to maintain the mortgagees and produce the mortgagee notices. Other Collector's have an outside agency that searches and produces the notices for them and then there are those who choose to do some of the process through the system and some outside. Depending on which process you use will determine the steps to take during this procedure. To produce the Mortgagee Lien Notices choose Utilities Mortgagee Lien Notice. The Mortgagee Lien Notice dialog box displays. Select the Warrant from the drop down text box. There are three radio buttons for applying fees. It is your choice on whether you select to apply both the Search & Notice Costs in one procedure, or by posting the Search Cost Only and subsequently posting the Notice Cost Only in a separate run. Below is a description of the three radio buttons. The first radio button, Both Search & Notice Costs, is used when you want to post all the expenses (Search and Notice Costs) all at once, in one step. 92

93 The second radio button, Search Cost Only, allows you to post the Search Cost to every liened account for the selected warrant. If you select this option, you should post the search costs at the time you are sending the information to your researcher. The third radio button, Notice Cost Only, is used if you previously posted the Search Cost and now need to charge the Notice Cost and produce the Mortgagee Notices. Once you have selected the Fees To Apply Today, enter the Cost associated with this process per RSA 80:67. The latest fee schedule is available by going to the NH Tax Collectors website at and selecting Tax Lien Procedure Schedule of Fees and Costs. Once the information is entered select Next to display the Mortgagee Lien Notice dialog box. The radio button you selected above determined how the Mortgagee Lien Notice screen displayed. If you are only posting Search costs, the options will be limited to Print Mortgagee List and Post Expenses. If you selected either Both Search & Notice Cost or Notice Cost Only, you will have all the options available. Select the date on which you plan to mail the notices. This is important, as the postmark date is utilized when proving you have met the requirements of the law. Select Print Mortgagee List to display a listing of each mortgagee receiving a notice. Verify this report for accuracy with the report sent by your researcher. If it is correct, print the report (see Printing) and select Post Expenses. The system will post all related expenses to each parcel. Note, the Expenses must be posted before you are allowed to print the notices. You can create a custom message to be included on the mortgagee notice by selecting Include Custom Message (see Custom Messages). After posting the expenses, select Print Mortgagee Notices. The first letter will display on the screen, verify all the dates are correct and print the notices (see Printing). Make a copy of each letter to keep for your records. If you wish to use the system to print your Certified Forms, select Print Certified Forms and fill in the appropriate fees. Otherwise, you can select Print Standard Labels. The Print Standard Labels option can be selected before expenses are posted in order to allow you to prepare your certified forms before printing the letters. 93

94 Edit Book & Page The Edit Book & Page function allows you to record the book & page number of the executed lien, which was recorded at the Registry of Deeds. Once the information is added to an invoice, and the invoice is paid, the Lien Redemption Report will reflect the Book & Page. To Edit Book & Page, using the Receivables data access tabs, search and select the liened invoice. Choose Edit Invoice Edit Book & Page. The Edit Book & Page dialog box displays. Enter the information into the text boxes and press OK. Lien Redemption Report RSA 80:70 states, When full redemption is made, the tax collector shall within 30 days after redemption notify the register of deeds of the act, giving the name of the person redeeming, the date when redemption was made, the date of the execution of the tax lien and a brief description of the real estate in question, together with the name of the person or persons against whom the tax was levied. The Lien Redemptions Report is used to meet the requirements of RSA 80:70. It may be printed for a specific lien warrant, or for all lien warrants, by date range. To run the Lien Redemptions Report choose Reports Lien Redemptions. The Lien Redemptions dialog box displays. 94

95 Fill in the information as follows: Warrant Year: Using the Warrant Year drop down box, select the lien warrant to restrict the report or leave as ALL. Beginning Date: Usually, this is the day after the ending date from last time the report was run. Example: If, in February, you ran the report 01/01/2009 to 01/31/2009, in March, your beginning date would be 02/01/2009. Ending Date: This is the date the system should include records posted up to. It is advised that you allow sufficient time for checks to clear the bank before releasing a lien. Many Collectors use a two week period, so using the example above, you would not run the report for the month of February until March 14 th and the ending date would be 02/28/2009. Include Deeded Properties: This check box is used to release the liens on the properties that were deeded to the Town through the tax deeding process. Click in the check box to select this option. There are three option to choose from under the section When Values Differ List Redeemed By as; Owner of Parcel at Time of Lien, Current Owner of Parcel, Payer of Final Lien Balance. Note, the Payer of Final Lien Balance will display the Payer you entered when making the final payment for that lien. For example, a property is owned by Smith, John and Citizens Bank sent a check to pay off the lien. If you enter Citizens Bank as the Payer at the time of the payment, Citizens Bank will display as the Redeemed By on the Redemption Report. If you leave the payer as Smith, John, he will display as the Redeemed By. Select the radio button next to the option you wish to use. Once you are sure everything is correct, select View. The report will display. Verify the information and print the report (see Printing). Make a copy the report for your records. 95

96 Mortgagees The Mortgagees process allows you to create and assign mortgage holders to specific properties to be used during the liening and deeding procedures. The Maintain Mortgagees function allows you to create, delete and modify the mortgagees in Tax Collect. The Assign Mortgagee function will allow you to assign a mortgagee you created through Maintain Mortgagees to a property. Maintain Mortgagees Maintain Mortgagees allows you to create, edit, and delete mortgage holders for the purpose of notification of a lien execution or an impending tax deeding. This function does not assign a mortgagee to a particular parcel, it maintains the list from which you can choose from when assigning a mortgagee to a parcel (see Assign Mortgagee). To Maintain Mortgagees choose Utilities Maintain Mortgagees (or from the main menu select Mortgagee All Mortgagees). The Mortgagees dialog box displays showing all the mortgagees currently in the system. Note: The Delete and Purge buttons are only available when an invoice or PID has not been selected. When you select a mortgagee their address displays under Mortgagee Information. If the information is incorrect, select Modify to update. If the mortgagee you are looking for is not in the list, select Create New to add them. Fill in the text boxes for the Name and Address and click Add. This will add the mortgagee to the list, however, you need to click Apply on the main Mortgagee screen after adding or modifying the mortgagees, and before closing the process, or the system will not recognize the changes. 96

97 The Delete button allows you to delete an individual mortgagee from the system. If the mortgagee you are trying to delete is assigned to a parcel, a message will display stating you cannot delete it. To print a list of all mortgagees in the system, select Print All. A report will display listing each mortgagee with their mailing addresses. The Purge button will purge mortgagee listings for PIDs that no longer exist in the billing file or the current owner file. When you select Purge, a message will display asking if you are sure you want to proceed with this action. Select Yes and a message will display stating how many mortgagees were deleted from the database. Assign Mortgagee Once a mortgagee has been created in the system (see Maintain Mortgagees), it must be assigned to an invoice. Assigning mortgagees will allow you to produce Lien and Deed Mortgagee notices (see Mortgagee Lien Notice and Tax Deed Notice) from the Tax Collect system. To assign a mortgagee, from the Receivables data access tabs, search and select the invoice or the PID. Then choose Mortgagee Mortgagee Mortgagees on This Parcel. The Maintain Mortgagee dialog box displays. A list of available mortgagees is displayed. If a mortgagee is already assigned to this parcel, a check will be in the box beside the mortgagee name and displayed at the top of the list. Clicking in the box again will remove that mortgagee from the parcel. If you need to assign a different mortgagee to this parcel, find the mortgagee and click in the box next to their name. A check will now display in the box telling the system this mortgagee belongs with this parcel. After you have updated the information, select Apply to save the changes. To modify or create a new mortgagee, see Maintain Mortgagees. Once a mortgagee has been attached to a parcel, a Bag of Money icon will display on the Details tab next to the Billed Owner radio button. You can click on the icon to display the Maintain Mortgagee dialog box. Mortgagees by Parcel Report The Mortgagees by Parcel Report displays a listing of all parcels in the system to which a mortgagee has been assigned. It can be printed in PID order or alphabetical by owner name. To create the Mortgagees by Parcel Report choose Reports Mortgagees by Parcel. The system defaults to printing the report in PID order, however a message will display asking if you want it in PID or by Owner Name. To print the report in PID order select Yes, or select No to print by Owner Name. The report displays including map/lot number, current owner, and mortgagee name. 97
98 Tax Deeding Process The Tax Deeding Process starts with a letter putting a property owner on notice that if they do not pay their tax lien, they will lose their property. A search of the registry must be done and a notice sent to every mortgagee and property owner giving them at least 30 days to pay. If they do not pay, the Collector shall execute a deed and issue the deed to the municipality. Tax Deed Notice RSA 80:77 and RSA 80:77-a state that a notice must be given to every Owner and Mortgagee at least 30 days prior to executing the deed. Many Collectors use an outside agency to produce the mortgagee notices, but they produce the owner notices within the system. Other Collectors use the system to produce both notices. Depending on your preference, the system can assign the notice fees automatically to each invoice. Before you begin the Tax Deed Notice process, there are a few things you should do. The first is to import any change of ownership or address changes from assessing. Choose Utilities Get Assessing Owners. After you send the deed notices, do not import changes from assessing until after the deed has been executed, as the owner you send the notice to must be the owner you deed. The next step is to create a backup (see Backup Database). If a problem arises during the deed process, Avitar can restore your data from this backup. If you are providing the notice to the mortgagee through the Avitar Tax Collect system, a search of the registry must be completed and mortgagees updated (see Maintain Mortgagees and Assign Mortgagee) before you start this process. To create the Tax Deed Notice choose Utilities Tax Deed Notice. The Deed Notice dialog box displays. 98

99 Fill in the information as follows: Lien Warrant: This is the levy year you are deeding. For example, if you liened your 2006 property on May 7, 2007, your deed warrant year is 2006L. Deed As Of Date: This is the date on which you plan to execute the deed. Deed Notice Cost, Mortgagee Search Cost, Mortgagee Notice Cost: Put in the appropriate fees from the latest Fee Schedule issued by the NH Tax Collectors Association. If you do not have the fee schedule and wish to obtain one, go to the NH Tax Collector s website at nhtaxcollectors.com and click on Tax Lien Procedure Schedule and Costs link. Include Notice to Mortgagee: If you wish to generate the Mortgagee Notice from the collect system, click in the check box. When you leave the box blank, you have chosen to create the letters outside the system. If you choose to create the letters outside the system, you will need to manually enter the cost for this service to each parcel receiving a mortgagee notice before you print the owner notices (see Penalties Menu). When executing for the first time, select Create New Group. Note, if you created a group previously and posted expenses, you can click Edit Existing Group to reprint notices. After answering several questions, the Deed Notice screen displays. 99

100 Select the Mail Date. This date will display on the letters. Select Print Deed List to review the Owners and Mortgagees receiving the notices. Adjust the fees if necessary by clicking on the fee in the grid and typing the correct amount. Uncheck the box next to an owner who should not receive a deed notice. For example, you would uncheck the box of an owner who has filed bankruptcy. After making changes, you will need to reprint the list to keep with your copy of the Deed Notices. Should you choose to exit the Deed Notice procedure, your dates will be saved automatically. Once all changes have been made, select Post Expenses to place the appropriate costs on each account notified. Note, the Expenses must be posted before you can print the notices. You can create a custom message to be included on the deed notice by selecting Include Custom Message (see Custom Messages). Once you are sure everything is correct, select Print Deed Notice. Make sure you print a copy of the letter for your records (see Printing). Re-Notice Previous The Re-Notice Previous Button is used to send a deed notice to an owner who has already received a deed notice. For example, you might send out your deed notices in April for a May deed date and the Selectmen decide they will accept a payment plan for a property owner who is having difficulty paying their bill. The agreement states that if the owner misses a payment they will deed the property. So, in October, the owner has not made their payment and the Selectmen decide to deed the property. In order to comply with the law, you must send another deed notice to the property owner giving them an additional 30 days to pay before deeding the property. As you have already sent a deed notice to this owner for this invoice, you will need to create the second notice using the Re-Notice Previous. 100

101 To use the Re-Notice Previous function, from the main menu choose Utilities Tax Deed Notice. The Deed Notice dialog box displays. The Re-Notice button will display if you have lien invoices that have received Deed Notices yet still have outstanding balances. To start the process select Re-Notice Previous to review the list of invoices. Select the invoice you want to re-notice from the grid and select the Re-Notice Owner button. This will create a group of one invoice which will follow the same process as the Deed Notice (see Tax Deed Notice). Tax Deeding RSA 80:76 states, The collector, after 2 years from the execution of the real estate tax lien, shall execute to the lien holder a deed of the land subject to the real estate tax lien and not redeemed.... The Tax Deeding process will clear the receivables for all past and current tax bills for a specific property and will only be allowed in the Avitar Tax Collect system if a Tax Deed Notice has been sent (see Tax Deed Notice). Before you begin the Tax Deeding process, create a backup (see Backup Database). If a problem arises during the process, we can restore your data from this backup. Also, we recommend printing an Activity Report for each parcel you are deeding with interest calculated through the Deed date (see Activity Report). To execute a Tax Deed choose Utilities Tax Deeding. The Tax Deeding dialog box displays. The list displays every invoice available for the tax deeding process. Select the invoice for the year which you are deeding. For example, if you are deeding for the 2006 unpaid tax liens, you would select the 2006L01xxxxxx for the PID you want to deed. When you click on an invoice, the corresponding details display to the right. 101
102 Note: The Deeding Date defaults to the current date. If this is not the actual deeding date, click on the Deeding Date label to display the Change Receivables Date dialog box and select the correct date. The View Affected Bills will produce a list of each invoice with the corresponding amount due. Select Print to view a report that can be printed and kept for the deeding file (see Printing). Print List will produce a report of parcels that are available for deeding. Once you are ready to execute the deed, select Deed This Parcel. A message will display verifying the deed date, if this is correct, click Yes. The Parcel Deeded message box displays stating the parcel has been successfully deeded. You can now print a Tax Collectors Deed for recording at the Registry (see Tax Collectors Deed ). Tax Collectors Deed The Tax Collectors Deed provides the Tax Collector with a document worded per RSA 80:76 and to the specifications of the Registry of Deeds. Before a deed can be printed, the Tax Deeding process must have been completed (see Tax Deeding). To print a Tax Collectors Deed choose Reports Tax Collector's Deed. The Tax Deed Report dialog box displays listing the available parcels and related invoices. Select the invoice for the year which you deeded. For example, if you deeded for the unpaid 2006 tax lien, you would select the 2006L01xxxxxx for the corresponding PID. When you click on an invoice, the details display to the right. The Tax Year text box tells the system the levy year of the unpaid taxes and will be printed on the Tax Deed. For example, if you deeded the property due to an unpaid 2006 Lien, the Tax Year text box should read On the deed, the Avitar Tax Collect system includes signature lines for your Selectmen to sign, however, you have the option to suppress them. If you do not want your Selectmen to sign, click in the Suppress Selectmen's Signature Lines check box. By leaving the box unchecked, the lines will print for the Selectmen's signatures. To add/edit the Selectmen's names to print under each line see Town Information, Tax Collector Tab. Once you have made your selections, click Print Tax Collector's Deed. A dialog box will display asking if you would like to include the book and page on the deed. If you select Yes, the Enter Book & Page dialog box displays. Type in the information from the original deed and select OK. Note that the book and page information you enter will display on the deed, but is not saved to the database. Therefore, if for any reason you need to reprint the deed, you will need to enter the book and page again. Once you enter the information, select OK to display the deed on the screen. Verify the information is correct and print the deed (see Printing). Deeded Property Report The Deeded Property Report will list every property that was deeded during the current fiscal year. To produce the report choose Reports Deeded Property. You will be asked if you want to suppress the prior year s information from the report. If you select Yes, you will only see the parcels that were deeded during this fiscal year. Selecting No, will display all parcels that were deeded since the last purge of paid items. Once you have made your selection, the report will display on the screen. For printing options, see Printing. 102
103 Monthly Balancing Auditors recommend that you complete monthly reconciliations of your financial records and compare them to your Treasurers and/or Accountants. Balancing monthly makes it is easier to find and correct mistakes in a timely manner. Avitar Tax Collect provides a Monthly Balance Report to assist you in this process. 103
104 Monthly Balance Report Auditors recommend that you complete monthly reconciliations of your financial records and compare them to your Treasurer and/or Accountant. Avitar Tax Collect provides a Monthly Balance Report to assist you in this process. The Monthly Balance Report is a summary of all transactions posted for a selected month. At the end of each month the system captures the balances for the previous month. Therefore, once the month has ended, your Monthly Balance Report will remain the same even if you reprint it in subsequent months. Oftentimes, Auditors refer back to Monthly Balance reports from previous months and they want to see a report showing the details behind the figures displayed. So we recommend you print and/or export the following reports at the end of each month, as it will save you valuable time at some point in the future. Also, some reports listed below are not needed to balance for the month, such as the MS61, Collection YTD, and Receivables reports. However, these reports are accumulative, which means the moment you post a transaction, the report is updated. By printing/exporting the reports monthly, before you post any transactions for the next month, you will be able to access that exact report for an Auditor at some point in the future. The following is a list of suggested reports to print and/or export each month. All reports requiring a date range should be run from the first of the month to the last of the month. For example if you are balancing for the month of October, you would run the reports from October 1st to October 31st. Monthly Balance Report Abatements Credits: All Credits by Payment Date Credits Assigned to Receivables by Assigned Date Credits Assigned to Int/Pen by Assigned Date Credits Assigned to Payables (Refunds) by Assigned Date Unassigned Deleted Credits Deeded Property (only if you deed in that month) Deposits by date range-only print first page Supplements Deleted Receipts Collections YTD MS61 Receivables Group of Invoices Warrant then Owner for Only Unpaid Invoices Receivables Group of Invoices Owner then Warrant for Only Unpaid Invoices Understanding the Monthly Balance Report Beginning Balance 104
105 The Beginning Balance column displays what was owed in total for each warrant at the beginning of the month you are proving. The figures listed should match the Ending Balance from your previous month. (Reports Monthly Balance select the previous month) Committed & Supplemented The Committed & Supplemented column displays all warrants that were committed to you during the month you are balancing. To balance, add up the signed warrants you received from the Selectmen/Assessor by categories. Abated The Abated column displays the abatements that were posted during the month you are balancing. They should also match the signed abatement slips from the Selectmen/Assessor. (Reports Abatements) Deeded The Deeded column displays the principal amount that was owed as of the tax deed date for all properties you deeded in the system. (Reports Liening & Deeding Deeded Property) Collected Under the Collected section are two columns: Principal and Int/Pen. These columns display the amounts you collected and posted to warrants. It does not include the credits you have collected. To reconcile with the amount you deposited at the bank for the month, you will need to use the section at the bottom of the report labeled Summary (see Summary below). Prior Months' Credits Assigned The Prior Months' Credits Assigned columns display credits that were created in a previous month and assigned to a receivable in this month. They are not shown under the Collected columns because it is not money you collected during the month you are balancing. (Reports Credits Credit Types to Include select Assigned Filter Credits select By select By Assigned Date) Adjustments The Adjustments column will show if a transaction that occurred in a prior month has been changed in the month you are balancing. For example, a customer pays their taxes on September 25th and the check is returned for insufficient funds on October 5th. Your monthly balance report for September recorded the amount you collected and will not change because that is what you actually remitted to your treasurer. So, the reversal of the amount collected would be reflected on your October monthly balance report under the Adjustments columns. Abatements can also cause amounts to show in the Adjustments columns if the abatement affected a payment that was posted in a previous month. For example, a customer pays a partial payment on their 2013P01 bill in September for $ ($ prin. and $10.00 Int.). In October you post a Beginning Balance Abatement to the invoice of $ An abatement means that the customer, for whatever reason, was billed too much. Therefore, the original late payment was paying interest on an outstanding balance that was $ higher than it should have been. By law, you must 105
106 adjust the payment to reflect interest charged on the new principal amount. The Avitar collect system will do this calculation for you at the time you post the abatement. In the example given, the partial payment of $ would now be posted as $ Principal, $8.00 Interest. There would also be a $ figure in the Abatement column. On the Monthly Balance report, under the Adjustments columns, you would see (2.00) in the Principal column and 2.00 in the Interest column. We suggest that when you are posting transactions (abatements, returned checks, deleting transactions/receipts), which affect payments from a previous month, that you keep documentation at the time you post the transaction. It will assist you in proving these figures. Error The Error column is used by the system to alert you that there might be a problem. Typically, we see figures in this column when a collector has entered a receipt, deleted the transaction from receipt, and subsequently deleted it again. This can cause problems for the system in knowing where it should display the amount on the monthly balance report. Give Avitar a call if you need help with an amount in the Errors column. Summary The Summary section of the report is used to help you balance, in total, to the amount you collected and deposited in the bank. Basically, it adds what you collected in Principal, Interest/Penalties, Unassigned Credits Received This Month (and still not assigned), any Prior Year adjustments, and any credits received and refunded in the month you are balancing. The Gross Receipts This Month figure should match the total deposit receipts you received from the bank. (Reports Deposits Deposit Summary Filter Report select By Deposit Date) Also under the Summary section is Total Prior Year Deletions This Month. If there is an amount here, it s because an error was made in the prior year and corrected in the month you are balancing. For example, you posted a payment on December 31st and closed your fiscal year on January 10th. On January 11th, the bank notifies you the check is being returned for insufficient funds. If this occurs, you can call Avitar and we will log in and process the reversal. Once the correction has been made, the monthly balance report is updated. (Reports Deleted Receipts) Credits The Credits section is used to track the credit activity that occurred during the month. Below is a brief outline of each line item and the report(s) used to balance each figure. Unassigned Beginning Balance: This figure should match the Unassigned Ending Balance from your last month s Monthly Balance report. (Reports Monthly Balance select the previous month) New This Month: This figure is the new credits you created during the month. (Reports Credits Credit Types to Include select All Filter Credits select By Deposit Date) Assigned This Month: This figure consists of all the credits you have assigned during the month. (Reports Credits Credit Types to Include select Assigned Assigned To select 106
107 Receivables Filter Credit select By Assigned Date. Note, you will need run the same report again except under the Assigned To section select Int/Pen. Add the two figures together) Returned This Month: This figure consist of credits you have chosen to refund. (Reports Credits Credit Types to Include select Assigned Assigned To select Payables Filter Credit select By Assigned Date Filter Credit select By Assigned Date) Deleted This Month: This figure consists of credits you have deleted in the system. (Reports Deleted Receipts) Unassigned Ending Balance: This figure is what you have remaining in credits at the end of the month. (Reports Credits Credit Types to Include select Unassigned) Refund Abatements Refund abatements are simply abatements posted to a receivable that was paid in the prior fiscal year. (Reports Abatements) 107
108 Year End Process The Avitar Tax Collect system has a hard fiscal year end close, which means that you cannot process work in the current fiscal year until the last fiscal year has been closed (see Close Period). When you close the fiscal year, the system captures the ending balances for that fiscal year and creates the beginning balances for the next fiscal year. The beginning and ending balances are extremely important as the ending balance of one year must match the beginning balances of the next year. If they do not, you must explain to the Department of Revenue (DRA) why they have changed. With this in mind, the system was designed not to allow changes in a closed fiscal year, hence the hard close. Some of the year end reports that should be printed before you close your fiscal year are as follows (not all of the reports will apply to your municipality and therefore it may not be necessary to print them): MS61 Collections Year to Date Abatements-Dated 01/01/xxxx thru 12/31/xxxx (For alternate fiscal year 7/1/xxxx thru 6/30/xxxx) Deposit Summary Supplements-All Deleted Receipts Inventory Penalties Uncollected Interest Deeded Property NSF Checks Credits: Unassigned Credits from the prior fiscal year (This comes from your Prior Year database). All Credits For FYxxxx (current fiscal year) Receipts Go to Credits All Credits and Filter Credits. Select By Fiscal Year of Receipt and select your current fiscal year. Unassigned Credit For FYxxxx Receipts-This is for all credits unassigned at the end of your current fiscal year. Credits Assigned to Payables For FYxxxx (current fiscal year) Credits Assigned to Receivables For Prior FY Receipts Credits Assigned to Interest/Penalties For Prior FY Receipts Receivables-For all unpaid invoices, interest date of 12/31/xxxx (or 6/30/xxxx) Warrant then Owner Sequence will give auditors a report of accounts due by Warrant Year. Owner then Warrant Sequence will give auditors a report of accounts/amounts due as total due per owner. (You also might want to run this report with the Include Address box checked.) Lien Redemption Report from the date of last redemption report was created through 12/31/xxxx (or 6/30/xxxx). 108
109 After running all of the above reports, balance the MS-61 (see Balancing the MS-61 Report). If the MS-61 is NOT in balance in the system, you will not be allowed to close. You will need to find the error and correct it before proceeding. IMPORTANT: After you have balanced for the year and right before you Close Period, do a backup of your current fiscal year. If the Close Period process is interrupted or you need to restore the information, we will not be able to restore without a backup (see Backup Database). Collections YTD Report The Collections YTD Report is a summary of all the work you processed in the Tax Collect system throughout the current fiscal year. It is a cumulative report, which means it starts capturing information at the beginning of the fiscal year and will summarize all the work you processed up to the date you view the report. For example, if you view the report on April 20th, the report will show the activity from 01/01/xxxx to 04/20/xxxx, if you are on a January to December fiscal year (see Fiscal Year). Auditors will use this report to verify the information you have entered into the system. For example, if the Collection YTD report shows that you posted an abatement of $ to the 2006L01 warrant, they will check to see that you have signed abatements matching that figure. You should verify every amount listed on this report and have backup to prove to these figures. To view/print the Collections YTD Report choose Reports Collections YTD. The report will display on the screen and can be printed or exported to a file (see Printing). MS-61 Report The MS-61 Report was created by the Department of Revenue in order to comply with RSA 41:35 which states,...the collector shall make a written report to the town at the end of each fiscal year which shall contain the amount of the taxes committed to him or her to collect; the amount of taxes collected, together with interest thereon; the amount of discounts allowed; the amount of taxes abated; the total amount of uncollected taxes; and an account of all sales of real estate to collect taxes...". This is a summary of all the work you processed in the Tax Collect system throughout the current fiscal year and it is a cumulative report, which means it starts capturing information at the beginning of the fiscal year and will summarize of all the work you processed up to the date you view the report. For example, if you are on a January to December fiscal year (see Fiscal Year) and you view the report on April 20th, the report will show the activity from 01/01/xxxx to 04/20/xxxx. The MS-61 purpose, as with the Collection YTD (see Collection YTD Report), is to show the activity for a fiscal year. Therefore, it must be balanced and printed at the end of your fiscal year. There are multiple reports that will assist you in proving the figures on the MS-61 (see Balancing the MS-61 Report for a listing of reports). The main difference between the MS-61 and the Collections YTD, is how DRA wants amounts categorized. For example, on the Collections YTD, the liened amounts are posted under the Collected Principal and Interest columns. On the MS-61, the principal paid by the lien is listed as one amount on Page 2 Remitted To Treasurer Converted to Liens (Principal Only). 109
110 The DRA requires that municipalities submit the MS-61 electronically using a fillable PDF form provided by the DRA. Rather than forcing you to manually complete the PDF, Avitar Tax Collect enables you to easily export the MS-61 report information to an XML file. You can then import the XML file to populate the DRA s fillable PDF and submit it electronically to the DRA. See Generating and Submitting the MS-61 for complete instructions on creating the MS
111 Generating and Submitting the MS-61 In order for you to import the system generated XML file into the MS-61 PDF form, it may be necessary for you to match the names, spelling, and format of the municipality name you've used in your database with the standardized values required by the DRA. For example, in the PDF form, DRA provides a dropdown list of approved municipality names. If the municiaplity name in your database was entered as "Town of Townname", you will need to select the corresponding state option of "Townname" in order for the municipality name to be listed properly when you import your XML file to the DRA's PDF form. However, once you have selected the corresponding standard values (where necessary), the system will automatically populate these values the next time you run the MS-61. Instructions on setting these values are listed in the steps below. The MS-61 purpose, as with the Collection YTD (see Collection YTD Report), is to show the activity for a fiscal year. Therefore, it must be balanced and printed at the end of your fiscal year. There are multiple reports that will assist you in proving the figures on the MS-61 (see Balancing the MS-61 Report for a listing of reports). The main difference between the MS-61 and the Collections YTD, is how DRA wants amounts categorized. For example, on the Collections YTD, the liened amounts are posted under the Collected Principal and Interest columns. On the MS-61, the principal paid by the lien is listed as one amount on Page 2 Remitted To Treasurer Converted to Liens (Principal Only). Step 1 - Generate the MS-61 To generate the main MS-61 report, select Reports MS-61. Review and update all of the required cover page information and select the Next button. If your Municipality name has not been standardized using the list of DRA permitted values, the Municipality description dialog box will open. Using the "DRA's Permitted Values" dropdown menu, select your Municipality description and select OK (this will only display if the Municipality description has not been set). 111


112 Once you have entered the required information you will see the following set of output options. Step 2 - Preview the MS-61 Click on the Preview Report label or the corresponding icon to display the current MS-61 Report. Note that you will need to print this report (in its traditional format) and keep this for your records. Step 3 - Export MS-61 Report Data to XML File 112
 and locate a folder on your computer in which you wish to create the XML file and click OK.")
113 Once you have previewed the report and are ready to submit it electronically to the DRA, you can generate an XML file that contains all of your MS-61 data in a format that can be imported into the DRA's PDF file. To do so, select the ellipsis button (...) and locate a folder on your computer in which you wish to create the XML file and click OK. Once this location is set, you won't need to set the location again for this machine. Select "Export Report Data to XML File" and this will create a file called MS61.xml to the location that was set. Step 4 - Get Latest PDF from DRA To download the latest MS-61 Report in PDF version please visit the DRA website. Locate the MS-61 PDF with the most recent revised date. Save that PDF to the same location you exported the XML file to in the previous step. Step 5 - Import XML into PDF MS-61 To import the XML file properly into the PDF you downloaded from the DRA, you must have Adobe Reader 11 installed. Open the PDF in Adobe Reader 11. Select Extended on the top right hand side of Adobe and select Import Data. If you do not see the Extended menu, go to View Extended Extended Menu and this will open the Extended options on the right hand side of the PDF. Browse and select the MS61.xml file that was exported to your computer and click Open. The fields of the PDF will populate with the data from the XML file. At the bottom of page five you 113
114 will see the preparers certification section. The preparer will need to electronically sign their name to identify who is submitting the report verifying that the information submitted to the DRA is accurate. Once you have reviewed the data, save your changes. The next step is to submit the report to the DRA by ing the appropriate address listed at the bottom of page five of the PDF. You should also print the completed MS-61 PDF to keep a copy for your records. 114
115 Balancing the MS-61 Report The purpose of this topic is to assist you in finding and printing the reports to verify the individual figures on the MS-61. Once you have balanced the MS-61, see Generating and Submitting the MS-61. Supporting Reports To balance the MS-61, you will need the following reports: MS-61 Last year's MS-61 (you can find this in Archived Reports) Collections YTD Abatements Deeded Property List Receivables listed by Warrant for Only Unpaid Receivables Supplements Deposit report for the deposit created by your lien (1st page only) Transaction Report for each Resident Tax Levy (Only if you are collecting Resident Taxes) Discounts (Only if you apply discounts for early payments) Credit Reports: All Credits Filter Credits By Fiscal Year of Receipt and select your current year (ex: 2012) Unassigned Credits Credits Assigned to Payables by Assigned Date Credits Assigned to Receivables For Prior FY Receipts Credits Assigned to Interest and Penalties For Prior FY Receipts Note, the following information was designed to follow the MS-61 format, which means each section listed corresponds with the order in which they are displayed on the MS-61. The preview MS-61 printed from Tax Collect will provide you additional information which will be listed in red in order to assist you with balancing the MS-61 that is submitted to DRA. Page 1 of the MS-61 Uncollected Taxes Beginning Of Year Property Taxes, Resident Taxes, Land Use Change Taxes, Yield Taxes, Excavation Tax The Uncollected Taxes At The Beginning Of The Year figures should match your Uncollected Taxes End Of Year from last year's MS-61 (Page 2). It should also match the Beginning Balance column from the Collections YTD report. The DRA will require an explanation if the figures do not match. Other Taxes The Other Taxes figure should equal the Utility Charges and Betterment Taxes combined under Uncollected Taxes End Of Year from last year's MS-61 (Page 2). 115
116 Property Tax Credit Balance The Property Tax Credit Balance represents the unassigned credits at the end of your last fiscal year. It should match the figure from last year's MS-61 report on Page 2 under Uncollected Taxes End of Year Property Tax Credit Balance. To verify this figure, go to Reports Archived Credits. On the last page, add the Unassigned Prepayments and the Unassigned Overpayments. NOTE: This Year's New Credits This line is no longer represented on the MS-61. This will now be included as a positive under "Credits Remitted to Treasurer Property Taxes Levy for Year of This Report". Taxes Committed This Year Property Taxes, Resident Taxes, Land Use Change Taxes, Yield Taxes, Excavation Tax The Taxes Committed This Fiscal Year columns list what was committed to you to collect. If you add up your signed warrants from the Selectmen (including any supplements) by categories, they should match these figures. They will also match the Committed and Supplemented column on the Collections YTD report. Keep in mind that, on the Collections YTD report, Property Tax is separated into P01 and P02 (if you bill twice a year) and the MS-61 combines them into one figure. The same applies to any supplement if you added them to the system separately as new warrants. For example, you had a warrant for a Timber Tax that you supplemented in July and then in August you received another Timber Tax warrant. When entering the second supplement, you can choose to add them to the existing 2013T01 Timber Tax from the Add Supplemental Bill screen (which is recommended), or you can add a new warrant creating a 2013T02 Timber Tax. If you decide to add a new warrant, 2013T02, it will be displayed on its own line on the Collections YTD report and it must be added together with any other like warrants to match the Timber Yield Taxes column on the MS-61. Other Taxes The Other Taxes row will be the amount committed for Utility and Betterment warrants combined from the Collections YTD report. Overpayment Refunds Property Taxes, Resident Taxes, Land Use Change Taxes, Yield Taxes, Excavation Tax Overpayment Refunds are the credits you have assigned to payables. As Avitar does not designate a warrant for an unassigned credit, the total amount refunded will be reflected under Property Taxes on the MS-61. To verify this figure, go to Reports Credits Assigned Assigned To - Payables. Under the Filter Credits section, select By Assigned Date and select January 1st to December 31st. This figure should also be verified with what your finance office has for refunds. Interest and Penalties on Delinquent Taxes 116
117 This is the amount of interest and penalties you collected, as well as any credits that were assigned to Interest and Penalties during your current fiscal year. This figure should also match the Interest (Include Lien Conversion) and Penalties combined on Page 2 of the MS-61. The MS-61 does not distinguish interest by warrants; only by year. For example, if you collected interest and penalties for a 2013 Gravel, 2013 Property 1st and 2nd issue, and 2013 Timber, the Interest and Penalties on Delinquent Taxes amount will be a total of all the 2013 Collected -Interest and Penalties on the Collection YTD report. Interest and Penalties on Resident Taxes This is only used if you are billing and collecting Resident taxes. Resident taxes are not charged interest, but they do get a penalty added to their accounts if they do not pay by a certain date. To verify the amounts listed, go to Reports Transactions. For the section labeled Include Transactions Based On, select Post Date, then select January 1st to December 31st. Under the Include Warrant section, select the Resident Tax warrant. Each year must be run separately. For example, selecting 2014R01-Resident Tax will give you a report of every transaction for January to December for the 2014 Resident Tax. If your MS-61 shows a 2013 Resident tax, you will need to run this report again, but select 2013R01-Resident Tax from the Include Warrant drop down box. Page 2 of the MS-61 Remitted To Treasurer Property Taxes The Remitted To Treasurer figures for Property Taxes consists of the following: The amounts you collected in principal for each warrant. New credits which were added to the system during the year that were not assigned to another receivable or to interest. Prior year overpayments assigned which are credits you carried over from last year and assigned in this fiscal year. Below are a list of reports to print to verify this total figure: Report Credits Assigned to Receivables By Fiscal Year Receipts. Filter Credits the drop down menu, select Before and your current fiscal year. (For example, if you are proving your 2014 MS-61, you would want to select Before 2014.) Report Credits Assigned to Interest and Penalties By Fiscal Year Receipts. From the drop down menu, select Before and your current fiscal year. (For example, if you are proving your 2014 MS-61, you would want to select Before 2014.) Reports Credits All By Fiscal Year of Receipt. Select your current fiscal year. As you are only looking for new credits that have not been assigned to another receivable or to interest, you will need to add the following figures: 117
118 Unassigned Prepayments Unassigned Overpayments Assigned to Payables Collections Summary YTD Keep in mind that the MS-61 does not include the principal amount that went to lien in the various warrants, where the Collections Summary YTD does. For example, when you created the lien, a deposit was generated to pay off all the unpaid receivables. The Collections Summary YTD sees this as payments and puts the totals in the payments column for each warrant type that went to lien. However, the MS-61 has a separate entry for the principal amount that went to lien, so it does not include them as amounts you actually collected. So, when you are balancing your Remitted to Treasurer on the MS-61, you need to know the principal amounts that went to lien for each warrant. You can get these figures by looking at your lien totals printed at the time of the lien, or print the deposit totals page for the deposit created by the lien. Start by proving your current fiscal year collections (FY2014) column. From the Collections Summary YTD report, look at the Collected -Principal column and add that figure to the Prior Yr Credits Assigned -Principal column, if there are any. For example, to prove the 2013 Property Taxes Remitted to Treasurer on the MS-61, using the Collections YTD report, add the Principal collected for 2014P01 and 2014P02. Then add the Principal from the Prior Yr Credits Assigned column for the same warrants. The total should match the Remitted To Treasurer for Property Taxes on the MS-61. Continue with this process until all the Current Fiscal Year amounts are balanced. To prove the MS-61 Prior Levies Remitted to Treasurer columns, you would start by following the same procedures above by adding the Collected -Principal with the Prior Yr Credits Assigned columns on the Collection YTD report; however, for the first column (2013), you need to you subtract the principal amount that went to lien for the category you are balancing. For example, to prove the 2013 Property Taxes Remitted to Treasurer on the MS-61, add the Collected -Principal for the 2013P01 and 2013P02, plus any Prior Yr Credits Assigned for the same warrants. Then, using the Deposit report for the Lien (or the Lien Report), subtract the Principal amount for the 2013P01 and 2013P02. The total should match the Remitted to Treasurer Property Taxes under the 2013 column on the MS-61. Resident Taxes, Land Use Change Taxes, Yield Taxes, Excavation Tax The Remitted To Treasurer figures are the amounts you collected in principal for each warrant. Keep in mind that the MS-61 does not include the principal amount that went to lien in the various warrants, where the Collections Summary YTD does. For example, when you created the lien, a deposit was generated to pay off all the unpaid receivables. The Collections Summary YTD sees this as payments and puts the totals in the payments column for each warrant type that went to lien. However, the MS-61 has a separate entry for the principal amount that went to lien, so it does not include them as amounts you actually collected. So, when you are balancing your Remitted to Treasurer on the MS-61, you need to know the principal amounts that went to lien for each 118
119 warrant. You can get these figures by looking at your lien totals printed at the time of the lien, or print the deposit totals page for the deposit created by the lien. Start by proving your current fiscal year collections (FY2014) column. From the Collections Summary YTD report, look at the Collected -Principal column and add that figure to the Prior Yr Credits Assigned -Principal column, if there are any. For example, to prove the 2013 Property Taxes Remitted to Treasurer on the MS-61, using the Collections YTD report, add the Principal collected for 2014P01 and 2014P02. Then add the Principal from the Prior Yr Credits Assigned column for the same warrants. The total should match the Remitted To Treasurer for Property Taxes on the MS-61. Continue with this process until all the Current Fiscal Year amounts are balanced. To prove the MS-61 Prior Levies Remitted to Treasurer columns, you would start by following the same procedures above by adding the Collected -Principal with the Prior Yr Credits Assigned columns on the Collection YTD report; however, for the first column (2013), you need to you subtract the principal amount that went to lien for the category you are balancing. For example, to prove the 2013 Property Taxes Remitted to Treasurer on the MS-61, add the Collected -Principal for the 2013P01 and 2013P02, plus any Prior Yr Credits Assigned for the same warrants. Then, using the Deposit report for the Lien (or the Lien Report), subtract the Principal amount for the 2013P01 and 2013P02. The total should match the Remitted to Treasurer Property Taxes under the 2013 column on the MS-61. Interest (Include Lien Conversion) This is the amount you collected in interest for each warrant. You can prove these figures by running your deposit report for your fiscal year and add the interest column for the warrant year you are proving. Penalties This is the amount you collected in penalties for each warrant. You can prove these figures by running a deposit report for your fiscal year and add the penalties column for the warrant year you are proving. Other Taxes These are the amounts you collected in principal for Utility Charges and Betterment warrants combined. Keep in mind that the MS-61 does not include the principal amount that went to lien in the various warrants, where the Collections Summary YTD does. For example, when you created the lien, a deposit was generated to pay off all the unpaid receivables. The Collections Summary YTD sees this as payments and puts the totals in the payments column for each warrant type that went to lien. However, the MS-61 has a separate entry for the principal amount that went to lien, so it does not include them as amounts you actually collected. Conversion To Liens (Principal Only) To prove the Converted To Liens (Principal Only) field, use the Deposit report for the deposit created by the lien (or the lien totals page from the lien report). Remember, this is the total of the principal only and does not include interest or cost. 119
120 Discounts Allowed The Discounts Allowed fields will only apply if your municipality, by a vote at town meeting, gives a discount to people who pay their taxes early. The amount on this line is the amount you did not collect due to the discount. To prove the figures, go to Reports Discounts. Abatements Made Property Taxes, Resident Taxes, Land Use Change Taxes, Yield Taxes, Excavation Tax The Abatements column on the MS-61 should match the figures under the Abated column on the Collections YTD report. They should also match the Abatements report and the signed abatement slips from the Selectmen. Other Taxes The Other Taxes row under the Abatements Made column should match the figures under the Abated column on the Collections YTD report for Utility and Betterment warrants combined. Current Levy Deeded The Current Levy Deeded figure consists of the principal amount owed as of the deed date for all current levy warrants. For example, to prove the 2013 Current Levy Deeded amount on the MS- 61, add all the Deeded amounts for every 2013 warrant on the Collections YTD report. The figures can be verified from the Deeded Property report. Uncollected Taxes End of Year #1080 Property Taxes, Resident Taxes, Land Use Change Taxes, Yield Taxes, Excavation Tax The Uncollected Taxes-End of Year figures are what remain in outstanding receivables at the end of your fiscal year. The figures should match your Balance Due column on the Collections YTD report. As in all the above procedures, you will need to add the multiple warrants in a year together to match the MS-61. Details about unpaid invoices and the outstanding balances can be found on the All Unpaid Receivables report. To print this report, go to Reports Receivables Group of Invoices. The system will default to the selections you need, except that you will need to change the interest date to your yearend date. Other Taxes The Other Taxes row under the Uncollected Taxes--End of Year #1080 column should match the figures under the Balance Due column on the Collections YTD report for Utility and Betterment warrants combined. Property Tax Credit Balance The Property Tax Credit Balance figure represents the credits that are unassigned at the end of your fiscal year. To verify this figure, go to Reports Credits Unassigned. Converted To Liens (Principal Only) 120
121 To prove the Converted To Liens (Principal Only) field, use the Deposit report for the deposit created by the lien (or the lien totals page from the lien report). Remember, this is the total of the principal only and does not include interest or cost. Betterment Taxes Betterment Taxes are handled just like any other tax (Property, Timber). Follow the same instructions under Remitted to Treasurer above. Discounts Allowed The Discounts Allowed fields will only apply if your municipality, by a vote at town meeting, gives a discount to people who pay their taxes early. The amount on this line is the amount you did not collect due to the discount. To prove the figures, go to Reports Discounts. Page 3 of the MS-61 Page 3 of the MS-61 is strictly the reporting of your lien(s) activity for the year. It is the same process you followed for the previous pages, but on a smaller scale. Note, if you processed two liens in one year, you will need to add the figures together from the Collection YTD report to match the figures on the MS-61. Summary of Debits Unredeemed Liens Balance - Beginning of Year The Unredeemed Liens Beginning of FY and the Unredeemed Elderly Liens Beg. of FY should match the Unredeemed Liens End of FY and the Unredeemed Elderly Liens End of FY from last years MS-61 and the Beginning Balance on the Collection YTD report. Liens Executed During Fiscal Year Liens Executed During FY are liens you created this year and should match the Committed and Supplemented column on the Collections YTD report. It should also match the total on the Deposit that was created at the time of the lien and the lien execution report. Interest and Cost Collected (After Lien Execution) Interest and Costs Collected is the amount of interest and penalties you collected during the fiscal year. To verify this figure with the Collection YTD report, look under the Collected -Interest and Penalties column for the lien year you are balancing. Add Line - Liens Supplemented This Fiscal Year This line will only be utilized if during the fiscal year you have had to supplement in a tax lien. For example, if you deeded a property in December, closed your fiscal year, and then the selectmen decided in January they didn't want to take the deed. In this case your only option would be to supplement the liens back in. Summary of Credits Redemptions 121
122 The Redemptions figure is the amount you have collected in principal this fiscal year and will match the Collected -Principal column on the Collections YTD report for each individual lien warrant. Interest and Cost Collected The Interest and Cost Collected is the same amount as the Interest and Cost Collected under the Debits section above. Abatements of Unredeemed Liens Abatements of Unredeemed Liens are any abatements you have received and posted during the fiscal year. This figure will match your Collections YTD report under the Abated column and the details will come from the Abatements report. Liens Deeded to Municipality Liens Deeded to Municipality are the principal amounts that were owed on the liens of the properties that went to deed. These figures will match your Collections YTD report under the Deeded column and the details will come from the Deeded Property report. Unredeemed Liens End of FY Unredeemed Liens End of FY and Unredeemed Elderly Liens End of FY are what is still outstanding in liens at the end of your fiscal year. They should match your Balance Due column on the Collections YTD report. The details of who is unpaid is on the All Unpaid Receivables report. Remember to sign and date the report. Give a copy to your selectmen for the town report. Make a copy for your auditors, a copy for yourself, and mail the original to DRA by the following dates: March 1st for municipalities reporting on a fiscal year basis pursuant to RSA 31:94 (January- December). September 1st for municipalities reporting on an optional fiscal year basis pursuant to RSA 31:94-a (July-June) Elderly Liens Elderly liens are not represented on the MS-61 submitted to the DRA. However, you can view a summary of Elderly liens committed and collected at the bottom of page three on the preview MS- 61 printed from Tax Collect. Close Period At the end of every fiscal year, after all the reports are run and balanced, you must use the Close Period process to tell the system to capture all ending balances and create the beginning balance for the new fiscal year. Do not Close Period until you are sure you are in balance and all corrections and deposits have been made. Once you close the fiscal year, you will not be able to go back and post/correct payments made prior to the close. Also, you should create a backup of your current fiscal year database before proceeding (see Backup Database). 122

123 At the end of your fiscal year, you are allowed to hold the books open for ten days in order to post payments and ensure all payments have cleared the bank. However, if you do not Close Period, you will not be able to post payments for the new fiscal year. The ten days should only be used to post payments or correct errors. You should not be assigning credits (see Assigning Credits). All credits should have been assigned prior to the end of your fiscal year. If you assign credits after the end of your fiscal year, but before the close, you may create reporting problems in your next fiscal year. To Close Period choose Utilities Close Period. The Close Fiscal Period dialog box displays. If your MS-61 is not in balance (in the Tax Collect system), you will not be allowed to close the period. You will need to click Cancel, find and fix the error, and then proceed with the Close Period procedure. As long as the dialog box states you are in balance, select Proceed. The Tax Collect system will start the process of closing the period and will flash several screens while it prepares to Close Period and archives reports (see Archived Reports ). When the process is complete, a message will display. Click OK to finalize the process. You should run a Collection YTD report (see Collection YTD Report) to verify your beginning balances match the ending balances for the report run prior to the close. Archived Reports As part of the Close Period process (see Close Period), the system will automatically archive several reports in the database, which you can then retrieve and reprint at anytime in the future. The archived reports include the following: MS-61 Report Collections Year to Date Report Credits Report Deleted Receipts Report Uncollected Interest Report Receivables By Owner 123

124 Receivables By Warrant Receivables By Warrant Unpaid Redemptions Abatements Report Supplements Report Monthly Balance Reports Uncollected Interest To view the Archived Reports choose Reports Archived. You can choose from the list of fiscal years and then select the report you wish to reprint. You should still print out your own reports prior to the close, but this should provide a useful resource for referring back to previous years' reports. Purge of Prior Years History Some towns that have been on the Avitar Tax Collect system for years may have as many as ten years worth of invoices and transactions in their Prior Years database. This can increase the size of the database and make the process of searching and displaying information take longer than desired. The Avitar Tax Collect system allows you to purge anything prior to three years ago from the Prior Years database. The information is exported to a series of files that can subsequently be imported back into the database if the need arises. To purge prior years' data, press the Prior Years toolbar button and choose File Manage Prior History. The Purge Prior History dialog box displays. 124

125 Select the year up to which you wish to purge by using the Purge Data Prior To drop down box and then select Purge Data. This process can take a while depending on the amount of data being purged. A status bar at the bottom of the dialog box will show the progress. The data is automatically purged to C:\Program Files\Civicware to a folder named PRPurge followed by the date of the purge. 125

126 Reports Menu The Reports Menu offers numerous reports to help you in balancing and proving the activity you have processed throughout the Avitar Tax Collect system. Most reports can be run by date range or for the whole fiscal year. In all cases, the report will display on the screen allowing you to view the report without having to print it. Credits Report In the Avitar Tax Collect system, credits can be assigned to a receivable, payables, or Interest and Penalties. They can also be carried as a credit from one fiscal year to the next. The Credits Report will assist you in keeping track of the status of a credit. To view the Credits Report choose Reports Credits. The Credit Report dialog box displays. Depending on what you want to include in the report, will determine which radio buttons you select. The Credit Types to Include tells the system what type of credits to include and the Filter Credits allows you to restrict the report to certain conditions. For example, you may want to see all credits Assigned for the month of June. In this case, under Credit Types to Include, you would select Assigned. This will give you several Assigned To options: 126

127 All: This will include all credits that have been assigned. Receivables: This will include only credits assigned to an invoice. Payables: This will include only credits that have been refunded. Interest/Penalties: This will include only credits assigned to Interest/Penalties. Under Filter Credits you would select By Assigned Date, which enables the from and to date drop down boxes. Using the month date picker, select from 06/01/xxxx to 06/30/xxxx. When the Deleted option is selected, Credits deleted before being deposited are clearly labeled, VOID BEFORE DEPOSIT. Credits deleted after a deposit are labeled VOID. After making your selection(s), select View to display the report. The report will display on the screen and can be printed or exported to a file (see Printing). Deposit Reports When a deposit is created, a Deposit Report listing all the payments included in the deposit is displayed for viewing and subsequent printing. Also, if the Deposit Slip indicator is set (see Rates & Fees Tab) a deposit slip will display. If however, you need to reprint a Deposit Report, or a Deposit Slip Report, you can do so from Deposit Reports. Deposit Report The Deposit Report will reprint any, all, or a range of deposits. To print a Deposit Report choose Reports Deposits Deposits. The Deposit Report dialog box displays. There are two options to filter the report by: 127
128 By Deposit Number: Allows you to reprint a single deposit number or a range of deposit numbers by typing the numbers into the text boxes. By Deposit Date: Allows you to reprint deposits for a single day or for range of days. For example the month of July. Use the month date picker to select the from (beginning date) and the to (ending date). Once you have made your selection, select View to display the report. The report will display on the screen and can be printed or exported to a file (see Printing). Deposit Slip Report The Deposit Slip was created to assist you with eliminating the need to hand write a deposit slip. It prints the check number, payer name, and amount for each check along with a cash total and the grand total for the deposit. This format may or may not be acceptable by your bank -- many of our Town Clerk users have been using it for years instead of creating one manually. Even if the format of this report is not acceptable by your bank, it may be helpful to print it anyway, if only to help you in preparing your traditional bank Deposit Slip. The Deposit Slip feature must be enabled in the system. To enable the option, choose Utilities Town Information. On the Rates & Fees Tab, check the "Use System Generated Deposit Slips" option. Once enabled, you will be able to enter the bank name, bank account number, and bank routing number. This information will then display on the Deposit Slip. To print a Deposit Slip choose Reports Deposits Deposit Slip. Using the drop down text box, select the deposit for which you wish to reprint a slip. Once you have made your selection, select View to display the report. The report will display on the screen and can be printed or exported to a file (see Printing). Note, on reprints, the slip will display the "REPRINT" watermark. Deposit Summary Report The Deposit Summary report produces a summarized report of all deposits. It can be generated by deposit number, deposit date, or for all deposits. This report is commonly used to find balancing issues between the Tax Collector and the Treasurer. 128

129 To view and print the Deposit Summary report choose Reports Deposits Deposits Summary. The Deposit Summary Report dialog box displays. There are three options to filter the report by: By Deposit Number: Allows you to print for a single deposit number or a range of deposit numbers by typing the numbers into the text boxes. By Deposit Date: Allows you to print a summary of deposits for a single day or for range of days. For example the month of July. Use the month date picker to select the date range. All Deposits: This deposit summary report will list every deposit for the current fiscal year. Once you have selected the appropriate radio butt, click View. The report will display on the screen and can be printed or exported to a file (see Printing). Activity Report The Activity Report produces a report showing the current activity for an individual owner or PID. It will show all activity that has occurred since the last purge date. For example, John Smith has the following activity: 2008P01 paid 07/01/ P02 paid 12/01/ P01 paid 07/01/2009 If you did not purge your paid invoices at the end of the fiscal year (in this case December 2008) all three invoices with their subsequent payments will be shown on the Activity Report. If you purged your paid invoices in December, the only invoice shown would be the 2009P01. To view and print the Activity Report choose Reports Activity. The Activity Report dialog box displays. 129

130 The Activity Report Interest Date allows you to select the date to which interest should be calculated and displayed on the report. This is important when you are printing the report for a property owner who wants to know what they will owe on a certain date. Use the date picker to select the Interest date. The Activity By Owner radio button will allow you to produce an Activity Report on an owner by showing all properties they own. For example, John Smith owns five parcels, so by selecting Activity By Owner the report will display the activity for all five parcels. To select an Owner, click on the ellipsis. This will allow you to search the tree view by Current or Billed Owner. Highlight the owner and click Select. The Activity By PID radio button will restrict the report to only activity for the selected parcel. Using the example above, John Smith is selling one of his five lots and needs a report showing what is owed just on this one property. You would select the Activity By PID radio button and type the Map/Lot/Sub into the text boxes. The system has the ability to filter the warrants that appear on the Activity report. For example, you only want to display property tax warrant activity. To suppress warrants, select the Filter Warrants check box and then click on the Set Warrant Filter link to choose the warrant(s).you can check the individual check boxes of the specific warrants you wish to include, or you can use the links at the bottom of the Warrant Filter dialog box to select entire categories of warrants. Once you set a Warrant Filter, it will remain available until you exit the program. 130
131 You can also suppress paid invoices from displaying on the report by clicking in the Exclude Paid Invoices check box. Keep in mind that if all the invoices are paid, a message will display stating no invoices were found. You can create a custom message to be included on the Activity report by selecting the Include Custom Message (see Custom Messages). Once you have made your selections, click View and the Select Mailing Address dialog box opens. In it, you will be able to choose from every distinct current owner address included on any and all invoices included on the receipt. Additionally, you will have the option to enter a new mailing address. The name for the new mailing address will default to the receipt payer name which you can choose to use or type over to enter a different recipient. So, for example, if a bank paid five different invoices for five different parcels, each with its own distinct current owner address, during a reprint you could choose to include any of those five addresses on the receipt or you could choose to manually enter the mailing address for the bank. If the address is unknown or you do not wish to include any of the possible options on the reprinted receipt, select No Address. Note that whether you are opting to include an address on a receipt from one of the available distinct current owner addresses or you are choosing to manually enter a different address the address for the receipt will not be saved. 131

132 Receivables Reports The Receivables Reports provide a wide variety of reports associated with the collections of taxes. The Receivables Reports include the following: Individual Invoice Group of Invoices Current History by Owner Paid Warrant Ledger Individual Invoice Individual Invoice is used to print a statement showing the activity on a selected invoice. This report displays the information on the billing, as well as any payments made for this particular invoice. In order to use this option, you must select the invoice you want to view by using the Receivables Data Access tabs before running the report. Once you have selected the invoice, to view and/or print an Individual Invoice, choose Reports Receivables Individual Invoice. The Individual Invoice report will display on the screen for you to view and/or print (see Printing). Group of Invoices The Group of Invoices report lists every invoice for a specific warrant(s) and can be configured to display only unpaid receivables or all paid receivables. This report is frequently run at year end for all unpaid receivables. To view and/or print a Group of Invoices choose Reports Receivables Group of Invoices. The Receivables Report dialog box displays. 132
133 The Include Warrant drop down box defaults to including All Warrants, however, you can select an individual warrant (2009P02 Property Tax). If you want to select multiple warrants, but not All Warrants, select the Filter Warrants check box. Click on the Set Warrant Filter link to choose the warrants you wish to appear on the Receivables report. You can check the individual check boxes of the specific warrants you wish to include, or you can use the links at the bottom of the Warrant Filter dialog box to select entire categories of warrants. Once you set a Warrant Filter, it will remain available until you close the application. There are two radio button options under the Include Warrant heading, which will tell the system what you want to include on the report. Only Unpaid Receivables: Selecting this option indicates you do not want to display any receivable that has been paid. It is commonly used at the end of the fiscal year to show who still owes taxes. All Receivables: This Selection will display every receivable for the given warrant, whether it has been paid or not. The Interest Date date picker allows you to change the date to which interest will be calculated and displayed on the report. The Sort Report By options will change the order in which the report prints and offers two options. Warrant Then Owner: This will order the report by the oldest warrant first, then under each warrant is every invoice by owner's last name. Owner Then Warrant: This will order the report alphabetically by owner's last name and then listing each invoice. When you select this option, an Include Address check box displays. If you check this box, the report will display each owners address, as well as the warrant information. Once you have made your selections, click View. The report will display on the screen for you to view and/or print (see Printing). Current History by Owner The Current History by Owner report displays a list of every owner listing each parcel as well as any invoice in the current year database. It will report each payment, as well as its corresponding deposit number. To view and/or print the Current History by Owner report choose Reports Receivables Current History by Owner. The report will display on the screen for you to view and/or print (see Printing). Paid Warrant The Paid Warrant report effectively combines the invoice information displayed for an entire warrant on the Ledger Report with the transactional information displayed for a smaller group of invoices on the Activity Report. You can select the warrant for the report as well as the date to which interest should be calculated. Note: As this report gathers and organizes a wealth of transactional data for an entire warrant's worth of invoices it can take a while for the system to generate it -- as in several minutes for a typical warrant of several thousand invoices. To get a look at the report to determine if it's something you may want to use, try generating the report for a smaller warrant like a Timber or Use Change warrant that should not take too long to display. 133

.")
134 To view and/or print the Paid Warrant report choose Reports Receivables Paid Warrant. The Paid Warrant screen displays. The Paid Warrant Interest Date allows you to select the date to which interest should be calculated, which will display on the report. Use the date picker to select the correct date. Use the Select Warrant drop down text box to select the warrant type to include. You can only select one warrant at a time. Once you have made your selections, click View. The report will display on the screen for you to view and/or print (see Printing). Ledger The Ledger report will produce a warrant style ledger report for manual posting or counter review showing the billed amount and the current balance at printing for the selected warrant. To view and/or print the Ledger report choose Reports Receivables Ledger. The Ledger dialog box displays. Using the Warrant drop down text box, select the Warrant and click View. The report will display on the screen for you to view and/or print (see Printing). 134
135 Uncollected Interest Report The Uncollected Interest report will produce a report of each account where interest was edited at the time of payment. To view/print the report choose Reports Uncollected Interest. You have two options available: Only Interest Greater Than $5.00: This report will show only interest greater than your forgivable amount (see Forgive Interest). All Uncollected Interest: This report will show all uncollected interest (even amounts less than the forgivable amount). If you are forgiving interest greater than the forgivable amount you should have documentation to explain why it was necessary as the report only shows that it was done, but not why it was done. Once you have made your selection the report will display on the screen for you to view and/or print (see Printing). Deleted Receipts Report The Deleted Receipts report will display all receipts that have been deleted after deposit, either due to data entry error or a returned check. As this report is used by Auditors, it is recommended that you print this report monthly. To view/print the report choose Reports Deleted Receipts. You will be asked if you want to suppress the prior years information from the report. If you select Yes, you will only this the receipts that have been deleted during this fiscal year. By selecting No, you will see all receipts deleted since the last purge of your paid items. Once you select an option, the report will display on the screen for you to view and/or print (see Printing). Inventory Penalties Report The Inventory Penalties report will display all inventory penalties by property owner name. It shows the invoice number and the amount billed each owner. If your municipality does not collect Inventory Penalties, this report will state there are no Inventory Penalties to report. To view the report choose Reports Inventory Penalties. The report will display on the screen for you to view and/or print (see Printing). NSF Checks Report The NSF Checks report will display a list of all the checks that have been returned by the bank unprocessed due to insufficient funds. To view the report choose Reports NSF Checks. The report will display on the screen for you to view and/or print (see Printing). Penalties Reports There are three reports dealing with Penalties, Penalties Assigned, Inventory Penalties, Balances. Each report is designed to assist you in the tracking and reporting of penalties added to the system. Penalties Assigned 135

136 The Penalties report is a listing of all of the penalties you have assigned in the system. You may report them by specific type and then sort by owner name, invoice number, or PID. To view the report choose Reports Penalties. The Penalty Report dialog box displays. There are four options to help filter what is displayed on the report: Penalty Types to Include: The system defaults to All Penalties, however, you can select one of the penalty type radio buttons to display only penalties matching those criteria. Penalties On Warrant: This option allows you to select penalties for a specific warrant. For example, if you posted your Mortgagee Notice penalties for the 2008L, selecting 2008L01-Lien, with the Mortgagee Notice radio button checked, will display only those penalties. Group Penalties By: This option allows you to sort the report in various formats. For example, you want to see all penalties by Owner Name, thereby displaying a report in alphabetical order with each penalty under the owner name. Order Penalties Within Group By: The above option allows you to group the penalties in a specific order. This option takes that order one step further by ordering the penalties within that group. For example, you might want to sort the Mortgagee Notice penalties by Penalty type and then by Owner Name. The report would display alphabetically by owners who received a mortgagee notice posted to their 2008L. The final option is the Only Show Deleted Penalties check box. Select this box if you only want to view the deleted penalties. 136

137 Once you have made your selections, click View. The report will display on the screen for you to view and/or print (see Printing). Inventory Penalties Inventory Penalties produces a report listing everyone who was billed for an inventory penalty. To print go to Reports Penalty Inventory Penalties. Balances The Penalty Balances Report is used by collectors and their finance departments in order to track when penalties are added, subsequently paid, and the remaining balance for each warrant. This report looks similar to the monthly balance report, except it deals only with penalties. To print, go to Reports Penalty Balances and select the corresponding month. Labels The Labels report will generate a list of owners and addresses in laser label format. They may be printed for a specific warrant, all warrants, all receivables, or only unpaid invoices. To view/print the report choose Reports Labels. The Mailing Labels dialog box displays. The Include Labels From Warrant radio button allows you the option of printing labels for owners on a specific warrant or for all warrants. Using the drop down box, select the warrant(s). You may print labels for every owner for the selected warrant by selecting the All Receivables radio button, or choose the Only Unpaid Receivables radio button to select owners who have not paid their bills for the selected warrant. The Include Labels From Current Recordset is only available as an option if you have created a Recordset using the Query function (see User Query). This feature will print labels for a specific recordset. For example, you queried for all Invoices greater than $10, and need to send a letter to these property owners. Once the recordset is created, the Include labels From Current Recordset radio button are enabled. Once you have made your selections, click View. The report will display on the screen for you to view and/or print (see Printing). Post-It Notes Report The Post-It Notes feature enables you to add notes to parcels and/or receipts (see Post-It Notes). In order to assist in maintaining the Post-It Notes in the system, you can print a report of all notes in the system by parcel, which will show all Post-It Notes added to parcels or to receipts. 137
138 To view the report choose Reports Post-It Notes select by Parcels or Receipts. The report will display on the screen for you to view and/or print (see Printing). 138
139 Penalties Menu The Penalties option is used to apply a penalty to a selected invoice. You can also change a penalty amount that has already been posted, or delete it all together. All of the Notice penalties are generally handled automatically via the lien, deed, and mortgagee notice options found on the Utilities menu, however, there may be instances where you will need to post individual penalties manually. Add Penalty The Add Penalty function allows you to manually add a penalty to a selected invoice. To Add Penalty, using the Receivables Data Access tab, search and select the invoice you wish to add a penalty. From the main menu select Penalties and select the type of penalty from the drop down list. The dialog box for that penalty will display. Select the Transaction Date using the month date picker, enter the Penalty Amount into the text box, and click Assign. Note: When selecting Other Penalty, the system allows the ability to enter a brief description as to the nature of the penalty. Delete Penalty The Delete Penalty option allows you to delete a penalty that was posted to an invoice. Deletion will only be permitted if there are no valid transactions that occurred after the penalty was assigned. When you select Delete Penalty, the system will check each penalty to determine if a deletion should be permitted. To Delete Penalty, using the Receivables Data Access tab, search and select the invoice with the penalty. From the main menu select Penalties Delete Penalty. The Delete Penalty dialog box displays. To complete the process, click the Delete button. 139

140 Note: The system will display a message dialog box if one or more penalties are found that cannot be deleted, due to a subsequent payment. Select OK to access the Delete Penalty Screen and use the buttons to navigate to the desired penalty. The Delete Button will only be enabled for penalties that can be deleted. Change Penalty The Change Penalty function allows you to change the amount charged on a penalty that is already posted to an invoice, but does not have a valid transaction(s) that occurred after the penalty was assigned. To Change Penalty, using the Receivables Data Access tab, search and select the invoice with the penalty. From the main menu select Penalties Change Penalty. The Change Penalty dialog box displays. In the Penalty Amount text box, type in the correct penalty amount, then select Change to finish the process. 140
141 Interest Interest is calculated based on the warrant type and due date assigned to that warrant. Once a warrant is created, the Interest Rate can be changed. It can also be forgiven on a paid invoice. Forgive Interest The Forgive Interest function allows you to forgive interest of a previously posted payment. For example, the total owed on an invoice was $1,288.07, which included interest due of $ The customer sent a payment in the amount of $1, The system automatically pays the interest of $15.07 first and applies the remaining $1, toward principal, leaving a balance of $0.07. At the time the payment was made, the system asked if you wanted to Forgive Interest of.07. If you selected No, the $0.07 would show as principal owed and the only way to get rid of it, would be through the Forgive Interest function. To forgive Interest, using the Receivables Data Access tab, search and select the invoice displaying the payment made. From the main menu select Edit Invoice Forgive Interest. The Forgive Interest dialog box displays. Click Yes to forgive the interest. Note: Interest can only be forgiven up to the amount allowed by RSA 76:13 and the Maximum amount set in the Avitar Tax Collect system (see Rates & Fees Tab). Change Interest Rate The Change Interest Rate function allows you change the interest rate of a selected invoice. The change will only apply to the selected bill and must be done before any payments are posted. Also, the interest rate on liened accounts cannot be edited. To Change the Interest Rate, using the Receivables Data Access tab, search and select the invoice you wish to change the rate on. From the main menu select Edit Invoice Change Interest Rate. The Change Interest Rate dialog box displays with the current interest rate. Enter the new rate into the text box and select OK to finalize the process. Interest Calculator The Interest Calculator function will compute the interest and per diem on any principal amount over a specified period of time. You access the Interest Calculator from Utilities Interest Calculator. 141

142 To use the Interest Calculator, simply enter the principal amount on which you wish to calculate interest, as well as the start and end date. The calculator will display the interest for that period, as well as the per diem. You can print the results of the Interest Calculator. Once you enter information into the Interest Calculator a printer icon displays. You can also add a description to the printed results. For example, a parcel address, or owner s name or even a disclaimer can be inserted to print above the calculation. To add a description to the printed results, select the Update Description link located on the lower left hand section of the Interest Calculator dialog box. A new window will open; select the font size and the alignment. Then type the description into the text box. Once done, select Save. When you click on the printer icon you will be asked if you want to include the custom description. If you select Yes, the Interest Calculator results will display with your description included. If you select No, the Interest Calculator results will display without the description. Note, the last entered description will remain unless it is modified. Note: This calculates interest consistent with the way in which the system calculates interest -- you should not use it when calculating interest on your mortgage or credit card bill as these entities typically calculate interest using elaborate compounding and average daily balances. 142

143 Maintain Users The Maintain Users functions allows for the adding, deleting and modifying of users, as well as the ability to change the password for an existing user. Add User The Add User function allows you to create user names and passwords into the Avitar Tax Collect system. To Add User choose Utilities Maintain Users Add User. The Add User dialog box displays. Enter a New User Name, which can be any combination of letters and/or numbers. The User Name is not case sensitive, however, passwords are. Once you enter the Password, you will need to reenter it into the Confirm Password text box. The Group drop down box allows you to restrict the access a user has to the program. For example, a Basic User can post payments, see reports, and has basic utility functions. Standard User allow the user to perform all system functions. The Auditor group allows town Auditors a way to generate and print reports only. Once you have completed the information for this user, select Add User to complete the process. Modify User The Modify User feature allows you to change a user's access level. This usually occurs when a deputy takes on more responsibility and, therefore, needs to have further access in the system. To Modify User choose Utilities Maintain Users Modify User. Select the User you wish to modify from the drop down box. From the Group drop down box, select the user's new access level and once done, click Modify User to complete the process. Delete User The Delete User function allows you to delete a user from the system. This is used when an employee no longer works for you and/or should not have access to the Avitar Tax Collect program. To Delete User choose Utilities Maintain Users Delete User. The Delete User dialog box displays. Use the Select User to Be Deleted drop down box to select the user you wish to delete and select Delete User to complete the process. 143

144 Change Password A user can change their password by utilizing the Change Password function. To Change Password choose Utilities Maintain Users Change Password. The Change Password dialog box displays. Select the User for whom you want to change the password. The system defaults to the User who is logged into the system. To select a different user, use the drop down text box to display and select from a list of Users. Enter the New Password into the text box and retype it into the Confirm New Password text box. Once complete, select Change Password. Note you can only change passwords for users with lesser access than your own thus a deputy would not be able to change the collector's password. 144

145 Town Settings The Town Settings section is used to maintain all of your local information such as; Tax Collector s name and address, fiscal year, rates and fees, discounts, and town accounts. There are six tabs, each with their own information and function. The information contained in the tabs is configured by Avitar when your system is installed. For information on each tab, see the tab heading for assistance. To access Town Settings choose Utilities Town Settings. The Town Settings dialog box will display. Tax Collector Tab The Town Settings Tax Collector Tab maintains the address, hours, phone number, and/or the names of your current Selectmen. To view and/or update the information choose Utilities Town Settings and select the Tax Collector tab. Update the information if needed and press Apply Changes. Fiscal Year Tab The Town Settings Fiscal Year Tab displays the information regarding your municipality's fiscal year (see Fiscal Year). Fiscal Year date changes can only occur through the Close Period process (see Close Period), or by calling Avitar. The only function that is available to you is the Purge Paid Invoices from Current Year Data button. This will allow you to purge data from your current year database to your prior year s database (see Purge Paid Invoices). 145

146 Purge Paid Invoices The Town Settings Fiscal Year tab allows you to manually Purge Paid Invoice from your current year database to your prior year database. Invoices, receipts, and transactions are created in your current database through the normal processes of being a Tax Collector importing warrants, creating supplements, posting receipts, and processing abatements. Over time, if you choose to never purge your paid invoices, not only will the tree view lists grow and become cumbersome to navigate, but the added data will cause your system to run slower when generating reports and creating deposits. What and when you should you purge depends on your preference and what you purge will often times dictate when you purge. Some collectors will purge all paid invoices up to the prior fiscal year (e.g. in FY 2014 they purge up to 2013). If this is your preference, you probably want to wait until after you have imported your first issue property tax bills; that way you always have at least one invoice for each parcel in the current year data. Other collectors will purge all paid invoices up to the year for which they have executed their deeds (e.g. in FY 2014 they purge up to 2011). If this is your preference, the time of year at which you purge is less important. Before you begin the purge process, you should create a backup of your current data (see Backup Database). The backup is extremely important if something happens to interrupt the process we will need to use the backup to restore your data. Also, make sure all other users are out of Tax Col- 146

147 lect and you have printed a Collection YTD report. You can use this report to validate your balances did not change once the purge process is complete. To Purge Paid Invoices choose Utilities Town Settings and select the Fiscal Year Tab. Click on the Purge Duplicate Paid Invoices from Current Year Data button. The Proceed with Purge of Prior Year Paid Invoices dialog box displays. After reading the message, select Yes to continue with the purge. 147


148 The next dialog box that displays allows you to choose a fiscal year up to which the data should be purged. The system defaults to your last fiscal year, which you can accept by selecting Yes, or No to enter a new year. After making your selection, the system will begin the process of the purge. Rates, Fees, Deposit Tab The Town Settings Rates, Fees, Deposit tab is used to set the various interest rates on the different types of warrants, the returned check fee amount, and the maximum amount you can assign to Interest and Penalties. It is 148

149 also where you can set the system to use computer generated Deposit Slips (see Deposit Slip Report). To view the Rates, Fees, Deposit tab choose Utilities Town Settings and select the Rates, Fees, Deposit tab. To change the interest rate that is charged by the system on delinquent taxes, simply type the new rate into the text box next to the appropriate warrant type. This rate is set by statutes and, therefore, will not change unless a law has changed. The Fees section indicates how much you want to charge a customer for a Bad Check. Once this amount is set, when a check is deleted due to a Returned Check (see Delete Receipt), the system will prompt to ask if you want apply this amount to the invoice. The Interest & Penalties section allows you to set the maximum amount of an overpayment that can be assigned to Interest & Penalties. Generally, the system defaults to $5.00, as that was the maximum allowed for many years. A change was made to RSA 76:13 increasing the amount to up to $25.00, however, you would need to enter the new amount into the text box in order for the system to reflect this change. The Prepare Deposit by User function allows you to automatically create separate deposits for each user. This allows each user to keep his or her work separate and prepare the deposits individually, as opposed to generating a single deposit for the entire office. Select Use Electronic Tender Types (EFT) if you are processing any payments via any method other than the standard Cash and Check (e.g. credit cards/ach) The system has several default EFT payment methods contact Avitar if you wish to create additional electronic tender type descriptions. Once you select to Use Electronic Tender Types, another checkbox will display that gives you the option to Include EFT Payments in Deposit Total. If you check the box, the amount you collected in EFT payments will be included in your overall deposit total on the deposit report. For example, if you collected $ in Checks, $ in Cash, and $ in EFT, your deposit total for the day would show as $ Select this option if you want your total deposit to reflect all the transactions you processed during the day, not just what you are actually taking to the bank. If you do not check the Include EFT Payments in Deposit Total, the EFT payments will still be itemized on the 149
150 deposit report, but will not be included in the overall deposit total. Using the example above, the deposit total would equal $700.00, which is the total of the Cash and Checks only. You will want to select this option if you want the deposit total to match what is actually being taken to the bank. With the EFT payment option enabled, you will have to select a tender type radio button (Electronic, Cash, Check) when you pay an invoice. When you select Electronic as the tender type, a dropdown text box displays allowing you to select the type of Electronic payment you received. By selecting the type of electronic payment used, the system captures the information and adds a total at the end of the deposit report summarizing the amounts by each electronic tender type. This is useful when balancing with credit card companies. The section labeled Deposits, Deposit Slips, & Tender Types. If you want the system to print a deposit slip at the time the deposit is finalized in the system, click on the Use System Generated Deposit Slips check box. Once checked, you will be able to enter the Bank Name, Bank Account Number, and the Bank Routing Number. This information will print on the deposit slip. The final option on this tab is Deposit Report Label for Treasurer's Signature. If this text box is left blank, the Deposit Report Label will read Treasurer's Signature. If you want to have the label read something different, for example Received By, simply type the information into the text box. Keep in mind, you are limited to 25 characters. After all changes have been made, press Apply Changes. Discounts Tab The Discounts tab allows you to automatically discount due amounts when a full payment is made, provided the payment is made at least a specified number of days prior to the due date (i.e. an early payment). When a payment is made within the allotted period of time for discounting, a box will appear with the heading Discount Bill? asking whether you wish to discount the bill. Select Yes to apply the discount. The MS-61 report will show the discount applied. To configure the system to accept Discounts for early payment, choose Utilities Town Settings and select the Discounts tab. 150

151 To accept discounts, click in the Apply Discounts For Early Payment checkbox. Enter the Discount Percentage tax payers will receive and the minimum number of days prior to the due date their payment must be applied in order to be eligible for this discount. After all changes have been made, press Apply Changes. Town Accounts Tab The Town Settings Town Accounts Tab allows you to enter your municipality's account numbers for each warrant and category. Once the account numbers are entered, the deposit report will reflect the account numbers next to the corresponding warrants every time the deposit report is displayed (see Deposit). To add account numbers to your deposit report, from the main menu select Utilities Town Settings and select the Town Accounts tab. 151
152 Enter the account numbers into the grid and click Apply Changes. Miscellaneous Tab The Town Settings Miscellaneous tab includes a number of different options. It is used to tell the system whether you want to prepare deposits by Users, set up taxable districts, create the settings for your backup, etc. 152

153 Display Inventory Penalties The Display Inventory Penalties function is used for those municipalities using Inventory Penalties. When the fall warrant is imported into the Avitar Tax Collect system, the Inventory Penalty amounts are added to the tax bill to display as a total principal amount owed. In order to assist you in knowing what the actual amount of the penalty was, you can set the system to display the Inventory Penalties, which will then show the amount of the penalty under the Assessment section of the Receivables main screen, labeled Invntry Pnlty. To Display Inventory Penalties choose Utilities Town Settings Miscellaneous tab. Click in the Display Inventory Penalties checkbox and select Apply Changes. Combine Water & Sewer Warrants on Importation The Combine Water & Sewer Warrants on Importation option is available to municipalities that utilize Avitar's Utility Billing system. When this option is selected and Water & Sewer warrants are imported, the amounts owed are combined to make one invoice. For example, John Smith has a water bill for $50.00 and a sewer bill for $ If this option is selected, when you import the warrants, the bills will be combined and displayed as one bill for $ If you deposit the funds for each water and sewer warrant into separate checking accounts, you should not select this option. To Combine Water & Sewer Warrants on Importation choose Utilities Town Settings Miscellaneous tab. Click in the Combine Water & Sewer Warrants on Importation checkbox and select Apply Changes. Credits Assignment Search Order When a credit is assigned to a receivable, the system will search for likely invoices matching certain criteria. The Credits Assignment Search Order instructs the system on which order you wish to search. There are two 153
154 options: Search initially by PID, then Owner Name Search initially on Owner Name, then PID To select the Credits Assignment Search Order choose Utilities Town Settings Miscellaneous tab. Under the Credit Assignment Search order, select the radio button next to the search option you prefer and select Apply Changes. Districts/Precincts Tab Many municipalities have Districts/Precincts that are configured in the Avitar Assessing program in which each District/Precinct has its own taxable rate. In order to match with Assessing, the Districts/Precincts must be added to the Tax Collect system as this information will display on the tax bills. To add Districts/Precincts choose Utilities Town Settings Miscellaneous tab Districts/Precincts tab. Type in the Number of Tax Districts to Display and press tab. This will bring up the appropriate number of text boxes where you can enter the district names. Keep in mind the District order and the District names need to match what Assessing has. Once you have entered the names, select Compare With Assessing. The collect system will search the Assessing database and display the districts in Assessing and the Districts in Tax Collect. As long as they match press Apply Changes. System Settings The System Settings tab is used to create and store the backup settings, the Avitar Assessing database settings, and the Avitar Utility Billing settings. Generally, you should only make changes to these settings in consultation with Avitar as they affect the way in which your system communicates with the other programs' databases. To access the System Settings tab choose Utilities Town Settings Miscellaneous tab System Settings tab. Tax Bill Setup The Tax Bill Setup tab allows options for the tax bill format and allows you to print the tax bills with the separate "Current Use Credit" line item (however confusing it may be to your taxpayers). To access the Tax Bill Setup, select Utilities Town Settings Miscellaneous Tab Tax Bill Setup tab. 154
155 To print the bills with the Current Use Credit line item, select the box "Display "Current Use Credit as separate assessment on Property Tax Bill". The traditional tax bill format, which is the default setting, is divided into three distinct thirds with each third containing essentially the same information. The bottom third is removed and retained at the town office before mailing the other two thirds to the taxpayer. The taxpayer will then keep the middle portion for his or her records and return the top portion with the payment. The alternate tax bill format is designed to as an entire page that is sent to the taxpayer and they return the bottom third with the payment. By doing it this way, it simplifies the bill by eliminating much of the duplication of information. If you elect to use this format, you must make certain to either print a duplicate set of bills (the entire page) to retain for your records, or you should export a copy of the bills to PDF format for reference. The alternate property tax bill format has several advantages: You have more control over the message you include on the tax bill. This format provides more space than the previous two lines. You can choose to include an image unique to your town across the top of the tax bill. Similar to the notices, you can include an image that spans the width of the page. Or you can include an image that's only half the width of the page. The bill more clearly indicates the current due amount, as well as any past due amounts. The bottom third is formatted such that it can be inserted into a standard double window envelope and to reveal the appropriate payment and return addresses. 155
156 To use the alternate tax bill format, check the box labeled Use Alternate Format. Once you do, you have several options for formatting the header of the bill. The Regular Return Address option uses the default, in which the municipality's address information appears in the upper right hand corner of the bill's top third (suitable for display through the envelope's second window). The Unique Image option allows you to add an image that will appear in the upper right hand corner of the tax bill. This could be a town seal saved as a JPG file. You may need to experiment with the proper size and scale in order to have it display properly on the tax bill. The Same Image as Notices option will appear if you have already configured your notices to include a header image. If you select this option, the same image will be used on the tax bills. Once all changes have been made, select Apply Changes. ADS ProFund Settings ADS ProFund, now called Tyler Technologies, is a financial software company, which has worked with Avitar to integrate the Tax Collect financial functions with their software. To utilize this function, call Avitar. Notice Format For instructions on this section see Customize Notice. 156
157 Backup Database The Tax Collect system was designed in what is referred to as client/server architecture. Essentially, the system consists of two parts: 1. The client application that you use everyday to view and update parcel records. 2. The server application that runs behind the scenes and makes the data available to the client application. If your town only has the Avitar Tax Collect application installed on one computer, then that computer is fulfilling both roles, that of client and the server. If your town has several computers which can all access the assessment data, then you have a single server and multiple clients. 157

158 Server Application This method is used to create a backup using DBUtils while standing at the server computer. You will also need to run an initial backup to save the settings for scheduling a Windows Scheduled Task. Highlight the ap_townname database you wish to backup. Choose the browse button ( ) and navigate to the appropriate backup folder and name the file (e.g. ap_townname.bak). You can choose to check the box Compress Backup to ZIP File if you would like to compress the backup. Press the Backup button to create the backup file. This method creates a single backup file and must be initiated manually. Scheduling Automated Backups on the Server This method is used to schedule backups for one or more databases using DBUtils and DBUtilsScheduled. Again, this is performed on the server. You will first need to run an initial manual backup using DBUtils as outlined above to save the settings for a scheduled backup for each database. When doing so, make sure to check the box to Include Database in Scheduled Backups and once you press Backup make certain to indicate you wish to save the settings for use with the scheduled backups. Once you have configured the settings for each database you wish to include in the scheduled backup, you will need to add DBUtilsScheduled.exe (located in the C:\Program Files\Civicware folder as a Windows Scheduled Task. DBUtilsScheduled uses the settings configured within DBUtils to create backups without the need for user input. 158
159 For information on creating a Windows Scheduled Task refer to 159

160 Workstation Settings By initially configuring these settings, you can allow users (who may not have access to the server) to perform their own backups of the data from within the application on their workstation to a location on the user s computer. This is often helpful to allow users to create their own backups before undertaking significant operations such as warrant calculations or lien executions. Essentially, in this method the application requests SQL Server to create a backup file in a predetermined folder on the server from which the application can then retrieve the backup file to the workstation. The following schematic depicts the settings outlined below in more detail: You will need to create a shared directory on the server which is accessible by all workstations and users. We recommend C:\Avitar\Backup\Remote for the directory on the server. In order for the backup to work from the application, users must have permission to create and delete a file in this directory. To do so, open DBUtils and select the Assessing folder. If no remote backup location is set, select the browse button ( ) and navigate to the appropriate remote backup folder on the server. Once you have selected the folder press the OK button. 160
 adjacent to the Database Backup Directory text box.")
161 Once you have identified the shared location in DBUtils in which SQL Server will create backup files, you will have to set the corresponding backup location in the application as well: o Navigate to Utilities Town Settings Miscellaneous System Settings and press the browse button ( ) adjacent to the Database Backup Directory text box. A message box may indicate the network path currently configured to point from the workstation to the folder identified on the server as the Remote Backup Location. (Note this path should identify a location on the server using a path relative to the workstation.) Choose Yes if you wish to proceed with selecting a new location. The Server Backup Device Location message box will indicate if the Remote Backup Location has been set on the server using DBUtils. (Note this path identifies a location on the server using a path relative to the server itself this path will be different from the perspective of the workstation.) Press OK on the message box and browse to locate the appropriate remote backup folder location on the server relative to the workstation. Once the configurations have been made on the server and the workstation, the user can create a backup on their own workstation by selecting File Backup Database from within the program. Review the following schematic to better understand the sequence of events necessary during a backup from the workstation. 161
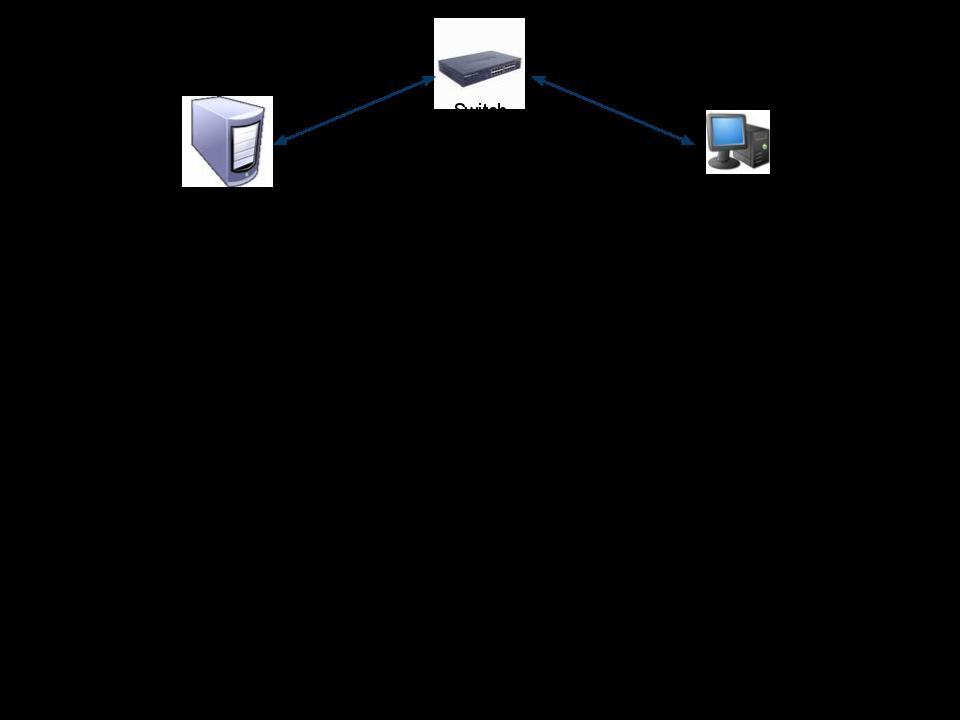
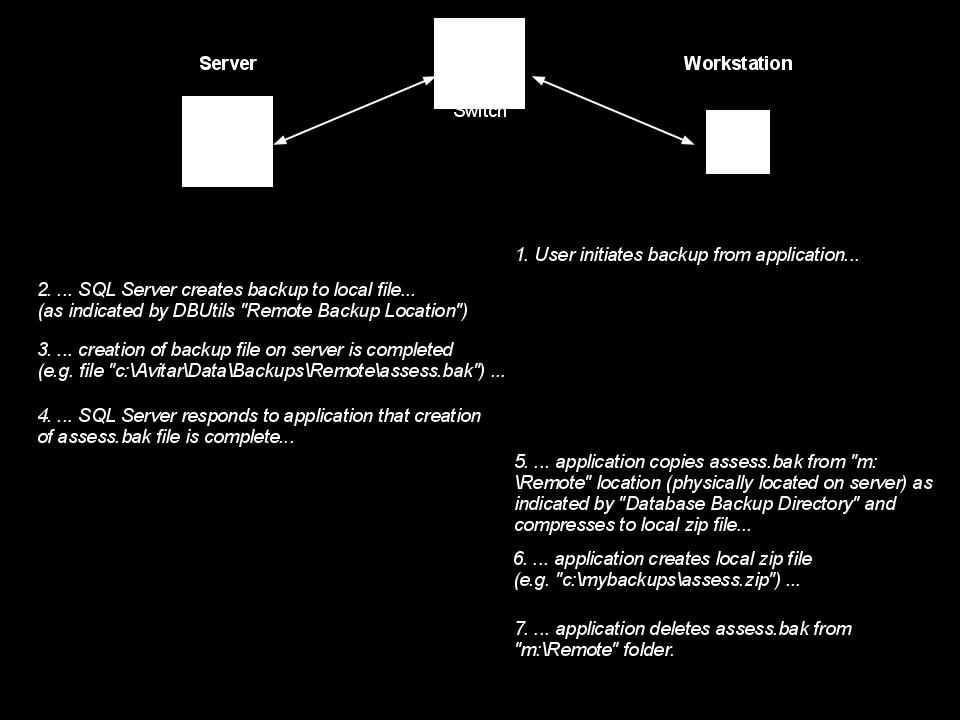
162 162
163 Import Database Script The Import Database Script function allows you to run update scripts as provided by Avitar. You will need a special, time-sensitive password in order to utilize this function. Call Avitar for assistance with this process. 163
164 FTP Data to Avitar The FTP Data to Avitar function allows you to transfer data to Avitar s FTP server when your computer is connected to the Internet. The acronym FTP stands for File Transfer Protocol and it is a method by which you can transfer data from your computer up to Avitar s web server utilizing the connectivity of the Internet. In order for this function to work, your computer s configuration must satisfy several conditions: Your remote backup must be configured such that you can use the File Backup Database menu item to successfully backup your data to your local computer. If this function is not configured, call Avitar. Your machine must have a connection to the Internet. If your connection is a dial-up connection that you must manually start, you will need to start the connection before selecting the FTP Data to Avitar menu item. If your database is large and your connection to the Internet utilizes dial-up, then the FTP function may be impractical due to the size of the database. In such cases, you will need to find an alternative for transferring the data. Any firewall application on your network must allow Avitar s avcollect.exe application to access the Internet. Firewalls exist in part to prevent malicious applications that may somehow get installed on your computer from being able to connect to other computers on the Internet to exploit your machine. In most all cases, however, these firewalls can be configured to allow certain trusted applications to access the Internet. As with the steps outlined above, you may need to contact your local hardware or networking specialist in order to help configure your system. If your system meets these criteria, select File FTP Data to Avitar and then press the FTP Data button. The progress bars will indicate the time remaining in the total process. Avitar Tax Collect Internet Kiosk The Avitar Tax Collect Internet Kiosk provides a method by which you can easily make invoice and transactional information maintained in the Avitar Tax Collect system available on the Internet. Taxpayers, mortgagees, banks, and title companies can view invoice summaries and balances, pay taxes (if enabled), download original invoices (if enabled), and receive paperless invoice notifications (if enabled) at any time of day without having to contact you for information. There are three options for deploying the Internet Kiosk: Limited: Invoice summary and balance only. Expanded: Invoice summary and balance, online payment capability. Comprehensive: Invoice summary and balance, online payment capability, downloadable invoices, and paperless notification. Your interaction with your Tax Kiosk will generally fall into the following categories: Updating Current Tax Information Online Modifying Who and What Appears Online Adding or Updating Tax Kiosk Messages Generation, Upload, and Maintenance of Downloadable PDF Invoices and Paperless Notification Settings. 164
165 Downloading, Importing, and Applying Payments (If configured with Invoice Cloud s Cloud Pay) See Features and Benefits for more details on the features and benefits of each option. 165
166 Features and Benefits Municipalities have several options for deploying Avitar s Tax Collect Internet Kiosk in conjunction with the Avitar Tax Collect system. The configuration which you and your municipality have selected will determine the options available, both within the Tax Collect program and on the Tax Kiosk itself. Note that each subsequent configuration includes all of the features of the previous configurations. 166
167 Limited Tax Collect Internet Kiosk The Limited Tax Kiosk configuration provides the following features: The web site can be customized for the municipality, showing specific contact information, office hours, news, color schemes, and pictures. Allows you to make your invoices and transactions available on the Internet. Internet users can search, select, and view invoices associated with the selected owner/parcel. Tax information is posted directly to the Internet from within the Avitar Tax Collect program. Information can be posted daily during tax season or more infrequently at other times of the year, using a simple export process. Internet users access the system directly and anonymously, without the need to purchase a subscription or obtain a username or login. Internet users can access tax information by Owner Name, Map and Lot (PID), or Parcel Address. Once an owner or parcel is selected, a list of all recent invoices is displayed, showing a summary for each invoice that includes type of invoice, due date, bill amount, and outstanding due amount. Internet users can change the Interest Date to determine the proper payment amount for future payments. For any individual invoice, the Internet user can click the Transactions or Assessments links to access additional information about the specific tax bill, including any transactions that have been made on that invoice (such as payments, abatements, or penalties) or the assessment at the time of billing (property taxes only). Note that the Town can elect to suppress assessment information. 167
168 Expanded Tax Collect Internet Kiosk In addition to the Limited Tax Kiosk features, the Expanded Tax Kiosk configuration provides the following features: The Expanded Tax Kiosk integrates with Invoice Cloud s Cloud Pay, allowing Internet users to make tax payments online with credit cards (including Visa, Discover, American Express, and MasterCard) or ACH electronic checks. Internet users wishing to make online payments begin by selecting invoices to be paid and indicating the payment amount within a shopping cart on Avitar s Tax Collect Internet Kiosk site. When the Internet user presses the Pay Now button, the Tax Kiosk submits the cart information to a secure web site maintained by Invoice Cloud where the payment transaction is completed. All financial information is collected and processed by Invoice Cloud. Invoice Cloud acts in the capacity of merchant and is a necessary intermediary in transaction processing. Invoice Cloud validates card numbers and expiration dates, obtains authorization from the card issuers, and issues confirmation numbers to taxpayers at the end of the payment transaction. Taxpayers are charged a service fee by Invoice Cloud to cover the cost of processing the payment transaction. Taxpayers are informed of the service fee amount before the payment is authorized. This fee is in addition to any charges, such as interest, that may be assessed by the taxpayers banks or credit card issuers. Taxpayers must agree to the terms and conditions of the payment including acceptance of the convenience fee before the transaction is completed. Invoice Cloud electronically deposits the payments in the Town s designated municipal bank account once the transactions have been processed. Avitar s a notification of payment to you and you can obtain daily transaction reports and transactions from the Tax Kiosk. Using the reports and payment files available to you from the Tax Kiosk, you can then process Internet payments within the actual Tax Collect system. You are responsible for processing any payments within the Avitar Tax Collect program once payment is received and you have been notified by Avitar and Invoice Cloud. Avitar collects and maintains only the information that is necessary to record the accounts that were paid and by whom (name, invoice number, amount paid, address, phone number). At no point during the process is either Avitar or the Town in possession of taxpayers electronic check or debit/credit card information. As such, Avitar is not responsible for the protection of taxpayers sensitive electronic check or debit/credit card information. It is the Town s responsibility to accurately maintain the information on the Kiosk web site. Avitar makes no warranties concerning the accuracy of information, data, or any other electronic mediums associated with the web site, and Avitar assumes no responsibility or liability for any inaccuracies, errors or failures resulting from use of the web site. 168
169 Comprehensive Tax Collect Internet Kiosk In addition to the Expanded Tax Kiosk features, the Comprehensive Tax Kiosk configuration provides the following features: Downloadable Invoice Features: You are able to provide printable and downloadable PDFs for all types of bills on the Tax Kiosk, regardless of whether the Internet user has elected to opt-in for paperless notification and whether or not the Internet user is paying a bill online. Internet users can access copies of original tax bills, as they were originally printed, for up to 24 months after the original due date of the bill. You will generate PDF invoices within the Tax Collect application using an export option available within the traditional Print Tax Bills process. The PDF invoices will first be exported by the system to your computer. Once the process is complete you will use the Upload PDFs tab within the Upload Data to Kiosk function to transfer the PDF files to the Tax Kiosk. When a PDF invoice exists, the Internet user will see a View Bill PDF button on the Tax Kiosk invoice display indicating that an electronic copy of the bill s original invoice is available. Users can elect to view, download, and/or print the PDF as necessary. In that the PDF Invoice is a digital copy of the original tax bill, the PDF Invoice available online will include the taxpayer s full address. Note, that while the taxpayer s complete address is public information, this is more information than is provided under either the Limited or Expanded Tax Kiosk configuration, in which only the current owner name, billed owner name, and parcel location have been displayed. Paperless Notification Features: When a taxpayer chooses to make a payment on the Tax Kiosk, prior to submitting the shopping cart to Invoice Cloud for payment, Avitar will ask the payer if they wish to opt-in to receive notification of future tax bill invoices electronically rather than by mail. Payers that opt-in to receive notification of future tax bill invoices electronically will be prompted to enter a valid address. The Tax Kiosk will the payer at the address provided to verify that the address is valid and to confirm the payer indeed wishes to opt-in for future paperless notification. The payer will be enrolled in Paperless Notification for the parcel(s) selected only after the payer clicks the Confirm link in the confirmation . There is no method at this time for Internet users to opt-in for Paperless Notification without first choosing to make an online payment. However, if you wish to provide the service to taxpayers that do not wish to make an online payment using the Tax Kiosk, you can, from within the Tax Collect system, initiate the opt-in confirmation process by selecting the parcel and entering an address. When printing tax bills within the Tax Collect system, traditional paper invoices will not be generated for parcels on which the taxpayer has opted-in for Paperless Notification. 169
170 After you upload the PDF Invoices for a selected tax warrant, taxpayers who have opted-in for Paperless Notification will receive at least one, but up to three, s alerting them that their bill is available online. The first is sent automatically by the Tax Kiosk to all Paperless Notification enrollees shortly after you have uploaded the PDF Invoices to the Tax Kiosk. A second is sent automatically by the Tax Kiosk to all Paperless Notification enrollees with an outstanding balance greater than zero approximately fifteen (15) days prior to the due date. A third and final is sent automatically by the Tax Kiosk to all Paperless Notification enrollees with an outstanding balance greater than zero approximately three (3) days prior to the due date. You can use the default text, which includes the notices required by RSA 76:11-a, or you can provide the Town s own text. All s can include an optional town header image. The Tax Kiosk will notify you by each time Paperless Notification s are sent, indicating how many Paperless Notification s were sent. The Tax Kiosk will you reminders several days prior to upcoming Paperless Notification dates so that you can be certain to update transaction information online with the latest payments, ensuring that Paperless Notification s are not sent erroneously to enrollees who only just recently paid the invoice. Each time you import owner and address changes from Assessing, the Tax Collect program will provide reports of Paperless Notification enrollees who may be affected by ownership changes, similar to the reports for Additional Mailtos and Mortgagees. You can then decide which Paperless Notification need to once again revert to traditional printed delivery for parcels on which a previous owner may have elected to receive paperless delivery. 170

171 Using Your Tax Collect Internet Kiosk It is worth emphasizing that the Tax Kiosk is essentially a copy of your application s data and that the copy exists on Avitar s own web server users of the Tax Collect Internet Kiosk will be accessing Avitar s web server and not the Town s computers. As such, you should get in the habit of regularly (or, at the very least, periodically) updating your Tax Kiosk data online. The following topics describe the essential steps you should follow to provide taxpayers with accurate and timely information, while at the same time reducing the number of direct inquiries you receive at the office. Updating Current Tax Information Online To update your tax information online, select Utilities Internet Kiosk Upload Data to Kiosk as shown below: 171

172 Within the Update Kiosk dialog box there are three distinct tabs: Update Kiosk Data, Upload PDFs, and Kiosk Settings. Update Kiosk Data Tab To update your tax information online select Utilities Internet Kiosk Upload Data to Kiosk Update Kiosk Data tab and press the Update Kiosk button. The application will connect to Avitar s web server and upload a copy of your current Tax Collect data. Once the progress bars are complete you can press Close to return to the Tax Collect program. Please note that changes you upload may not be immediately visible online. Throughout the day, your Tax Kiosk will periodically check for newly uploaded data, so it could take up to two hours before you see your new information online. If you need your data updated immediately, please contact Software Support and we can expedite the process. Modifying Who and What Appears Online (All Tax Kiosk configurations) The Internet Kiosk Settings from within Avitar Collect (Edit Invoices Internet Kiosk Settings) provides a method that allows you to control which invoices appear within your Tax Kiosk, as well as to update other information online users see when using your Tax Kiosk. Suppress/Display Parcel 172

173 The Suppress/Display Parcel option is used to suppress a parcel s information from displaying online, as well as to once again display a parcel that was previously suppressed. For parcels that are suppressed, online users will not see any invoice details. There might be some people in town that wish to not have their tax information available online. This could be police officers, selectmen, or anyone who may call and request their tax information be taken offline. To suppress a parcel s information from displaying online, you begin in Avitar Tax Collect by looking up the parcel and selecting an invoice. Once you have selected an invoice, from the main menu, select Edit Invoices Internet Kiosk Settings Suppress/Display Parcel. If you want to suppress a parcel from displaying online, select the Suppress This Parcel From Kiosk check box and press OK. If at some point a suppressed parcel needs to be put back on the Kiosk, follow the same procedures above but uncheck the Suppress This Parcel From Kiosk check box. Note that changes made will not be reflected online until your next Tax Kiosk Upload. To view a report of which parcels have been suppressed, go to Reports Parcels Kiosk Settings Suppressed Parcels. 173
174 Creating PDF Invoices for Paperless Notification (Only Available as part of the Comprehensive Tax Kiosk Configuration) It is your responsibility to generate PDFs at the time when tax bills are printed for mailing, as it is not possible to retroactively produce accurate PDF invoices for previously existing invoices. The PDF export functionality should be used only for new invoices going forward. Also, traditional paper invoices will not be generated for parcels on which the taxpayer has opted-in for Paperless Notification. Before you start the tax bill process, we recommend creating a new folder on your desktop in which you can store the PDF invoices until they have been uploaded to the kiosk. To create a folder, put your mouse on a blank spot on your desktop and right click. Select New Folder and enter a name for the folder i.e. Kiosk PDF Invoices. As the PDF invoices need to be created at the time the bills are generated, you should be in the Print Tax Bills process (Utilities Print Bills) and continue until you get to the final Tax Bill Setup dialog box. Select the Generate PDF Invoices for Tax Kiosk radio button. The first time you perform this process you will need to tell the system where to store the invoices by selecting the ellipses button and 174
175 locating the folder you created on your desktop. Once you have the location set select Create. Generating the individual PDFs for each bill can take considerable time, so you will be asked if you want to export a preview set of 50 bills to verify they look correct. Select Yes to preview 50 bills or No to process the PDF for all bills. Once the all the bills have been exported as a PDF to the folder, they are ready to be uploaded to the Tax Kiosk. 175

176 Upload PDFs Tab (Only Available as part of the Comprehensive tax Kiosk configuration) The Upload PDFs tab is used to transfer the PDFs you created of the tax bills to your Tax Kiosk, making them available to be viewed and/or printed. This process cannot be completed until tax bills have been created and PDFs have been saved to a file. (See Creating PDF Invoices for Paperless Notification ) To upload the PDFs from the Tax Collect program select Utilities Internet Kiosk Upload Data to Kiosk and select the Upload PDFs tab. Press the Connect button. This will enable the Upload button, which will allow you to transfer the PDFs to the Tax Kiosk. The Delete Files After Upload check box is used to delete the PDFs in the file after the upload to the kiosk is complete. However, if the upload process fails, you will have to create the PDFs again before proceeding. If you do not select this option, the PDFs will remain in the folder until you manually delete them. Press the Upload button to begin the process. 176

177 Paperless Notification Settings (Only Available as part of the Comprehensive Tax Kiosk configuration) When a taxpayer chooses to make a payment on the Tax Kiosk, prior to submitting the shopping cart to Invoice Cloud for payment, the Tax Kiosk will ask the payer if they wish to opt-in to receive notice of future tax bill invoices electronically by rather than by mail. However, if a customer would like to opt-in but not make an online payment, you have the option from within Tax Collect to initiate the opt-in confirmation process for them. To flag a parcel for Paperless Notification, you begin in Avitar Tax Collect by looking up the parcel and selecting an invoice. Once you have selected an invoice, from the main menu, select Edit Invoices Internet Kiosk Settings Paperless/ Settings. To flag this parcel for Paperless Notification, select the Provide This Parcel s Invoices Paperlessly check box and press OK. If at some point the taxpayer wants to be removed from paperless notification, follow the same procedures above but uncheck the Provide This Parcel s Invoices Paperlessly check box. Note that changes made will not be reflected online until your next Tax Kiosk Upload. To view a report of which parcels have been flagged as for paperless notification, go to Reports Parcels Kiosk Settings Paperless Parcels. Kiosk Settings Tab 177


178 Generally speaking, the values on the Kiosk Settings tab are configured by Avitar when the Kiosk client is installed and should not be changed. If you have any problems connecting to the Tax Collect Internet Kiosk please call Software Support. However, you can use the View/Edit Kiosk Messages link on the Kiosk Settings tab anytime you wish to modify the contact information or news displayed on your Kiosk web page or to download payment files. Additional details on updating the Tax Kiosk messages are included below. View/Edit Kiosk Messages The View/Edit Kiosk Messages link launches your computer s default internet browser and loads the login page for administering your Tax Kiosk. Enter your User Name and Password to access your web site for modifying its appearance. 178

179 Once you are logged in to administer your Tax Kiosk web site, you can update any of the three editable areas: Home, Notices, and Contact. Edit Home Page If you have logged in to your Tax Kiosk as the kiosk administrator you have two areas you can configure on the Home page of the Tax Kiosk: the header at the top of the page and the greeting message in the middle of the page. To do so, select the Home page and then click the Edit link associated with each title to display the corresponding edit text box. Once you are done editing, press the corresponding Save link. Note that to log in to your Tax Kiosk as the kiosk administrator you have two options: Either press the View/Edit Kiosk Messages link in the Kiosk Update dialog box within Tax Collect (Utilities Internet Kiosk Upload Data to Kiosk Kiosk Settings) or utilize the Tax Kiosk Admin bookmark within your browser. Edit Notices Page If you have logged in to your Tax Kiosk as the kiosk administrator you have the ability to add or edit notices that appear on the Notices page. To do so, select the Notices page and then select the Add More Notices link. Enter a title and a message for the item and press the Save link. Select the 179
180 Edit button on the right side of the screen to add or change the information located down the right hand margin Notices page. Note that to log in to your Tax Kiosk as the kiosk administrator you have two options: Either press the View/Edit Kiosk Messages link in the Kiosk Update dialog box within Tax Collect (Utilities Internet Kiosk Upload Data to Kiosk Kiosk Settings) or utilize the Tax Kiosk Admin bookmark within your browser. Edit Contact Page If you have logged in to your Tax Kiosk as the kiosk administrator you have the ability to update the contact information on the Contact Page. To so select the Contact page and then click the Edit link. You can use this area to update your contact information and office hours. 180
181 Note that to log in to your Tax Kiosk as the kiosk administrator you have two options: Either press the View/Edit Kiosk Messages link in the Kiosk Update dialog box within Tax Collect (Utilities Internet Kiosk Upload Data to Kiosk Kiosk Settings) or utilize the Tax Kiosk Admin bookmark within your browser. 181
182 Default Invoice Cloud Wording The following two types are commonly generated from Invoice Cloud to the customer throughout the tax payment process. The content is maintained within the Invoice Cloud Biller Portal. Invoice Cloud provides each biller with default wording for the s which contains information not directly related to the Tax Kiosk process. We have taken Invoice Cloud's default templates for the two common types and reworded them to provide an template that will correspond with the Avitar Tax Collect Internet Kiosk. Payment Transaction Receipt Thank you for your payment to **BillerDBA**. Your payment has been successfully processed and your tax invoice will be updated once your payment has been approved and received by the tax collector. This generally takes three to four business days, after which you can check back to review your bill at to verify that your payment has been applied. If you have any questions regarding your account, please us at **Biller- CustomerService Address** and include your parcel identifier (i.e. map, lot, and sublot), first name, and last name on the account. Thank you for being a valued **BillerDBA** customer. Please Note: To ensure delivery of account related notifications, please add no-reply@invoicecloud.net to your safe senders list. ACH Reject Notification Your recent echeck/ach transaction to **BillerDBA** was returned by your financial institution. Please note that there may be a charge added to your account balance for any transaction that is returned/rejected by your bank. The reject amount shown on this has not been paid. Your payment has not been processed and your invoice is still unpaid. If you made a one time payment, you should return to and resubmit your payment with the corrected payment information. The description on this will tell you why the payment was not processed.. If you need help making changes or have any questions regarding your account, please us at **BillerCustomerService Address** and include your parcel identifier (i.e. map, lot, and sublot), first name, and last name on the account. 182

183 Thanks for resolving this issue as quickly as possible. **BillerDBA** Please Note: To ensure delivery of account related notifications, please add to your safe senders list. Downloading, Importing, and Applying Payments If your Tax Kiosk is configured to accept online payments, you will receive a notification when residents pay their bills. Once payments have been made, you can log in to the Tax Kiosk and download a payment file. The payment file allows you to batch process online payments within your standard Tax Collect database. The steps for downloading payments will determine on whether you are using Invoice Cloud or another payment processor. Remember that until you download, import, and apply online payments within your actual Tax Collect application the outstanding balances for those invoices will not reflect any payments. Downloading and Importing Payments from Invoice Cloud To download your payments, begin by navigating to Utilities Internet Kiosk Process Payments. The Import Payments tab allows you to import payments made via the Tax Collect Internet Kiosk. To begin, select a From Date and To Date then click Retrieve Payments. 183

184 Once you have selected the Retrieve Payments button, available payments will display in a grid to the left. Review the payments in the grid to verify what you are importing. You can adjust the date and select Retrieve Payments again to add or reduce the payments ready for import.once you have reviewed the payments, click the Import Payments button. This will import the payments, but will not actually apply the transactions. Downloading and Importing Payments from other Payment Processors To download a payment file, begin by logging into your Tax Kiosk as the Tax Kiosk administrator. Once you have logged in, select the Settlement Reports link in the middle of the page. 184
 or utilize the Tax Kiosk Admin")

185 Note that to log in to your Tax Kiosk as the kiosk administrator you have two options: Either press the View/Edit Kiosk Messages link in the Kiosk Update dialog box within Tax Collect (Utilities Internet Kiosk Upload Data to Kiosk Kiosk Settings) or utilize the Tax Kiosk Admin bookmark within your browser. Use the two calendars to define date range of payments you wish to download. Once you have selected your date range press the Export Payments button. To download payments for just a single day, select the desired date on both the Begin Date and End Date calendars. 185

186 After you select the Export Payments button, your browser will ask where you wish to save the download file. Save the file to your desktop and select OK. To import a payment file you have just downloaded from the Tax Kiosk, select Utilities Internet Kiosk Process Payments. On the Import Payments tab, use the browse button to locate the payment file you just downloaded to your system. Once you have located the file press Import Payments to load the payments into Tax Collect. This will import the payments, but will not actually apply the transactions. To finalize a pending batch of transactions from an imported payment file, you must actually apply the payments. You should review and apply the pending transactions using the tools available on the Edit Imported Payments tab and the Apply Payments tab. 186
187 Edit Imported Payments Tab To make sure the payments imported correctly, click Print Report button. Compare this report to the Tax Kiosk information, making sure the total amounts match. If you need to edit a payment, find the owner in the treeview and select the payment you wish to edit. This will display the payment information. After you view and print the report of imported payments, select the Print Warnings button to verify any warnings. If there are warnings, print the report and locate the invoice of the intended payment. For example, there might be a payment posted after the kiosk payment was applied and a credit will be issued. There are three options available when editing a payment, each is associated with one of the icons. You can hover your pointer over each icon for a tooltip until you are familiar with each icon's function. The three functions are: delete payer from the batch; assign payment to a different invoice; or assign payment to a credit. Delete Payer from the Batch -- This deletes the entire payment from the current batch process. For example, if there are problems with a check and you need to remove all of those payments from the payment batch. We recommend you print the payment report before proceeding with this selection so you will know how the batch was originally downloaded. Assign Payment to a Different Invoice -- This allows you to browse through a treeview and select a different invoice for payment. For instance, the customer may incorrectly made the payment with the wrong owner or parcel and you want to assign the payment to the correct person. Select the payment, click the icon, find the correct invoice to which the payment should be applied, and press Select. Assign the Payment to a Credit -- This selection allows you to remove the application of the selected payment from the specified invoice and instead maintain the amount as a credit. Once you have made the changes, you should print the bank report, which will show the updated information. Apply Payments Tab The Apply Payments tab is used to finalize the import process and post the payments to the appropriate invoices. The effective date on the payments applied will be reflected based upon the original transaction date. For example, if the payment was made through the Tax Kiosk on May 1st and the payment wasn t processed through the Tax Collect program until May 5th, the effective date will be May 1st. Note that each online payment will be assigned to an individual receipt within Tax Collect. If a taxpayer made a single payment that was applied to two separate invoices, both of those individual payment transactions will be on consolidated on a single receipt. 187
188 Best Practices for Managing Online Payments Invoice Cloud will configure, in consultation with you, the time of day at which payments made online will be rolled up into a daily batch. Generally speaking, payments made online take 48 business hours to clear. So, for example, payments made on Monday will appear in the town s account on Thursday. As such, you should generally download payment files to coincide with this lag time so you are processing the payments in your Tax Collect system on the day on which the town actually receives the money. When doing so, Tax Collect will use the date on which the payment was made online when calculating interest due. Generally speaking you can use the following guide, noting however that it may be different in your particular case depending on the time of day used to define payment batches: Payments Made Online On Monday Tuesday Wednesday Thursday Friday, Saturday, Sunday Are Deposited On Thursday Friday Monday Tuesday Wednesday When downloading, importing, and applying online payments it is a good idea to process the online payments as a separate deposit within Tax Collect as these amounts will not appear with your regular counter work in your end of day deposit. To do so, make sure you have deposited other counter work before you apply a batch of online payments. Then once you have applied a batch of online payments you should create a deposit for those receipts before continuing to do normal counter payments. 188

189 Supporting Reports for Reconciling Online Payments The following reports should be printed at the end of each month to assist you in reconciling online payments with the Treasurer. You can compare the Invoice Cloud reports to the deposit reports you print from Tax Collect to verify all online payments have been processed accordingly. You should keep these reports with the rest of your monthly balancing reports you print from Tax Collect. Supporting Reports from the Invoice Cloud Biller Portal Deposit Reconciliation This report will be listed by settled batch date using the desired date range entered at the top of the report. The columns break down the totals by credit card tender type. You can export this to Excel which you can add a total line at the bottom of the excel spreadsheet. Settled Batch History This report shows the settled batches within the last 90 days. You can use the date picker to select a desired date range. This report is broken down by payment type and batch date so you or your Treasurer can compare this to the bank statements. You can view individual transactions for a specific batch by selecting the magnifying glass. You can also download this to excel by selecting the excel icon on the top right. 189

190 EFT/ACH Rejects Invoice Cloud will send you and the customer an when there is an EFT/ACH reject. However, you should print off the EFT/ACH reject report off the Biller portal monthly to keep for your records. If you have an EFT/ACH reject, and you have already processed the payment in Tax Collect, you will need to delete the receipt and add a returned check penalty if you wish to do so. If Invoice Cloud has already deposited this money into the Town bank account, you might see a withdrawal from that Town account for that amount. Supporting Reports from Tax Collect Tax Collect Internet Kiosk Report You can generate this report each time you import a batch of payments from the tax kiosk. This will list the invoices to be paid and how much the payment was for. There will be a total on the last page which you can verify your total payments received. This report is only available after you import a batch of payments and before you apply the payments. So make sure you print this after you import the payments and keep for your records. Deposit Report It is recommended that you create a separate deposit for online payments. This will make reconciling just the online payments easier. Page one of the deposit report is a summary of all money collected. At the bottom of page one you will see a summary of electronic payments. You can use that 190
191 total to compare with the reports from Invoice Cloud. After you create a deposit for online payments, print an extra copy and keep it in a folder so you can refer to them if needed. Utilizing Your Invoice Cloud Biller Portal You will receive s from your Tax Kiosk notifying you when taxpayers make online payments. You should also receive daily s with end of day reports which you and your bookkeeper/treasurer can use to balance the electronic transfers you receive in the account you have designated for Invoice Cloud to deposit payments. In the event you need to research any individual payments or manage chargebacks or ACH reversals consult your Invoice Cloud Biller Portal documentation for further assistance. 191
192 Update Instructions This update should be run on each workstation on which you use the Avitar system. If your town has a separate server computer on which the system's data is maintained but the client application is not installed (i.e. you don't sit down at the server to view or edit data) then you do not need to run this update on your server machine. However, be sure to update every machine from which you view or edit data. As this update may register new components with your computer's Windows operating system, you may need to be logged in as an administrator if your town's network security settings prevent some users from being able to install and/or update applications. View the latest Update Notes. Downloading the Update Software updates are available for download to supported users. You may be asked to enter your address in order to complete the download. The number of downloads may be limited for a single user so if you have multiple workstations on which you need to run the update you should download the update once to a shared network resource and run the update from there. If you are unable to access the update file contact Avitar Software Support directly for assistance. 1. Open the from Avitar containing the update information. 2. Select the"download Update..." button within the This will direct you to a new page where you will be asked to enter the address Avitar has on file. 4. Select the "Download File" button in the middle of the screen. A window will open asking if you wish to Run or Save the file. Select Save File and save the file to your Desktop. If you don't have the option to save the file to your Desktop, the file might save to the Downloads folder within your computer. This is usually "C:\Users\{Your User Name}\Downloads". This will create a file called "AvitarSoftwareTypeUpdateVersionNumber.exe" 192
193 If you're having trouble downloading and saving your file, help for the browser you're using can be found here: Internet Explorer Mozilla Firefox Google Chrome If, for security reasons, your mail client or web browser prevents you from downloading an executable or strips away the ".EXE" extension when it does, you can download the same file compressed as a ".ZIP" file using this link. Follow the set of instructions below on downloading the update as a ".ZIP" file: 1. Open the from Avitar containing the update information. 2. Select the"download As Zip File..." button within the This will direct you to a new page where you will be asked to enter the address Avitar has on file. 4. Select the "Download File" button in the middle of the screen. A window will open asking if you wish to Run or Save the file. Select Save File and save the file to your Desktop. If you don't have the option to save the file to your Desktop, the file might save to the Downloads folder within your computer. This is usually "C:\Users\{Your User Name}\Downloads". This will create a file called "AvitarSoftwareTypeUpdateVersionNumber.zip" 5. Once the update has finished downloading, you will need to unzip the file before you can run it. 193
 on your computer. Select the Next button.")
\civicware) is not where your current Civicware folder is located, you")
194 Running the Update Locate and double click on the file you downloaded on your desktop or within the Downloads folder (C:\Users\{Your User Name}\Downloads) on your computer. Select the Next button. The next step displays the default install directory. If the default install location (C:\Program Files (x86)\civicware) is not where your current Civicware folder is located, you can select the Change button and choose a new install directory. Once you've verified the install directory, select Next. 194
Policy. Chapter 6. Accessing the Policy. Nexsure Training Manual - CRM. In This Chapter
 Nexsure Training Manual - CRM Policy In This Chapter Accessing the Policy Adding a Thank You Letter Editing the Policy Adding, Editing and Removing Assignments Admitted Carrier Identification Summary of
Plan Sponsor User Guide
 Plan Sponsor User Guide Getting Started with PensionEdge Plus This guide is designed to provide you with a quick understanding of the many features of the PensionEdge Plus portal. The portal allows you
INTUIT PROA DVISOR PR O G RAM. QuickBooks Desktop Certification
 INTUIT PROA DVISOR PR O G RAM QuickBooks Desktop Certification Getting Started Guide Table of Contents TABLE OF CONTENTS QuickBooks ProAdvisor Training Objectives... 1 What s in the Workbook?... 2 Chapter
Sage Bank Services User's Guide. May 2017
 Sage 300 2018 Bank Services User's Guide May 2017 This is a publication of Sage Software, Inc. 2017 The Sage Group plc or its licensors. All rights reserved. Sage, Sage logos, and Sage product and service
Sage Bank Services User's Guide
 Sage 300 2017 Bank Services User's Guide This is a publication of Sage Software, Inc. Copyright 2016. Sage Software, Inc. All rights reserved. Sage, the Sage logos, and the Sage product and service names
Using the Clients & Portfolios Module in Advisor Workstation
 Using the Clients & Portfolios Module in Advisor Workstation Disclaimer - - - - - - - - - - - - - - - - - - - - - - - - - - - - - - - - - - - - - 1 Overview - - - - - - - - - - - - - - - - - - - - - -
FMS View Expense Budget Information
 FMS View Expense Budget Information Budget Information Queries To view your operating expense budget (Fund 110) in the Financial Management System (FMS), you create a budget query with specific criteria;
Plan Access ABA-RF Guide
 Plan Access ABA-RF Guide September 1, 2014 Copyright Copyright 2009, 2014 Voya Institutional Plan Services, LLC All rights reserved. No part of this work may be produced or used i4 any form or by any means
Bank Reconciliation Processing SYSTEM ADMINISTRATION AND PROCESSING GUIDE. Last revised: 8/19/10 12:22 PM
 Bank Reconciliation Processing SYSTEM ADMINISTRATION AND PROCESSING GUIDE Last revised: 8/19/10 12:22 PM New World Systems 1 CONTENTS Contents... 1 Introduction... 3 System Administrator Guide... 4 Company
DUS DocWay TM Loan Documents User Guide. January 2019
 DUS DocWay TM Loan Documents User Guide January 2019 Table of Contents Getting Started with DUS DocWay... 1 Welcome Page Navigation... 3 Loan Documents Navigation... 6 Update Document Category and Type...
Chapter #4 - Demonstration:
 Chapter #4 - Demonstration: Meeting the Accelerating Needs of Loan Servicing Effective loan servicing requires control over an immense quantity of data. For all but the smallest operations, computerized
Individual Taxpayer Electronic Filing Instructions
 Individual Taxpayer Electronic Filing Instructions Table of Contents INDIVIDUAL TAXPAYER ELECTRONIC FILING OVERVIEW... 3 SUPPORTED BROWSERS... 3 PAGE AND NAVIGATION OVERVIEW... 4 BUTTONS AND ICONS... 5
UCAA Expansion Application Insurer User Guide December 2017
 UCAA Expansion Application Insurer User Guide December 2017 2017 National Association of Insurance Commissioners All rights reserved. Revised Edition National Association of Insurance Commissioners NAIC
Re: The Broker s Workstation and The Underwriter s Workstation Important Releases and Changes
 23 March 2016 To: Users of The Broker s Workstation and/or The Underwriter s Workstation Dear Valued Client: Re: The Broker s Workstation and The Underwriter s Workstation Important Releases and Changes
emerchantview Service July 23, 2010
 emerchantview Service July 23, 2010 2010 FIRST DATA CORPORATION All Rights Reserved. Printed in U.S.A. This document contains confidential and proprietary information of First Data Corporation. You may
Online Presentment and Payment FAQ s
 General Online Presentment and Payment FAQ s What are some of the benefits of receiving my bill electronically? It is convenient, saves time, reduces errors, lets you hold money longer, allows you to receive
Product Eligibility and Pricing Services. Loan Originator User Guide
 Product Eligibility and Pricing Services Loan Originator User Guide Table of Contents Table of Contents Log In... 1 Enter New Loan Data... 1 Evaluate Products... 6 Analyze Search Results... 6 Update Search
NJ DCA ADS, SDS & AFS User Manual: Portal
 NJ DCA ADS, SDS & AFS User Manual: Portal Contents Access Portal & How to Log In... 4 Navigation... 4 Main Navigation: Header... 4 FAST Navigation... 5 Select Local Government Entity... 5 Click LGE Name
Chapter 17 School Cash Catalog
 Chapter 17 School Cash Catalog In Palm Beach County, schools have the ability to accept online payments from parents, guardians, other relatives, and members of the public. Acceptable methods of payment
Online Presentment and Payment FAQ s
 General Online Presentment and Payment FAQ s What are some of the benefits of receiving my bill electronically? It is convenient, saves time, reduces errors, allows you to receive bills anywhere at any
USER GUIDE. October 2015
 TM USER GUIDE October 2015 CONTENTS ACCESS SMARTCLOSE TO INITIATE COLLABORATION... 1 INVITE COLLABORATORS... 3 PIPELINE VIEW... 4 INSIDE SMARTCLOSE... 5 OWNER DROPDOWN... 5 THE AUDIT SYSTEM... 6 THE MESSAGING
FMS Account Summary Inquiry View Budget Information
 FMS Account Summary Inquiry View Budget Information Account Summary Inquiry The Account Summary Inquiry (ASI) in our Financial Management System (FMS) displays budget, expenditure, encumbrance, and available
SINGLE-YEAR LINE-ITEM BUDGETING
 SINGLE-YEAR LINE-ITEM BUDGETING TABLE OF CONTENTS OPENING A PLAN FILE... 2 GENERAL NAVIGATION... 4 ENTERING NEW YEAR LINE-ITEM BUDGETS... 5 VIEWING HISTORICAL DATA... 6 ADDING, DELETING & MODIFYING CHARTSTRINGS...
Introduction to Client Online
 Introduction to Client Online Trade Finance Guide TradeFinanceNewClientsV2Sept15 Contents Introduction 3 Welcome to your introduction to Client Online 3 If you have any questions 3 Logging In 4 Welcome
Seller Procedures Non-Delegated. Seller Portal
 Seller Procedures Non-Delegated 1 Seller Portal Summary 2 Introduction to the Seller Portal (EZCLD.LHFS.com) and review of the Loan Submission phases. TOOLS AND FUNCTIONALITY LeftNav Menu Loan Actions
FLORIDA SURPLUS LINES SERVICE OFFICE. IPC Procedures Manual
 FLORIDA SURPLUS LINES SERVICE OFFICE IPC Procedures Manual December 2016 TABLE OF CONTENTS 1. INTRODUCTION... 4 1.1. Purpose of this Document...4 1.2. Intended Audience...4 1.3. FSLSO Contact Information...4
Microsoft Dynamics GP. Receivables Management
 Microsoft Dynamics GP Receivables Management Copyright Copyright 2012 Microsoft. All rights reserved. Limitation of liability This document is provided as-is. Information and views expressed in this document,
Online Presentment and Payment FAQ s
 General Online Presentment and Payment FAQ s What are some of the benefits of receiving my bill electronically? It is convenient, saves time, reduces errors, allows you to receive bills anywhere at any
Microsoft Dynamics GP. Electronic Bank Management
 Microsoft Dynamics GP Electronic Bank Management Copyright Copyright 2010 Microsoft. All rights reserved. Limitation of liability This document is provided as-is. Information and views expressed in this
Microsoft Dynamics GP. COA Ecuador
 Microsoft Dynamics GP COA Ecuador Copyright Copyright 2010 Microsoft. All rights reserved. Limitation of liability This document is provided as-is. Information and views expressed in this document, including
Seller Procedures Delegated. Seller Portal
 Seller Procedures Delegated 1 Seller Portal Summary 2 Introduction to the Seller Portal (EZCLD.LHFS.com) and review of the Loan Submission phases. TOOLS AND FUNCTIONALITY LeftNav Menu Loan Actions Menu
Complete Closing Enterprise Closing Disclosure Form
 Complete Closing Enterprise Closing Disclosure Form VERSION 8.3 RamQuest.com 2015 RamQuest, Inc. Table of Contents Introduction... 5 Loan Estimate... 5 Closing Disclosure Form... 5 Accessing the CDF...
Standard Accounts User Guide
 Standard Accounts User Guide v. 8.1, Windows February 2016 Table of Contents Table of Contents INTRODUCTION... 4 Installation and Starting of Standard Accounts... 4 Starting Standard Accounts for the first
Master User Manual. Last Updated: August, Released concurrently with CDM v.1.0
 Master User Manual Last Updated: August, 2010 Released concurrently with CDM v.1.0 All information in this manual referring to individuals or organizations (names, addresses, company names, telephone numbers,
Finance Self Service Financial Systems
 Finance Self Service Financial Systems Finance Self Service Financial Systems 2008 University of North Florida Center for Professional Development & Training 1 UNF Drive, Jacksonville, Fl 32224 904.620.1707
MARATHON FINANCIAL ACCOUNTING END OF CALENDAR YEAR
 The following instructions will guide you through the end of a calendar year process. This process includes steps for W-2 Forms, Electronic W-2 Filing, Clear Calendar Year to Date Totals, Tax Table updates
Multifamily Securities Investor Access Desk Reference Manual
 Multifamily Securities Investor Access Manual February 2013 Contents 1 Application Overview... 3 2 Minimum Browser Requirements... 3 3 Contacting Investor Access Tool Administrator... 3 4 Accessing and
ShelbyNext Financials: Credit Card Tracking (Course #N211)
") ShelbyNext Financials: Credit Card Tracking (Course #N211) Presented by: Dave Heston Shelby Consultant 2017 Shelby Systems, Inc. Other brand and product names are trademarks or registered trademarks of
ShelbyNext Financials: Credit Card Tracking (Course #N211) Presented by: Dave Heston Shelby Consultant 2017 Shelby Systems, Inc. Other brand and product names are trademarks or registered trademarks of
Vivid Reports 2.0 Budget User Guide
 B R I S C O E S O L U T I O N S Vivid Reports 2.0 Budget User Guide Briscoe Solutions Inc PO BOX 2003 Station Main Winnipeg, MB R3C 3R3 Phone 204.975.9409 Toll Free 1.866.484.8778 Copyright 2009-2014 Briscoe
Sage Tax Services User's Guide
 Sage 300 2017 Tax Services User's Guide This is a publication of Sage Software, Inc. Copyright 2016. Sage Software, Inc. All rights reserved. Sage, the Sage logos, and the Sage product and service names
Medici Lending Training Guide
 Medici Lending Training Guide This publication was written for Medici Publication Information Medici Lending Training Guide Material ID Number: 280816 Revision: January, 2013 Distributed Subject to Terms
Solar Eclipse Accounts Receivable. Release 9.0.3
 Solar Eclipse Accounts Receivable Release 9.0.3 Disclaimer This document is for informational purposes only and is subject to change without notice. This document and its contents, including the viewpoints,
Certifying Mortgages for Freddie Mac. User Guide
 Certifying Mortgages for Freddie Mac User Guide December 2017 The Freddie Mac Single-Family Seller/Servicer (Guide) requires a Seller/Servicer selling Mortgages to Freddie Mac to forward the Notes, assignments
StuckyNet-Link.NET User Interface Manual
 StuckyNet-Link.NET User Interface Manual Contents Introduction Technical Information General Information Logging In & Out Session Timeout Changing Your Password Working with the Borrowing Base Creating
NextGen Trustee Receipting
 NextGen Trustee Receipting This class will cover Miscellaneous and Property Tax receipting. We will review the receipting processes as well as how to properly handle corrections for receipts entered with
ShelbyNext Financials: General Ledger Best Practices
 ShelbyNext Financials: General Ledger Best Practices (Course #F213) Presented by: Dave Heston Shelby Consultant 2018 Shelby Systems, Inc. Other brand and product names are trademarks or registered trademarks
BBPadmin s WebCOBRA On Demand Employer User s Guide. BBPadmin s Employer User s Guide to
 BBPadmin s Employer User s Guide to 1 Table of Contents Introduction to Employers... 5 Chapter 1: Getting Started... 6 Purpose of WebCOBRA... 6 For Employers... 6 For Participants... 6 Getting Started
Quality Control Advisor SM. User Guide. January 2018
 Quality Control Advisor SM User Guide January 2018 Notice The information in this document is intended to provide general guidance to Freddie Mac Seller/Servicers. The information is offered as an aid
Banner Finance Self Service Budget Development Training Guide
 Banner Finance Self Service Budget Development Training Guide Table of Contents Introduction and Assistance...3 FOAPAL....4 Accessing Finance Self Service...5 Create a Budget Development Query... 6 Query
ALLEGANY CO-OP INSURANCE COMPANY. Agency Interface. Choice Connect User Guide
 ALLEGANY CO-OP INSURANCE COMPANY Agency Interface Choice Connect User Guide ALLEGANY CO-OP INSURANCE COMPANY Choice Connect User Guide Allegany Co-op Insurance Company 9 North Branch Road Cuba NY 14727
X-Charge Credit Card Processing
 X-Charge Credit Card Processing OpenEdge (Formerly X-Charge) Payment Processing Setup... 1 Setting Permissions for Credit Card Processing... 1 Setting Up X-Charge Payment Processing in SuccessWare 21...
Claims. Chapter 11. Adding a Claim. HOW to Add a Claim. Nexsure Training Manual - CRM. In This Chapter
 Nexsure Training Manual - CRM Claims In This Chapter Adding a Claim Populating the Claim form Tracking the Claim Delivering the Claim form Closing and Reopening the Claim Adding a Claim When a claim is
NFX TradeGuard User's Guide
 NFX TradeGuard User's Guide NASDAQ Futures, Inc. (NFX) Version: 4.1.1229 Document Version: 4 5 Publication Date: Monday, 12 th Dec, 2016 Confidentiality: Non-confidential Genium, INET, ITCH, CONDICO, EXIGO,
Insurance Tracking with Advisors Assistant
 Insurance Tracking with Advisors Assistant Client Marketing Systems, Inc. 880 Price Street Pismo Beach, CA 93449 800 643-4488 805 773-7985 fax www.advisorsassistant.com support@climark.com 2015 Client
ACS YEAR-END FREQUENTLY ASKED QUESTIONS. General Ledger
 ACS YEAR-END FREQUENTLY ASKED QUESTIONS This document includes answers to frequently asked questions about the following ACS modules: General Ledger Payroll Accounts Payable Accounts Receivable General
Fiscal Closing Methods Summary
 Fiscal Closing Methods Summary Update 1/27/2017 FALSC 1 What is Fiscal Close? In general terms, Fiscal Closing is the process of closing one set of financial books at the end of the current fiscal year
Basic Application Training
 Basic Application Training Class Manual 99.273 The documentation in this publication is provided pursuant to a Sales and Licensing Contract for the Prophet 21 System entered into by and between Prophet
Commerce Manager Manual
 Commerce Manager Manual Purpose and Overview Commerce Manager is a payment processing site that allows UMW departments the option to accept online credit card and/or e-check payments for events such as
Advanced Financial Statements
 Sage 100 Fund Accounting Advanced Financial Statements STUDENT WORKBOOK SAGE LEARNING SERVICES Important Notice: Authentic Sage 100 Fund Accounting training guides display a holographic image on the front
ShelbyNext Financials: Credit Card Tracking
 ShelbyNext Financials: Credit Card Tracking (Course #F211) Presented by: Dave Heston Shelby Consultant 2018 Shelby Systems, Inc. Other brand and product names are trademarks or registered trademarks of
Tabs3 Trust Accounting Guide
 Tabs3 Billing PracticeMaster General Ledger Accounts Payable Trust Accounting TA BS3.COM Copyright 2013-2018 Software Technology, LLC 1621 Cushman Drive Lincoln, NE 68512 (402) 423-1440 Tabs3.com Tabs3,
Margin Direct User Guide
 Version 2.0 xx August 2016 Legal Notices No part of this document may be copied, reproduced or translated without the prior written consent of ION Trading UK Limited. ION Trading UK Limited 2016. All Rights
Mutual Fund & Stock Basis Keeper
 A Guide To Mutual Fund & Stock Basis Keeper By Denver Tax Software, Inc. Copyright 1995-2006 Denver Tax Software, Inc. Denver Tax Software, Inc. P.O. Box 5308 Denver, CO 80217-5308 Telephone (voice): Toll-Free:
Quick Reference Guide: General Budget Change
 Quick Reference Guide: General Budget Change In the USC Kuali system, every type of transaction is created and submitted in the form of an electronic document referred to as an edoc. The Kuali Financial
Seventh-day Adventist Church (SPD) Limited. The New Online SPD Tithes & Offerings Reporting System. Training Manual
 Limited. The New Online SPD Tithes & Offerings Reporting System. Training Manual") Seventh-day Adventist Church (SPD) Limited The New Online SPD Tithes & Offerings Reporting System Training Manual Local Church Treasurers & Assistants Page 2 of 35 Version 1.1 Authorised By: Table of Contents
Seventh-day Adventist Church (SPD) Limited The New Online SPD Tithes & Offerings Reporting System Training Manual Local Church Treasurers & Assistants Page 2 of 35 Version 1.1 Authorised By: Table of Contents
MUNSOFT 5.2 INCOME: SUNDRY DEBTORS MANUAL. Y Walters B.Sc. (Math Science) Hons
 Hons") MUNSOFT 5.2 INCOME: SUNDRY DEBTORS MANUAL 1 Y Walters B.Sc. (Math Science) Hons SUNDRY DEBTORS... 4 Enquiries... 4 Sundry Enquiries... 4 Account Search... 5 Master Files... 6 Account Master... 6 Account
MUNSOFT 5.2 INCOME: SUNDRY DEBTORS MANUAL 1 Y Walters B.Sc. (Math Science) Hons SUNDRY DEBTORS... 4 Enquiries... 4 Sundry Enquiries... 4 Account Search... 5 Master Files... 6 Account Master... 6 Account
4.9 PRINTING LENDING FORMS
 4.9 PRINTING LENDING FORMS In the Home library material window, you can print out a lending form, i.e. the list of material recorded for the member. 1. Highlight the Member class and select the Class /
Budget - By Salesperson
 Budget - By Salesperson Entering a budget is easy. Follow these five steps to get started. Version 2013.12.21.01 1 Create a template. Before you can enter a budget, you first need to create a template.
In this chapter: Budgets and Planning Tools. Configure a budget. Report on budget versus actual figures. Export budgets.
 Budgets and Planning Tools In this chapter: Configure a budget Report on budget versus actual figures Export budgets Project cash flow Chapter 23 479 Tuesday, September 18, 2007 4:38:14 PM 480 P A R T
Finance. Training Manual
 Finance Training Manual Introduction to Finance Module Shepherd s Staff Finance module lets you keep track of your church s financial information. This manual will walk you through setting up a chart of
Learning TradeStation. News, Time & Sales, Research, Browser, and Ticker Bar
 Learning TradeStation News, Time & Sales, Research, Browser, and Ticker Bar Important Information No offer or solicitation to buy or sell securities, securities derivative or futures products of any kind,
Scheme Management System User guide
 Scheme Management System User guide 20-09-2016 1. GETTING STARTED 1.1 - accessing the scheme management system 1.2 converting my Excel file to CSV format 2. ADDING EMPLOYEES TO MY PENSION SCHEME 2.1 Options
Enhanced General Ledger Quick Steps version 8.016
 Enhanced General Ledger Quick Steps version 8.016 The General Ledger module is designed to handle journal entries for various transactions that are not accounted for in other modules (A/P, Payroll etc.).
å Follow these steps to delete a list: å To rename a list: Maintaining your lists
 Maintaining your lists TradingExpert Pro provides a number of functions for maintaining the data contained in your Group/Sector List and all other lists that you have created. This section lists the data
Construction Budget Application Using Procorem
 Construction Budget Application Using Procorem User Guide Updated: August 2, 2018 Trademarked names may appear throughout this document. Rather than list the names and entities that own the trademark or
Grants Administration Office. Space Telescope Grants Management System (STGMS) STGMS User Guide
 STGMS User Guide") Grants Administration Office Space Telescope Grants Management System (STGMS) STGMS User Guide February 2018 Table of Contents Introduction... 3 Section 1: Login... 4 Section 2: Navigating STGMS... 5 Section
Grants Administration Office Space Telescope Grants Management System (STGMS) STGMS User Guide February 2018 Table of Contents Introduction... 3 Section 1: Login... 4 Section 2: Navigating STGMS... 5 Section
How to Manage THD Budgets. Step One Create New Project Budget
 Version 1.0 How To: Manage THD Budgets: - Create New Project Budget - How would I create subsequent budgets? - Create Report to Compare Budgets - How is the Budget Versions Comparison Report Printed? How
Setting up TaxSlayer Pro Online
 Setting up TaxSlayer Pro Online To set up TaxSlayer ProOnline as a Favorite in your web browser, use the following steps: 1. Open Internet Explorer, Mozilla Firefox, or Google Chrome. 2. Type https://vita.taxslayerpro.com
BudgetPak User Guide. Lewis & Clark College. October 2016
 BudgetPak User Guide Lewis & Clark College October 2016 Contents Overview... 2 Definitions and Set Up... 2 Logging In to BudgetPak... 3 Reviewing Current and Historical Budget and Actual Information...
Get Started with My Budget Planner
 Page 1 of 24 Get Started with My Budget Planner Click on the "Start" button, select "Programs", select "My Budget Planner" to open My Budget Planner software. When you open My Budget Planner a Welcome
Genium INET PRM User's Guide
 TM Genium INET NASDAQ Nordic Version: 4.0.0250 Document Version: 11 Publication Date: Wednesday, 6th May, 2015 Confidentiality: Non-confidential Whilst all reasonable care has been taken to ensure that
PFM MoneyMobile. Product Overview Guide. August 2013
 PFM MoneyMobile Product Overview Guide August 2013 1 Contents MoneyMobile iphone App... 3 New Navigation Menu... 5 Accounts... 6 Transactions... 13 Excluded Transactions... 16 Spending Wheel... 17 Bubble
QuickSuper. User Guide.
 QuickSuper User Guide www.clearinghouseapp.hostplus.com.au QuickSuper User Guide Document History Date Description 26 Jul 2010 Initial release 20 May 2011 Updated to include EFT payment method. 03 Nov
Oracle Public Sector Revenue Management
 Oracle Public Sector Revenue Management Business Processes Guide Release 2.4.0 Service Pack 2 E49976-03 August 2015 Oracle Public Sector Revenue Management Business Processes Guide Release 2.4.0 Service
Guide to Credit Card Processing
 CBS ACCOUNTS RECEIVABLE Guide to Credit Card Processing version 2007.x.x TL 25476 (07/27/12) Copyright Information Text copyright 1998-2012 by Thomson Reuters. All rights reserved. Video display images
Contents. Introduction
 Getting Started Introduction O&M Profiler User Guide (v6) Contents Contents... 1 Introduction... 2 Logging In... 2 Messages... 3 Options... 4 Help... 4 Home Screen... 5 System Navigation... 5 Dashboard...
How to Enter Foreclosure Mitigation Data in Counselor Max using the Guidance and Planning System (GPS) and the Work Plan Generator
 and the Work Plan Generator") How to Enter Foreclosure Mitigation Data in Counselor Max using the Guidance and Planning System (GPS) and the Work Plan Generator Table Of Contents Creating a New Foreclosure Mitigation Client (FMC)...
How to Enter Foreclosure Mitigation Data in Counselor Max using the Guidance and Planning System (GPS) and the Work Plan Generator Table Of Contents Creating a New Foreclosure Mitigation Client (FMC)...
Introduction to Client Online
 Introduction to Client Online Bibby Factors International Guide 1 InternationalFactoringNewClientBibbyUKopsSept15 Introduction 3 Logging In 5 Welcome Screen 6 Navigation 7 Viewing Your Account 9 Invoice
Maintaining Budget Change Requests
 Maintaining Budget Change Requests This document describes the functions used in TEAMS to enter and approve requests to move funds from one General Ledger account to another. In this document: Request
SAS2000. Financial 2. Training Manual
 SAS2000 Financial 2 Training Manual Tribal SchoolEdge Level 1, 17 Madden Grove RICHMOND VIC 3121 Support Centre: Web: https://support.schooledge.com.au/ Email: support.schooledge@tribalgroup.com Tel: 1300
Introduction to Client Online
 Introduction to Client Online Construction Finance Guide ConstructionFinanceNewClientsV2Sept15 Contents Introduction 3 Welcome to your introduction to Client Online 3 If you have any questions 3 Logging
Microsoft Dynamics GP. Taxes On Returns
 Microsoft Dynamics GP Taxes On Returns Copyright Copyright 2010 Microsoft. All rights reserved. Limitation of liability This document is provided as-is. Information and views expressed in this document,
GREAT BASIN COLLEGE PURCHASING CARD PROGRAM PAYMENTNET CARDHOLDER GUIDE
 GREAT BASIN COLLEGE PURCHASING CARD PROGRAM PAYMENTNET CARDHOLDER GUIDE July 26, 2010 GBC PaymentNet Cardholder Guide July 2010 1 Table of Contents Logging into PaymentNet... 3 Changing Pass Phrase (password)...
Creating a Standard AssetMatch Proposal in Advisor Workstation 2.0
 Creating a Standard AssetMatch Proposal in Advisor Workstation 2.0 - - - - - - - - - - - - - - - - - - - - - - - - - - - - - - - - - - - - - - 1 What you will learn - - - - - - - - - - - - - - - - - -
Microsoft Dynamics GP. VAT Daybook
 Microsoft Dynamics GP VAT Daybook Copyright Copyright 2012 Microsoft. All rights reserved. Limitation of liability This document is provided as-is. Information and views expressed in this document, including
Table of Contents Budgets & Expenses
 Table of Contents Budgets & Expenses Budgets & Expenses 3 Introduction... 3 Budget/Expense File (Chart of Accounts)... 3 Budget/Expense Transaction File... 3 Monthly Flow Cycle... 4 Budgets & Expenses
User guide for employers not using our system for assessment
 For scheme administrators User guide for employers not using our system for assessment Workplace pensions CONTENTS Welcome... 6 Getting started... 8 The dashboard... 9 Import data... 10 How to import a
Form 162. Form 194. Form 239
 Below is a list of topics that we receive calls about each year with the solutions to them detailed. New features and funds have also been added. Note: Some of the topics have more than one question so
Any symbols displayed within these pages are for illustrative purposes only, and are not intended to portray any recommendation.
 Allocation Fund Investment Manager Getting Started Guide February 2018 2018 Interactive Brokers LLC. All Rights Reserved Any symbols displayed within these pages are for illustrative purposes only, and
Gtrade manual version 2.04 updated
 Gtrade manual version 2.04 updated 9.30.2016 Table of Contents Contents Table of Contents2 Getting started, Logging in and setting display language in TurboTick Pro3 Level 25 Order Entry8 Streamlined Order