For more information and assistance:
|
|
|
- Cameron West
- 6 years ago
- Views:
Transcription


1 For Android (10/17)
2 For more information and assistance: Web: getpayd.com/paydpro/support Toll-free: PAYD (7293) Record your Moneris merchant ID here:
3 Contents Introduction... 6 Before you get started... 7 Activating your PAYD Pro store... 8 Setting up the PAYD App on your mobile device... 9 Downloading and installing the PAYD App from Google Play 10 Setting up the PAYD PIN Pad Pairing a new PAYD PIN Pad with your mobile device 12 Pairing an initialized PAYD PIN Pad with a different mobile device 18 Pairing a replacement PAYD PIN Pad with your mobile device 21 Other PAYD PIN Pad settings 23 Changing an initialized PAYD PIN Pad's default language 23 Bluetooth pairing in Legacy mode 25 Ready to use the PAYD App? 29 Optional features Setting the transaction details level 30 Setting a default payment device 31 1
4 Enabling Pre-Authorizations 31 Enabling tip prompting 32 Setting a tax rate 33 Location-mapping transactions 34 Viewing a location map 34 Setting a quick PIN for sign-in 35 Pre-filling the employee ID/store ID at sign-in 36 Setting an address to receive exported reports 37 Auto-sending transaction receipts to a set merchant address 38 Setting a default PAYD App screen 39 Setting the default language of the PAYD App 39 Determining the PAYD App's version number 39 Signing into/signing out of the PAYD App Signing in with full credentials 40 Signing out 41 Signing in with a quick PIN 42 The PAYD App main menu 43 Need to reset your sign-in password? 44 Can't remember your quick PIN? 45 Configuring your security question/answer 46 2 USING PAYD PRO FOR ANDROID
5 The PAYD PIN Pad Bluetooth connectivity indicator 49 Battery charge indicator 50 Maintaining battery charge 50 Powering on the PAYD PIN Pad 51 Sleep mode 52 Using the PAYD PIN Pad while it is in Sleep mode 52 Exiting Sleep mode 52 Powering off the PAYD PIN Pad 52 Card entry options Insert: chip cards 53 Swipe: magnetic stripe cards 54 Wave/tap: contactless cards 55 Maximum Contactless Dollar Value (CDV) 55 Manual card entry on the PAYD PIN Pad 56 Transactions General guidelines for transactions 57 Sale with debit/credit card 58 Sale with cash 59 Pre-Authorization with credit card 60 3
6 Manually entering card data on the PAYD PIN Pad 61 Customer prompts on the PAYD PIN Pad 62 Customer prompts on the PAYD PIN Pad (tip prompting enabled) 64 Customer prompts in the PAYD App 65 Voiding/refunding a transaction 67 Capturing a Pre-Authorization 70 Receipts Cardholder verification method (CVM) statement 72 Card masking 72 Signature capture for receipts 73 ing a transaction receipt 74 Sending an SMS text message transaction notification 75 Reporting Transactions report 76 "Details" screen (transactions) 78 Totals (batches) report 80 Re-initializing the PAYD PIN Pad Troubleshooting Error messages in the PAYD App 83 4 USING PAYD PRO FOR ANDROID
7 Other issues (PAYD App) 86 Error messages on the PAYD PIN Pad 91 Other issues (PAYD PIN Pad) 94 Using the PAYD card reader 95 Manual card entry on your mobile device 97 Sources of electromagnetic interference 99 Merchant support
8 Introduction PAYD Pro allows you to accept Interac Debit and credit payments right on your mobile device, just about anywhere your business takes you. This guide provides instructions on how to pair a Moneris PAYD PAYD PIN Pad with an Android mobile device (referred to as "mobile device" or "device"); download and install the PAYD App to the mobile device; initialize the PAYD PIN Pad; and use the PAYD App to perform transactions. Note: For instructions on how to use PAYD Administration to manage your PAYD Pro store and any other registered account users, refer to the Using Moneris PAYD Administration guide (visit getpayd.com/paydpro/support to download a copy). 6 USING PAYD PRO FOR ANDROID
9 Before you get started 1. Ensure that you have the following components: Bluetooth -discoverable mobile device. PAYD PIN Pad and USB charging cable (provided in your welcome kit). Note: You will be required to plug this cable into a powered USB port (e.g., on a computer). The PAYD PIN Pad hardware identifier ("terminal ID") is an 8-digit alpha-numeric code starting with "I6" (e.g., "I "). This ID (also known as the "PAYD PIN Pad ID") is printed on a white label affixed to the underside of the PAYD PIN Pad (you will be asked to refer to this ID during the setup steps): 2. Ensure that you have the required credentials for your PAYD Pro store: If are activating your store, ensure that you have your merchant ID and store ID (refer to your "Useful Information" for these IDs). If your store is already activated, ensure that you have your sign-in credentials (contact your store administrator for these credentials). 3. Do one of the following: If you have all the required components and IDs, go to step 4. If you do not have the required elements, please contact us: call PAYD (7293) or info@getpayd.com. 4. Determine your setup requirements: If you need to activate your PAYD Pro store, proceed to Activating your PAYD Pro store (page 8). If your PAYD Pro store is already activated, proceed to Setting up the PAYD App on your mobile device (page 9). 7
10 Activating your PAYD Pro store 1. Visit getpayd.com/activate. 2. In the Merchant ID and Store ID fields, enter your merchant ID and store ID (refer to your "Useful Information" for these IDs).* 3. Tap Next. 4. In the First name and Last name fields, enter your first name and last name.* 5. In the field, enter your address.* Note: Once you have successfully completed the activation steps, an "Activation Confirmation" will be sent to this address. If you ever need to have your password reset, a password reset link will be sent to this address. 6. In the Employee ID, Password, and Confirm password fields, enter the username and password under which you want to sign into your store.* Note: The password must be from 8 to 16 characters in length and include at least 1 letter, 1 number, and 1 special character. Accents are not supported. Password fields are case sensitive. You will be prompted to update your password every 90 days (your new password must be different than your last 4 passwords). 7. In the Security question and Answer fields, enter a security question and the answer.* Note: Periodically you will be prompted to answer this question when signing in. 8. Tap Save. 9. The statement "Activation completed" displays above the fields on the PAYD Administration sign-in screen. Note: You will shortly receive an "Activation Confirmation" containing your store ID and employee ID (the username you created). 10. Proceed to Setting up the PAYD App on your mobile device (page 9). * The information entered here applies to both the PAYD App and PAYD Administration. 8 USING PAYD PRO FOR ANDROID
11 Setting up the PAYD App on your mobile device The PAYD App must be downloaded and installed on your mobile device before you can start to perform PAYD Pro transactions. 1. Do one of the following: If you need to download/install the PAYD App to your mobile device, proceed to Downloading and installing the PAYD App from Google Play (page 10). If you have already downloaded/installed the PAYD App to your mobile device, proceed to Setting up the PAYD PIN Pad (page 11). 9
12 Downloading and installing the PAYD App from Google Play Follow the steps below to download and install the PAYD App to your mobile device. 1. From your mobile device s home screen, open Google Play. 2. In Google Play, search for "PAYD", and then select the PAYD App. 3. Tap INSTALL. If at any time the PAYD App requests permission to access data from your mobile device (e.g., location, microphone, or contacts data), allow the PAYD App to access the data. 4. Once the PAYD App is downloaded and installed on your mobile device, do not open/launch the PAYD App at this time. 5. Return to your mobile device's home screen. 6. Proceed to Setting up the PAYD PIN Pad (page 11). 10 USING PAYD PRO FOR ANDROID
13 Setting up the PAYD PIN Pad Your PAYD PIN Pad must be paired with a mobile device before it can be used to perform PAYD Pro transactions. 1. If the PAYD App is open on your mobile device, close the PAYD App now. 2. Determine your setup requirements: If you need to pair a PAYD PIN Pad, go to step 3. If you do not need to pair a PAYD PIN Pad (i.e., your PAYD PIN Pad is already paired with your mobile device), proceed to setup step 6 (page 16). 3. Follow one of the pairing options below: Pairing option 1: If you want to pair a new PAYD PIN Pad (that has never been paired and initialized) with an Android mobile device that is not currently paired with a PAYD PIN Pad, proceed to Pairing a new PAYD PIN Pad with your mobile device (page 12). Pairing option 2: If you want to pair a new PAYD PIN Pad (that has never been paired and initialized) with an Android mobile device that is currently paired with an initialized PAYD PIN Pad, proceed to Pairing a replacement PAYD PIN Pad with your mobile device (page 21). Pairing option 3: If you want to pair an initialized PAYD PIN Pad with a different Android mobile device, proceed to Pairing an initialized PAYD PIN Pad with a different mobile device (page 18). Note: The PAYD PIN Pad can be used to perform transactions with only one mobile device at a time. Pairing option 4: If you want to move an initialized PAYD PIN Pad to an Apple ipad, iphone, or ipod touch, refer to the Using PAYD Pro for Apple ipad, iphone, and ipod touch Guide (follow Pairing option 3 on page 11 of that guide). 11
14 Pairing a new PAYD PIN Pad with your mobile device 1. Power on the new PAYD PIN Pad a. Plug the small end of the USB charging cable into the micro-usb port on the new PAYD PIN Pad (see page 49). Important! Use the USB charging cable provided with the PAYD PIN Pad. Failure to do so may affect the operability of or cause damage to the PAYD PIN Pad. b. Plug the other end of the charging cable into a powered USB port (e.g., on a computer). Note: Leave the charging cable connected to the PAYD PIN Pad for the remainder of the PAYD PIN Pad setup procedures. c. Wait while the PAYD PIN Pad beeps and powers on. d. When the LANGUAGE/LANGUE screen displays, proceed to step 2 (Configure the PAYD PIN Pad's default language) on page 13. LANGUAGE/LANGUE ENGL FRAN 12 USING PAYD PRO FOR ANDROID
15 2. Configure the PAYD PIN Pad's default language a. On the LANGUAGE/LANGUE screen, press F1 (ENGL). Note: If the WELCOME/BONJOUR screen displays instead, press F1 and F4 in sequence, and go directly to step 2c of this procedure. b. When the PED SERIAL NUMBER screen displays press the green key to continue. Note: The serial number (e.g., "I ") also represents the PAYD PIN Pad's terminal ID, which can also be found on a label affixed to the underside of the PAYD PIN Pad (see page 7). c. When the BLUETOOTH PAIRING screen displays, proceed to step 3 (Ready your mobile device for Bluetooth pairing) below. ENGL LANGUAGE/LANGUE PED SERIAL NUMBER I PAIR BLUETOOTH PAIRING FRAN ADMIN 3. Ready your mobile device for Bluetooth pairing a. Power on the mobile device with which you want to pair the PAYD PIN Pad. b. Ensure that Bluetooth is turned on, the mobile device is discoverable, and its Bluetooth settings screen is displayed. Note: If the mobile device has ever been paired with a different PAYD PIN Pad in the past, ensure that the mobile device does not continue to retain the older PAYD PIN Pad's terminal ID in its Bluetooth memory (i.e., if necessary, unpair the older PAYD PIN Pad from the mobile device so that it forgets the PAYD PIN Pad's terminal ID). c. Set the mobile device down beside the PAYD PIN Pad. d. Proceed to step 4 (Pair the PAYD PIN Pad with your mobile device) on page
16 4 4. Pair the PAYD PIN Pad with your mobile device a. On this BLUETOOTH PAIRING screen, press F1 (PAIR). BLUETOOTH PAIRING PAIR ADMIN b. When this next BLUETOOTH PAIRING screen displays, press F2 to scroll to PAIR ANDROID, and then press the green key to select it. c. When the WAITING FOR PAIRING...NAME: screen displays, go to the next step. Note: The "I " portion of the name is the PAYD PIN Pad's terminal ID. BLUETOOTH PAIRING PAIR IOS PAIR ANDROID WAITING FOR PAIRING... NAME: icmp-i d. Make the mobile device search/scan for other devices with which to pair. e. On the mobile device's Bluetooth settings screen, locate the PAYD PIN Pad's terminal ID (displays with prefix "icmp-" as in "icmp -I "), and tap it. f. Wait for a 6-digit passkey/code to be generated: On the mobile device, a Bluetooth pairing request with a 6-digit passkey/code will display. On the PAYD PIN Pad, the COMPARE KEY: screen with a 6-digit passkey will display. g. If the passkey/code is the same on both the PAYD PIN Pad and the mobile device, tap Pair on the mobile device's Bluetooth pairing request. h. On the PAYD PIN Pad (COMPARE KEY: screen), press F1 (YES). COMPARE KEY: YES YES NO 14 USING PAYD PRO FOR ANDROID
17 i. When the TERMINAL WILL BE REBOOTED... screen displays (shown here), go to step 4j of this procedure. If you cannot complete the pairing, clear any error message displayed on the mobile device (e.g., "Pairing Unsuccessful" may be displayed), then press F4 (NO) on the PAYD PIN Pad (COMPARE KEY: screen), and then repeat steps 4b to 4h of this procedure. Note: If you are unable to pair the PAYD PIN Pad after making several attempts, proceed to Bluetooth pairing in Legacy mode (page 25). TERMINAL WILL BE REBOOTED... j. Wait while the PAYD PIN Pad reboots. k. When the WELCOME/BONJOUR screen displays, proceed to step 5 (Confirm that your mobile device is successfully paired with the PAYD PIN Pad) below. Note: The battery icon in the upper right corner on the screen may appear fuller than is shown here. WELCOME/BONJOUR 5 5. Confirm that your mobile device is successfully paired with the PAYD PIN Pad a. Ensure that the PAYD PIN Pad's 8-digit terminal ID (starts with prefix "icmp" as in "icmp-i ") is shown as "Paired" on your mobile device's Bluetooth settings screen. Note: The terminal ID (e.g., "I ") can also be found on a label affixed to the underside of the PAYD PIN Pad (see page 7). b. Proceed to step 6 (Initialize the PAYD PIN Pad) on page
18 6 6. Initialize the PAYD PIN Pad The PAYD PIN Pad must be successfully initialized from your mobile device before you can use it to perform PAYD Pro transactions. Follow the steps below to initialize the PAYD PIN Pad. Note: If the PAYD PIN Pad is already initialized, go to step 6k of this procedure. a. From your mobile device's home screen, tap the PAYD icon ( ) to launch the PAYD App. If the "Terms of Use" screen displays, read the terms, and tap I Agree. If at any time the PAYD App requests permission to access data from your mobile device (e.g., location, microphone, or contacts data), allow the PAYD App to access the data. If at any time the "Pinpad has been successfully connected" message displays, tap OK. b. When the sign-in screen displays, sign into the PAYD App (see page 40). c. In the PAYD App, start on the "Settings" screen. Note: If another screen is displayed, tap, and then tap Settings. d. Tap Pinpad. If Connect Pinpad displays, tap it. e. Tap Bluetooth if it is not already selected. f. Tap Initialize Pinpad. Note: If Connect Pinpad continues to display even after you have tapped it, see page 87 for troubleshooting. 16 USING PAYD PRO FOR ANDROID
19 g. When PLEASE WAIT displays on the PAYD PIN Pad, wait while it initializes. Note: During this process, the PAYD App displays the message "Initializing Pinpad. This may take a few minutes". PLEASE WAIT h. When the PAYD App displays the message "Initialization was successful. Pinpad is ready to use", tap OK. i. When the PAYD PIN Pad displays the WELCOME/BONJOUR screen, go to the next step. Note: The BT icon displays in the upper right corner on the PAYD PIN Pad screen to indicate that Bluetooth connectivity is established. BT WELCOME/BONJOUR 7 j. Tap to return to the main menu, and then tap Signout. k. Proceed to step 7 (Charge the PAYD PIN Pad's battery to full capacity) below. 7. Charge the PAYD PIN Pad's battery to full capacity a. Leave the USB charging cable plugged into the PAYD PIN Pad and the external power source until the PAYD PIN Pad's battery is fully charged. (If the USB charging cable is not connected to the PAYD PIN Pad, connect it now.) Note: It may take up to 3 hours to fully charge the battery depending on its current charge status. Once the battery is fully charged, the icon in the upper right corner of the PAYD PIN Pad's screen displays solid black ( ). Important! Use the USB charging cable provided to work with the PAYD PIN Pad. Failure to do so may affect the operability of or cause damage to the PAYD PIN Pad. b. Once the battery is fully charged, proceed to Ready to use the PAYD App? (page 29). 17
20 Pairing an initialized PAYD PIN Pad with a different mobile device 1. Remove the initialized PAYD PIN Pad's terminal ID from your mobile device's Bluetooth memory a. Open the Bluetooth settings screen on the mobile device with which the initialized PAYD PIN Pad is currently paired. b. On the Bluetooth settings screen, locate the initialized PAYD PIN Pad's 8-digit terminal ID (displays with prefix "icmp-" as in "icmp- I "). Note: The terminal ID (e.g., "I ") can also be found on a label affixed to the underside of the PAYD PIN Pad (see page 7). c. Unpair the PAYD PIN Pad so that the mobile device forgets the PAYD PIN Pad's terminal ID. d. Power off the mobile device, and set it aside. e. Proceed to step 2 (Reset the initialized PAYD PIN Pad to its factory defaults) on page USING PAYD PRO FOR ANDROID
21 2. Reset the initialized PAYD PIN Pad to its factory defaults a. If the initialized PAYD PIN Pad is not already powered on, press its power button (see page 49), and wait until the PAYD PIN Pad powers on. b. When the WELCOME/BONJOUR screen displays, press F1 and F4 in sequence. WELCOME/BONJOUR c. When this BLUETOOTH PAIRING screen displays, press F4 (ADMIN). PAIR BLUETOOTH PAIRING ADMIN d. When this next BLUETOOTH PAIRING screen displays, press F2 to scroll to FACTORY DEFAULTS, and then press the green select it. key to e. When the TERMINAL WILL BE REBOOTED... screen displays, wait while the PAYD PIN Pad reboots. BLUETOOTH PAIRING SECURITY MODE FACTORY DEFAULTS TERMINAL WILL BE REBOOTED... f. When the LANGUAGE/LANGUE screen displays, press F1 (ENGL). LANGUAGE/LANGUE ENGL FRAN g. When the TERMINAL ID screen displays, press the green key to continue. TERMINAL ID I h. When the PED SERIAL NUMBER screen displays, press the green key to continue. PED SERIAL NUMBER I
22 i. When this BLUETOOTH PAIRING screen displays, proceed to step 3 (Ready your mobile device for Bluetooth pairing) on page 13. BLUETOOTH PAIRING PAIR ADMIN 20 USING PAYD PRO FOR ANDROID
23 Pairing a replacement PAYD PIN Pad with your mobile device 1. Remove the older PAYD PIN Pad's terminal ID from your mobile device's Bluetooth memory a. Open the Bluetooth settings screen on the mobile device with which the older (initialized) PAYD PIN Pad is currently paired. b. On the Bluetooth settings screen, locate the older (initialized) PAYD PIN Pad's 8-digit terminal ID (displays with prefix "icmp-" as in "icmp- I "). Note: The terminal ID (e.g., "I ") can also be found on a label affixed to the underside of the PAYD PIN Pad (see page 7). c. Unpair the PAYD PIN Pad so that the mobile device forgets the older PAYD PIN Pad's terminal ID. d. If the PAYD App is open and/or you are signed in, close the PAYD App. e. Set the mobile device aside. f. Proceed to step 2 (Reset the older PAYD PIN Pad to its factory defaults) on page
24 2. Reset the older PAYD PIN Pad to its factory defaults a. If the older PAYD PIN Pad is not already powered on, press its power button (see page 49) and wait until the PAYD PIN Pad powers on. b. When the WELCOME/BONJOUR screen displays, press F1 and F4 in sequence. WELCOME/BONJOUR c. When this BLUETOOTH PAIRING screen displays, press F4 (ADMIN). PAIR BLUETOOTH PAIRING ADMIN d. When this next BLUETOOTH PAIRING screen displays, press F2 to scroll to FACTORY DEFAULTS, and then press the green select it. key to e. When the TERMINAL WILL BE REBOOTED... screen displays, wait while the PAYD PIN Pad reboots. BLUETOOTH PAIRING SECURITY MODE FACTORY DEFAULTS TERMINAL WILL BE REBOOTED... f. When the LANGUAGE/LANGUE screen displays, go to the next step. LANGUAGE/LANGUE ENGL FRAN g. Simultaneously press and hold down both the yellow key and the key until the PAYD PIN Pad starts to power off. Important! When this older PAYD PIN Pad is powered off completely, set it aside, and do not attempt to use it again. h. Pair the new/replacement PAYD PIN Pad with your mobile device (proceed to Pairing a new PAYD PIN Pad with your mobile device on page 12). 22 USING PAYD PRO FOR ANDROID
25 Other PAYD PIN Pad settings Changing an initialized PAYD PIN Pad's default language 1. Access the initialized PAYD PIN Pad's LANGUAGE/LANGUE screen Note: If the USB charging cable is connected to the PAYD PIN Pad, disconnect the cable before you continue. a. Simultaneously press and hold down both the yellow key and the key until the PAYD PIN Pad starts to power off, and then wait while it powers off completely. b. Once the PAYD PIN Pad is powered off, press the power button (see page 49), and wait while the PAYD PIN Pad powers on. c. As soon as the version screen displays (shown here), press the red key, and then quickly press the green Note: key. The version screen displays for 10 seconds. d. When the LANGUAGE/LANGUE screen displays (shown here), go to step 1e of this procedure. If the WELCOME/BONJOUR screen displays, repeat steps 1a to 1c of this procedure. U-VVVV-I LANGUAGE/LANGUE ENGL FRAN e. Proceed to step 2 (Select a default display language for the PAYD PIN Pad) on page
26 2. Select a default display language for the PAYD PIN Pad a. On the LANGUAGE/LANGUE screen, select a default display language: For English, press F1 (ENGL). For French, press F4 (FRAN). LANGUAGE/LANGUE ENGL FRAN b. When the next screen displays, simultaneously press and hold down both the yellow key and the key until the PAYD PIN Pad starts to power off, and then wait while it powers off completely. c. Power on the PAYD PIN Pad when you are ready to use it to perform transactions. Note: The PAYD PIN Pad is now configured to display the new default language (you do not have to re-initialize the PAYD PIN Pad). If you also want to change the language of the PAYD App, see page USING PAYD PRO FOR ANDROID
27 Bluetooth pairing in Legacy mode If you are following the PAYD PIN Pad setup steps and have been unable to pair a PAYD PIN Pad with your mobile device, follow the steps below to pair the PAYD PIN Pad using Legacy mode. 1. Enable Legacy mode on the PAYD PIN Pad a. On this BLUETOOTH PAIRING screen, press the red key once. BLUETOOTH PAIRING PAIR IOS PAIR ANDROID b. When this next BLUETOOTH PAIRING screen displays, press F4 (ADMIN). PAIR BLUETOOTH PAIRING ADMIN c. When this next BLUETOOTH PAIRING screen displays, press the green key (SECURITY MODE). BLUETOOTH PAIRING SECURITY MODE FACTORY DEFAULTS d. When the SECURITY MODE screen displays, press F1 (LEGACY). ENGL LEGACY SECURITY MODE SSP e. When the TERMINAL WILL BE REBOOTED... screen displays, wait while the PAYD PIN Pad reboots. TERMINAL WILL BE REBOOTED... f. When the LANGUAGE/LANGUE screen displays, press F1 (ENGL). LANGUAGE/LANGUE ENGL FRAN g. If the TERMINAL ID screen displays, press the green key to continue. TERMINAL ID I
28 h. When the PED SERIAL NUMBER screen displays, press the green key to continue. PED SERIAL NUMBER I i. When this BLUETOOTH PAIRING screen displays, proceed to step 2 (Pair the PAYD PIN Pad with your mobile device using legacy mode) on page 27. BLUETOOTH PAIRING PAIR ADMIN 26 USING PAYD PRO FOR ANDROID
29 2. Pair the PAYD PIN Pad with your mobile device using legacy mode a. On this BLUETOOTH PAIRING screen, press F1 (PAIR). BLUETOOTH PAIRING PAIR ADMIN b. When this next BLUETOOTH PAIRING screen displays, press F2 to scroll to PAIR ANDROID, and then press the green key to select it. c. When the WAITING FOR PAIRING...NAME: screen displays, go to the next step. Note: The "I " portion of the name is the PAYD PIN Pad's terminal ID (which is also printed on a label affixed to the underside of the PAYD PIN Pad). BLUETOOTH PAIRING PAIR IOS PAIR ANDROID WAITING FOR PAIRING... NAME: icmp-i d. Make the mobile device search/scan for other devices with which to pair. e. On the mobile device's Bluetooth settings screen, locate the PAYD PIN Pad's terminal ID (displays with prefix "icmp-" as in "icmp -I "), and tap it. f. When the mobile device prompts you to enter a PIN code, enter a 4-digit number of your choosing (e.g., 1234). g. On the PAYD PIN Pad, wait for the ENTER PIN CODE:_ screen to display, and then enter the same 4-digit number that you input on the mobile device, and press the green key. ENTER PIN CODE:_ 27
30 h. When the TERMINAL WILL BE REBOOTED... screen displays (shown here), go to step 2i of this procedure. If you cannot complete the pairing, clear any error message displayed on the mobile device (e.g., "Pairing Unsuccessful" may be displayed), and repeat steps 2b to 2g of this procedure. i. When the WELCOME/BONJOUR screen displays, proceed directly to step 5 (Confirm that your mobile device is successfully paired with the PAYD PIN Pad) on page 15. Note: The battery icon in the upper right corner on the screen may appear fuller than is shown here. TERMINAL WILL BE REBOOTED... WELCOME/BONJOUR 28 USING PAYD PRO FOR ANDROID
31 Ready to use the PAYD App? To learn about the PAYD App and some of its features, read the sections listed here: Configuring optional PAYD App settings, see pages 30 to 39. Signing in/signing out of the PAYD App, see pages 40 to 41. PAYD PIN Pad power management and card entry options, see pages 47 to 56. Performing transactions, see pages 57 to 70. Generating reports, see pages 76 to
32 Optional features Setting the transaction details level Sets the optional transaction details (secondary transaction identifiers, customer ID and order ID) that you can enter during a transaction. Note: Even if optional transaction details are enabled, you may bypass entering data in the Customer ID and Order ID fields during a transaction. If you enter data in one or both of these fields during a transaction, you can subsequently retrieve the transaction by using one or more of the identifiers as search criteria (e.g., when generating a report and/or doing a Refund, Void, or Capture). 1. In the PAYD App, start on the "Settings" screen. Note: If another screen is displayed, tap to return to the main menu, and then tap Settings. 2. Tap Interface. 3. Specify the optional transaction details to include by tapping one of: Quick Pay: Excludes the customer ID and order ID. Minimal: Includes only the customer ID. Full: Includes the customer ID and order ID. 4. Tap to return to the main menu. Note: To change this setting on a different mobile device, repeat these steps on the other device. 30 USING PAYD PRO FOR ANDROID
33 Setting a default payment device Sets a default payment device for transactions. 1. In the PAYD App, start on the "Settings" screen. Note: If another screen is displayed, tap to return to the main menu, and then tap Settings. 2. Tap Interface. 3. Specify the default payment device by tapping one of: Pinpad: Sets "Pinpad" as default. Swipe/Keyed: If the PAYD card reader is connected to your mobile device, sets "Swipe" as the default. If the PAYD card reader is not connected to your mobile device, sets "Keyed" as the default. Cash: Sets "Cash" as the default. 4. Tap to return to the main menu. Note: To change this setting on a different mobile device, repeat these steps on the other device. Enabling Pre-Authorizations Enables the option to process Pre-Authorizations. 1. In the PAYD App, start on the "Settings" screen. Note: If another screen is displayed, tap to return to the main menu, and then tap Settings. 2. Tap Interface. 3. Tap (checkmark or unmark the box) Display Preauth: With checkmark: Option to "Process as Preauth" always displays on the "Sale" screen (see page 60). Without checkmark: Option to "Process as Preauth" does not display on the "Sale" screen. 4. Tap to return to the main menu. Note: To enable/disable this feature on a different mobile device, repeat these steps on the other device. 31
34 Enabling tip prompting If enabled, tip prompts display during every debit/credit Sale transaction. 1. Ensure that the PAYD PIN Pad is powered on and ready (see page 57). 2. In the PAYD App, start on the "Settings" screen. Note: If another screen is displayed, tap to return to the main menu, and then tap Settings. 3. Tap Tip, and do one of the following: To enable tip prompting: a. Tap (checkmark the box) Tip on Purchase. b. When the "Tip settings have been successfully configured on the Pinpad" message displays, tap OK. c. Go to step 4. To disable tip prompting: a. Tap (unmark the box) Tip on Purchase. b. When the "Tip settings have been successfully configured on the Pinpad" message displays, tap OK. c. Go to step Configure the three tip percentages: Note: Pre-set tip percentages are not supported when the PAYD PIN Pad is used as the card entry device. To change one or more pre-set tip percentages: a. Enter a tip percentage in one or more "Quick Tip" fields. b. Tap Save Tip Values. c. When the "Success" message displays, tap OK. To bypass changing the pre-set tip percentages: a. Go directly to the next step. 5. Tap to return to the main menu. Note: To enable/disable this feature or change this setting on a different mobile device, repeat these steps on the other device. 32 USING PAYD PRO FOR ANDROID
35 Setting a tax rate Sets a tax name and a percentage by which the tax will be auto-calculated during any Sale, Pre-Authorization, Refund, or Capture. Note: The tax will be calculated based on the original transaction amount excluding any tip (for information about tip prompting, see page 32). 1. In the PAYD App, start on the "Settings" screen. Note: If another screen is displayed, tap to return to the main menu, and then tap Settings. 2. Tap Tax, and do one of the following: To enable a tax rate: a. Tap (checkmark the box) Calculate Tax. Note: The option to calculate/add tax will display on all transaction screens except "Void". By default the tax box will always be checkmarked (selected) on a transaction screen, but you may unmark (deselect) the box if you do not want to add tax to the transaction. b. In the Tax Description and Tax Rate (%) fields, enter the tax name and the tax percentage. Note: This name will display on the transaction screen but may be truncated if longer than 12 characters. c. Tap Save Tax Rate. d. When the "Success" message displays, tap OK. To disable a tax rate: a. Tap (unmark the box) Calculate Tax. 3. Note: The option to calculate/add tax will not display on any transaction screen. 4. Tap to return to the main menu. Note: To enable/disable this feature or change this setting on a different mobile device, repeat these steps on the other device. 33
36 Location-mapping transactions The PAYD App can map the location of PAYD financial transactions performed from your mobile device if: The device is configured to use a location service; The device is configured to allow the PAYD App to access the device's location data; The transaction response is "APPROVED" or "DECLINED". Note: Your mobile device may prompt you to allow the PAYD App to access the device's location data. You must grant this access to use the location mapping feature. If you want to enable this feature on a different mobile device, repeat these steps on the other device. Viewing a location map To view the mapped location of a PAYD transaction, you must access the transaction's "Details" screen (see page 78) from any mobile device. 34 USING PAYD PRO FOR ANDROID
37 Setting a quick PIN for sign-in Sign into the PAYD App with a 4-digit PIN. 1. In the PAYD App, start on the "Settings" screen. Note: If another screen is displayed, tap to return to the main menu, and then tap Settings. 2. Tap Quick Login. 3. Do one of the following: To enable a quick PIN: a. Tap (checkmark the box) PIN Login. b. In the Please enter PIN field, enter a 4-digit PIN. c. In the Please confirm PIN field, re-enter the same 4-digit PIN. d. When the "Success" message displays, tap OK. Note: You will be prompted to enter a PIN when you next attempt to sign in (see page 42). To change a quick PIN: a. Disable the current quick PIN (see To disable a quick PIN below). b. Enable a new quick PIN (see To enable a quick PIN above). To disable a quick PIN: a. Tap (unmark the box) PIN Login. b. When the "Success" message displays, tap OK. 4. Tap to return to the main menu. Note: To enable/disable this feature or change this setting on a different mobile device, repeat these steps on the other device. 35
38 Pre-filling the employee ID/store ID at sign-in Pre-fills the PAYD full sign-in fields with your PAYD employee ID and PAYD store ID credentials whenever you launch the PAYD App (see page 40). 1. In the PAYD App, start on the "Settings" screen. Note: If another screen is displayed, tap to return to the main menu, and then tap Settings. 2. Tap Login Credentials. 3. Fill in the field(s) that you want to have pre-filled whenever you launch the PAYD App. Note: To disable this feature, leave the field(s) blank. 4. Tap Save Login Credentials. 5. When the "Success" message displays, tap OK. 6. Tap to return to the main menu. Note: To enable/disable this feature or change this setting on a different mobile device, repeat these steps on the other device. 36 USING PAYD PRO FOR ANDROID
39 Setting an address to receive exported reports Sets an address to which transaction reports will be sent when you export report results to a comma-separated values (CSV) file (see page 76). Note: Results include the following transaction data (CSV fields appear in quotations): Store ID ("store id"), Terminal (PAYD PIN Pad) ID ("terminal"), Batch Number ("batch"), Date and Time ("date time"), Transaction Type ("type"), Order ID ("order no"), Customer ID ("cust id"), Amount ("amount"), Card Type ("card type"), Account Number ("card"), Result ("result"), Auth Code ("auth code"), Response Code ("response code"), Clerk ID ("clerk"), and Customer (" "). 1. In the PAYD App, start on the "Settings" screen. Note: If another screen is displayed, tap to return to the main menu, and then tap Settings. 2. Tap Export to CSV. 3. In the Export Address field, enter the address to which the CSV-format text file will be sent when you export your report results. Note: To disable this feature, leave the field blank. 4. Tap Save Export When the "Success" message displays, tap OK. 6. Tap to return to the main menu. Note: To enable/disable this feature or change this setting on a different mobile device, repeat these steps on the other device. 37
40 Auto-sending transaction receipts to a set merchant address Sets an address to which the PAYD App will automatically PAYD transaction receipts. The PAYD App s receipts only for "APPROVED" or "DECLINED" responses. Note: Receipts will be ed to the set address in the background (i.e., the PAYD App will give no visual indication that an has been sent following a transaction). 1. In the PAYD App, start on the "Settings" screen. Note: If another screen is displayed, tap to return to the main menu, and then tap Settings. 2. Tap Merchant In the Merchant Address field, enter the address to which a receipt will automatically be sent following a transaction performed from this mobile device. Note: To disable this feature, leave the field blank. 4. Tap Save Merchant When the "Success" message displays, tap OK. 6. Tap to return to the main menu. Note: To enable/disable this feature or change this setting on a different mobile device, repeat these steps on the other device. 38 USING PAYD PRO FOR ANDROID
41 Setting a default PAYD App screen Sets a default screen ("Sale", "Reports", "Totals", or "Settings") to open whenever you sign into the PAYD App. Note: "Sale" is pre-set as the default screen. 1. In the PAYD App, start on the main menu. Note: If another screen is displayed, tap to return to the main menu. 2. Press and hold down the main menu item (Sale, Reports, Totals, or Settings) that you want to set as your default screen. Note: "Help" and "Sign Out" cannot be set as default screens. 3. Release your hold on the menu item when a confirmation message displays indicating that the default screen has been set. Note: Whenever you sign in with your credentials, the default screen that you have just set will display. To change this setting on a different mobile device, repeat these steps on the other device. Setting the default language of the PAYD App The language of the PAYD App is determined by the language set for your mobile device. Note: If your device is configured for a language other than English or French, the PAYD App defaults to English. To change the PAYD PIN Pad's default language, see page 23. Determining the PAYD App's version number 1. In the PAYD App, start on the "Settings" screen. Note: If another screen is displayed, tap and then tap Settings. 2. The version number of the PAYD App displays near the bottom of the "Settings" screen (displays as "PAYD Mobile App v#.##"). 39
 to launch the PAYD App. 2. Wait for the PAYD full sign-in screen to display: 3.")
42 Signing into/signing out of the PAYD App Signing in with full credentials Follow these steps to sign in using full credentials. Note: If you have configured a quick PIN, see page From your mobile device's home screen, tap the PAYD icon ( ) to launch the PAYD App. 2. Wait for the PAYD full sign-in screen to display: 3. Enter your credentials in the sign-in fields (PAYD Employee ID, PAYD Store ID, and PAYD Password). Note: Some fields may be pre-filled (see page 36). 4. Tap Sign In. 40 USING PAYD PRO FOR ANDROID
43 If at any time the PAYD App requests permission to access data from your mobile device (e.g., location, microphone, or contacts data), allow the PAYD App to access the data. If the PAYD App prompts you to change your password, enter a new password, and tap Save Password. Note: The password must be from 8 to 16 characters in length and include at least 1 letter, 1 number, and 1 special character. Accents are not supported. Password fields are case sensitive. You will be prompted to update your password every 90 days (your new password must be different than your last 4 passwords). If the PAYD App prompts you to select and answer one or more security questions, see page 46. If the PAYD App prompts you to answer one security question, enter the answer, and tap Next. 5. Your default PAYD App screen displays once you are signed in. Note: To change the default screen, see page 39. Signing out To ensure that unauthorized PAYD transactions cannot be performed from your mobile device, sign out of the PAYD App when you are not using it. 1. In the PAYD App, start on the main menu. Note: If another screen is displayed, tap to return to the main menu. 2. Tap Sign Out. 3. When the PAYD App sign-in screen displays, it means you are signed out. Note: Depending on how you have configured the PAYD App, the full sign-in screen may display (see page 40) or the "Enter PIN" sign-in screen may display (see page 42). 41
 to launch the PAYD App. 2. Wait for the \"Enter PIN\" sign-in screen to display: 3. In the Enter PIN field, enter your 4-digit quick PIN.")
44 Signing in with a quick PIN Follow these steps to sign in using a 4-digit quick PIN. Note: To enable this method of signing in, see page From your mobile device's home screen, tap the PAYD icon ( ) to launch the PAYD App. 2. Wait for the "Enter PIN" sign-in screen to display: 3. In the Enter PIN field, enter your 4-digit quick PIN. Note: You will automatically be signed in once you enter the last digit; otherwise, tap Sign In. 4. Your default PAYD App screen displays once you are signed in. Note: To change the default screen, see page USING PAYD PRO FOR ANDROID

45 The PAYD App main menu From this menu, you can access any transaction, report, or setting in the PAYD App. To return to this menu from any other screen, simply tap at the top of the screen. 43
46 Need to reset your sign-in password? 1. From your mobile device's home screen, tap the PAYD icon ( ) to launch the PAYD App. 2. On the PAYD full sign-in screen, tap Forgot Password?. 3. On the "Password Reset" screen, enter your employee ID and store ID, and tap Next. 4. Answer the security question, and tap Next. 5. When the "Success" message displays, tap OK. 6. Wait for a "Password reset" (from getpayd.com) to be sent to the address that is registered to your PAYD user account. 7. Open the , and tap the Reset my password link. 8. Wait for the "New Password" page to display on PAYD Administration. 9. In the New password and Confirm password fields, enter a new password, and tap Save. Note: The password must be from 8 to 16 characters in length and include at least 1 letter, 1 number, and 1 special character. Accents are not supported. Password fields are case sensitive. You will be prompted to update your password every 90 days (your new password must be different than your last 4 passwords). 10. When the "Password reset successfully" message displays on PAYD Administration's sign-in screen, it means your password has been reset. Note: You must enter the new password when signing into the PAYD App/PAYD Administration. 44 USING PAYD PRO FOR ANDROID
47 Can't remember your quick PIN? 1. From your device's home screen, tap the PAYD icon ( ) to launch the PAYD App. 2. When the PAYD "Enter PIN" sign-in screen displays, tap Forgot PIN?. 3. When the PAYD full sign-in screen displays, enter your full sign-in credentials (see page 40). Note: If you have also forgotten your sign-in password, see page Once you are signed in, you may change or disable your quick PIN (see page 35). 45
48 Configuring your security question/answer The question/answer that you configure will be used to identify you in the event that you forget your password. (Periodically you may be prompted to answer the question when signing in.) Note: The information that you enter here also applies to PAYD Administration. 1. Select a question from the Choose security question drop-down list, and enter an answer in the Security Answer field. Note: If there is more than one drop-down list, select the additional questions, and then enter answers in the corresponding fields. 2. If the Address field displays, enter your address. Note: If you ever need to have your password reset, a password reset link will be sent to this address. 3. Tap Save Security Question (or Save Security Questions). 4. When the "Sale" screen displays, do one of the following: If the PAYD PIN Pad with which you have paired your mobile device has not yet been initialized, proceed to setup step 6 (page 16); begin at step c. If the PAYD PIN Pad with which you have paired your mobile device is already initialized, proceed to Ready to use the PAYD App? (page 29). 46 USING PAYD PRO FOR ANDROID

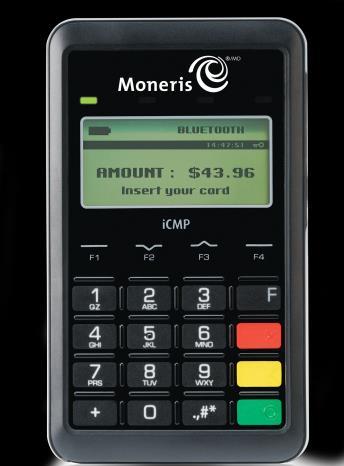
49 The PAYD PIN Pad The customer uses the PAYD PIN Pad to input data when prompted to do so during a transaction. For names and descriptions of labelled areas on the PAYD PIN Pad (shown below), see pages 48 to
50 To see the location of the labelled areas on the PAYD PIN Pad, see page 47. Label Description Function keys Select the option displayed above the key (F1, F2, F3, and F4). Alpha-Numeric keys Cancel key (red) Clear message displayed on PAYD PIN Pad. Cancel transaction. Correct key (yellow) Clear data entered on PAYD PIN Pad. 5 OK / Enter key (green) Submit data, or acknowledge a message on PAYD PIN Pad Chip Reader (slot at the bottom of PAYD PIN Pad) See page 53. Contactless Reader Indicator (green flashing light) No lights flash: PAYD PIN Pad is in Sleep mode (see page 52) or off. One light flashes: Reader is fully powered on. Four lights flash: Reader capturing card data (see page 55). Display Screen/Contactless Reader WELCOME/BONJOUR screen displays when PAYD PIN Pad idle. Magnetic Stripe Reader (slot along the top of PAYD PIN Pad) See page 54. Micro-USB port (located on right side) Plug USB charging cable here. 48 USING PAYD PRO FOR ANDROID
51 To see the location of the labelled areas on the PAYD PIN Pad, see page 47. Label 11 Description Power button (located on right side) For power functions, see pages 51 to 52. For reset function, press and hold down until the rebooting starts. Bluetooth connectivity indicator The Bluetooth connectivity icon (shown below) displays on the WELCOME/BONJOUR screen in the upper right corner of the screen. Icon BT Description Displays when your mobile device is paired with the PAYD PIN Pad, and: Bluetooth is enabled on your mobile device; The PAYD App is open on your mobile device; The PAYD PIN Pad is within Bluetooth communication range of your mobile device. 49
52 Battery charge indicator The battery charge icons (shown below) display on WELCOME/BONJOUR screen in the upper right corner of the screen. Battery charging Icon Description Battery charge level The battery is charging. Charging occurs when the PAYD PIN Pad is connected to an external power source via the USB charging cable and the battery is not already fully charged. Icon Description 100% or less. 75% or less. 50% or less. (Contactless reader may not read card.) 25% or less. (PAYD PIN Pad may power off if it is not connected to an external power source.) Maintaining battery charge To maintain battery charge while the PAYD PIN Pad is powered on, connect it to an external power source via the USB charging cable provided with the PAYD PIN Pad. Power off the PAYD PIN Pad when it is not in use or being charged (see page 52). 50 USING PAYD PRO FOR ANDROID
53 Powering on the PAYD PIN Pad The WELCOME/BONJOUR screen displays when the PAYD PIN Pad is fully powered on (see also Sleep mode on page 52). 1. To power on the PAYD PIN Pad, do one of the following: With the USB charging cable: a. Plug the small end of the USB charging cable into the micro-usb port on the PAYD PIN Pad (see page 48). b. Plug the other end of the cable into a powered USB port. Without the USB charging cable: a. Press the power button on the PAYD PIN Pad (see page 49). Note: The battery must be sufficiently charged (see page 50). 2. Wait while the PAYD PIN Pad beeps and powers on to the WELCOME/BONJOUR screen. 51
54 Sleep mode The PAYD PIN Pad will go into Sleep mode (the hardware manufacturer name/logo will display) and then power off after 10 minutes if the PAYD PIN Pad is not connected to an external power source or otherwise being operated under the conditions listed in Using the PAYD PIN Pad while it is in Sleep mode below. Using the PAYD PIN Pad while it is in Sleep mode If you are ready to perform a debit/credit transaction while the PAYD PIN Pad is in Sleep mode, simply initiate the transaction in the PAYD App, enter the required data, and tap Process Transaction. The PAYD PIN Pad will automatically "wake" to the WELCOME/BONJOUR screen and then display the appropriate card entry prompt if: The PAYD PIN Pad is within communication (Bluetooth) range of the mobile device with which it is paired. The screen saver is not active on the mobile device with which the PAYD PIN Pad is paired. The PAYD PIN Pad s battery is sufficiently charged (see page 50). Exiting Sleep mode 1. To exit Sleep mode, press the power button on the PAYD PIN Pad (see page 49), and then wait for the WELCOME/BONJOUR screen to display. Powering off the PAYD PIN Pad 1. Disconnect the USB charging cable from the PAYD PIN Pad if it is connected. 2. Ensure the WELCOME/BONJOUR screen is displayed. Note: If the hardware manufacturer name/logo is displayed instead, see Exiting Sleep mode above. 3. Simultaneously press and hold down both the yellow key and the key until the PAYD PIN Pad starts to power off, and then wait while it powers off completely (the screen is blank when the PAYD PIN Pad is powered off). 52 USING PAYD PRO FOR ANDROID


55 Card entry options Insert: chip cards 1. The PAYD PIN Pad displays SWIPE OR INSERT CARD or SWIPE, TAP OR INSERT CARD. 2. The customer inserts their card into the PAYD PIN Pad's chip reader. Note: Unless the PAYD PIN Pad prompts otherwise, the card should not be swiped even if it has a magnetic stripe. 3. The customer may be prompted to enter data, including a PIN. 4. The customer leaves the chip card inserted until REMOVE CARD displays on the PAYD PIN Pad. Tip for proper card insertion: Hold the PAYD PIN Pad with one hand, and insert the card in the chip reader with the other hand (this will prevent the PAYD PIN Pad's contactless reader from inadvertently reading the card data as a contactless transaction). 53

56 Swipe: magnetic stripe cards Note: If the card has a chip, it must be inserted (see page 53). 1. The PAYD PIN Pad displays SWIPE OR INSERT CARD or SWIPE, TAP OR INSERT CARD. 2. You or the customer swipes their card on the PAYD PIN Pad's magnetic stripe reader. Note: If the card is a credit card, you should swipe the card. If the card is a debit card, the customer will be prompted to enter a PIN. 3. You may be prompted to capture the customer's signature on your mobile device. Tip for proper card swipe: Hold the PAYD PIN Pad with one hand, and swipe the card in the magnetic stripe reader with the other hand (this will prevent the PAYD PIN Pad's internal contactless reader from inadvertently reading the card data as a contactless transaction). 54 USING PAYD PRO FOR ANDROID
 to ensure a successful tap.")
. 3.")
57 Wave/tap: contactless cards * 1. The PAYD PIN Pad to displays SWIPE, TAP OR INSERT CARD. 2. The customer taps/waves their card over the PAYD PIN Pad's display screen: The PAYD PIN Pad's battery charge level should be at least 50% (see page 50) to ensure a successful tap. Only Sales and Refunds can be performed as contactless transactions. The customer will not be prompted for a PIN. The transaction amount must be equal to or less than the card's maximum Contactless Dollar Value (see below). 3. The PAYD PIN Pad beeps and four green lights flash when the contactless reader is reading the card data. 4. You may be prompted to capture the customer's signature. * In this guide, the term "contactless card" refers to a contactless-enabled card (supported brands include Visa, Mastercard, American Express, Discover, and Interac ) or other items such as a key fob, mobile tag, or mobile device (e.g., a smartphone, tablet, or smartwatch; the cardholder is responsible for any related software on their mobile device including downloading any required apps and loading their card information into their digital wallet). Maximum Contactless Dollar Value (CDV) To determine the maximum CDV for a card type, contact us. Credit cards: If a credit card is tapped for an amount that exceeds its maximum CDV, the PAYD PIN Pad will display CONTACTLESS TRANSACTION LIMIT EXCEEDED (see message on page 92). Debit cards: If a debit card is tapped for an amount that exceeds its maximum CDV, the PAYD PIN Pad will display "MUST INSERT CARD" (see message on page 92). Tips for proper card tap/wave: The card must be within 0.5 in. (1.3 cm) of the PAYD PIN Pad's display screen, but it does not have to touch it. The card must be tapped or waved by itself. It should not be waved while in a wallet with other cards. 55
58 Manual card entry on the PAYD PIN Pad If all available card entry methods fail, you may manually enter the card number for credit cards and some chip debit cards. 1. In the PAYD App, initiate a Sale (or Pre-Authorization). 2. For detailed transaction steps to a Sale, see page 58 (for a Pre- Authorization, see page 60). 3. On the "Sale" screen, tap (checkmark the box) Keyed entry on pinpad. Note: If you are unable to use the PAYD PIN Pad to capture the card data, try using the PAYD card reader (see page 95). 56 USING PAYD PRO FOR ANDROID
59 Transactions General guidelines for transactions 1. Keep the PAYD PIN Pad and your mobile device in close proximity to each other. 2. Do not attempt to perform transactions near strong sources of electromagnetic interference (see page 97). 3. Before you perform a transaction, confirm the operational status of the PAYD PIN Pad: It must be powered on (see page 51); It must display WELCOME/BONJOUR and BT (see page 49), or it must display the hardware manufacturer name/logo; It must be sufficiently charged (see page 50). 4. If the status of the PAYD PIN Pad's connection with the PAYD App/mobile device changes while the PAYD App is open, the PAYD App will display a notification: If "Pinpad has been successfully connected" displays, tap OK, and continue the transaction. If "Pinpad has been disconnected" displays, tap OK (see page 83 for troubleshooting). 5. A transaction is complete when the PAYD App displays an "APPROVED" or "DECLINED" response. 57
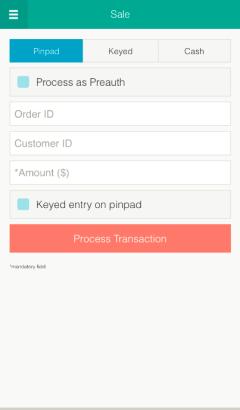
60 Sale with debit/credit card Debit or credit card sale of goods and services. 1. Ensure that the PAYD PIN Pad is powered on and ready (see page 57). 2. In the PAYD App, start on the "Sale" screen. Note: If another screen is displayed, tap to return to the main menu, and then tap Sale. 3. Tap Pinpad. If the Customer ID and Order ID fields display and you want to track the transaction with your own identifier(s), enter the required data in one or both fields; otherwise, leave these fields blank to bypass entering any identifier. Note: If you enter your own order ID, it must be unique. If you don't enter your own order ID, it will be generated automatically. 4. In the Amount ($) field, enter the Sale amount (#.##). If the tax AA% ($) field/box displays and is checkmarked, the tax that will be added displays in the field while the total transaction amount (including the tax) displays in the Total ($) field. Note: If you do not want to add the tax to this transaction, tap (unmark) the tax AA% ($) box. 5. Use the PAYD PIN Pad to capture the card data: If you want the card to be inserted, tapped, or swiped on the PAYD PIN Pad, go to step 6. If you need to manually enter the card data on the PAYD PIN Pad, see page Tap Process Transaction. 7. When "Follow prompts on pinpad" displays, do one of the following: If tip prompting is disabled, see page 62. If tip prompting is enabled, see page USING PAYD PRO FOR ANDROID
61 Sale with cash Cash sale of goods and services. 1. In the PAYD App, start on the "Sale" screen. Note: If another screen is displayed, tap to return to the main menu, and then tap Sale. 2. Tap Cash. If the Customer ID and Order ID fields display and you want to track the transaction with your own identifier(s), enter the required data in one or both fields; otherwise, leave these fields blank to bypass entering any identifier. Note: If you enter your own order ID, it must be unique. If you don't enter your own order ID, it will be generated automatically. 3. In the Amount ($) field, enter the Sale amount (#.##). If the tax AA% ($) field/box displays and is checkmarked, the tax that will be added displays in the field while the total transaction amount (including the tax) displays in the Total ($) field. Note: If you do not want to add the tax to this transaction, tap (unmark) the tax AA% ($) box. 4. In the Amount Tendered ($) field, enter the amount tendered. Note: The Change Due ($) field will automatically display the amount owed to the customer. 5. Tap Process Transaction. 6. When the PAYD App displays the "APPROVED" response, the transaction is complete: To a transaction receipt, see page 74. Note: If you enabled the PAYD App to auto-send receipts to a set merchant address, the PAYD App automatically s a receipt to the address (the PAYD App will not notify you that the has been sent). To send an SMS text message notification, see page Tap to return to the main menu. 59
62 Pre-Authorization with credit card Authorization of an amount on a credit card if the final transaction amount is unknown. Important! To receive funds, you must perform a Capture (see page 70). 1. Ensure that the PAYD PIN Pad is powered on and ready (see page 57). 2. In the PAYD App, start on the "Sale" screen. Note: If another screen is displayed, tap to return to the main menu, and then tap Sale. 3. Tap (checkmark the box) Process as Preauth. 4. Tap Pinpad. 5. When "Pinpad has successfully connected" displays, tap OK. If the Customer ID and Order ID fields display and you want to track the transaction with your own identifier(s), enter the required data in one or both fields; otherwise, leave these fields blank to bypass entering any identifier. Note: If you enter your own order ID, it must be unique. If you don't enter your own order ID, it will be generated automatically. 6. In the Amount ($) field, enter the Pre-Authorization amount (#.##). If the tax AA% ($) field/box displays and is checkmarked, the tax that will be added displays in the field while the total transaction amount (including the tax) displays in the Total ($) field. Note: If you do not want to add the tax to this transaction, tap (unmark) the tax AA% ($) box. 7. Use the PAYD PIN Pad to capture the card data: If you want the card to be inserted or swiped on the PAYD PIN Pad, go to step 8. If you need to manually enter the card data on the PAYD PIN Pad, see page Tap Process Transaction. 9. When "Follow prompts on pinpad" displays, see page USING PAYD PRO FOR ANDROID
63 Manually entering card data on the PAYD PIN Pad In the PAYD App, ensure that you have entered the transaction amount, selected/added the sales tax if enabled, and entered any optional tracking identifiers (customer ID and/or order ID) before you follow the steps below. 1. Tap (checkmark the box) Keyed entry on pinpad. 2. Tap Process Transaction. 3. When "Follow prompts on pinpad" displays, go to the next step. If PURCHASE $0.00-OK? displays on the PAYD PIN Pad, see page Wait for ENTER CARD # to display on the PAYD PIN Pad. 5. On the PAYD PIN Pad, key in the card number, and press the green key. 6. When EXPIRY DATE MMYY displays on the PAYD PIN Pad, key in the card expiry date (MMYY), and press the green 7. Wait while the transaction is processed. key. If the PAYD App displays the "Customer Signature" screen, capture the customer's signature on your mobile device (see page 73). 8. When the PAYD App displays the "APPROVED" or "DECLINED" response, the transaction is complete: To a transaction receipt, see page 74. Note: If you enabled the PAYD App to auto-send receipts to a set merchant address, the PAYD App automatically s a receipt to the address (the PAYD App will not notify you that the has been sent). To send an SMS text message notification, see page Tap to return to the main menu. 61
64 Customer prompts on the PAYD PIN Pad When the PAYD App displays "Follow prompts on pinpad", do the following: 1. Hand the PAYD PIN Pad to the customer. 2. The customer responds to any prompt that displays on the PAYD PIN Pad. Note: Potential prompts (and the actions to take for each) are listed in order of appearance in the table below. Only some of the listed prompts will display for any one transaction. Prompt SWIPE, TAP OR INSERT CARD or SWIPE OR INSERT CARD SELECT ENGL LANGUAGE FRAN SELECT <Application name> YES NO <Application name> -OK? YES NO I PRE-AUTHORIZE UP TO $0.00-OK? Customer action Enters their card on the PAYD PIN Pad (see pages 53 to 55 for options). For English prompts, presses F1 (ENGL). For French prompts: Presses F4 (FRAN). To select the displayed application, presses F1 (YES). To view the next available application, presses F4 (NO). Presses F1 (YES) to use the displayed application. Presses the green key to confirm the displayed Pre-Authorization amount. <TRANSACTION NAME> $0.00-OK? Presses the green displayed amount. key to confirm the This table continues on the next page USING PAYD PRO FOR ANDROID
65 Prompt SELECT CHQ ACCOUNT SAV Customer action For chequing account, presses F1 (CHQ). For savings account, presses F4 (SAV). ENTER PIN & OK PLEASE WAIT APPROVED THANK YOU REMOVE CARD APPROVED THANK YOU OBTAIN CARD Keys in their Personal Identification Number (PIN) and presses the green key. Waits while the transaction is processed. Removes their card from chip reader. Note: The PAYD PIN Pad beeps until the card is removed. Retrieves their card. WELCOME/BONJOUR Returns the PAYD PIN Pad to you (go to step 3). 3. Retrieve the PAYD PIN Pad from the customer. Note: If the WELCOME/BONJOUR screen is not already displayed on the PAYD PIN Pad, press the red key until it does. If the PAYD App displays the "Customer Signature" screen, capture the customer's signature on your mobile device (see page 73). 4. When the PAYD App displays the "APPROVED" or "DECLINED" response, the transaction is complete: To a transaction receipt, see page 74. Note: If you enabled the PAYD App to auto-send receipts to a set merchant address, the PAYD App automatically s a receipt to the address (the PAYD App will not notify you that the has been sent). To send an SMS text message notification, see page Tap to return to the main menu. 63
66 Customer prompts on the PAYD PIN Pad (tip prompting enabled) When PURCHASE $0.00-OK? displays on the PAYD PIN Pad during a Sale transaction, do the following: 1. Hand the PAYD PIN Pad to the customer. 2. The customer responds to any prompt that displays on the PAYD PIN Pad. Note: Potential prompts (and the actions to take for each) are listed in order of appearance in the table below. Prompt PURCHASE $0.00-OK? ENTER TIP AMOUNT PURCHASE $0.00-OK? $0.00 Customer action Presses the green displayed amount. key to confirm the To add a tip, keys in an amount and presses the green key. To bypass adding a tip, presses the green key without keying in an amount. Presses the green key to confirm the displayed amount (go to step 3). Note: If the customer wants to change the tip amount, they press the yellow key once, and then they rekey the tip amount when prompted. 3. Do one of the following: If SWIPE, TAP OR INSERT CARD displays on the PAYD PIN Pad, continue on page 62; begin at step 2. If ENTER CARD # displays on the PAYD PIN Pad, the customer returns the PAYD PIN Pad to you (continue on page 61; begin at step 5). 64 USING PAYD PRO FOR ANDROID
67 Customer prompts in the PAYD App When the PAYD App displays "Please specify a tip amount" during a Sale transaction, do the following: 1. Hand your mobile device to the customer. 2. The customer does one of the following: To add a default tip percentage: a. The customer taps one of the three displayed percentages. To add a different tip as an amount or percentage: a. The customer taps Custom Tip. b. The customer chooses a tip type: To add a percentage-based tip, they tap %. To add a dollar-amount tip, they tap $. c. In the Please specify tip field, the customer enters a value (percentage or dollar amount) and taps OK. To bypass adding a tip: a. The customer taps No Tip (go directly to step 4). 3. When "Please confirm totals" displays, the customer confirms the displayed totals and taps OK. Note: If the customer wants to change the tip amount, they tap Back, and then they re-enter the tip when prompted (see To add a different tip as an amount or percentage above; begin at step b). 4. When "Processing Transaction" or "Please swipe card" displays, retrieve your mobile device from the customer. If "Please swipe card" displays, swipe the card on the connected PAYD card reader. If the "Customer Signature" screen displays, capture the customer's signature on your mobile device (see page 73). 5. When the PAYD App displays the "APPROVED" or "DECLINED" response, the transaction is complete: 65
68 To a transaction receipt, see page 74. Note: If you enabled the PAYD App to auto-send receipts to a set merchant address, the PAYD App automatically s a receipt to the address (the PAYD App will not notify you that the has been sent). To send an SMS text message notification, see page Tap to return to the main menu. 66 USING PAYD PRO FOR ANDROID
69 Voiding/refunding a transaction Reverses a debit/credit or cash transaction. Note: If you want to reverse a debit/credit transaction on the same day it was originally processed, you must do a Void for the full amount. If you want to reverse a debit/credit transaction processed on a different day, you must do a Refund. Debit transactions must be refunded for the full amount. Credit transactions can be refunded for a full or partial amount. Cash transactions are always reversed (refunded) for the full amount regardless of the date on which the original transaction was processed. 1. Ensure that the PAYD PIN Pad is powered on and ready (see page 57). 2. In the PAYD App, start on the "Reports" screen. Note: If another screen is displayed, tap to return to the main menu, and then tap Reports. 3. Do one of the following: To display the last 10 transactions processed today: a. Leave all search fields blank, and go directly to step 4. To narrow the scope of your search: a. Select one or more of the following criteria: Note: The original transaction receipt includes the transaction identifiers submitted with the original transaction. Date: To retrieve transactions processed within a date range other than today: Tap the Today drop-down list, and select a date range from the list; otherwise, skip this step to retrieve only transactions processed today. Order ID: Enter the ID in the Order ID field (a full or partial ID may be entered). Customer ID: Enter the ID in the Customer ID field (a full or partial ID may be entered). Amount: Enter the amount in the Amount ($) field. b. Tap Sort by, and select a sort order (amount, customer ID, date, order ID, card type, or transaction type) from the drop-down list. 67
70 4. Tap Search Transactions, and wait for a transaction list to display. To display the next 10 transactions if applicable, tap More (to maximum of 300). 5. Tap the transaction that you want to reverse. 6. When the transaction "Details" screen displays, confirm this is the transaction that you want to reverse (see page 78), and then: Note: If you do not want to reverse this transaction, tap (repeat step 5). To do a Void: a. Tap Void this transaction. To do a Refund: a. Tap Refund this transaction. b. In the Refund Amount ($) field, enter the Refund amount. If the tax AA% ($) field/box displays and is checkmarked, the tax that will be added displays in the field while the total transaction amount (with tax) displays in the Total ($) field. 7. Tap Process Transaction. Note: If you do not want to add the tax to this transaction, tap (unmark) the tax AA% ($) box. If the PAYD App displays "Follow prompts on pinpad", do one of the following: Hand the PAYD PIN Pad to the customer (see page 62). Manually enter the card data on the PIN Pad yourself (continue on page 61, and begin at step 4). 8. When the PAYD App displays the "APPROVED" or "DECLINED" response, the transaction is complete: 68 USING PAYD PRO FOR ANDROID
71 To a transaction receipt, see page 74. Note: If you enabled the PAYD App to auto-send receipts to a set merchant address, the PAYD App automatically s a receipt to the address (the PAYD App will not notify you that the has been sent). To send an SMS text message notification, see page Tap to return to the main menu. 69
72 Capturing a Pre-Authorization Completes a Pre-Authorization so that the funds are transferred to your account at settlement. Note: If the Pre-Authorization was performed via card swipe or insert on a PAYD PIN Pad, you must perform the Capture with the same PAYD PIN Pad (you will not be prompted to enter card data during the Capture). 1. Ensure that the PAYD PIN Pad is ready (see page 57). 2. In the PAYD App, start on the "Reports" screen. Note: If another screen is displayed, tap to return to the main menu, and then tap Reports. 3. Do one of the following: To display the last 10 transactions processed today: a. Leave all search fields blank, and go to step 4. To narrow the scope of your search: a. Select one or more of the following criteria: Note: The original transaction receipt includes the transaction identifiers submitted with the original transaction. Date: To retrieve transactions processed within a date range other than today: Tap the Today drop-down list, and select a date range from the list; otherwise, skip this step to retrieve only transactions processed today. Order ID: Enter the ID in the Order ID field (a full or partial ID may be entered). Customer ID: Enter the ID in the Customer ID field (a full or partial ID may be entered). Amount: Enter the amount in the Amount ($) field. b. Tap Sort by, and select a sort-by option (amount, customer ID, date, order ID, card type, or transaction type) from the dropdown list. 4. Tap Search Transactions, and wait for a transaction list to display. 70 USING PAYD PRO FOR ANDROID
73 To display the next 10 transactions if applicable, tap More (to maximum of 300). 5. Tap the "Preauth" transaction that you want to complete. 6. When the transaction "Details" screen displays, confirm this is the transaction that you want to complete (see page 78). Note: If this transaction is not the one that you want to complete, tap (repeat step 5). 7. Tap Capture this transaction. 8. In the Capture Amount ($) field, enter the amount to be completed (captured). Note: If the Pre-Authorization is completed for an amount that is less than the original, the hold on the remaining amount will be released. If the tax AA% ($) field/box displays and is checkmarked, the tax that will be added displays in the field while the total transaction amount (with the tax) displays in the Total ($) field. Note: If you do not want to add the tax to this transaction, tap (unmark) the tax AA% ($) box. 9. Tap Process Transaction. Note: The PAYD App displays the "Follow prompts on pinpad" message, and the PAYD PIN Pad displays PLEASE WAIT. This is part of normal operation. A "Customer Signature" screen will not display on your mobile device. 10. When the PAYD App displays the "APPROVED" or "DECLINED" response, the transaction is complete: To a transaction receipt, see page 74. Note: If you enabled the PAYD App to auto-send receipts to a set merchant address, the PAYD App automatically s a receipt to the address (the PAYD App will not notify you that the has been sent). To send an SMS text message notification, see page Tap to return to the main menu. 71
74 Receipts When a transaction is completed, a receipt is always generated. If a debit or credit card was used for the transaction, the receipt includes information about the cardholder verification method used for the transaction (see below). Cardholder verification method (CVM) statement The CVM statement appearing near the bottom in a receipt is determined by the card type and card entry method used during the transaction for which the receipt was generated. Note: The CVM statement is not included in receipts for cash or swiped/contactless debit transactions. CVM statement Card type Card entry method NO SIGNATURE TRANSACTION credit tap (contactless) SIGNATURE VERIFIED BY PIN credit credit debit swipe (stripe) manual entry insert (chip) Card masking To reduce the risk of fraudulent card use, masking and truncation are applied to card numbers in receipts. Masking replaces a card s numbers (except for the last 4) with "*"s (e.g., ************1234). Truncation displays only the last 4 digits of a card (e.g., 1234). The expiry date does not appear in any receipt. 72 USING PAYD PRO FOR ANDROID
75 Signature capture for receipts The PAYD App displays the "Customer Signature" screen if you are required to capture the customer's signature. Note: If a signature is captured, it will not be included in ed receipts; however, a receipt with signature will be stored on PAYD Administration and can be viewed or printed from there at any time (see the Using Moneris PAYD Administration Guide). A receipt with signature can also be viewed via the hyperlink included in any SMS text message notification sent for the transaction. The captured customer signature can also be viewed in the PAYD App when you retrieve the transaction's details in a Transactions Report (see page 76) or when you are doing a Void or Refund (see page 67) or Capture (see page 70). When the PAYD App displays the "Customer Signature" screen, do the following: 1. Retrieve the PAYD PIN Pad if it was used to capture the card data. Note: The WELCOME/BONJOUR screen displays on the PAYD PIN Pad. 2. Have the customer "write" their signature above the Customer Signature line on the screen of your mobile device. If the customer wishes to redo their signature, they tap Clear and then sign again. 3. Once the customer approves their signature, they tap Done. 4. When the PAYD App displays the "APPROVED" or "DECLINED" response, the transaction is complete: To a transaction receipt, see page 74. Note: If you enabled the PAYD App to auto-send receipts to a set merchant address, the PAYD App automatically s a receipt to the address (the PAYD App will not notify you that the has been sent). To send an SMS text message notification, see page Tap to return to the main menu. 73
76 ing a transaction receipt When the PAYD App displays the "APPROVED" or "DECLINED" response, follow these steps to a transaction receipt. Note: If you enabled the PAYD App to auto-send receipts to a set merchant address (see page 38), the PAYD App automatically s a receipt to the address (the PAYD App will not notify you that the has been sent). 1. Under "Receipt" (bottom of the screen), tap. 2. When the "Send Receipt" screen displays, enter an address as follows: To manually enter an address: a. In the Address field, enter the address to which you want to send the receipt. b. Tap. To select an address from your mobile device's contacts list: Note: To use this feature, your mobile device's privacy settings must be configured to allow the PAYD App to access your device's contacts data. (Your mobile device may prompt you to allow the PAYD App to access the device's contacts data. You must grant this access to use this feature.) a. Tap. b. When the "Contacts" screen displays, tap the Firstname Lastname of the contact to whom you want to send the receipt. c. Tap the name@domain.nnn ( address) to which to send the receipt. 3. When the "Receipt successfully sent" message displays, tap OK. 4. If you want to a receipt to additional addresses, repeat steps 1 to 3 as many times as you require. 5. When you are finished, tap to return to the main menu. 74 USING PAYD PRO FOR ANDROID
77 Sending an SMS text message transaction notification When the PAYD App displays the "APPROVED" or "DECLINED" response, follow these steps to send an SMS (short message system) text message notification. Note: The text message includes a hyperlink to a transaction receipt. If a customer signature was captured for the transaction, the signature will appear on the displayed receipt's "SIGNATURE" line. 1. Under "Receipt" (bottom of the screen), tap. 2. When the "Send Receipt" screen displays, enter a phone number as follows: To manually enter a phone number: a. In the Phone Number field, enter the phone number to which you want to send the text message. b. Tap. To select a phone number from your mobile device's contacts list: Note: To use this feature, your mobile device's privacy settings must be configured to allow the PAYD App to access your device's contacts data. (Your mobile device may prompt you to allow the PAYD App to access the device's contacts data. You must grant this access to use this feature.) a. Tap. b. When the "Contacts" screen displays, tap the Firstname Lastname of the contact to whom you want to send the text message. c. Tap the (123) phone number to which to send the text message. 3. When the "Receipt successfully sent" message displays, tap OK. 4. If you want to send an SMS text message notification to additional phone numbers, repeat steps 1 to 3 as many times as you require. 5. When you are finished, tap to return to the main menu. 75
78 Reporting Transactions report Search for and display transactions by date, order ID, customer ID, or amount. You may also export the search results. 1. In the PAYD App, start on the "Reports" screen. Note: If another screen is displayed, tap to return to the main menu, and then tap Reports. 2. Do one of the following: To display the last 10 transactions processed today: a. Leave all search fields blank, and go to step 4. To narrow the scope of your search: a. Select one or more of the following criteria: Note: The original transaction receipt includes the transaction identifiers submitted with the original transaction. Date: To retrieve transactions processed within a date range other than today: Tap the Today drop-down list, and select a date range from the list; otherwise, skip this step to retrieve only transactions processed today. Order ID: Enter the ID in the Order ID field (a full or partial ID may be entered). Customer ID: Enter the ID in the Customer ID field (a full or partial ID may be entered). Amount: Enter the amount in the Amount ($) field. b. Tap Sort by, and select a sort-by option (amount, customer ID, date, order ID, card type, or transaction type) from the dropdown list. 3. Tap Search Transactions, and wait for a transaction list to display. 76 USING PAYD PRO FOR ANDROID
79 4. You may do any of the following: To display the next 10 transactions if applicable, tap More (to maximum of 300). To export the report results in CSV format in a text file, tap Export Report (near the top of the screen). Note: The file will be sent to the address that you specified in your Export to CSV setting (see page 37). To view the details of a listed transaction, tap the desired transaction (see page 78). 5. When you are finished, tap to return to the transaction list, or tap to return to main menu. 77
. Note: Line items 1 to 10 and item 16 display by default. To display line items 11 to 15, tap More Details.")
80 "Details" screen (transactions) The "Details" screen (shown below) displays when you tap a transaction record listed in a Transactions Report (e.g., you may be performing a Void, Refund, or Capture, or simply reviewing transactions). Note: Line items 1 to 10 and item 16 display by default. To display line items 11 to 15, tap More Details. (For label descriptions, see page 79). 1. You may do one or more of the following if applicable: To perform a Refund/Void, continue at step 6 on page 68. To perform a Capture, continue at step 7 on page 71. To a transaction receipt, see page 74. To send an SMS text message notification, see page 75. Tap to return to the transaction list, or tap to return to the main menu. 78 USING PAYD PRO FOR ANDROID
81 This table describes the "Details" screen shown on page 78. Label Description 1 Transaction name. 2 Transaction date (DD/MM/YYYY) and time (hh:mm:ss). 3 Unique transaction identifier. Auto-generated if no order ID entered for transaction. 4 Card type or "Cash". 5 Card number (masked) or "Cash". 6 Displays if customer ID entered for transaction. 7 Transaction amount excluding tax and tip. 8 Tax amount (see page 33). 9 Tip amount (see page 32). 10 Total amount including tax and/or tip if entered. 11 Transaction performed by user signed in under this employee ID Moneris Host identifier (e.g., if "I " is the number, then "I " is the terminal ID (i.e., PAYD PIN Pad ID). This number may be requested by Moneris to help track a transaction. Transaction Response code: < 50: Transaction approved. >= 50: Transaction declined. NULL: Transaction was not sent for authorization. 14 Auth code (6-8 digits) from the card-issuing institution. 15 Location of transaction (see page 34). 16 Customer signature (displays if captured for transaction). 79
82 Totals (batches) report Displays open and closed batch totals (sub-totals include transaction totals, tip totals, and terminal ID totals) so that you can determine the amount deposited in your back account for a batch that has been closed. Note: Totals for a batch can be viewed from the PAYD App for up to three months from the date a batch is closed. 1. Start on the "Totals" screen. Note: If another screen is displayed, tap to return to the main menu, and then tap Totals. 2. Select a date range from the drop-down list. 3. Tap Search Batches. If the "Totals" screen displays listing one or more "Daily Total" records, tap the record that you want to view. 4. When the "Daily Summary" screen displays, you may review one or more of the following sub-reports: Daily Summary Totals For the selected date range, displays transaction types and totals grouped by card type (or "Cash"). a. To display this sub-report, tap. Daily Tip Totals For the selected date range, displays tip totals grouped by the PAYD employee ID (clerk ID) under which the tip amounts were accrued. a. To display this sub-report, tap. Note: If "No tip totals for today" displays, it means no tip amounts were accrued for the specified date range. Terminal Totals For the selected date range, displays transaction types and totals (excluding cash) grouped by batch number and terminal ID. 80 USING PAYD PRO FOR ANDROID
83 a. To display this sub-report, tap. Note: Totals grouped under a terminal ID starting with "I6" indicate those transactions were performed on a PAYD PIN Pad with the same ID. Totals grouped under the terminal ID starting with "66" indicate those transactions were performed entirely on the PAYD App (i.e., without the use of a PAYD PIN Pad). A blank screen indicates no debit/credit transactions were performed for the specified date range. 5. When you are finished, tap to return to the "Totals" list, or tap to return to the main menu. 81
84 Re-initializing the PAYD PIN Pad 1. Ensure that the PAYD PIN Pad is powered on and ready (see page 57). 2. In the PAYD App, start on the "Settings" screen. Note: If another screen is displayed, tap to return to the main menu, and then tap Settings. 3. Tap Pinpad. 4. Tap Bluetooth if it is not already selected. Tap Connect Pinpad if it displays. 5. Tap Initialize Pinpad. Note: If Connect Pinpad continues to display even after you have tapped it, see page 87 for troubleshooting. 6. When PLEASE WAIT displays on the PAYD PIN Pad, wait while it initializes. Note: During this process, the PAYD App displays the message "Initializing Pinpad. This may take a few minutes". 7. When the PAYD App displays the message "Initialization was successful. Pinpad is ready to use", tap OK. 8. When the PAYD PIN Pad displays the WELCOME/BONJOUR screen, the operation is complete. 9. Tap to return to the main menu. 82 USING PAYD PRO FOR ANDROID
85 Troubleshooting Error messages in the PAYD App If an error message is displayed in the PAYD App (i.e., on your mobile device) and is listed in the table below, tap OK and then follow the instructions in the table s Solution column. If the problem is still not resolved, call us at PAYD (7293). Note: For error messages displayed on the PAYD PIN Pad and/or other PAYD PIN Pad hardware issues, see pages 91 to 94. Error message An error occurred on the pinpad. Transaction was not processed. Application PAYD already exists. Replace version ### with version ###. Card Read Error. Please swipe again. Pinpad has been disconnected. Solution An application or communication error occurred. 1. Retry the transaction. (See also the issues listed on pages 86 to 90). You have already installed an earlier version of the PAYD App. 1. Delete the unusable App from your mobile device. 2. Download and install the latest version of the PAYD App (see page 10). The connected PAYD card reader could not read the card data when the card was swiped on it. 1. Try swiping again (see page 95). The PAYD App/your mobile device can no longer detect the PAYD PIN Pad with which it is paired. 1. See "Unable to connect to Pinpad" (page 85). 83
86 Error message Sign in failed. Please Try Again. The Request has timed out. Please ensure your signal is strong and try again. Tip has not been configured on the pinpad. Please connect pinpad to update pinpad settings. Solution 1. Try signing in again. 2. If the text "Quit Demo Mode" displays at the bottom of the sign-in screen, tap Quit Demo Mode to return to the "live" sign-in screen, and retry signing in again. 3. If the authentication fails, and you are: Trying to sign in using your full credentials, use the password reset feature (see page 44). Trying to sign in using your quick PIN, use the forgot PIN feature (see page 45). 4. If the problem persists, redo the setup procedures starting on page 10. There may be too much interference in your area and/or your mobile device is too far from its wireless network access point. 1. Move to a location within your wireless network coverage area where there are no sources of interference (see page 97), and retry the operation. Tip prompting cannot be enabled/disabled on the PAYD PIN Pad because the PAYD App/your mobile device is unable to detect the PAYD PIN Pad with which it is paired. 2. See "Unable to connect to Pinpad" (page 85). 84 USING PAYD PRO FOR ANDROID
87 Error message Unable to connect to Pinpad. Solution The PAYD App/your mobile device cannot detect the PAYD PIN Pad with which it is paired. 1. Confirm that the PAYD PIN Pad is powered on (see page 51). 2. Confirm that the PAYD PIN Pad is in range of your mobile device and operating in a suitable environment (see page 97). 3. Confirm that the PAYD PIN Pad's 8-digit terminal ID (e.g., "I ") is shown as "paired" on your mobile device's Bluetooth settings screen. 4. If the error message continues to display, simultaneously press and hold down both the yellow key and the key on the PAYD PIN Pad until it starts to power off, and then wait while it powers off completely. 5. When the PAYD PIN Pad is powered off, press its power button (see page 49), and then wait while the PAYD PIN Pad powers on. 6. When the WELCOME/BONJOUR screen displays, retry the transaction. 85
88 Other issues (PAYD App) Issue PAYD App and/or PAYD PIN Pad stalls or freezes midway during a transaction. Solution 1. If a card is inserted, remove it from the chip reader. 2. Simultaneously press and hold down both the yellow key and the key on the PAYD PIN Pad until it starts to power off, and then wait while it powers off completely. 3. When the PAYD PIN Pad is powered off, press its power button (see page 49), and wait while the PAYD PIN Pad to powers on to the WELCOME/BONJOUR screen. 4. When the PAYD App resumes operation on your mobile device, retry the transaction. 5. If the issue recurs, close the PAYD App, and reboot the PAYD PIN Pad again. 6. Re-launch the PAYD App, sign in (see page 40), and retry the transaction. 86 USING PAYD PRO FOR ANDROID
89 Issue "Initialize Pinpad" button does not display. Solution 1. Ensure that the PAYD PIN Pad is powered on. 2. In the PAYD App, tap Connect Pinpad. 3. If the Initialize Pinpad button still does not display, simultaneously press and hold down both the yellow key and the key on the PAYD PIN Pad until it starts to power off, and then wait while it powers off completely. 4. When the PAYD PIN Pad is powered off, press its power button (see page 49), and then wait while the PAYD PIN Pad powers on to the WELCOME/BONJOUR screen. 5. In the PAYD App, tap Connect Pinpad. 6. If the issue recurs, sign out of the PAYD App. 7. Power off your mobile device. 8. Simultaneously press and hold down both the yellow key and the key on the PAYD PIN Pad until it starts to power off, and then wait while it powers off completely. 9. When the PAYD PIN Pad is powered off, press its power button (see page 49), and then wait while the PAYD PIN Pad powers on to the WELCOME/BONJOUR screen. 10. Restart your mobile device, and try initializing the PAYD PIN Pad again: If you are initializing for the first time, go back to page 16 (begin at setup step 6). If you are re-initializing, go back to page
90 Issue You get a "DECLINED" response, and the PAYD PIN Pad continues to display WELCOME /BONJOUR. You cannot remember your sign-in password or quick PIN. The "Export Report" button does not display on the "Reports" screen. Nothing happens when you tap. Solution 1. Simultaneously press and hold down both the yellow key and the key on the PAYD PIN Pad until it starts to power off, and then wait while it powers off completely. 2. When the PAYD PIN Pad is powered off, press its power button (see page 49), and then wait while the PAYD PIN Pad powers on to the WELCOME/BONJOUR screen. 3. Retry the transaction. 4. If the issue recurs, re-initialize the PAYD PIN Pad (see page 82). 1. Reset your password (see page 44), or reset your quick PIN (see page 45). 1. Set an address to receive exported reports (see page 37). 2. Redo the report and try exporting it again (the Export Report button should now display near the top of the "Reports" screen). Your mobile device's privacy settings are configured to deny the PAYD App access your device's contacts list, or you do not have any contact listings stored on your device. 1. Configure your device's privacy settings to allow the PAYD App to access to your device's contacts list, and then retry to access your contacts list from the PAYD App. 88 USING PAYD PRO FOR ANDROID
91 Issue The "Swipe" option does not display on the transaction page when the PAYD card reader is connected. Nothing happens when you swipe the card on the connected PAYD card reader. A location map does not display on a transaction's "Details" screen. Solution Your mobile device was unable to detect the PAYD card reader connection. Note: The Swipe option will replace the Keyed option only if a reader is properly connected to your mobile device. 1. Ensure the PAYD card reader is securely connected to your mobile device (see page 95). 2. If your mobile device has a protective sleeve, ensure it is not preventing the reader from being completely plugged in. 3. When Swipe is displayed as a card entry option, tap it and continue the transaction. You may not have swiped the card correctly and/or the PAYD App does not have access to your mobile device's microphone settings. 1. Try swiping the card again (see page 95 for correct swipe position). 2. If this does not work ensure your mobile device is configured to allow the PAYD App to access the device's microphone, and then retry swiping the card. 3. If you are unable to perform the transaction using the PAYD card reader, you may try manually entering the card data on your mobile device (see page 97). Your mobile device is not configured to use location services and/or the PAYD App does not have access to your device's location data. 1. To enable location mapping, see page
92 Issue You want to determine the version number of the PAYD App. Solution 1. See Determining the PAYD App's version number (page 39). 90 USING PAYD PRO FOR ANDROID
93 Error messages on the PAYD PIN Pad If an error message displays on the PAYD PIN Pad, first press the red key once or twice to clear the message, then retry the transaction. If the error message reappears and is listed in the table below, follow the instructions in the table. If the problem is still not resolved, call us at PAYD (7293). Note: For error messages displayed in the PAYD App on your mobile device and/or other PAYD App-related issues on your mobile device, see pages 83 to 90. Error message BATTERY CHARGING IN PROGRESS CANNOT SWIPE CHIP CARD CARD BLOCKED REMOVE CARD CARD NOT SUPPORTED PLEASE RETRY CARD PROBLEM Solution The PAYD PIN Pad battery is recharging from a very low charge level. 1. Wait for the WELCOME/BONJOUR screen to display (may take several minutes) before you attempt to perform a transaction. 1. Insert the chip card into the PAYD PIN Pad's chip card reader. The chip card cannot be used. 1. Ask for another form of payment. 1. Swipe the card again. 2. If this does not work, try using the PAYD card reader (see page 95). 3. If this does not work, request another form of payment. 1. Retry the transaction. 2. If the message reappears: If card was inserted: Swipe the card. If credit card was swiped: Manually enter the card (see page 56). 91
94 Error message CARD READ ERR CONTACTLESS TRANSACTION LIMIT EXCEEDED DECLINED BY CARD Solution The card data could not be read when the card was swiped or tapped. 1. Retry the transaction. 1. If the card has a chip, insert it into the chip reader; otherwise, swipe the card. The chip card has declined the transaction. 1. Retrieve the PAYD PIN Pad, and remove the chip card. 2. Request another form of payment. ERROR CARD REMOVED MUST INSERT CARD NO CARD NO SUPPORTED APPLICATIONS REMOVE CARD NOT ACCEPTED REMOVE CARD or NOT ACCEPTED USE MAG STRIPE REMOVE CARD The chip card was removed during the transaction. 1. Retrieve the PAYD PIN Pad, and retry the transaction. 1. If the card has a chip, insert it into the chip reader; otherwise, swipe the card. The card was not entered on the PAYD PIN Pad in the required time. If card was inserted: Remove the card from the chip reader, and swipe it when prompted. If card was tapped: If the card has a chip, insert it into the chip reader; otherwise, swipe the card. 1. Remove the chip card from the chip reader. 2. If prompted, swipe the card on the magnetic stripe reader. 3. Credit only: If swiping does not work, manually enter the card number (see page 56). 92 USING PAYD PRO FOR ANDROID
95 Error message NOT COMPLETED PLEASE CHARGE THE TERMINAL REFUND LIMIT EXCEEDED TAP NOT ACCEPTED WRONG CARD TYPE Solution The customer took more than 30 seconds to respond to the prompts. 1. Retry the transaction. The PAYD PIN Pad's battery charge is low. 1. Connect the PAYD PIN Pad to an external power source via the USB charging cable. 2. When BATTERY CHARGING IN PROGRESS displays, see page 91. The total value of Refunds performed today is greater than your daily Refund Limit. 1. Contact us for a temporary increase in your daily Refund Limit. 2. Ensure that you have the original Purchase receipt available for reference. 1. Cancel the transaction. 2. Ensure that the PAYD PIN Pad battery has a charge level of at least 50% (see page 50), and retry the transaction. 3. If the issue recurs, insert the card into the chip reader if the card has a chip; otherwise, swipe the card. The card that was swiped cannot be used for this transaction. 1. Ask for another card and retry. 93
96 Other issues (PAYD PIN Pad) Issue The PAYD PIN Pad and/or PAYD App stalls or freezes midway during a transaction. The screen displays the hardware manufacturer name/logo instead of WELCOME/ BONJOUR. The PAYD PIN Pad powers off. The contactless reader does not beep when a card is tapped/waved at the SWIPE, TAP OR INSERT CARD prompt. Solution 1. If the card is inserted, remove it from the chip reader. 2. Close/shutdown the PAYD App. 3. Power off the PAYD PIN Pad, and then power it on again (see page 52 and 51). 4. Re-launch the PAYD App, and sign in (see page 40). 5. Retry the transaction. The PAYD PIN Pad is in Sleep mode. 1. To use the PAYD PIN Pad while it is in Sleep mode, see page 52. The PAYD PIN Pad may have gone into Sleep mode and then shut down to conserve power. 1. To power on the PAYD PIN Pad, press the PAYD PIN Pad's power button (see page 49). 2. If this does not work (the battery charge may be depleted), connect the PAYD PIN Pad to an external power source via the USB charging cable. The PAYD PIN Pad battery charge level may be too low. 1. See TAP NOT ACCEPTED (page 93). 94 USING PAYD PRO FOR ANDROID
): 1. Make sure the media speaker on your mobile device is turned off. 2. Ensure that the volume level of your mobile device is maximized. 3.")
, enter the required data in one or both of the fields; otherwise, leave the fields")
97 Using the PAYD card reader If you are unable to perform a credit card transaction using the PAYD PIN Pad, follow the steps below to use the PAYD card reader as a backup device (to order a PAYD card reader, please contact us at PAYD (7293)): 1. Make sure the media speaker on your mobile device is turned off. 2. Ensure that the volume level of your mobile device is maximized. 3. Connect the PAYD card reader: 4. In the PAYD App, initiate the Sale (or Pre-Authorization), and then tap Swipe. If the Customer ID and Order ID fields display and you want to track the transaction with your own identifier(s), enter the required data in one or both of the fields; otherwise, leave the fields blank to bypass the identifiers. Note: If you enter your own order ID, it must be unique. If you don't enter your own order ID, it will be generated automatically. 5. In the Amount field, enter the transaction amount. If the tax AA% ($) field/box displays and is checkmarked, the tax that will be added displays in the field while the total transaction amount (including the tax) displays in the Total ($) field. Note: If you do not want to add the tax to this transaction, tap (unmark) the tax AA% ($) box. 95
98 6. Tap Process Transaction. If the PAYD App displays "Please specify a tip amount", see page 65. If the PAYD App displays "Please swipe card", swipe the credit card on the PAYD card reader. If the PAYD App displays the "Customer Signature" screen, capture the customer's signature on your mobile device (see page 73). 7. When the PAYD App displays the "APPROVED" or "DECLINED" response, the transaction is complete: To a transaction receipt, see page 74. Note: If you enabled the PAYD App to auto-send receipts to a set merchant address, the PAYD App automatically s a receipt to the address (the PAYD App will not notify you that the has been sent). To send an SMS text message notification, see page Tap to return to the main menu. 96 USING PAYD PRO FOR ANDROID
99 Manual card entry on your mobile device If you are unable to perform a Sale or Pre-Authorization using the PAYD card reader (see page 95), follow the steps below to manually enter the transaction entirely on you mobile device (i.e., neither the PAYD PIN Pad nor the PAYD card reader will be used). 1. If the PAYD card reader is connected to your mobile device, disconnect the PAYD card reader. 2. In the PAYD App, initiate the Sale (or Pre-Authorization). 3. Tap Keyed. If the Customer ID and Order ID fields display and you want to track the transaction with your own identifier(s), enter the required data in one or both fields; otherwise, leave these fields blank to bypass entering any identifier. Note: If you enter your own order ID, it must be unique. If you don't enter your own order ID, it will be generated automatically. 4. In the Amount ($) field, enter the transaction amount (#.##). If the tax AA% ($) field/box displays and is checkmarked, the tax that will be added displays in the field while the total transaction amount (including the tax) displays in the Total ($) field. Note: If you do not want to add the tax to this transaction, tap (unmark) the tax AA% ($) box. 5. In the Card Number field, enter the card number. 6. In the Exp (MMYY) field, enter the card expiry date. If the CVV field displays, enter the 3- or 4-digit card verification value (code). 7. Tap Process Transaction. If the PAYD App displays "Please specify a tip amount", see page 65. If the PAYD App displays the "Customer Signature" screen, capture the customer's signature on your mobile device (see page 73). 8. When the PAYD App displays the "APPROVED" or "DECLINED" response, the transaction is complete: 97
100 To a transaction receipt, see page 74. Note: If you enabled the PAYD App to auto-send receipts to a set merchant address, the PAYD App automatically s a receipt to the address (the PAYD App will not notify you that the has been sent). To send an SMS text message notification, see page Tap to return to the main menu. 98 USING PAYD PRO FOR ANDROID
101 Sources of electromagnetic interference Listed below are some common sources of electromagnetic interference that may impair the operability of the PAYD PIN Pad: Motors and compressors Computer screens and televisions Radio transmitters and other wireless devices operating at 2.4GHz (e.g., Wi-Fi devices, wireless routers, cordless phone bases, etc.) - at least 2 m (6.5 feet) away Microwave ovens - at least 3 m (10 feet) away Anti-theft barriers, etc. Elevator shafts Cash registers Blenders and food processors Air conditioning units, ventilation fans Large, metal, horizontal or vertical surfaces (e.g., appliances, metallic blind or countertops, etc.) 99
102 Merchant support If you need assistance with your payment processing solution, we re here to help, 24/7. We re only one click away. Visit getpayd.com/paydpro/support to: Consult the FAQs on how to set up and use PAYD Pro. Download PAYD Pro guides to assist with getting started, configuration, and usage instructions. Visit shop.moneris.com to purchase point-of-sale supplies and accessories. Visit moneris.com/insights for business and payment news & trends, customer success stories, and quarterly reports & insights. Can t find what you are looking for? info@getpayd.com or call Moneris Customer Care toll-free (available 24/7) at PAYD (7293). We ll be happy to help. You can also send us a secure message 24/7 by logging in to Merchant Direct at moneris.com/mymerchantdirect. 100 USING PAYD PRO FOR ANDROID
103 Notes 101

104 Important! You must use the USB charging cable provided with the PAYD PIN Pad. Failure to do so may affect the operability of or cause damage to the PAYD PIN Pad. MONERIS, PAYD, PAYD PRO, MERCHANT DIRECT, MONERIS PAYD and MONERIS BE PAYMENT READY & Design are registered trade-marks of Moneris Solutions Corporation. INTERAC is a registered trade-mark of Interac Inc. BLUETOOTH is a registered trade-mark of Bluetooth SIG, Inc. Apple, ipad, ipod Touch, and App Store are trade-marks of Apple Inc., registered in the U.S. and other countries. ANDROID and GOOGLE PLAY are trade-marks of Google Inc. All other marks or registered trade-marks are the property of their respective owners Moneris Solutions Corporation, 3300 Bloor Street West, Toronto, Ontario, M8X 2X2. All Rights Reserved. This manual shall not wholly or in part, in any form or by any means, electronic, mechanical, including photocopying, be reproduced or transmitted without the authorized consent of Moneris Solutions Corporation ("Moneris"). This guide is for informational purposes only. Neither Moneris nor any of its affiliates shall be liable for any direct, indirect, incidental, consequential or punitive damages arising out of use of any of the information contained in this guide. Neither Moneris or any of its affiliates nor any of our or their respective licensors, licensees, service providers or suppliers warrant or make any representation regarding the use or the results of the use of the information, content and materials contained in this guide in terms of their correctness, accuracy, reliability or otherwise. Your credit and/or debit card processing is governed by the terms and conditions of the Moneris PAYD Merchant Agreement (the "Merchant Agreement") with Moneris. It is the merchant s responsibility to ensure that proper card processing procedures are followed at all times. Please refer to your Merchant manuals and the Terms and Conditions of your Merchant Agreement(s) for details. The Moneris Merchant Operating Manual is available at getpayd.com/paydpro/support. PAYDPRO_iCMP_And_YT_E (10/17)
USING PAYD PRO TM. For Apple ipad, iphone and ipod touch (01/16)
") USING PAYD PRO TM For Apple ipad, iphone and ipod touch (01/16) Table of Contents Important: Read First 4 Before you begin 4 For more information and assistance: Web: getpayd.com/paydpro/support Email:
USING PAYD PRO TM For Apple ipad, iphone and ipod touch (01/16) Table of Contents Important: Read First 4 Before you begin 4 For more information and assistance: Web: getpayd.com/paydpro/support Email:
Moneris PAYD PIN Pad: Quick Install Guide
 Moneris PAYD PIN Pad: Quick Install Guide (09/17) For more information and assistance: Web: moneris.com/support-paydproplus-mobile Toll-free: 1-855-423-PAYD (7293) Record your Moneris merchant ID here:
USING YOUR TERMINAL. For Dynamic Currency Conversion on the Moneris ict250, iwl220, and iwl255 (11/16)
") USING YOUR TERMINAL For Dynamic Currency Conversion on the Moneris ict250, iwl220, and iwl255 (11/16) Contents For more information and assistance: Web: moneris.com/support Toll-free: 1-866-319-7450 Record
USING YOUR TERMINAL For Dynamic Currency Conversion on the Moneris ict250, iwl220, and iwl255 (11/16) Contents For more information and assistance: Web: moneris.com/support Toll-free: 1-866-319-7450 Record
Cash Advance Application
 Verifone Evolution Series Cash Advance Application Quick Reference Guide 2017 Elavon Inc. Elavon is a registered trademark in the United States and other countries. Apple Pay is a trademark of Apple Inc.
Converge. Transaction Processing Guide. Revision Date: July 2015
 Converge Transaction Processing Guide Revision Date: July 2015 Two Concourse Parkway, Suite 800, Atlanta, GA 30328 Elavon Incorporated 2015. All Rights Reserved Copyright Copyright 2015 Elavon Incorporated.
User Document: Merchant Partners First Mile Middleware Electronic Payment Processing
 User Document: Merchant Partners First Mile Middleware Electronic Payment Processing R.O. Writer Version 1.31 R.O. Writer Version 2.0 October 2016 The R.O. Writer name and logo are properties and registered
Credit Card Processing Guide
 Credit Card Processing Guide A Guide For Processing Transactions With The Integrity Edge Software I Integrity Credit Card Processing Table of Contents Part I Credit Card Processing Setup 1 Part II Credit
TD Generation. Merchant Guide: More Rewards. For the TD Generation
 TD Generation Merchant Guide: More Rewards For the TD Generation Portal 2 with PINpad COPYRIGHT 2016 by The Toronto-Dominion Bank This publication is confidential and proprietary to The Toronto-Dominion
V1.3 October 2016 Version 1.3 October 2016 Page 1
 V1.3 October 2016 Version 1.3 October 2016 Page 1 Contents 1 Overview... 6 1.1 Operator Created Booking... 6 1.2 App Created Booking:... 8 2 Setting up... 9 2.1 Fleet details... 9 2.2 Stripe account...
Introduction to Client Online
 Introduction to Client Online Trade Finance Guide TradeFinanceNewClientsV2Sept15 Contents Introduction 3 Welcome to your introduction to Client Online 3 If you have any questions 3 Logging In 4 Welcome
Introduction to Client Online
 Introduction to Client Online Bibby Factors International Guide 1 InternationalFactoringNewClientBibbyUKopsSept15 Introduction 3 Logging In 5 Welcome Screen 6 Navigation 7 Viewing Your Account 9 Invoice
Classification: Public ANZ TRANSACTIVE AU & NZ USER GUIDE
 Classification: Public ANZ TRANSACTIVE AU & NZ USER GUIDE 08 2015 CONTENTS INTRODUCTION... 3 PAYMENTS... 5 About Payments in ANZ Transactive AU & NZ... 5 Domestic Payments... 7 Single Payments... 8 Payment
X-Charge Credit Card Processing
 X-Charge Credit Card Processing OpenEdge (Formerly X-Charge) Payment Processing Setup... 1 Setting Permissions for Credit Card Processing... 1 Setting Up X-Charge Payment Processing in SuccessWare 21...
QUICK REFERENCE GUIDE Electronic Benefits Transfer
 Electronic Benefits Transfer page 1 Ingenico Telium2 QUICK REFERENCE GUIDE Electronic Benefits Transfer 2016 Elavon Inc. Elavon is a registered trademark in the United States and other countries. Apple
BOCI SmartXpress iphone & Android Trading Platform User Guide
 BOCI SmartXpress iphone & Android Trading Platform User Guide 1 P a g e Contents I. Start with Download P.3 P.5 II. Securities Account Login P.6 III. Quote and News P.7 P.15 IV. HK and US Securities Trading
Business Mobile Banking Quick Reference Guide
 i Business Mobile Banking Table of Contents Business Mobile Banking 1 Downloading the App 1 Requirements 1 Log On 1 View Account Balances and Transaction History 2 Transfer Internal Funds 2 Initiate ACH
To Enable Access to Encompass LO Connect: 1. On the Encompass menu bar, click Encompass, and then click Settings.
 Using Encompass Loan Officer Connect Encompass Loan Officer (LO) Connect is an extension of Encompass that provides loan originators with quick, secure access to loan files. Encompass LO Connect enables
Verifone User Guide. VX 820 VX 680.
 Verifone User Guide. VX 820 VX 680. Table of contents. Terminal layout 3 Acceptable Cards 4 General Information 5 Purchase transactions 6 Purchase transactions Restaurants only. 7 Pre-authorisation 9 Processing
TRAVEL PORTAL INSTRUCTIONS
 TRAVEL PORTAL INSTRUCTIONS Date: June 22, 2018 Version: Version 3.1 Prepared By: Berkley Canada Table of Contents 1 ACCESSING THE PORTAL... 3 1.1 LOGIN & LOGOUT... 3 1.2 RESET YOUR PASSWORD... 3 2 THE
DUS DocWay TM Loan Documents User Guide. January 2019
 DUS DocWay TM Loan Documents User Guide January 2019 Table of Contents Getting Started with DUS DocWay... 1 Welcome Page Navigation... 3 Loan Documents Navigation... 6 Update Document Category and Type...
Certifying Mortgages for Freddie Mac. User Guide
 Certifying Mortgages for Freddie Mac User Guide December 2017 The Freddie Mac Single-Family Seller/Servicer (Guide) requires a Seller/Servicer selling Mortgages to Freddie Mac to forward the Notes, assignments
Access and User Management
 Date published: 25.06.2018 Estimated reading time: 30 minutes Authors: Editorial Team The bookmarks and navigation in this tutorial are optimized for Adobe Reader. Access and User Management 1. Introduction
FirstData (FDMS) BuyPass Credit Card Processing in a Restaurant/Fine Dining Environment
 BuyPass Credit Card Processing in a Restaurant/Fine Dining Environment") One Blue Hill Plaza, 16th Floor, PO Box 1546 Pearl River, NY 10965 1-800-PC-AMERICA, 1-800-722-6374 (Voice) 845-920-0800 (Fax) 845-920-0880 FirstData (FDMS) BuyPass Credit Card Processing in a Restaurant/Fine
One Blue Hill Plaza, 16th Floor, PO Box 1546 Pearl River, NY 10965 1-800-PC-AMERICA, 1-800-722-6374 (Voice) 845-920-0800 (Fax) 845-920-0880 FirstData (FDMS) BuyPass Credit Card Processing in a Restaurant/Fine
Thank you for choosing Auctionpay Event Payment card reader option, below you will learn about the benefits of choosing the new card reader option.
 Thank you for choosing Auctionpay Event Payment card reader option, below you will learn about the benefits of choosing the new card reader option. The Auctionpay Event Payment card reader is an alternative
Sage Payment Processing User's Guide. March 2018
 Sage 300 2017 Payment Processing User's Guide March 2018 This is a publication of Sage Software, Inc. 2017 The Sage Group plc or its licensors. All rights reserved. Sage, Sage logos, and Sage product and
Introduction to Client Online
 Introduction to Client Online Construction Finance Guide ConstructionFinanceNewClientsV2Sept15 Contents Introduction 3 Welcome to your introduction to Client Online 3 If you have any questions 3 Logging
Payment Center Quick Start Guide
 Payment Center Quick Start Guide Self Enrollment, Online Statements and Online Payments Bank of America Merrill Lynch August 2015 Notice to Recipient This manual contains proprietary and confidential information
Ikano Online Credit Approval
 Ikano Online Credit Approval 1(21) Table of Contents Part 1. An introduction to the Ikano Online Credit Approval system... 3 Part 2. Logging into the system... 3 Part 3. Creating a new application... 4
Payment Center Quick Start Guide
 Payment Center Quick Start Guide Self Enrollment, Online Statements and Online Payments Bank of America Merrill Lynch May 2014 Notice to Recipient This manual contains proprietary and confidential information
emerchantview Service July 23, 2010
 emerchantview Service July 23, 2010 2010 FIRST DATA CORPORATION All Rights Reserved. Printed in U.S.A. This document contains confidential and proprietary information of First Data Corporation. You may
Retail Internet Banking
 Retail Internet Banking Frequent Asked Questions Version 3.0 Thank you for using QNBALAHLI individual internet banking. Kindly note that the following information is intended to help the bank customers
Frequently Asked Questions Guide
 Global Card Access Frequently Asked Questions Guide Table of Contents Section I: General Overview... 2 Section II: Registration... 2 Section III: Alerts... 3 Section IV: Online PIN Check... 5 Section V:
Customer Guide. Don t just be good with money, be MoneyBrilliant
 Customer Guide Welcome to MoneyBrilliant. Your Financial Partner has invited you to use the MoneyBrilliant service and to share your MoneyBrilliant information with them. They can work with you and provide
Plan Access ABA-RF Guide
 Plan Access ABA-RF Guide September 1, 2014 Copyright Copyright 2009, 2014 Voya Institutional Plan Services, LLC All rights reserved. No part of this work may be produced or used i4 any form or by any means
FAQ. Jump to. How does one Finch? Signing Up. Pay and Request. Tabs. Bank Transfers. Bank Account and Cards. Account Settings and Security
 FAQ How does one Finch? Jump to Signing Up Pay and Request Tabs Bank Transfers Bank Account and Cards Account Settings and Security Signing Up Having trouble getting started? Where can I sign up? You can
Welcome. Credit Card
 Welcome Credit Card TABLE OF CONTENTS page 3 5-7 8 9 10-11 12-13 14 16-19 section Welcome Online Banking Account Access Make a Payment Rewards Security Digital Payments FAQs Welcome Your new MidFirst Bank
Getting started. UltraBranch Business Edition. alaskausa.org
 Getting started UltraBranch Business Edition alaskausa.org Contents 2 4 6 8 9 11 13 14 15 21 22 23 24 Key features Getting started Company permissions Setting & exceeding limits Configuring ACH & tax payments
d. ability to capture the identity of the trooper who runs the card.
 C.1. Overview The State of Oklahoma Office of Management and Enterprise Services (OMES) Information Services Division (ISD) on behalf of The Oklahoma Department of Public Safety (DPS), is seeking bids
MOBILE (iphone/ipad)
") MOBILE (iphone/ipad) USER GUIDE www.fxbtrading.com 1 CONTENTS Download and installation...3 Quotes...5 Chart...8 Trade...9 Type of orders...10 Setting Stop Loss & Take Profit (Modify order)...12 History...14
MOBILE (iphone/ipad) USER GUIDE www.fxbtrading.com 1 CONTENTS Download and installation...3 Quotes...5 Chart...8 Trade...9 Type of orders...10 Setting Stop Loss & Take Profit (Modify order)...12 History...14
OpenEdge Credit Card Module User Manual
 OpenEdge Credit Card Module User Manual How to access the Credit Card module Unless you have decided to continue using the old Credit Card module (Fortis or VeriFone) during a transition period (the time
Bell Aliant PC Phone Installation/Removal Guide
 Bell Aliant PC Phone Installation/Removal Guide Version 10.4 (January 2017) bellaliant.ca/unifiedcommunications 1 Before you begin You will need to login into your Personal Agent, and change your password,
PRODUCTS AND SERVICES GUIDE INFORMATION ABOUT THE TRANSFER OF YOUR PERSONAL ACCOUNT FROM ALOSTAR TO CADENCE BANK. A division of Cadence Bank, N.A.
 PRODUCTS AND SERVICES GUIDE INFORMATION ABOUT THE TRANSFER OF YOUR PERSONAL ACCOUNT FROM ALOSTAR TO CADENCE BANK. A division of Cadence Bank, N.A. WELCOME TO CADENCE BANK. WE ARE VERY PLEASED TO INTRODUCE
Cayan (Gateway) Credit Card / Debit Card Processing in Retail/Quick Service
 Credit Card / Debit Card Processing in Retail/Quick Service") One Blue Hill Plaza, 16 th Floor, PO Box 1546 Pearl River, NY 10965 1-800-PC-AMERICA, 1-800-722-6374 (Voice) 845-920-0800 (Fax) 845-920-0880 Cayan (Gateway) Credit Card / Debit Card Processing in Retail/Quick
One Blue Hill Plaza, 16 th Floor, PO Box 1546 Pearl River, NY 10965 1-800-PC-AMERICA, 1-800-722-6374 (Voice) 845-920-0800 (Fax) 845-920-0880 Cayan (Gateway) Credit Card / Debit Card Processing in Retail/Quick
Scotiabank Visa Business Card. CentreSuite Online Card Management Guide October 2017
 CentreSuite Online Card Management Guide October 2017 Version 2.0 2018 About this Guide... 3 What is CentreSuite?... 3 Web Browser Requirements... 3 1.0 Welcome Email... 3 1.1 How to Log In... 5 1.2 Forgot
Frequently Asked Questions
 Account to Account Transfers... 1 Bill Pay... 1 Branch Locations and Hours... 2 Credit Card Business... 2 Credit Card Personal... 3 Cybersecurity Information... 3 Debit Cards... 4 estatements/enotices...
PFM MoneyMobile. Product Overview Guide. August 2013
 PFM MoneyMobile Product Overview Guide August 2013 1 Contents MoneyMobile iphone App... 3 New Navigation Menu... 5 Accounts... 6 Transactions... 13 Excluded Transactions... 16 Spending Wheel... 17 Bubble
TAA Scheduling. User s Guide
 TAA Scheduling User s Guide While every attempt is made to ensure both accuracy and completeness of information included in this document, errors can occur, and updates or improvements may be implemented
06/13/2017 Blackbaud Altru 4.96 Revenue US 2017 Blackbaud, Inc. This publication, or any part thereof, may not be reproduced or transmitted in any
 Revenue Guide 06/13/2017 Blackbaud Altru 4.96 Revenue US 2017 Blackbaud, Inc. This publication, or any part thereof, may not be reproduced or transmitted in any form or by any means, electronic, or mechanical,
Guide to Credit Card Processing
 CBS ACCOUNTS RECEIVABLE Guide to Credit Card Processing version 2007.x.x TL 25476 (07/27/12) Copyright Information Text copyright 1998-2012 by Thomson Reuters. All rights reserved. Video display images
Asia Corporate Travel Card and Corporate Purchasing Card. Programme Administrator Guide Australia
 Asia Corporate Travel Card and Corporate Purchasing Card Programme Administrator Guide Australia Contents 1 Introduction 3 2 How to Contact Bank of America Merrill Lynch 3 Programme Administrator Contact
School Online Payments Parent User Guide
 School Online Payments Parent User Guide Edited for Wolf Creek Public Schools Copyright Rycor Solutions Inc. 2015 Table of Contents Table of Contents............................................. 2 Create
FREQUENTLY ASKED QUESTIONS
 General Questions: Questions 1. How should store sites be named? 2. How do I get help? 3. How to request consultant/vendor access? 4. How to request FBO Vendor access? 5. How do I delete a project? Responses
Web Incentive Processing System User Guide. For Participating Independent Contractors (PICs)
") Web Incentive Processing System User Guide For Participating Independent Contractors (PICs) Revised: January 2017 2 W e b I n c e n t i v e P r o c e s s i n g S y s t e m U s e r G u i d e P a r t i c
Web Incentive Processing System User Guide For Participating Independent Contractors (PICs) Revised: January 2017 2 W e b I n c e n t i v e P r o c e s s i n g S y s t e m U s e r G u i d e P a r t i c
Employee Online Enrollment User Guide
 Employee Online Enrollment User Guide Welcome to Online Enrollment! In this guide, you will find information and step-by-step instructions on how to enroll in your benefits. Table of Contents Before you
Participant Reference Guide
 Participant Reference Guide Welcome to FlexSystem and to the tax saving benefits of a Section 125 Cafeteria Plan. We hope you will find FlexSystem to be an efficient and valuable service. Our Participant
Gilsbar Flexible Spending Accounts
 Gilsbar Flexible Spending Accounts Gilsbar Flexible Spending Accounts Medical Reimbursement Plan Maximum: $2,650 Dependent Care Account Maximum: $5,000 MANAGE YOUR ACCOUNT ONLINE 24/7 AT WWW.MYGILSBAR.COM!
Genium INET PRM User's Guide
 TM Genium INET NASDAQ Nordic Version: 4.0.0250 Document Version: 11 Publication Date: Wednesday, 6th May, 2015 Confidentiality: Non-confidential Whilst all reasonable care has been taken to ensure that
Any symbols displayed within these pages are for illustrative purposes only, and are not intended to portray any recommendation.
 Allocation Fund Investment Manager Getting Started Guide February 2018 2018 Interactive Brokers LLC. All Rights Reserved Any symbols displayed within these pages are for illustrative purposes only, and
Credit Card Processing Guide
 Tabs3 Billing PracticeMaster General Ledger Accounts Payable Trust Accounting TA BS3.COM Copyright 2008-2018 Software Technology, LLC 1621 Cushman Drive Lincoln, NE 68512 (402) 423-1440 Tabs3.com Tabs3,
Dear Client, We appreciate your business!
 FTJ FundChoice Website Guide Page 1 Dear Client, Thank you for choosing FTJ FundChoice. This guide will assist you in managing your online account at: www.portfoliologin.com. In keeping with our mission
Pay. Quick Start Guide Creditor Payments. Pay QUICK START GUIDE CREDITOR PAYMENTS
 Creditor ments QUICK START GUIDE CREDITOR PAYMENTS 1 Creditor ments Our easy to use guide will get you up and running in no time! Index: Page: 2 Login 3 Load creditors 5 Add a creditor batch 6 Obtain a
Online Help for Client Employees
 Online Help for Client Employees Accessing the portal (Employee) HowdenBenefits.com is an online web based Self Service Portal that enables employees to view details of insurance products offered by their
HELP MANUAL MEXN OPTION TRADER FOR ANDROID USER
 HELP MANUAL MEXN OPTION TRADER FOR ANDROID USER Steps to download 1. Go to Play Store 2. Search for "MEXN Option Trader". 3. Download and install the free version. Steps to Start Trading 1. Open the Installed
Mobile Trading User Guide. For iphone
 Mobile Trading User Guide For iphone 2012 Table of Contents Table of Contents... 2 Introduction... 4 What is Jupiter MPro Mobile Trading?... 4 About this Guide... 4 Getting Started... 5 System Requirements...
META TRADER 4 MOBILE (ANDROID) USER GUIDE MOBILE (ANDROID) USER GUIDE.
 USER GUIDE MOBILE (ANDROID) USER GUIDE.") MOBILE (ANDROID) USER GUIDE www.fxbtrading.com 1 CONTENTS Download and installation...3 Quotes...5 Chart...8 Type of orders...10 History...13 Indicators for technical analysis...14 2 MetaTrader 4 for Android
MOBILE (ANDROID) USER GUIDE www.fxbtrading.com 1 CONTENTS Download and installation...3 Quotes...5 Chart...8 Type of orders...10 History...13 Indicators for technical analysis...14 2 MetaTrader 4 for Android
MySchoolBucks Invoicing App Guide
 MySchoolBucks Invoicing App Guide Table of Contents General Overview... 3 Getting Started... 3 Student Search Screen... 4 Add Funds... 6 Pay Invoice... 10 Menu... 16 Settings... 17 Log Out... 19 Support...
User Guide for Securities Trading Mobile App
 User Guide for Securities Trading Mobile App www.easecurities.com.hk Version 1.4 1. Mobile Phone Requirements... 2 2. Application for Mobile App Service (the Service)... 2 3. Download our Mobile App...
U.S. BANK FOCUS CARD. Frequently Asked Questions. The Focus Card. What is the Focus Card? How does the Focus Card work?
 Frequently Asked Questions What is the Focus Card? The Focus Card is a reloadable, prepaid debit card issued by U.S. Bank. It provides an electronic option for receiving your pay. It is not a credit card,
Fanfare Gift Card Application
 Quick Reference Guide Fanfare Gift Card Application Ingenico Telium2 United States 2017 Elavon Inc. Elavon is a registered trademark in the United States and other countries. This document is prepared
CLIP Credit Card Set Up Guide for Internet Processing PCCharge created 8/5/2005
 CLIP Credit Card Set Up Guide for Internet Processing PCCharge created 8/5/2005 Items you must have for setup. 1. Latest version of CLIP software 2. PC Charge Server software installed (version 5.7) 3.
People First User Guide for the Benefits Enrollment Process
 People First User Guide for the Benefits Enrollment Process Table of Contents Change My Benefits Overview... 2 Introduction... 2 Getting Started... 2 Change My Benefits... 4 Introduction... 4 Getting Started...
ELECTRONIC BILL PAYMENT OVERVIEW
 ELECTRONIC BILL PAYMENT Our online electronic bill payment system allows you to pay bills through our secure Internet server. You may schedule a payment; schedule recurring payments to be issued automatically;
ATTENTION: SECTION 8 CLIENTS WHO RECEIVE UTILITY ASSISTANCE PAYMENT Posted: November 2017
 ATTENTION: SECTION 8 CLIENTS WHO RECEIVE UTILITY ASSISTANCE PAYMENT Posted: November 2017 Housing Authority of Yamhill County is now offering a fast and convenient way for you to instantly receive your
THE BORROWER EXPERIENCE
 PRESENTS THE BORROWER EXPERIENCE Page 1 The Borrower Experience Table of Contents ipromise..3-44 mycampusloan.com.45-100 E-Exit 101-116 Page 2 Campus Partners ipromise is a web-based product, which helps
PROGRAM Guide RETAIN MERCHANTS AND INCREASE YOUR EARNINGS. more sales and more profit. Selling Sterling Rewards is a proven way to
 PROGRAM Guide Selling Sterling Rewards is a proven way to RETAIN MERCHANTS AND INCREASE YOUR EARNINGS. It is a program that sets you apart from your competition and keeps your merchants with you because
Table of Content. Trading Open an account to trade via emo! View your account and portfolio Search for a stock...
 emo! User Guide Table of Content Trading... 3 Open an account to trade via emo!... 3 View your account and portfolio... 4 Search for a stock... 5 Switch between snapshot real-time and delayed quotes...
Online Presentment and Payment FAQ s
 General Online Presentment and Payment FAQ s What are some of the benefits of receiving my bill electronically? It is convenient, saves time, reduces errors, allows you to receive bills anywhere at any
TAX GROUP USER GUIDE (REGISTRATION, AMENDMENT AND DE- REGISTRATION) December 2017
 December 2017") TAX GROUP USER GUIDE (REGISTRATION, AMENDMENT AND DE- REGISTRATION) December 2017 Contents 1. Brief overview of this user guide... 3 2. Creating and using your e-services account... 4 2.1 Create an e-services
TAX GROUP USER GUIDE (REGISTRATION, AMENDMENT AND DE- REGISTRATION) December 2017 Contents 1. Brief overview of this user guide... 3 2. Creating and using your e-services account... 4 2.1 Create an e-services
How to enroll in your Tulsa Fire Health and Welfare benefits!
 How to enroll in your Tulsa Fire Health and Welfare benefits! Step 1: go to https://www.employeenavigator.com Click Login in the upper right hand corner Step 2: Click Register as a new user Step 3: Fill
RentWorks Version 4 Credit Card Processing (CCPRO) User Guide
 User Guide") RentWorks Version 4 Credit Card Processing (CCPRO) User Guide Table of Contents Overview... 2 Retail Processing Method... 3 Auto Rental Method... 4 How to Run a Draft Capture... 5 Draft Capture Failures.....6
RentWorks Version 4 Credit Card Processing (CCPRO) User Guide Table of Contents Overview... 2 Retail Processing Method... 3 Auto Rental Method... 4 How to Run a Draft Capture... 5 Draft Capture Failures.....6
Money Management (MX) Frequently Asked Question s
 Frequently Asked Question s") Money Management (MX) Frequently Asked Question s Account Maintenance How do I get rid of duplicate accounts? How do I permanently delete an account? How do I hide/exclude an account? How do I rename my
Money Management (MX) Frequently Asked Question s Account Maintenance How do I get rid of duplicate accounts? How do I permanently delete an account? How do I hide/exclude an account? How do I rename my
Welcome to Citizens Bank Online New & Improved
 Welcome to Citizens Bank Online New & Improved You ll enjoy enhanced Citizens Bank online banking services this fall. This User s Guide explains the features and the use of Citizens Bank s Online Banking
07/21/2016 Blackbaud CRM 4.0 Revenue US 2016 Blackbaud, Inc. This publication, or any part thereof, may not be reproduced or transmitted in any form
 Revenue Guide 07/21/2016 Blackbaud CRM 4.0 Revenue US 2016 Blackbaud, Inc. This publication, or any part thereof, may not be reproduced or transmitted in any form or by any means, electronic, or mechanical,
COUNT ONLINE BROKING USER GUIDE
 Welcome to the Count Online Broking website, offering market-leading functionality to help you get more from your online trading and investing: Powerful charting giving you valuable insight into client
Rev B. Getting Started with the ISDS Platform User Guide
 4021199 Rev B Getting Started with the ISDS Platform User Guide Please Read Important Please read this entire guide. If this guide provides installation or operation instructions, give particular attention
Broker FAQ. Program overview. 1. What is my Driving Discount? 4. How does my Driving Discount benefit my customers?
 Broker FAQ Program overview 1. What is my Driving Discount? my Driving Discount is the Intact Insurance usage-based insurance program that rewards safe driving behaviour. The program offers a personalized
Quality Control Advisor SM. User Guide. January 2018
 Quality Control Advisor SM User Guide January 2018 Notice The information in this document is intended to provide general guidance to Freddie Mac Seller/Servicers. The information is offered as an aid
RESOLV WAREHOUSE MANAGEMENT
 RESOLV WAREHOUSE MANAGEMENT USER MANUAL Version 9.3 for HANA PRESENTED BY ACHIEVE IT SOLUTIONS Copyright 2010-2018 by Achieve IT Solutions These materials are subject to change without notice. These materials
Welcome to your CIBC Dividend Visa* Card
 Welcome to your CIBC Dividend Visa* Card Banking that fits your life. Turn your everyday spending into cash back rewards Get started with your new cash back card 1. Activate your card Activate your card
Setting up TaxSlayer Pro Online
 Setting up TaxSlayer Pro Online To set up TaxSlayer ProOnline as a Favorite in your web browser, use the following steps: 1. Open Internet Explorer, Mozilla Firefox, or Google Chrome. 2. Type https://vita.taxslayerpro.com
Microsoft Dynamics GP. COA Ecuador
 Microsoft Dynamics GP COA Ecuador Copyright Copyright 2010 Microsoft. All rights reserved. Limitation of liability This document is provided as-is. Information and views expressed in this document, including
Commsec Adviser Services User Guide
 Commsec Adviser Services User Guide Welcome to the CommSec Adviser Services trading website, offering market-leading functionality to help you get more from your online trading and investing: Powerful
2GoTrade Limited. New Web Trading Platform. User Manual. Version:1.57
 2GoTrade Limited New Web Trading Platform User Manual Version:1.57 Last Update:Mar-2015 CONTENT GENERAL... 2 1.1 SELECT LANGUAGE... 2 1.2 CUSTOMER SERVICE... 2 1.3 LOGOUT... 3 1.3.1 Login... 3 1.4 FIRST-TIME
User guide for employers not using our system for assessment
 For scheme administrators User guide for employers not using our system for assessment Workplace pensions CONTENTS Welcome... 6 Getting started... 8 The dashboard... 9 Import data... 10 How to import a
Solar Eclipse Credit Card Authorization. Release 9.0.4
 Solar Eclipse Credit Card Authorization Release 9.0.4 i Table Of Contents Disclaimer This document is for informational purposes only and is subject to change without notice. This document and its contents,
GREAT BASIN COLLEGE PURCHASING CARD PROGRAM PAYMENTNET CARDHOLDER GUIDE
 GREAT BASIN COLLEGE PURCHASING CARD PROGRAM PAYMENTNET CARDHOLDER GUIDE July 26, 2010 GBC PaymentNet Cardholder Guide July 2010 1 Table of Contents Logging into PaymentNet... 3 Changing Pass Phrase (password)...
Propertyware epayments. Powered by RealPage
 Propertyware epayments Powered by RealPage Page i Copyrights 2002-2011 Propertyware, Inc. All rights reserved. No part of this publication may be reproduced, transmitted or stored in any archives without
AIBB Mobile Trading User Guide. For Android Mobile Device
 For Android Mobile Device 2012 Table of Contents Table of Contents... 2 Introduction... 4 What is AIBB Mobile Trading?... 4 About this Guide... 4 Getting Started... 5 System Requirements... 5 1. Operating
Quick Reference Guide Welcome TEST USER
 Welcome TEST USER HELP RETIREMENT MANAGER DEMO FEEDBACK VersionS_000 Getting Started This Retirement Manager participant website Quick Reference Guide will assist you to easily navigate and complete important
MMF Investment Policy Management
 MMF Investment Policy Management Citibank Online Investments Transaction Services MMF Investment Policy Management Table of Contents Table of Contents Money Market Funds Investment Policy Management...2